Page 122 of 414

4-34 Instruments and Controls
Cruise Control Messages
Apply Brakes Before Cruise
If this message displays when
attempting to activate cruise control,
apply the brake and then try again.
Cruise Set to XXX
This message will display when the
cruise control is set and it will show
the speed it was set to. SeeCruise
Control
on page 8‑37for more
information.
Door Ajar Messages
Driver Door Open
This message will display when the
driver door is open. Close the door
completely.
Hood Open
This message will display when the
hood is open. Close the hood
completely.
Left Rear Door Open
This message will display when the
driver side rear passenger door is
open. Close the door completely.
Passenger Door Open
This message will display when the
passenger door is open. Close the
door completely.
Right Rear Door Open
This message will display when the
passenger side rear passenger door
is open. Close the door completely.
Trunk Open
This message will display when the
trunk is open. Close the trunk
completely.
Engine Cooling System
Messages
A/C Off Due to High
Engine Temp
This message displays when the
engine coolant becomes hotter than
the normal operating temperature.
To avoid added strain on a hot
engine, the air conditioning
compressor automatically turns off.
When the coolant temperature
returns to normal, the air
conditioning compressor turns back
on. You can continue to drive your
vehicle.
If this message continues to appear,
have the system repaired by your
dealer/retailer as soon as possible
to avoid damage to the engine.
Coolant Level Low Add
Coolant
This message will display if the
coolant is low, see Engine Coolant
on page 9‑18.
Page 264 of 414

8-42 Driving and Operating
The following describes how the URPA display lights appear as the vehicle
gets closer to a detected object:Description Metric Englishamber light 2.5 m 8 ft.
amber/amber lights 1.0 m 40 in.
amber/amber/red lights and continuous beeping for five seconds 0.6 m 23 in.
amber/amber/red lights flashing and continuous beeping for five seconds 0.3 m 1 ft.
PARK ASSIST OFF displays on the
Driver Information Center (DIC) to
indicate that URPA is off, see Driver
Information Center (DIC)
on
page 4‑25for more information.
Turning the System On and Off
The URPA system can be turned on
and off using the park assist button
located next to the shift lever.
The park assist button lights up
when the system is on and turns off
when it has been disabled.
URPA defaults to the on setting
each time the vehicle is started.
When the System Does Not
Seem to Work Properly
If the URPA system does not
activate due to a temporary
condition, the message PARK
ASSIST OFF displays on the DIC
and a red light is shown on the rear
URPA display when the shift lever is
moved into R (Reverse). This can
occur under the following
conditions:
.The ultrasonic sensors are not
clean. Keep the vehicle's rear
bumper free of mud, dirt, snow,
ice and slush. For cleaning
instructions, see Exterior Care
on page 9‑82.
.A trailer was attached to the
vehicle, or an object was
hanging out of the trunk during
the last drive cycle, a red light
may come on in the rear display.
Once the attached object is
removed, URPA will return to
normal operation.
Page 275 of 414

Driving and Operating 8-53
{WARNING
Fuel can spray out on you if you
open the fuel cap too quickly.
If you spill fuel and then
something ignites it, you could be
badly burned. This spray can
happen if the tank is nearly full,
and is more likely in hot weather.
Open the fuel cap slowly and wait
for any hiss noise to stop. Then
unscrew the cap all the way.
Do not top off or overfill the tank and
wait a few seconds before removing
the nozzle. Clean fuel from painted
surfaces as soon as possible. See
Exterior Care on page 9‑82.
{WARNING
If a fire starts while you are
refueling, do not remove the
nozzle. Shut off the flow of fuel by
shutting off the pump or by
notifying the station attendant.
Leave the area immediately. Notice:
If a new fuel cap is
needed, be sure to get the right
type of cap from your dealer/
retailer. The wrong type fuel cap
might not fit properly, might
cause the malfunction indicator
lamp to light, and could damage
the fuel tank and emissions
system. See Malfunction Indicator
Lamp on page 4‑17.
Filling a Portable Fuel
Container
{WARNING
Never fill a portable fuel container
while it is in the vehicle. Static
electricity discharge from the
container can ignite the fuel
(Continued)
WARNING (Continued)
vapor. You can be badly burned
and the vehicle damaged if this
occurs. To help avoid injury to you
and others:
.Dispense fuel only into
approved containers.
.Do not fill a container while it
is inside a vehicle, in a
vehicle's trunk, pickup bed,
or on any surface other than
the ground.
.Bring the fill nozzle in contact
with the inside of the fill
opening before operating the
nozzle. Contact should be
maintained until the filling is
complete.
.Do not smoke while
pumping fuel.
.Do not use a cellular phone
while pumping fuel.
Page 317 of 414
Vehicle Care 9-35
4. Push the new bulb into thesocket and reinstall the socket
into the headlamp assembly by
turning it clockwise.
Fog Lamps
To replace one of these bulbs:
1. Locate the bulb assembly under
the front facia.
2. Disconnect the bulb socket from the electrical connector and pull
out the bulb assembly. 3. Remove the old bulb from the
bulb socket and push the new
bulb straight into the bulb socket
until it connects.
4. Push the bulb socket into the bulb assembly to lock it into
place.
5. Reconnect the bulb socket to the electrical connector.
Taillamps, Turn Signal,
Stoplamps, and Back-Up
Lamps
A. Turn Signal Lamp
B. Back–Up Lamp
To replace one of these lamps:
1. Open the trunk. See Trunk
on
page 1‑11.
2. Pull back the trunk trim.
3. Remove the four plastic wing nuts retaining the taillamp
assembly in place.
Page 318 of 414
9-36 Vehicle Care
4. Pull out the taillamp assemblyand disconnect the wiring
harness.
A. Back-up Lamp
B. Turn Signal Lamp
5. Turn the bulb socket counterclockwise to remove it.
6. Pull the old bulb straight out of the bulb socket. 7. Push the new bulb straight into
the bulb socket until it clicks.
8. Turn the bulb socket clockwise to reinstall.
9. Reconnect the wiring harness.
10. Push the taillamp assembly back into place on the vehicle.
11. Turn the four wing nuts clockwise to reinstall them.
12. Place the trunk trim to its original location.
License Plate Lamp
The licence plate lamps for this
vehicle are on the trunk lid.
To replace one of these bulbs:
1. Open the trunk. See Trunk
on
page 1‑11for more information.
2. Push the end on either of the lamp assemblies (passenger
side shown) and then move the
lamp assembly down to remove
it from trunk lid.
Page 319 of 414
Vehicle Care 9-37
A. Bulb Socket
B. Lamp Assembly
C. Bulb
3. Turn the bulb socket (A) counterclockwise to remove from
lamp assembly (C).
4. Pull the bulb (B) straight out of the bulb socket. 5. Push the replacement bulb
straight into the bulb socket and
turn the bulb socket clockwise to
install into lamp assembly.
6. Move the lamp assembly into the trunk lid engaging the clip
side first.
7. Push on the lamp side opposite the clip until the lamp assembly
snaps into place.
Replacement Bulbs
Exterior Lamp Bulb
Number
Back-Up Lamp W16W
Daytime Running
Lamp (Up-Level) 3157K
Fog Lamp H11LL
Front Turn Signal/
Park Lamp 3757NAK
Headlamp High
Beam (Base) H9
Headlamp Low
Beam (Base) H11LL
License Plate Lamp W5WLL
Rear Turn Signal 3757AK
For replacement bulbs not listed
here, contact your dealer/retailer.
Page 325 of 414
Vehicle Care 9-43
FusesUsage
13 Driver Seat
14 Diagnostic Link
Connector
15 Airbag
16 Trunk
17 Heater Ventilation
Air Conditioning
Controller
18 Radio, OnStar
®,
Universal Hands
Free Phone
19 Display
20 Automatic Occupant
Sensing
21 Instrument Panel
Cluster
22 Discrete Logic
Ignition Switch
23 Body Control
Module 3 Fuses Usage
24 Body Control
Module 2
25 Rear Heater
Ventilation Air
Conditioning/Blower
26 AC/DC Inverter
Relays Usage R1 Trunk Relay
R2 Not Used
R3 Power Outlet Relay
Rear Compartment Fuse
Block
The rear compartment fuse block is
located on the left side of the trunk
behind a cover.
Page 351 of 414

Vehicle Care 9-69
A. Wheel Block
B. Flat Tire
The following information explains
how to repair or change a tire.
Tire Changing
Removing the Spare Tire and
Tools
The equipment you need is located
in the trunk.
1. Open the trunk.
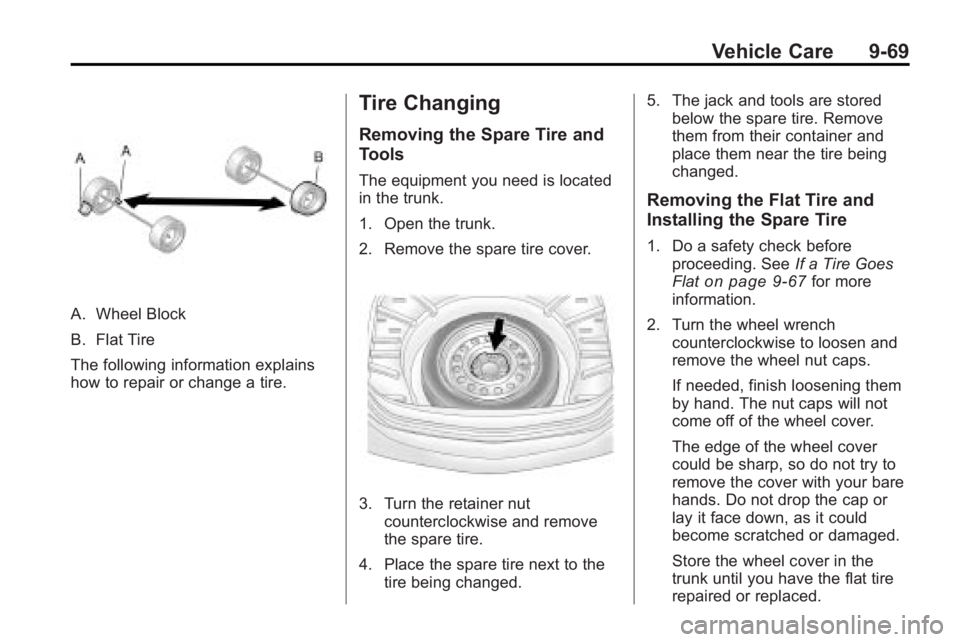
2. Remove the spare tire cover.
3. Turn the retainer nutcounterclockwise and remove
the spare tire.
4. Place the spare tire next to the tire being changed. 5. The jack and tools are stored
below the spare tire. Remove
them from their container and
place them near the tire being
changed.
Removing the Flat Tire and
Installing the Spare Tire
1. Do a safety check before
proceeding. See If a Tire Goes
Flat
on page 9‑67for more
information.
2. Turn the wheel wrench counterclockwise to loosen and
remove the wheel nut caps.
If needed, finish loosening them
by hand. The nut caps will not
come off of the wheel cover.
The edge of the wheel cover
could be sharp, so do not try to
remove the cover with your bare
hands. Do not drop the cap or
lay it face down, as it could
become scratched or damaged.
Store the wheel cover in the
trunk until you have the flat tire
repaired or replaced.