2010 BMW Z4 SDRIVE30I lights
[x] Cancel search: lightsPage 90 of 254

Lamps
88
Lamps
Parking lamps/low beams
0Lamps off,
daytime running lights
1Parking lamps and daytime running lights
2Low-beam headlamps and welcome lamps
3Automatic headlamp control
*, daytime run-
ning lights, welcome lamps, high-beam
assistant
* and adaptive light control*
When you open the driver's door with the igni-
tion switched off, the exterior lighting is auto-
matically switched off if the light switch is in
position 0, 2 or 3.
Switch on the parking lamps if necessary,
switch position 1.
Parking lamps
In switch position1, the front, rear and side
vehicle lighting is switched on. You can use the
parking lamps for parking.
The parking lamps will discharge the bat-
tery. Therefore, do not leave them on for
unduly long periods of time; otherwise, the bat-
tery might not have enough power to start the
engine. It is preferable to switch on the left-
hand or right-hand roadside parking lamps,
refer to page90.<
Low beams
The low beams light up when the light switch is
in position 2 and the ignition is on.
Automatic headlamp control*
When the switch is in position3, the low beams
are switched on and off automatically depend-
ing on ambient light conditions, e.g., in a tunnel,
in twilight, or if there is precipitation. The adap-
tive light control
* is active. The LED next to the
symbol is illuminated when the low beams are
on. You can also activate the daytime running
lights, refer to page89. In the situations
described above, the lamps then automatically
switch from daytime running lights to low
beams.
The headlamps may also come on when the
sun is sitting low on a blue sky.
The automatic headlamp control cannot
serve as a substitute for your personal
judgment in determining when the lamps
should be switched on in response to ambient
lighting conditions. For example, the system
cannot detect fog or hazy weather. To avoid
safety risks, you should always switch on the
low-beam headlamps manually under these
conditions.<
Welcome lamps
If you leave the light switch in position 2 or 3
when you park the car, the parking lamps and
the interior lamps light up briefly when you
unlock the vehicle.
Page 91 of 254

Controls
89Reference
At a glance
Driving tips
Communications
Navigation
Entertainment
Mobility
Activating/deactivating welcome
lamps
1."Settings"
2."Lighting"
3."Welcome light"
Welcome lamps are activated and are
stored for the remote control currently in use.
Pathway lighting
If you activate the headlamp flasher after
parking the car, with the lights switched off,
the low beams come on and remain on for a
certain time.
You can adjust the operating period or deacti-
vate the function.
1."Settings"
2."Lighting"
3."Pathway light.:"
4.Set or deactivate the duration.
The setting is stored for the remote control cur-
rently in use.
Daytime running lights
The daytime running lights light up in switch
position0, 1 and 3. They are less powerful than
the low beams.
Activating/deactivating the daytime
running lights
1."Settings"
2."Lighting"
3."Daytime running lamps"
Daytime running lights are activated and
are stored for the remote control currently
in use.
Adaptive light control*
The concept
Adaptive light control is a variable headlamp
control system that enables better illumination
of the road surface. Depending on the steering
angle and other parameters, the light from the
headlamp follows the course of the road.
Activating adaptive light control
With the ignition switched on, turn the light
switch to position 3, refer to page88.
Standstill function
*: To avoid blinding oncom-
ing traffic, adaptive light control directs light
towards the passenger side when the vehicle is
at a standstill.
Malfunction
A message appears on the Control Display.
Adaptive light control is malfunctioning or has
failed. Have the system checked as soon as
possible.
Page 92 of 254

Lamps
90
High beams/roadside parking
lamps
1High beams
2Headlamp flasher
3Roadside parking lamps
*
Roadside parking lamps, left or right*
There is an additional option of switching on the
lamps on the side of the car facing the road
when parked.
Switching on
After parking the vehicle, press the lever up or
down beyond the pressure point for a longer
period, arrow 3.
The roadside parking lamps drain the bat-
tery. Therefore, do not leave them on for
unduly long periods of time; otherwise, the bat-
tery might not have enough power to start the
engine.<
Switching off
Press the lever in the opposite direction to the
pressure point, arrow 3.
High-Beam Assistant*
The concept
This system automatically switches the high
beams on and off. The procedure is controlled
by a sensor on the front of the interior rearview
mirror. The assistant ensures that the high
beams are switched on whenever the traffic sit-uation allows. It handles this task for you and
gives you the benefit of the best possible view.
You can intervene at any time and switch the
high beams on and off as usual.
Activating the system
1.Turn the light switch to position3, refer
to page88.
2.With the low beams switched on, briefly
push the turn indicator lever in the direction
of the high beam.
The indicator lamp in the instrument
cluster lights up when the high beams
are activated. The system automati-
cally switches from high beams to low beams
and vice versa in response to oncoming traffic,
traffic ahead of you, and adequate ambient
lighting, e.g., on city streets.
Switching the high beams on and off
manually
Whenever you wish, or when the situation
requires, you can intervene:
>If the high-beam assistant switches on the
high beams, but you would like to drive with
the low beams, simply switch off the high
beams using the turn indicator lever. This
deactivates the high-beam assistant.
To reactivate the system, briefly push the
turn indicator lever toward the high beams
again.
>If the high-beam assistant switches on the
low beams, but you would like to drive with
the high beams, switch on the high beams
as usual. This deactivates the system and
the high beams need to be switched off
manually, if necessary.
To reactivate the system, briefly push the
turn indicator lever toward the high beams
again.
>Use the headlamp flasher as usual with the
low beams switched on.
Page 98 of 254

Climate
96
Automatic climate control*
1Temperature, left side of passenger com-
partment
2Maximum cooling
3Rear window defroster
4Defrosting windows and removing conden-
sation
5Automatic recirculated-air control AUC/
recirculated-air mode6Air distribution, manual
7AUTO program
8Air flow rate, manual, climate level
9Temperature, right side of passenger com-
partment
10Switching cooling function on/off manually
Comfortable interior climate
AUTO program7 offers the ideal air distribution
and air flow rate for almost all conditions, refer
to AUTO program below. All you need to do is
select an interior temperature which is comfort-
able for you.
The following sections inform you in detail
about how to adjust the settings.
Most settings are stored for the remote control
currently in use, refer also to Personal Profile
settings on page28.
Air distribution, manual
Depending on the selected setting, the air is
directed to the windshield, to the upper body
area, to the knee area and into the footwell.
Adjusting air distribution manually
Press the button repeatedly until
the air distribution is set as
required. The corresponding LED lights up.
The manual air distribution is also switched on
when the AUTO program is deactivated.
Temperature
Set the desired temperatures indi-
vidually for the driver's and pas-
senger sides.
The automatic climate control
achieves this temperature as quickly as possi-
ble regardless of the season, using maximum
cooling or heating power if necessary, and then
maintains it.
To give the automatic climate control
enough time to achieve the set tempera-
ture, do not switch between different tempera-
ture settings in quick succession.<
You can achieve maximum heating power with
the highest setting, regardless of the outside
temperature.
The lowest setting effects continuous cooling.
Page 115 of 254

Driving tips
113Reference
At a glance
Controls
Communications
Navigation
Entertainment
Mobility
Drive defensively
Avoid unnecessary acceleration and braking
maneuvers. To do so, keep an adequate
distance to the forward vehicle. A defensive
and smooth driving style keeps fuel consump-
tion down.
Avoid high engine speeds
Only use first gear when setting off. In second
and higher gears, accelerate without hesitation
or pauses. When accelerating, shift up before
reaching high engine speeds.
When you reach the desired speed, shift into
the highest applicable gear and drive with the
engine speed as low as possible and at a con-
stant speed.
As a rule: driving at low engine speeds lowers
fuel consumption and reduces wear.
Coasting
When approaching a red light, take your foot off
the accelerator and coast to a stop in the high-
est applicable gear.
On a downhill slope, take your foot off the accel-
erator and coast in a suitable gear.
The fuel supply is interrupted when coasting.
Switch off the engine during lengthy
stops
Switch off the engine when stopping for lengthy
periods, e.g., at traffic lights, railroad crossings
or in traffic congestion. You achieve fuel sav-
ings even if standing time is as short as approx.
4 seconds.
Switch off functions you do not need at
the moment
Functions such as the air conditioner and the
seat or rear window heating draw large amounts
of power and consume additional fuel. Espe-
cially in city traffic and in stop-and-go driving
they have a considerable impact. Therefore,
switch these functions off when they are not
really needed.
Have the vehicle serviced
Have the vehicle serviced regularly to achieve
good economy and a long vehicle life. BMW
recommends having the vehicle serviced at a
BMW center. Also note the BMW service sys-
tem, refer to page206.
General driving notes
Close the luggage compartment lid
Operate the vehicle only when the lug-
gage compartment lid is closed. Other-
wise, exhaust fumes could enter the interior of
the vehicle.<
If the vehicle must be driven with the luggage
compartment lid open:
1.Close all windows.
2.Greatly increase the air volume of the
automatic climate control system, refer
to page97.
Hot exhaust system
In all vehicles, extremely high tempera-
tures are generated in the exhaust sys-
tem. Do not remove the heat shields installed
adjacent to various sections of the exhaust sys-
tem, and never apply undercoating to them.
When driving, standing at idle and while park-
ing, take care to avoid possible contact
between the hot exhaust system and any highly
flammable materials such as hay, leaves, grass,
etc. Such contact could lead to a fire, with the
risk of serious personal injuries and property
damage. Do not touch hot exhaust tail pipes.
Otherwise, there is a risk of burns.<
Hydroplaning
When driving on wet or slushy roads,
reduce road speed. If you do not, a wedge
of water can form between tires and road sur-
face. This situation, known as hydroplaning,
means that the tire can completely lose contact
with the road surface, so that neither the car can
be steered nor the brake be properly applied.<
Page 158 of 254

CD/DVD player and CD/DVD changer
156
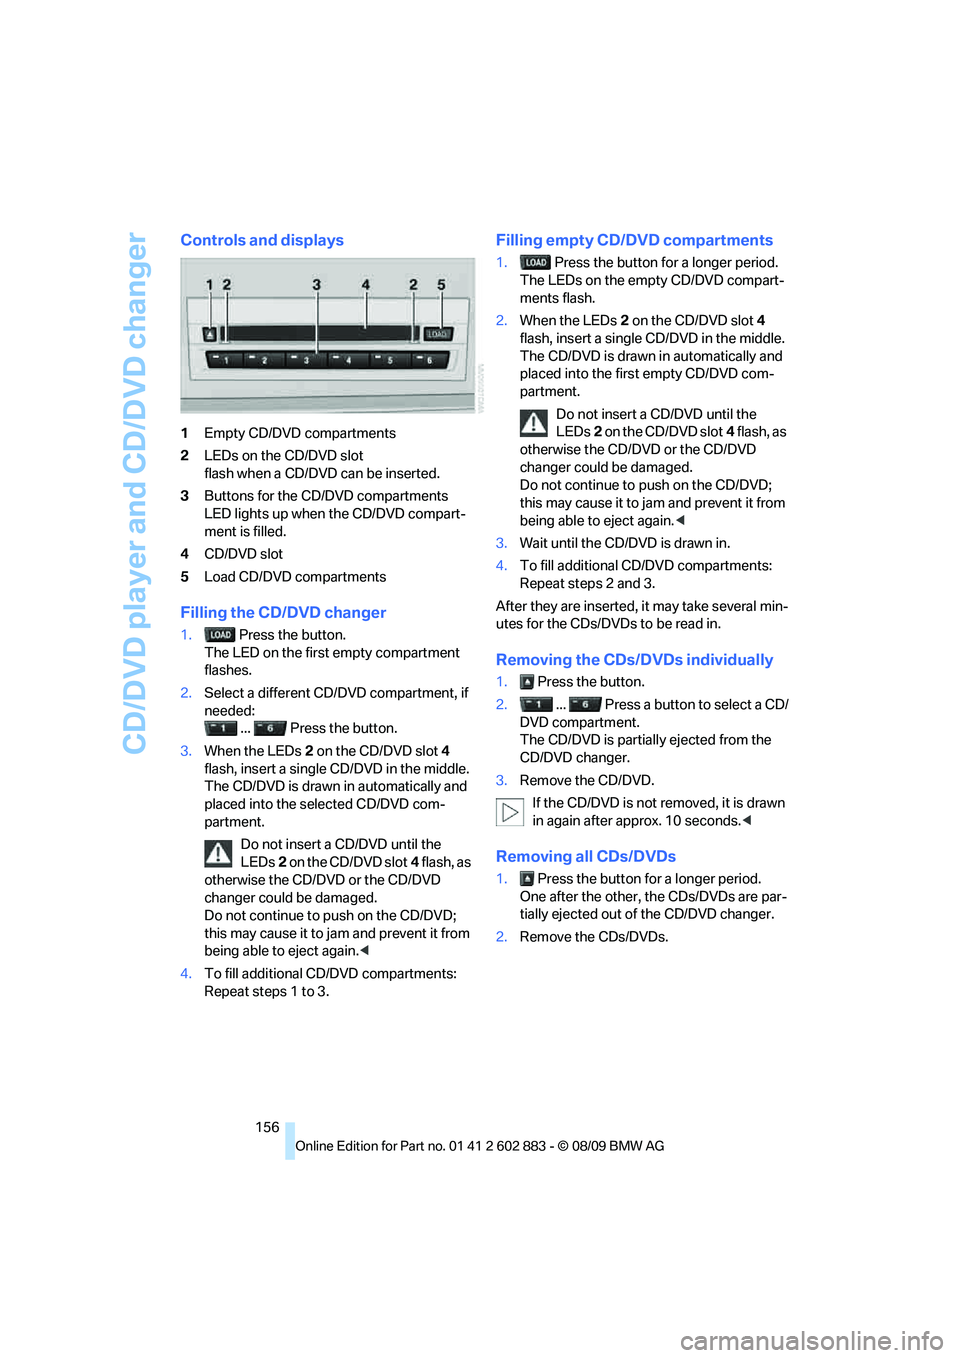
Controls and displays
1Empty CD/DVD compartments
2LEDs on the CD/DVD slot
flash when a CD/DVD can be inserted.
3Buttons for the CD/DVD compartments
LED lights up when the CD/DVD compart-
ment is filled.
4CD/DVD slot
5Load CD/DVD compartments
Filling the CD/DVD changer
1. Press the button.
The LED on the first empty compartment
flashes.
2.Select a different CD/DVD compartment, if
needed:
... Press the button.
3.When the LEDs 2 on the CD/DVD slot4
flash, insert a single CD/DVD in the middle.
The CD/DVD is drawn in automatically and
placed into the selected CD/DVD com-
partment.
Do not insert a CD/DVD until the
LEDs2 on the CD/DVD slot4 flash, as
otherwise the CD/DVD or the CD/DVD
changer could be damaged.
Do not continue to push on the CD/DVD;
this may cause it to jam and prevent it from
being able to eject again.<
4.To fill additional CD/DVD compartments:
Repeat steps 1 to 3.
Filling empty CD/DVD compartments
1. Press the button for a longer period.
The LEDs on the empty CD/DVD compart-
ments flash.
2.When the LEDs 2 on the CD/DVD slot4
flash, insert a single CD/DVD in the middle.
The CD/DVD is drawn in automatically and
placed into the first empty CD/DVD com-
partment.
Do not insert a CD/DVD until the
LEDs2 on the CD/DVD slot4 flash, as
otherwise the CD/DVD or the CD/DVD
changer could be damaged.
Do not continue to push on the CD/DVD;
this may cause it to jam and prevent it from
being able to eject again.<
3.Wait until the CD/DVD is drawn in.
4.To fill additional CD/DVD compartments:
Repeat steps 2 and 3.
After they are inserted, it may take several min-
utes for the CDs/DVDs to be read in.
Removing the CDs/DVDs individually
1. Press the button.
2. ... Press a button to select a CD/
DVD compartment.
The CD/DVD is partially ejected from the
CD/DVD changer.
3.Remove the CD/DVD.
If the CD/DVD is not removed, it is drawn
in again after approx. 10 seconds.<
Removing all CDs/DVDs
1. Press the button for a longer period.
One after the other, the CDs/DVDs are par-
tially ejected out of the CD/DVD changer.
2.Remove the CDs/DVDs.
Page 209 of 254

Mobility
207Reference
At a glance
Controls
Driving tips
Communications
Navigation
Entertainment
Socket for Onboard
Diagnosis OBD
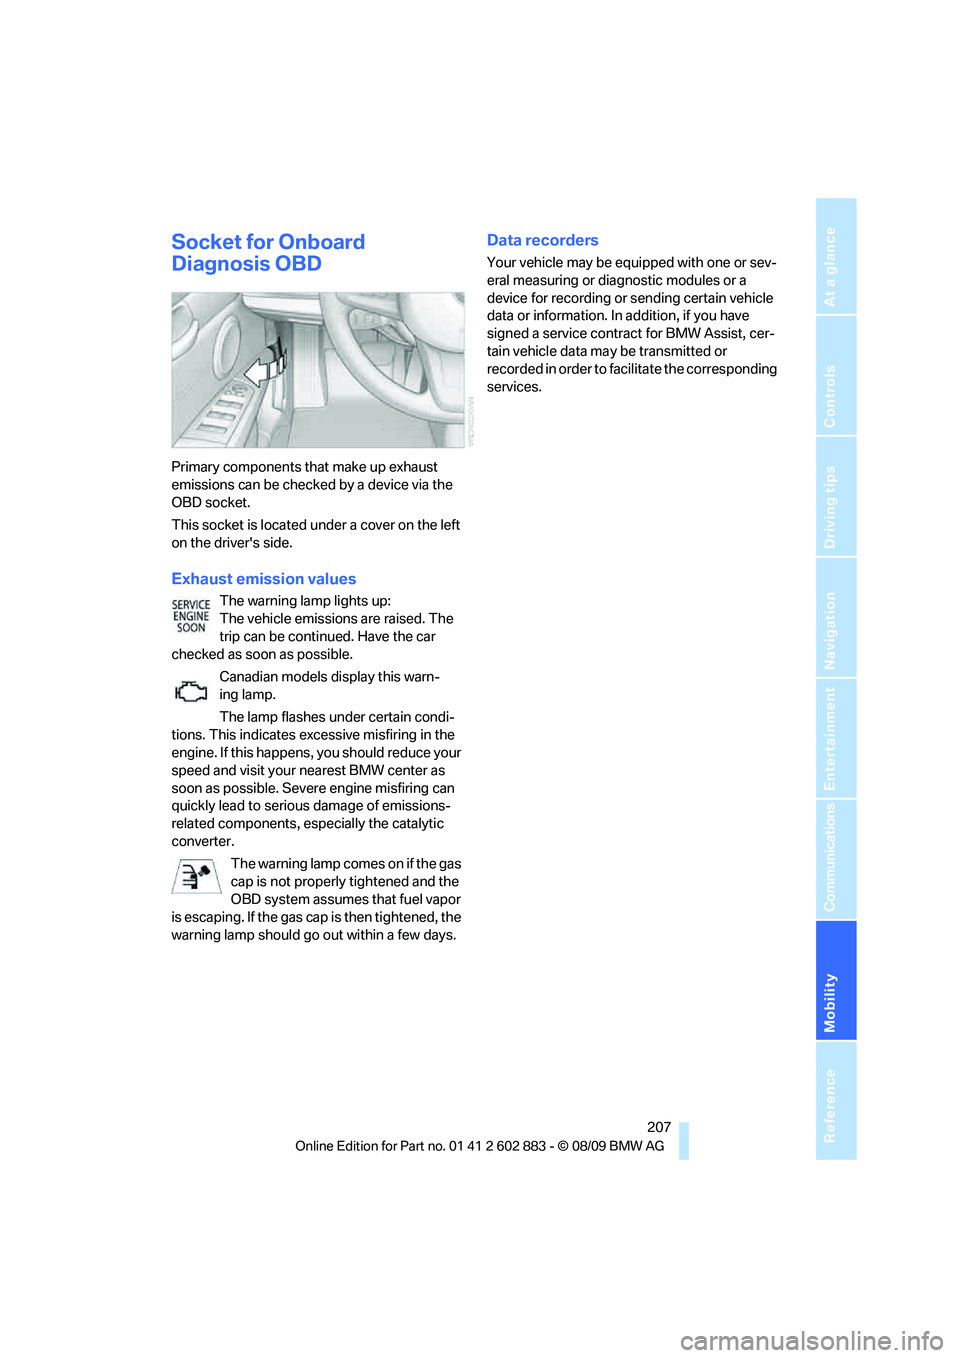
Primary components that make up exhaust
emissions can be checked by a device via the
OBD socket.
This socket is located under a cover on the left
on the driver's side.
Exhaust emission values
The warning lamp lights up:
The vehicle emissions are raised. The
trip can be continued. Have the car
checked as soon as possible.
Canadian models display this warn-
ing lamp.
The lamp flashes under certain condi-
tions. This indicates excessive misfiring in the
engine. If this happens, you should reduce your
speed and visit your nearest BMW center as
soon as possible. Severe engine misfiring can
quickly lead to serious damage of emissions-
related components, especially the catalytic
converter.
The warning lamp comes on if the gas
cap is not properly tightened and the
OBD system assumes that fuel vapor
is escaping. If the gas cap is then tightened, the
warning lamp should go out within a few days.
Data recorders
Your vehicle may be equipped with one or sev-
eral measuring or diagnostic modules or a
device for recording or sending certain vehicle
data or information. In addition, if you have
signed a service contract for BMW Assist, cer-
tain vehicle data may be transmitted or
recorded in order to facilitate the corresponding
services.
Page 215 of 254

Mobility
213Reference
At a glance
Controls
Driving tips
Communications
Navigation
Entertainment
Xenon lamps
Have any work on the xenon lamp system,
including bulb replacements, performed
only by a BMW center or a workshop that works
according to BMW repair procedures with cor-
respondingly trained personnel. Otherwise, if
such work is carried out improperly, the high
voltage in the system presents the danger of
fatal injuries.<
Parking lamps and roadside parking
lamps, daytime running lights
H8 bulb, 35 watts
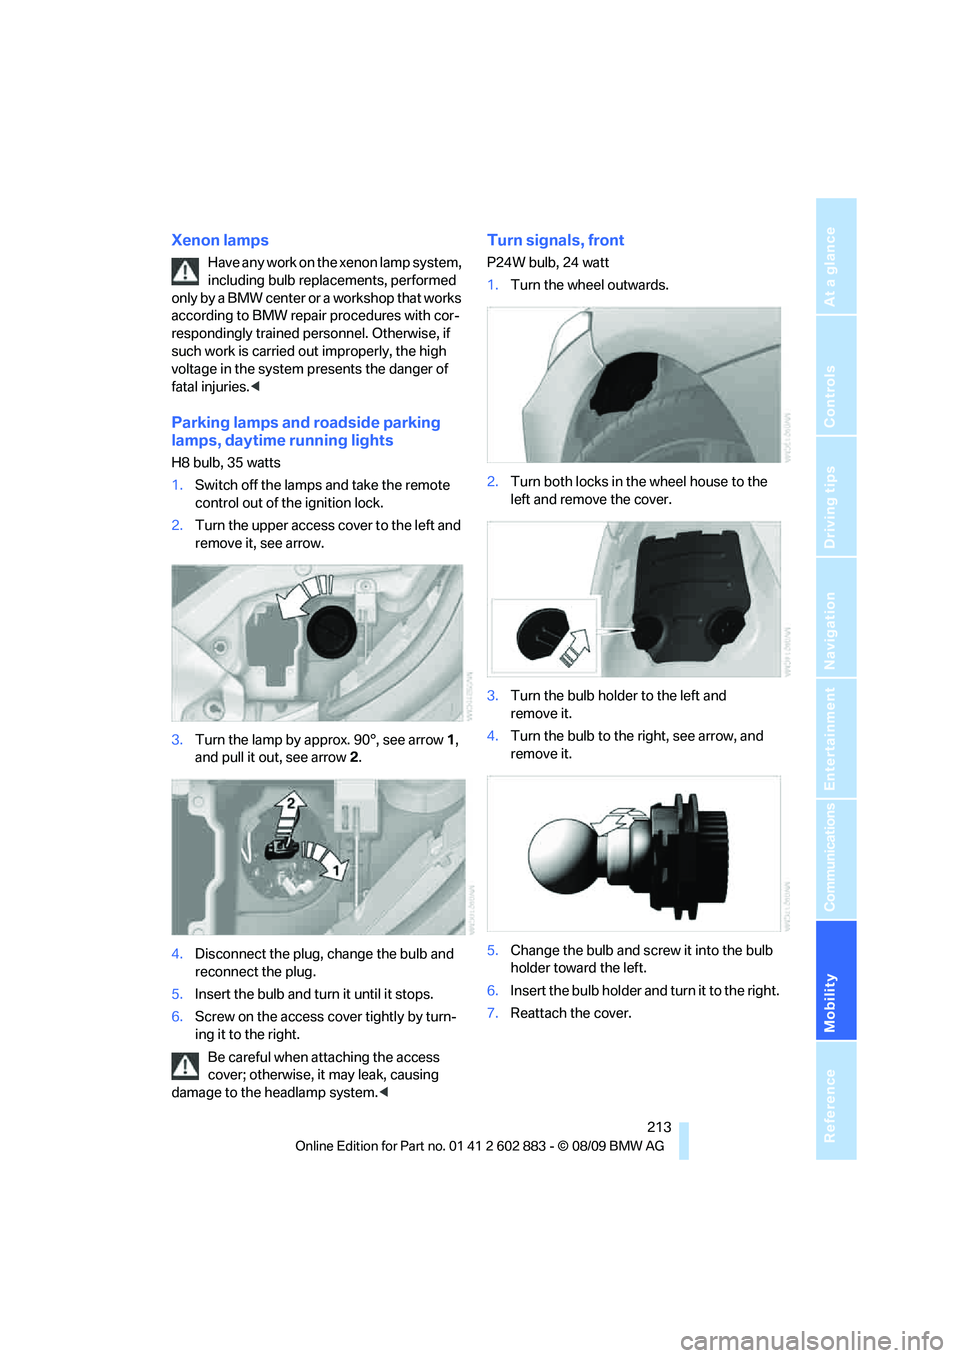
1.Switch off the lamps and take the remote
control out of the ignition lock.
2.Turn the upper access cover to the left and
remove it, see arrow.
3.Turn the lamp by approx. 90°, see arrow 1,
and pull it out, see arrow 2.
4.Disconnect the plug, change the bulb and
reconnect the plug.
5.Insert the bulb and turn it until it stops.
6.Screw on the access cover tightly by turn-
ing it to the right.
Be careful when attaching the access
cover; otherwise, it may leak, causing
damage to the headlamp system.<
Turn signals, front
P24W bulb, 24 watt
1.Turn the wheel outwards.
2.Turn both locks in the wheel house to the
left and remove the cover.
3.Turn the bulb holder to the left and
remove it.
4.Turn the bulb to the right, see arrow, and
remove it.
5.Change the bulb and screw it into the bulb
holder toward the left.
6.Insert the bulb holder and turn it to the right.
7.Reattach the cover.