2010 BMW Z4 SDRIVE30I height
[x] Cancel search: heightPage 36 of 254

Opening and closing
34
Switching off an alarm
>Unlock the car with the remote control, refer
to page29.
>Insert the remote control all the way into the
ignition lock.
Indicator lamp displays
>The indicator lamp under the inside rear-
view mirror flashes continuously: the sys-
tem is armed.
>The indicator lamp flashes after locking:
doors, hood or luggage compartment lid are
not properly closed. Even if you do not close
the alerted area, the system begins to mon-
itor the remaining areas, and the indicator
lamp flashes continuously after approx.
10 seconds. The interior motion sensor and
the tilt alarm sensor are not activated.
>The indicator lamp goes out after unlocking:
your vehicle has not been disturbed while
you were away.
>If the indicator lamp flashes after unlocking
until the remote control is inserted in the
ignition, but for no longer than approx.
5 minutes: your vehicle has been disturbed
while you were away.
Tilt alarm sensor
The tilt of the vehicle is monitored. The alarm
system reacts, e.g., to attempts to steal a wheel
or tow the vehicle.
Interior motion sensor
The interior of the car is monitored up to the
height of the seat cushions. Thus the alarm sys-
tem is activated together with the interior
motion sensor even if the hardtop is open. An alarm can be triggered unintentionally by falling
objects such as leaves, refer to Avoiding unin-
tentional alarms.
Avoiding unintentional alarms
The tilt alarm sensor and interior motion sensor
may be switched off at the same time. This pre-
vents unintentional alarms, e.g., in the following
situations:
>In duplex garages
>During transport on car-carrying trains,
boats/ships or on a trailer
>When animals are to remain in the vehicle
Switching off tilt alarm sensor and
interior motion sensor
Press the button on the remote control
again as soon as the vehicle is locked.
The indicator lamp lights up briefly and then
flashes continuously. The tilt alarm sensor and
the interior motion sensor are switched off until
the next time the vehicle is unlocked and subse-
quently locked again.
Comfort Access*
Comfort Access enables you to enter your vehi-
cle without needing to hold the remote control
in your hand. All you need to do is wear the
remote control close to your body, e.g., in your
jacket pocket. The vehicle detects the corre-
sponding remote control within the immediate
vicinity or in the passenger compartment.
Comfort Access supports the following func-
tions:
>Unlocking/locking the vehicle
>Unlocking the luggage compartment lid
separately
>Starting the engine
>Convenient opening
>Convenient closing
Page 40 of 254
Opening and closing
38
Retractable hardtop
The retractable hardtop combines reliable
weather protection with simple and convenient
operation.
Please note:
>It is advisable that you close the retractable
hardtop when you park the vehicle. Not only
does the closed hardtop protect the vehicle
interior against unanticipated weather dam-
age, it also offers theft protection. However,
even when the hardtop is closed, valuables
should only be stored in the locked
cargo area.
>Do not attach roof rack systems to the
retractable hardtop, and in particular do not
attach magnetic racks.
>Do not attach rack systems to the luggage
compartment lid, and in particular do not
attach magnetic racks.
>When the retractable hardtop is operated,
the luggage compartment lid swings back
and up. Before operating the retractable
hardtop, ensure that there is enough clear-
ance, e.g., in tight parking spaces.
>If you open the hardtop while it is wet, e.g.,
after driving in the rain, water may drip into
the cargo area. If necessary, remove items
from the cargo area beforehand to avoid
water stains or soiling.
Do not place any objects on the retract-
able hardtop or on the luggage compart-
ment lid; otherwise, they could fall during move-
ments of the retractable hardtop and cause
damage or injury.
Driving when the hardtop is not fully opened or
not fully closed may result in damage or injury.
Do not reach into the mechanism while the
hardtop is opening or closing. Keep children
away from the swiveling area of the retractable
hardtop.<
The retractable hardtop cannot be moved
at temperatures below + 147/–106. A
message appears on the Control Display.
stationary. To avoid causing damage, do not
drive off until the hardtop has stopped
moving.<
Before opening and closing
Do not let the hardtop stop in an interme-
diate position when opening or closing.
Otherwise, there is the danger of personal injury
since the hardtop will be lowered automatically
after a few minutes.<
>Comply with the safety precautions
described above.
>Ensure that the luggage compartment lid is
closed.
>The vehicle should be parked on fairly level
ground. Excessive angle is indicated by
alamp.
>Fold down the cargo area partition and
make sure it engages, refer to the instruc-
tions below.
>Do not place any objects next to or on the
cargo area partition and close the storage
compartment on the left side of the
cargo area.
>Do not exceed the maximum loading height
under the cargo area partition; refer to the
label in the cargo area showing a line indi-
cating the maximum height.
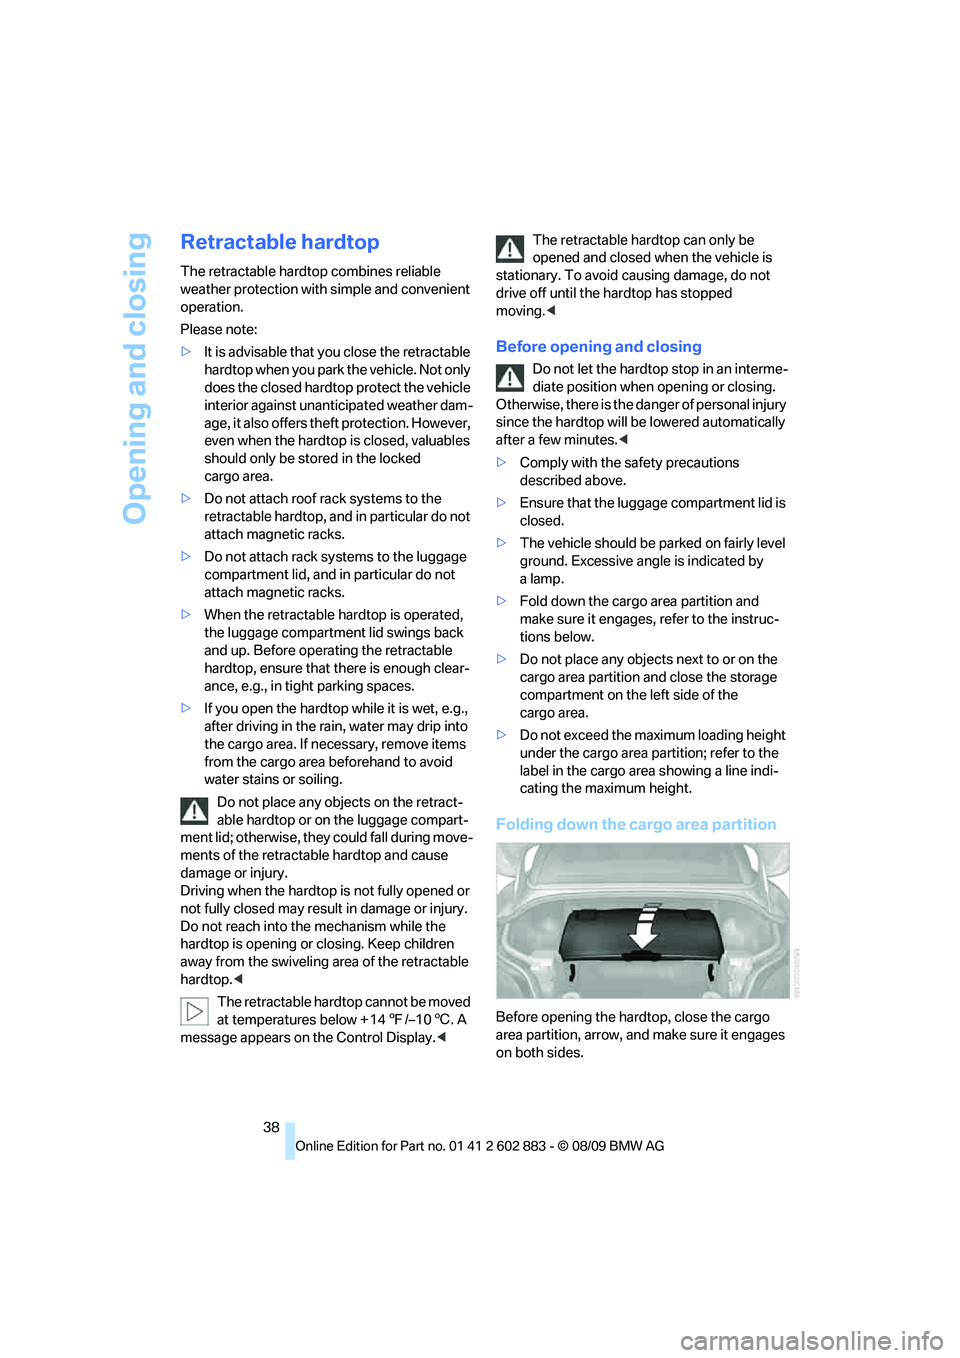
Folding down the cargo area partition
Before opening the hardtop, close the cargo
area partition, arrow, and make sure it engages
on both sides.
Page 44 of 254
Adjustments
42
Manual adjustment
Observe the adjustment instructions on
page41 to ensure the best possible per-
sonal protection.<
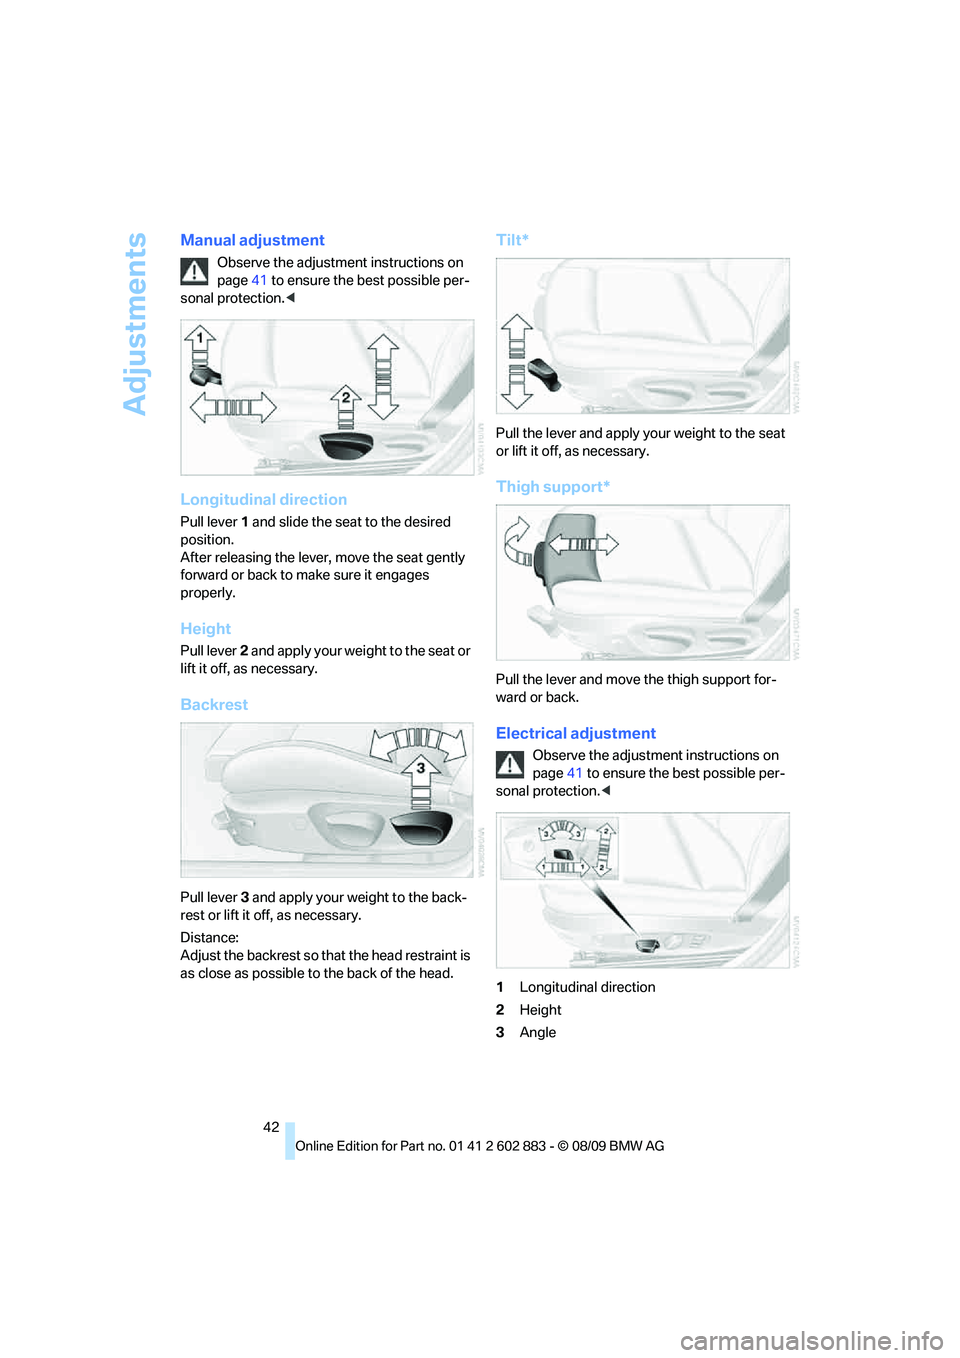
Longitudinal direction
Pull lever 1 and slide the seat to the desired
position.
After releasing the lever, move the seat gently
forward or back to make sure it engages
properly.
Height
Pull lever 2 and apply your weight to the seat or
lift it off, as necessary.
Backrest
Pull lever 3 and apply your weight to the back-
rest or lift it off, as necessary.
Distance:
Adjust the backrest so that the head restraint is
as close as possible to the back of the head.
Tilt*
Pull the lever and apply your weight to the seat
or lift it off, as necessary.
Thigh support*
Pull the lever and move the thigh support for-
ward or back.
Electrical adjustment
Observe the adjustment instructions on
page41 to ensure the best possible per-
sonal protection.<
1Longitudinal direction
2Height
3Angle
Page 48 of 254

Adjustments
46
Automatic heating
Depending on the outside temperature, both
exterior mirrors are heated automatically when
the engine is running or the ignition is
switched on.
Passenger-side mirror tilt function –
automatic curb monitor*
Activating
1.Push the switch to the position for the
driver's side mirror, arrow 1.
2.Engage reverse gear or move the selector
lever to position R.
The glass of the mirror on the passenger
side tilts slightly down. This allows the
driver to see the area immediately adjacent
to the vehicle, e.g., a curb, when backing
into a parking space.
Deactivating
Push the switch to the position for the passen-
ger-side mirror, arrow 2.
Interior rearview mirror
Turn the knob to reduce glare from the head-
lamps of cars behind you when driving
at night.
Interior and exterior mirrors, automatic
dimming feature*
The automatic dimming feature of the interior
and exterior mirrors
* is controlled by two photo
cells in the interior rearview mirror. One photo
cell is in the mirror frame, see arrow; the other is
on the back of the mirror.
In order to ensure that the system functions
correctly, keep the photo cells clean, do not
cover the area between the interior rearview
mirror and windshield, and do not affix adhesive
labels or stickers of any kind to the windshield
directly in front of the mirror.
Steering wheel
Adjustments
Do not adjust the steering wheel position
while the car is in motion; otherwise, there
is a risk of accident due to an unexpected
movement.<
1.Fold the lever down.
2.Move the steering wheel to the preferred
height and angle to suit your seated
position.
Page 108 of 254
Practical interior accessories
106
Connecting electrical
appliances
Sockets
In your BMW, when the engine is running or the
ignition is switched on, you can use electrical
devices such as a flashlight, car vacuum
cleaner, etc., up to approx. 200 watts at
12 volts, as long as one of the following sockets
is available. Avoid damaging the sockets by
attempting to insert plugs of unsuitable shape
or size.
Cigarette lighter socket*
To access the socket: take the cigarette lighter
out of the socket.
Under the center armrest
External audio device, refer to page104.
In the passenger footwell*
A socket is located on the left below the glove
compartment.
Cargo area
Depending on your vehicle's equipment, the
following storage spaces can be found in the
cargo area:
>Rubber band
* for securing light objects
>Storage compartment
To open: turn the lock to the left, see arrow,
and fold the cover up.
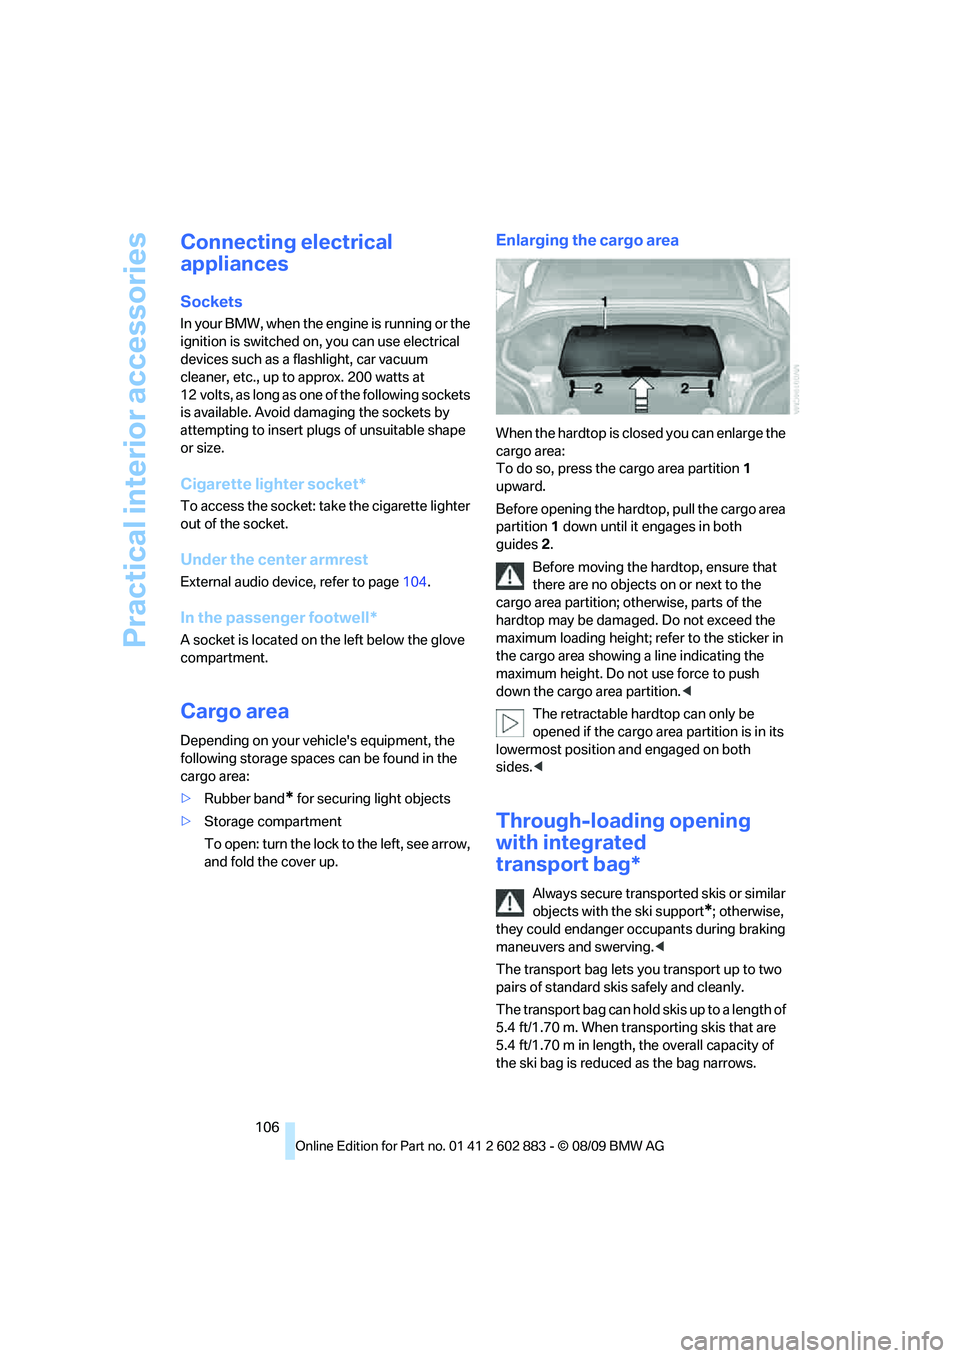
Enlarging the cargo area
When the hardtop is closed you can enlarge the
cargo area:
To do so, press the cargo area partition 1
upward.
Before opening the hardtop, pull the cargo area
partition 1 down until it engages in both
guides2.
Before moving the hardtop, ensure that
there are no objects on or next to the
cargo area partition; otherwise, parts of the
hardtop may be damaged. Do not exceed the
maximum loading height; refer to the sticker in
the cargo area showing a line indicating the
maximum height. Do not use force to push
down the cargo area partition.<
The retractable hardtop can only be
opened if the cargo area partition is in its
lowermost position and engaged on both
sides.<
Through-loading opening
with integrated
transport bag*
Always secure transported skis or similar
objects with the ski support
*; otherwise,
they could endanger occupants during braking
maneuvers and swerving.<
The transport bag lets you transport up to two
pairs of standard skis safely and cleanly.
The transport bag can hold skis up to a length of
5.4 ft/1.70 m. When transporting skis that are
5.4 ft/1.70 m in length, the overall capacity of
the ski bag is reduced as the bag narrows.
Page 116 of 254
Things to remember when driving
114 The risk of hydroplaning increases with declin-
ing tread depth on the tires, refer also to Mini-
mum tread depth on page198.
Driving through water
Drive though calm water only if it is not
deeper than 1 ft/25 cm and at this height
no faster than walking speed, up to 6 mph/
10 km/h. Otherwise, the vehicle's engine, the
electrical systems and the transmission may be
damaged.<
Use the parking brake on inclines
On inclines, do not hold the vehicle for a
lengthy period using the clutch; use the
parking brake instead. Otherwise, greater
clutch wear will result.<
For more information about the drive-off assis-
tant, refer to page80.
Braking safely
Your BMW is equipped with ABS as a standard
feature. Applying the brakes fully is the most
effective way of braking in situations in which
this is necessary. Since the vehicle maintains
steering responsiveness, you can still avoid
possible obstacles with a minimum of steering
effort.
Pulsation of the brake pedal, combined with
sounds from the hydraulic circuits, indicate that
ABS is in its active mode.
Driving in wet conditions
When roads are wet or there is heavy rain,
briefly exert gentle pressure on the brake pedal
every few miles. Monitor traffic conditions to
ensure that this maneuver does not endanger
other road users. The heat generated in this
process helps dry the pads and rotors. Full
braking efficiency will then be available when
you need it.
Hills
To prevent overheating and the resulting
reduced efficiency of the brake system,
drive long or steep downhill gradients in the
gear in which the least braking is required. Even light but consistent brake pressure can lead to
high temperatures, brake wear and possibly
even brake failure.<
You can increase the engine's braking effect by
shifting down, all the way to first gear if neces-
sary. This strategy helps you avoid placing
excessive loads on the brake system. Down-
shifting in manual mode of the automatic trans-
mission, refer to page54.
7-gear sport automatic transmission with
dual clutch: Never drive with the trans-
mission in neutral or with the engine switched
off; otherwise, engine braking action will not be
present or there will be no power assistance to
the brakes or steering.
Manual transmission: Never drive with the
clutch held down, with the transmission in neu-
tral or with the engine switched off; otherwise,
engine braking action will not be present or
there will be no power assistance to the brakes
or steering.
Never allow floor mats, carpets or any other
objects to protrude into the area around the
pedals; otherwise, pedal function could be
impaired.<
Corrosion on brake rotors
When the vehicle is driven only occasionally,
during extended periods when the vehicle is not
used at all, and in operating conditions where
brake applications are less frequent, there is an
increased tendency for corrosion to form on
rotors, while contaminants accumulate on the
brake pads. This occurs because the minimum
pressure which must be exerted by the pads
during brake applications to clean the rotors is
not reached.
Should corrosion form on the brake rotors, the
brakes will tend to respond with a pulsating
effect that even extended application will fail
to cure.
When the vehicle is parked
Condensation forms while the automatic cli-
mate control is in operation, and then exits
under the vehicle. Traces of condensed water
under the vehicle are therefore normal.
Page 203 of 254
Mobility
201Reference
At a glance
Controls
Driving tips
Communications
Navigation
Entertainment
Under the hood
Do not work on the car unless you pos-
sess the necessary technical knowledge.
If you are unfamiliar with the statutory guide-
lines, have any work on the vehicle performed
only by a BMW center or by a workshop that
works according to BMW repair procedures
with correspondingly trained personnel. If this
work is not carried out properly, there is a dan-
ger of subsequent damage and related safety
hazards.<
Hood
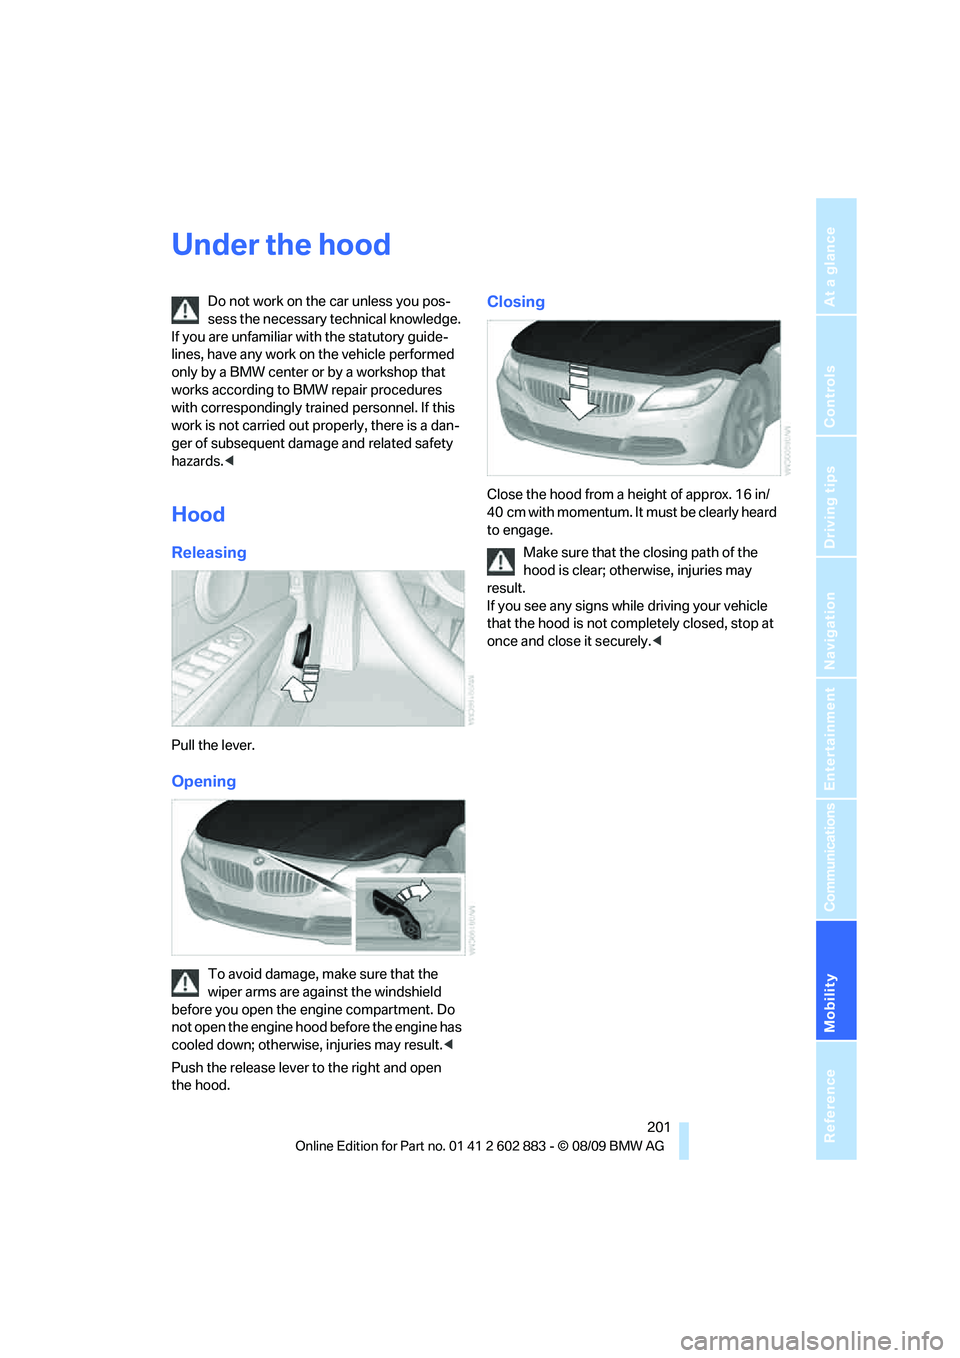
Releasing
Pull the lever.
Opening
To avoid damage, make sure that the
wiper arms are against the windshield
before you open the engine compartment. Do
not open the engine hood before the engine has
cooled down; otherwise, injuries may result.<
Push the release lever to the right and open
the hood.
Closing
Close the hood from a height of approx. 16 in/
40 cm with momentum. It must be clearly heard
to engage.
Make sure that the closing path of the
hood is clear; otherwise, injuries may
result.
If you see any signs while driving your vehicle
that the hood is not completely closed, stop at
once and close it securely.<
Page 210 of 254

Care
208
Care
Care products
Regular cleaning and care contributes signifi-
cantly to the value retention of your BMW.
BMW recommends cleaning and caring for your
vehicle with products that are approved by
BMW for this purpose.
Your BMW center will be happy to advise you on
the products and services available for cleaning
and caring for your BMW.
Original BMW CareProducts have been
material-tested, laboratory-checked and
proven in the field, and offer optimal care and
protection for your vehicle.<
Do not use cleaners that contain alcohol
or solvents as these may result in
damage.<
Cleaning agents can contain substances
that are dangerous or hazardous to your
health. Therefore, follow the warning and safety
instructions on the packaging. When cleaning
inside the vehicle, always open the doors or
windows of the vehicle. In enclosed areas, pro-
vide for sufficient ventilation. Only use products
designed for cleaning vehicles.<
Exterior care
Washing the vehicle
Especially during the winter months,
ensure that the vehicle is washed more
frequently. Heavy soiling and road salt can lead
to vehicle damage.<
After washing the vehicle, apply the
brakes briefly to dry them; otherwise,
water can reduce braking efficiency over the
short term and brake discs can corrode.<
Automatic car washes
Preference should be given to cloth car washes.
Do not use high-pressure car washes;
otherwise, water may drip into the vehicle
around the windows.<
Before driving into a car wash, ensure that it is
suitable for your BMW. Check the following:
>Dimensions of your vehicle, refer
to page227.
>If necessary: fold in the exterior mirrors,
refer to page45.
>Maximum permissible tire width.
Avoid car washes with guide rail heights
over 4 in/10 cm; otherwise, there is dan-
ger of damaging chassis parts.<
Preparations before driving into an automatic
car wash:
>Unscrew the rod antenna
*.
>Deactivate the rain sensor
* to avoid unin-
tentional activation of the wipers.
>Remove additional attachments, e.g., spoil-
ers or telephone antennas, if there is a pos-
sibility that they could be damaged.
Automatic transmission
Before driving into an automatic car wash, per-
form the following steps to ensure that the vehi-
cle can roll:
1.Insert the remote control, even with Com-
fort Access, into the ignition lock.
2.Move the selector lever to position N.
3.Release the parking brake.
4.Switch off the engine.
5.Leave the remote control in the ignition lock
so that the vehicle can roll.