2010 BMW Z4 ROADSTER SDRIVE35I light
[x] Cancel search: lightPage 212 of 254
Care
210
Preservation
A preservation treatment is necessary when
water no longer beads off the clean paintwork
surface. Only use products for paintwork pres-
ervation that contain carnauba or synthetic
waxes.
Rubber seals
Treat only with water or rubber care products.
Do not use silicon-containing care prod-
ucts on rubber seals; otherwise, noise
and damage could occur.<
Chrome parts
Carefully clean vehicle parts, such as the radia-
tor grill, door handles or window frames, with
copious quantities of water and a shampoo
additive. For additional treatment, use a chrome
polish.
Light-alloy wheels
For technical reasons, dust is generated during
braking that is deposited on the light-alloy
wheels. Remove the dust regularly using acid-
free rim cleaner.
Do not use aggressive, acidic, strongly
alkaline and abrasive cleaning agents or
steam jets over 1407/606; otherwise, dam-
age may occur.<
Outside sensors / cameras
Keep the sensors and cameras on the
outside of the vehicle, e.g., those of Park
Distance Control, clean and free of ice to ensure
that they remain fully functional.<
Interior care
Upholstery fabrics/cloth trims/
Alcantara fabrics
Vacuum regularly with a vacuum cleaner to
remove superficial dirt.
To remove severe spots such as stains from
beverages, use a soft sponge or lint-free
microfiber cloth and suitable interior cleaners.
Follow the instructions on the packaging.Clean the upholstery down to the seams
using a sweeping motion. Avoid strong
rubbing.<
Opened Velcro fasteners, etc., on pants
or other articles of clothing can damage
the seat covers. Ensure that Velcro fasteners
are closed.<
Leather/leather trim
The leather used by BMW is a high quality
natural product. Slight irregularities in the
leather are a typical characteristic of natural
leather.<
Dust and road grit in the pores and folds of the
leather have an abrasive effect, leading to
increased wear and causing the leather surface
to become brittle prematurely. Therefore, regu-
larly dust the leather with a cloth, for example.
Clean light-colored leather more frequently as
dust and dirt are more noticeable.
Treat the leather at least once every two
months using a leather lotion as dirt and grease
will gradually attack the leather's protective
layer.
Rivets, etc., on pants or other articles of
clothing can damage the seat covers.<
Carpets / cargo area
You can vacuum the carpets and floor mats or
clean them with interior cleaner if heavily soiled.
The floor mats can be removed for cleaning.
When replacing the mats, ensure that the seat
rails do not extend over the floor mats, as this
may damage the mats.
Lint on the floor mats occurs for technical rea-
sons and can be removed by vacuuming
repeatedly.
When cleaning the interior, do not move
both seats all the way forward while mov-
ing them to their uppermost position and lean-
ing the backrests forward. Otherwise, the seats
could hit and damage the seal on the wind-
shield, the sun visor or the headliner.<
Page 214 of 254

Replacing components
212
Replacing components
Onboard vehicle tool kit
The onboard vehicle tool kit is stored in a pouch
under the cargo area floor panel.
Wiper blades
1.Fold up the wiper arm.
2.Fold the wiper blade upwards.
3.Press the hook.
4.Pull the wiper blade downward out of the
holder and remove it toward the top left, see
arrow.
To avoid damage, make sure that the
wiper arms are resting against the
windshield before you open the engine com-
partment.<
Lamps and bulbs
Lamps and bulbs make an essential contribu-
tion to vehicle safety. They should, therefore,
be handled carefully. BMW recommends hav-ing your BMW center perform any work that you
do not feel competent to perform yourself or
that is not described here.
Never touch the glass of new bulbs with
your bare fingers, as even minute
amounts of contamination will burn into the
bulb's surface and reduce its service life. Use a
clean tissue, cloth or something similar, or hold
the bulb by its base.<
You can obtain a selection of replacement bulbs
at your BMW center.
Only change bulbs while they are cool to
the touch; otherwise, you could suffer
burns.<
When working on electrical systems,
always begin by switching off the con-
sumer in question; otherwise, short-circuits
could result. To avoid possible injury or equip-
ment damage when replacing bulbs, observe
any instructions provided by the bulb manufac-
turer.<
For care of the headlamps, please follow the
instructions in the chapter entitled "Care"'.
If the routine for changing a particular
bulb is not described here, please contact
your BMW center or a workshop that works
according to BMW repair procedures with cor-
respondingly trained personnel.<
Light-emitting diodes LED
Light-emitting diodes installed behind translu-
cent lenses serve as the light source for many of
the controls and displays in your vehicle. These
light-emitting diodes, which operate using a
concept similar to that applied in conventional
lasers, are officially designated as Class 1 light-
emitting diodes.
Do not remove the covers or expose the
eyes directly to the unfiltered light source
for several hours; otherwise, this could cause
irritation to the retina.<
Page 215 of 254
Mobility
213Reference
At a glance
Controls
Driving tips
Communications
Navigation
Entertainment
Xenon lamps
Have any work on the xenon lamp system,
including bulb replacements, performed
only by a BMW center or a workshop that works
according to BMW repair procedures with cor-
respondingly trained personnel. Otherwise, if
such work is carried out improperly, the high
voltage in the system presents the danger of
fatal injuries.<
Parking lamps and roadside parking
lamps, daytime running lights
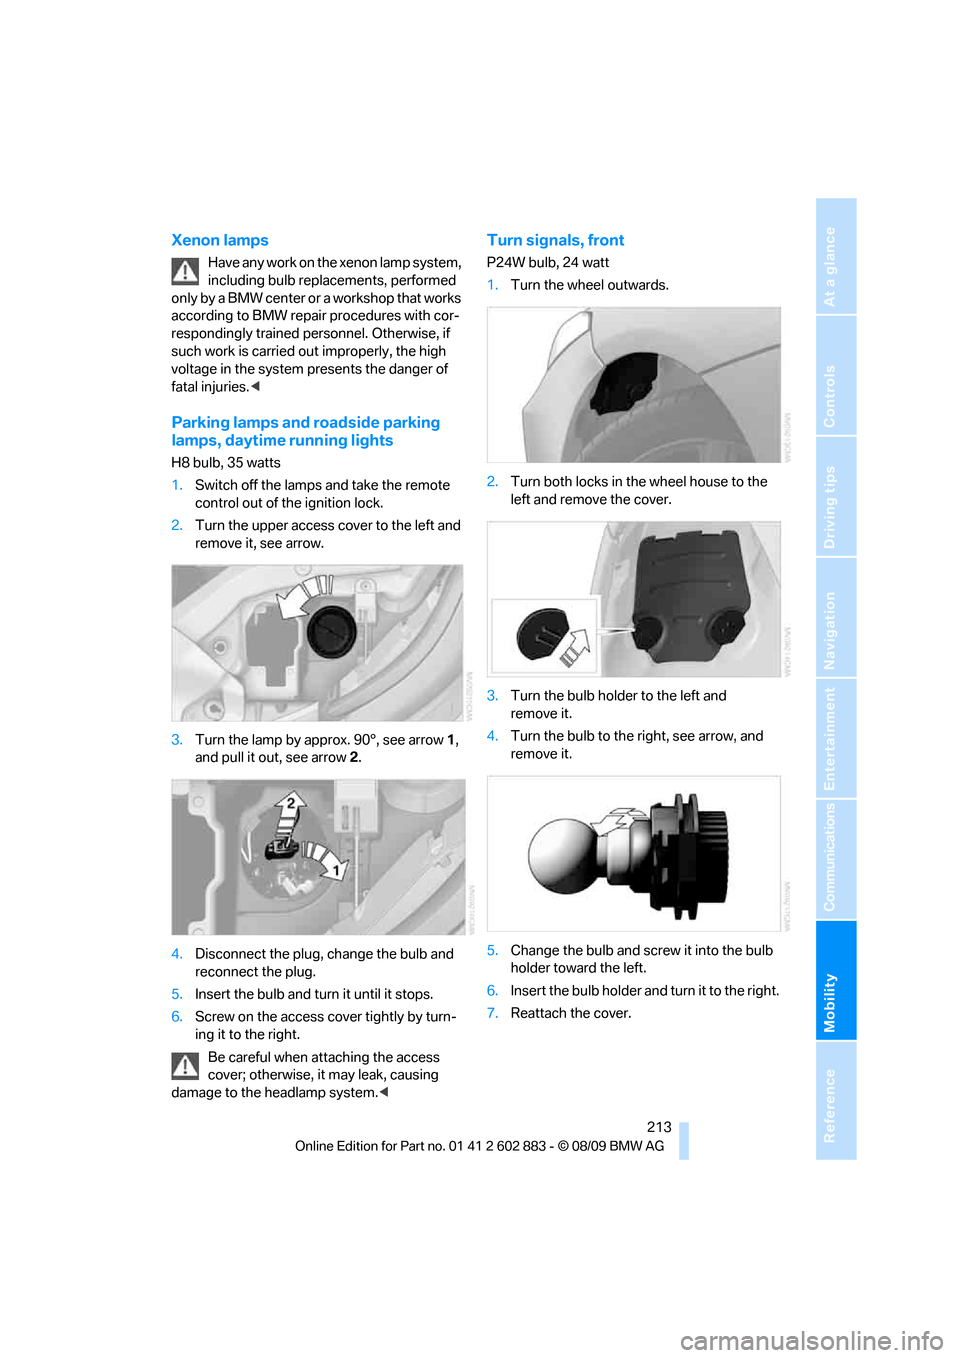
H8 bulb, 35 watts
1.Switch off the lamps and take the remote
control out of the ignition lock.
2.Turn the upper access cover to the left and
remove it, see arrow.
3.Turn the lamp by approx. 90°, see arrow 1,
and pull it out, see arrow 2.
4.Disconnect the plug, change the bulb and
reconnect the plug.
5.Insert the bulb and turn it until it stops.
6.Screw on the access cover tightly by turn-
ing it to the right.
Be careful when attaching the access
cover; otherwise, it may leak, causing
damage to the headlamp system.<
Turn signals, front
P24W bulb, 24 watt
1.Turn the wheel outwards.
2.Turn both locks in the wheel house to the
left and remove the cover.
3.Turn the bulb holder to the left and
remove it.
4.Turn the bulb to the right, see arrow, and
remove it.
5.Change the bulb and screw it into the bulb
holder toward the left.
6.Insert the bulb holder and turn it to the right.
7.Reattach the cover.
Page 220 of 254
Giving and receiving assistance
218
Giving and receiving assistance
Emergency Request*
Requirements
>BMW Assist is activated. Activating
BMW Assist, refer to page186.
>Radio readiness is on.
>The BMW Assist system is logged on to a
wireless network.
>The Emergency Request system is
operable.
>Equipment version with full preparation
package mobile phone. This equipment
makes it possible to send an Emergency
Request even if no mobile phone is paired
with the vehicle.
Once your service contract for BMW Assist
expires, the BMW Assist system can be deacti-
vated by a BMW center without you having to
visit a workshop. Once the BMW Assist system
has been deactivated, Emergency Requests
are not possible. The BMW Assist system can
be reactivated by a BMW center after a new
contract has been signed.
Sending an Emergency Request
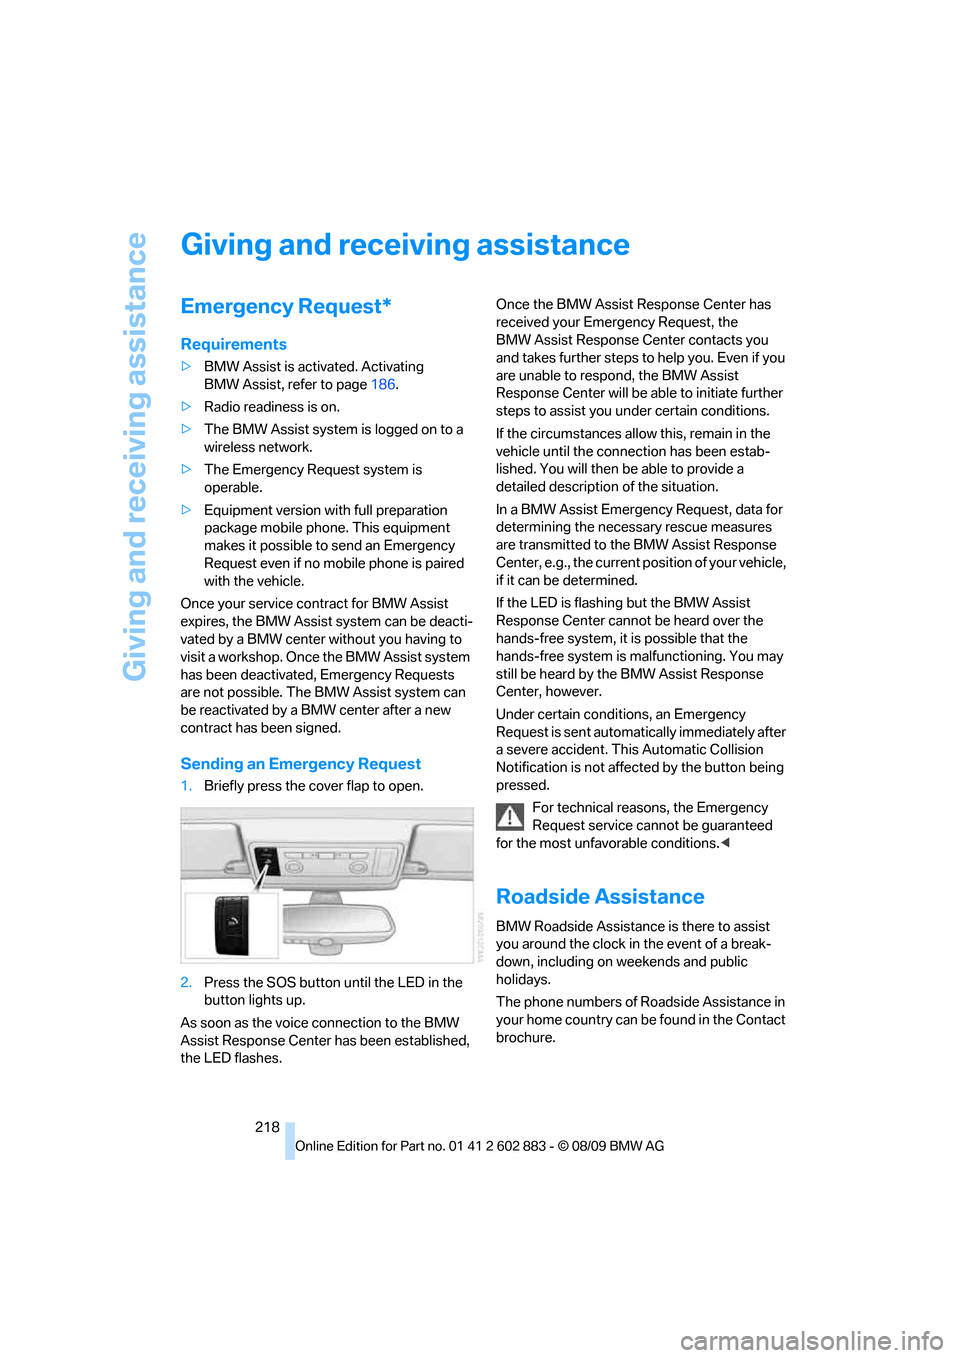
1.Briefly press the cover flap to open.
2.Press the SOS button until the LED in the
button lights up.
As soon as the voice connection to the BMW
Assist Response Center has been established,
the LED flashes.Once the BMW Assist Response Center has
received your Emergency Request, the
BMW Assist Response Center contacts you
and takes further steps to help you. Even if you
are unable to respond, the BMW Assist
Response Center will be able to initiate further
steps to assist you under certain conditions.
If the circumstances allow this, remain in the
vehicle until the connection has been estab-
lished. You will then be able to provide a
detailed description of the situation.
In a BMW Assist Emergency Request, data for
determining the necessary rescue measures
are transmitted to the BMW Assist Response
Center, e.g., the current position of your vehicle,
if it can be determined.
If the LED is flashing but the BMW Assist
Response Center cannot be heard over the
hands-free system, it is possible that the
hands-free system is malfunctioning. You may
still be heard by the BMW Assist Response
Center, however.
Under certain conditions, an Emergency
Request is sent automatically immediately after
a severe accident. This Automatic Collision
Notification is not affected by the button being
pressed.
For technical reasons, the Emergency
Request service cannot be guaranteed
for the most unfavorable conditions.<
Roadside Assistance
BMW Roadside Assistance is there to assist
you around the clock in the event of a break-
down, including on weekends and public
holidays.
The phone numbers of Roadside Assistance in
your home country can be found in the Contact
brochure.
Page 222 of 254

Giving and receiving assistance
220 2.Attach one terminal clamp of the plus/+
jumper cable to the positive terminal of the
battery or a starting-aid terminal of the vehi-
cle providing assistance.
3.Attach the second terminal clamp of the
plus/+ jumper cable to the positive terminal
of the battery or a starting-aid terminal of
the vehicle to be started.
4.Attach one terminal clamp of the minus/–
jumper cable to the negative terminal of the
battery or to an engine or body ground of
the assisting vehicle.
Your BMW has a special nut as body ground
or negative pole.
5.Attach the second terminal clamp of the
minus/– jumper cable to the negative termi-
nal of the battery or to the engine or body
ground of the vehicle to be started.
Starting the engine
1.Start the engine of the donor vehicle and
allow it to run for a few minutes at slightly
increased idle speed.
2.Start the engine on the other vehicle in the
usual way.
If the first start attempt is not successful,
wait a few minutes before another attempt
in order to allow the discharged battery to
recharge.
3.Let the engines run for a few minutes.
4.Disconnect the jumper cables by reversing
the above connecting sequence.
If necessary, have the battery checked and
recharged.
Never use spray fluids to start the
engine.<
Tow-starting, towing away
Observe the applicable laws and regula-
tions for tow-starting and towing
vehicles.<
Do not transport any passengers other
than the driver in a vehicle that is being
towed.<
Using a tow fitting
The screw-in tow fitting must always be carried
in the car. It can be screwed in at the front or
rear of the BMW.
It is stored in the onboard vehicle tool kit under-
neath the floor panel in the cargo area, refer
to page212.
Use only the towing eyelet supplied with
the vehicle and screw it in firmly until it
stops. Use the tow fitting for towing on paved
roads only. Avoid lateral loading of the tow fit-
ting, e.g., do not lift the vehicle by the tow fitting.
Otherwise, the tow fitting and the vehicle could
be damaged.<
Access to screw thread
Front
Release the cover panel in the bumper:
Press on the recess at the bottom left in the
cover panel.
Page 223 of 254

Mobility
221Reference
At a glance
Controls
Driving tips
Communications
Navigation
Entertainment
Rear
Release the cover panel in the bumper:
Press on the recess at the bottom center in the
cover panel.
Being towed
Make sure that the ignition is switched on,
refer to page50; otherwise, the low-beam
headlamps, tail lamps, turn signal indicators and
windshield wipers may be unavailable.
If the electrical system fails, do not tow-start or
tow the vehicle. The electrical steering wheel
lock cannot be released and the vehicle cannot
be steered. Jump-starting, refer to page219.
Power steering assistance is not available when
the engine is not running. Thus, braking and
steering will require increased effort.<
Manual transmission
Gearshift lever in neutral position.
Automatic transmission
Selector lever in position N.
Changing selector lever positions, refer
to page54.
Do not exceed a towing speed of 31 mph
or 50 km/h and a towing distance of
31 miles/50 km; otherwise, the automatic
transmission may be damaged.<
7-gear sport automatic transmission
with dual clutch
Ensure that transmission lock P is not
engaged as the rear wheels will otherwise
be blocked.
When using the car wash function, refer to
page209, note that the parking lock P is
engaged automatically after approx. 30 min-
utes, blocking the rear wheels.
If an electrical malfunction occurs or if towing
takes longer than approx. 20 minutes, manually
release the parking lock, refer to page58.<
Do not exceed a towing speed of 31 mph
or 50 km/h and a towing distance of
31 miles/50 km; otherwise, the 7-gear sport
automatic transmission may be damaged.<
Towing methods
Do not lift the vehicle by a tow fitting or
body and chassis parts; otherwise, dam-
age may result.<
With a tow bar
The towing vehicle must not be lighter
than the towed vehicle; otherwise, it may
be impossible to maintain control.<
The tow fittings used should be on the same
side on both vehicles. Should it prove impossi-
ble to avoid mounting the tow bar at an angle,
please observe the following:
>Clearance and maneuvering capability will
be sharply limited during cornering.
>The tow bar will generate lateral forces if it is
attached offset.
Attach the tow bar to the tow fittings only,
as attaching it to other parts of the vehicle
could result in damage.<
Page 235 of 254
Reference 233
At a glance
Controls
Driving tips
Communications
Navigation
Entertainment
Mobility
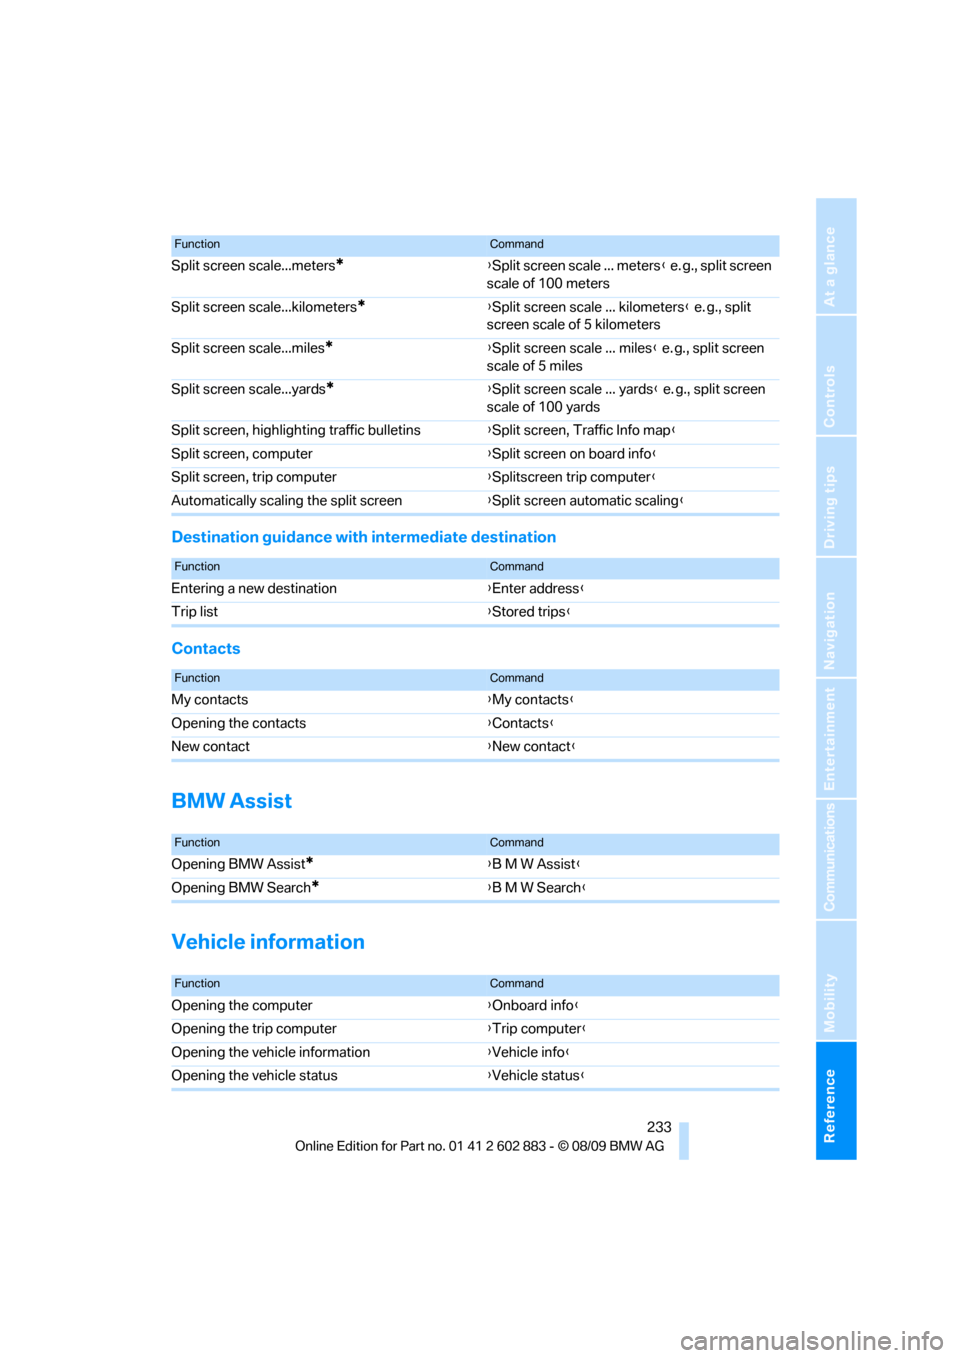
Destination guidance with intermediate destination
Contacts
BMW Assist
Vehicle information
Split screen scale...meters*{Split screen scale ... meters} e. g., split screen
scale of 100 meters
Split screen scale...kilometers
*{Split screen scale ... kilometers} e. g., split
screen scale of 5 kilometers
Split screen scale...miles
*{Split screen scale ... miles} e. g., split screen
scale of 5 miles
Split screen scale...yards
*{Split screen scale ... yards} e. g., split screen
scale of 100 yards
Split screen, highlighting traffic bulletins{Split screen, Traffic Info map}
Split screen, computer{Split screen on board info}
Split screen, trip computer{Splitscreen trip computer}
Automatically scaling the split screen{Split screen automatic scaling}
FunctionCommand
FunctionCommand
Entering a new destination{Enter address}
Trip list{Stored trips}
FunctionCommand
My contacts{My contacts}
Opening the contacts{Contacts}
New contact{New contact}
FunctionCommand
Opening BMW Assist*{B M W Assist}
Opening BMW Search
*{B M W Search}
FunctionCommand
Opening the computer{Onboard info}
Opening the trip computer{Trip computer}
Opening the vehicle information{Vehicle info}
Opening the vehicle status{Vehicle status}
Page 236 of 254
Short commands for the voice activation system
234
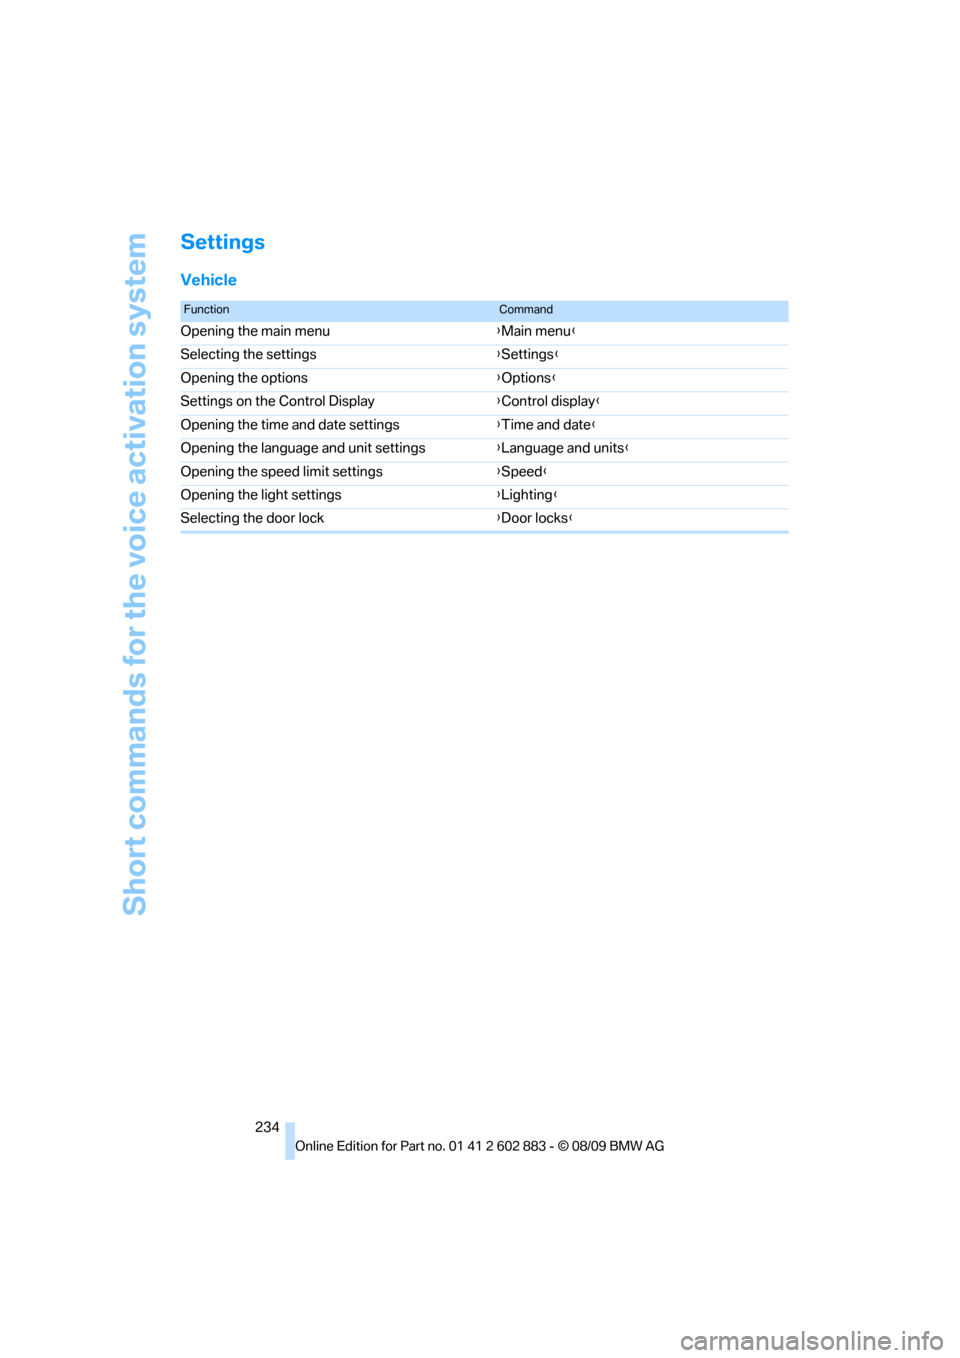
Settings
Vehicle
FunctionCommand
Opening the main menu{Main menu}
Selecting the settings{Settings}
Opening the options{Options}
Settings on the Control Display{Control display}
Opening the time and date settings{Time and date}
Opening the language and unit settings{Language and units}
Opening the speed limit settings{Speed}
Opening the light settings{Lighting}
Selecting the door lock{Door locks}