2010 BMW Z4 ROADSTER SDRIVE35I deflector
[x] Cancel search: deflectorPage 41 of 254

Controls
39Reference
At a glance
Driving tips
Communications
Navigation
Entertainment
Mobility
Opening and closing
When the vehicle is stationary and at radio
readiness or beyond, refer to page50:
If possible, conserve the battery by only
operating the retractable hardtop when
the engine is running.
Before closing the retractable hardtop, remove
all foreign objects from the windshield frame as
these could prevent the hardtop from closing
properly.<
1Press and hold button1:
The retractable hardtop closes.
2Press and hold button2:
The retractable hardtop opens.
3LEDs
The side windows move down when the
hardtop is opened or closed. Convenient
closing
* If you continue pressing the buttons
after the LED 3 goes out, the windows move
back up.<
If the windows pause briefly as they move, this
is for technical reasons and is not a malfunction.
LEDs
In the following situations, a message appears
on the Control Display or an acoustic signal
sounds in addition to the LED lighting up:
>While the hardtop is being operated, the
green LED lights up. It goes out as soon as
the top is fully opened or closed.
>If the red LED flashes when you release the
switch, the opening or closing action has
not yet finished.>If the red LED lights up when the switch is
pressed, the cargo area partition is folded
up, the luggage compartment lid is not
closed, the vehicle is standing on a strong
incline or there is a malfunction. The
retractable hardtop cannot be moved.
Interruption
The automatic sequence of movements is
interrupted if the switch for hardtop operation is
released. The sequence can be continued in
the desired direction by pushing or pulling the
switch.
Open or close the hardtop fully; other-
wise, there is a risk of injury or damage
when driving.
Do not interrupt and resume the closing proce-
dure several times in close succession as this
could damage the mechanism.<
If the hardtop is not fully opened or
closed, the luggage compartment lid can-
not be opened and the windows cannot be
moved.<
Convenient operation with remote
control or via door lock
Refer to pages30 and31.
Wind deflector*
The wind deflector keeps air movements in the
passenger compartment to a minimum when
the hardtop is open and provides an even more
comfortable ride, particularly at high speeds.
Page 42 of 254

Opening and closing
40
Installation
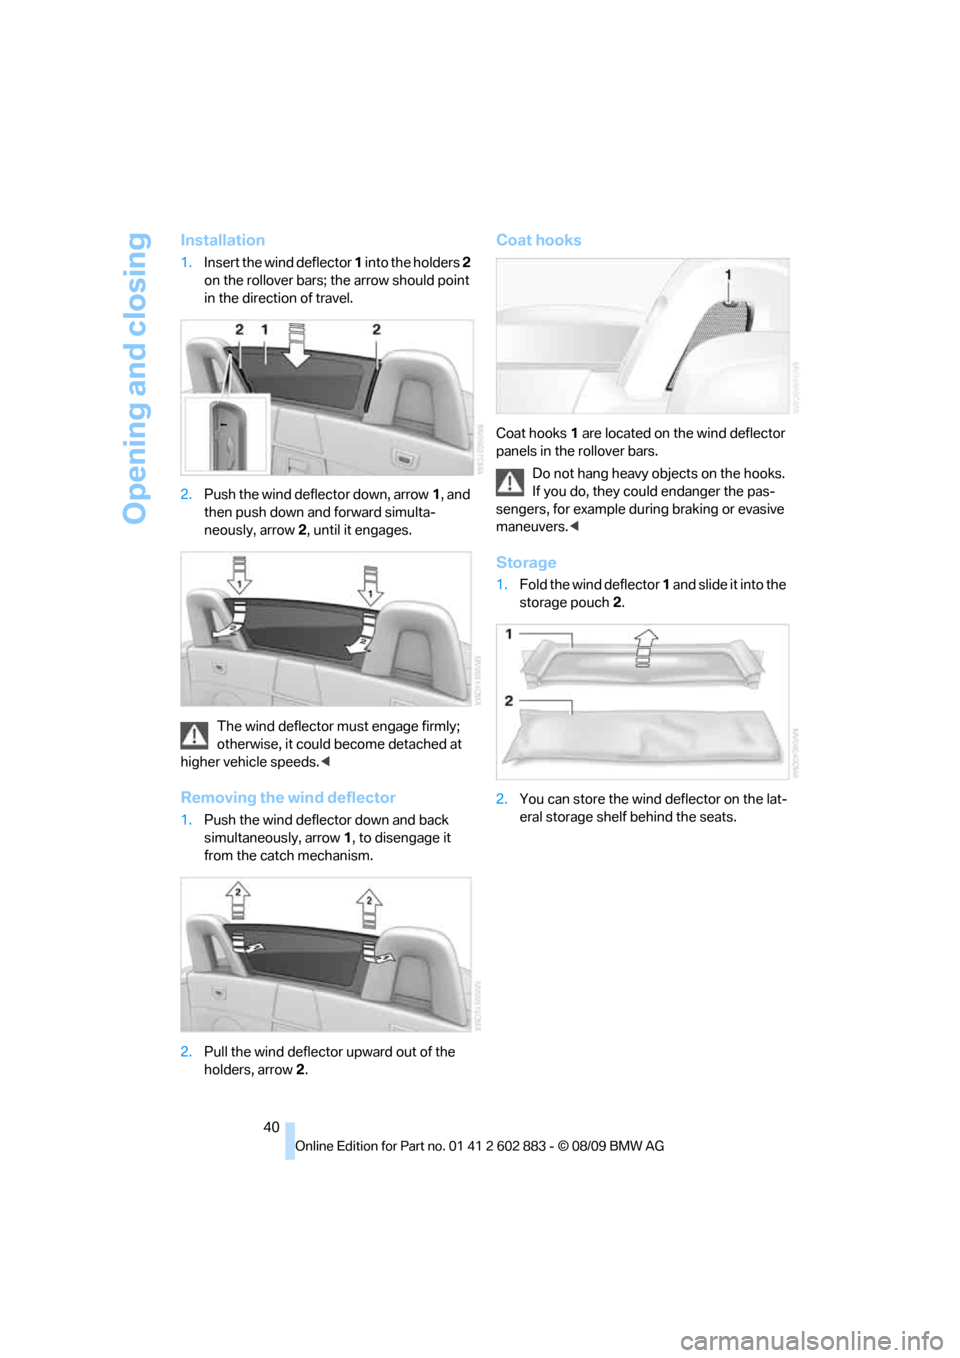
1.Insert the wind deflector 1 into the holders 2
on the rollover bars; the arrow should point
in the direction of travel.
2.Push the wind deflector down, arrow1, and
then push down and forward simulta-
neously, arrow 2, until it engages.
The wind deflector must engage firmly;
otherwise, it could become detached at
higher vehicle speeds.<
Removing the wind deflector
1.Push the wind deflector down and back
simultaneously, arrow 1, to disengage it
from the catch mechanism.
2.Pull the wind deflector upward out of the
holders, arrow 2.
Coat hooks
Coat hooks1 are located on the wind deflector
panels in the rollover bars.
Do not hang heavy objects on the hooks.
If you do, they could endanger the pas-
sengers, for example during braking or evasive
maneuvers.<
Storage
1.Fold the wind deflector 1 and slide it into the
storage pouch 2.
2.You can store the wind deflector on the lat-
eral storage shelf behind the seats.
Page 99 of 254

Controls
97Reference
At a glance
Driving tips
Communications
Navigation
Entertainment
Mobility
Switching the cooling function on
and off
The cooling function cools and
dehumidifies the incoming air
before reheating it as required,
according to the temperature set-
ting. This function is only available while the
engine is running.
The cooling function helps prevent condensa-
tion on the windows or removes it quickly.
Depending on the weather, the windshield may
fog over briefly when the engine is started.
The cooling function is automatically switched
on along with the AUTO program.
Maximum cooling
Maximum cooling is achieved most
quickly at outside temperatures
above 327/06 and when the
engine is running.
The automatic climate control goes into recir-
culated-air mode at the lowest temperature. Air
flows at maximum rate from the vents for the
upper body area. You should therefore open the
vents for maximum cooling.
AUTO program
The AUTO program automatically adjusts the
air distribution to the windshield and side win-
dows, towards the upper body area, and into the
footwell and knee area.
The air flow rate and air distribution, in addition
to your temperature specifications, will be
adapted to outside influences as a result of sea-
sonal changes, e.g., sunlight or window con-
densation.
The cooling is switched on automatically with
the AUTO program.
Switching on/off
Press the button.
Manual air distribution and air flow rate are acti-
vated when the AUTO program is deactivated.
AUTO program climate level
The climate levels can be used to vary the inten-
sity when the AUTO program is switched on.
For example, air flow is adjusted automatically
to optimize climate control.
When the AUTO program is
switched on, you can select the cli-
mate level of the AUTO program
using the buttons for controlling the manual air
flow rate.
The selected climate level is displayed by
an LED.
Convertible program
When the hardtop is open, the convertible pro-
gram is activated as well. In the convertible pro-
gram, the automatic climate control is opti-
mized for driving with the hardtop open. In
addition, the air flow rate is increased as vehicle
speed increases.
The effectiveness of the convertible pro-
gram can be enhanced considerably by
installing the wind deflector.<
Adjusting air flow rate manually
Press the left side of the button to
reduce air flow. Press the right side
of the button to increase it.
The air flow rate may be reduced to save battery
power. The display remains the same.
Switching the system on/off
With the blower at its lowest setting, press the
left side of the button to switch off the auto-
matic climate control. All displays are cleared
except for the rear window defroster if it is
switched on.
Press any button except the rear window
defroster to reactivate the automatic climate
control.
Page 217 of 254

Mobility
215Reference
At a glance
Controls
Driving tips
Communications
Navigation
Entertainment
2.Pull out the bulb holder, see arrow, and
change the bulb.
3.Attach the bulb holder.
4.Reattach the cover.
License plate lamp, rear lamp, center
brake lamp and turn signal
These lamps use LED technology for operation.
In the event of a malfunction, please contact
your BMW center or a workshop that works
according to BMW repair procedures with cor-
respondingly trained personnel.
Changing wheels
Your BMW is equipped with run-flat tires as
standard. This removes the need to change a
wheel immediately in the event of a puncture.
For information on continuing to drive with a
damaged tire, refer to Indication of a flat tire
on page81.
The symbol identifying run-flat tires is a circle
with the letters RSC on the sidewall, refer to
Run-flat tires, page199.
When mounting new tires or changing over
from summer to winter tires and vice versa,
mount run-flat tires for your own safety. In the
event of a flat, no spare wheel is available. Your
BMW center will be glad to advise you. Refer
also to New wheels and tires, page199.
The tools for changing wheels are avail-
able as optional accessories from your
BMW center.<
Jack mounting points
The jacking points are at the positions shown in
the illustration.
Lug bolt lock*
1Lug bolt for adapter
2Adapter, in onboard vehicle tool kit
Removing the wind deflector
1.Remove the adapter 2 from the onboard
vehicle tool kit and insert it in the lug bolt.
2.Unscrew the lug bolt1.
Remove the adapter after screwing the lug bolt
back on.
The code number is stamped on the front of the
adapter. Please note down this number and
keep it in a safe place in case the adapter should
get lost.
Page 252 of 254

Everything from A to Z
250 Voice, refer to Destination
guidance through voice
instructions132
Voice commands
– short commands229
– telephone178
Voice instructions from
navigation system132
– repeating132
– switching on/off132
– volume132
Voice phone book*179
Volume140
– audio sources140
– fuel tank, refer to
Capacities228
– mobile phone173
– voice instructions132
Volume balance, tone
setting142
W
Warning and indicator
lamps13Warning messages, refer to
Check Control73
Warning triangle219
Washer fluid61
– content of the reservoir61
Washer fluid reservoir61
Water on roads, refer to
Driving through water114
Water penetration208,209
Waveband on the radio143
Wear indicators in tires, refer
to Minimum tread depth198
Weights228
Welcome lamps88
Wheel/tire combination, refer
to Correct wheels and
tires199
Wheelbase, refer to
Dimensions227
Wheels, new199
Wheels and tires194
Width, refer to
Dimensions227
Wind deflector39
Windows36
– convenient operation30
– opening, closing37
– pinch protection system37
Windows, defrosting, refer to
Defrosting windows95
Windows, defrosting and
defogging
– air conditioner95
Windows, indicator on Control
Display16
Windshield
– cleaning61
– defrosting and defogging95
Windshield, defrosting, refer
to Defrosting windows95
Windshield wash60
– filling capacity, reservoir228
– nozzles61
– reservoir for washer fluid61
– washer fluid61
Windshield wiper blades,
changing212
Windshield wipers, refer to
Wiper system60Winter tires200
– storage200
Wiper blade replacement212
Wiper system60
Word-matching principle for
navigation129
Work in the engine
compartment201
Wrench/screwdriver, refer to
Onboard vehicle tool kit212
X
Xenon lamps
– replacing bulbs213
Y
Your individual vehicle
– settings, refer to Personal
Profile28