2010 BMW Z4 ROADSTER SDRIVE35I light
[x] Cancel search: lightPage 98 of 254
Climate
96
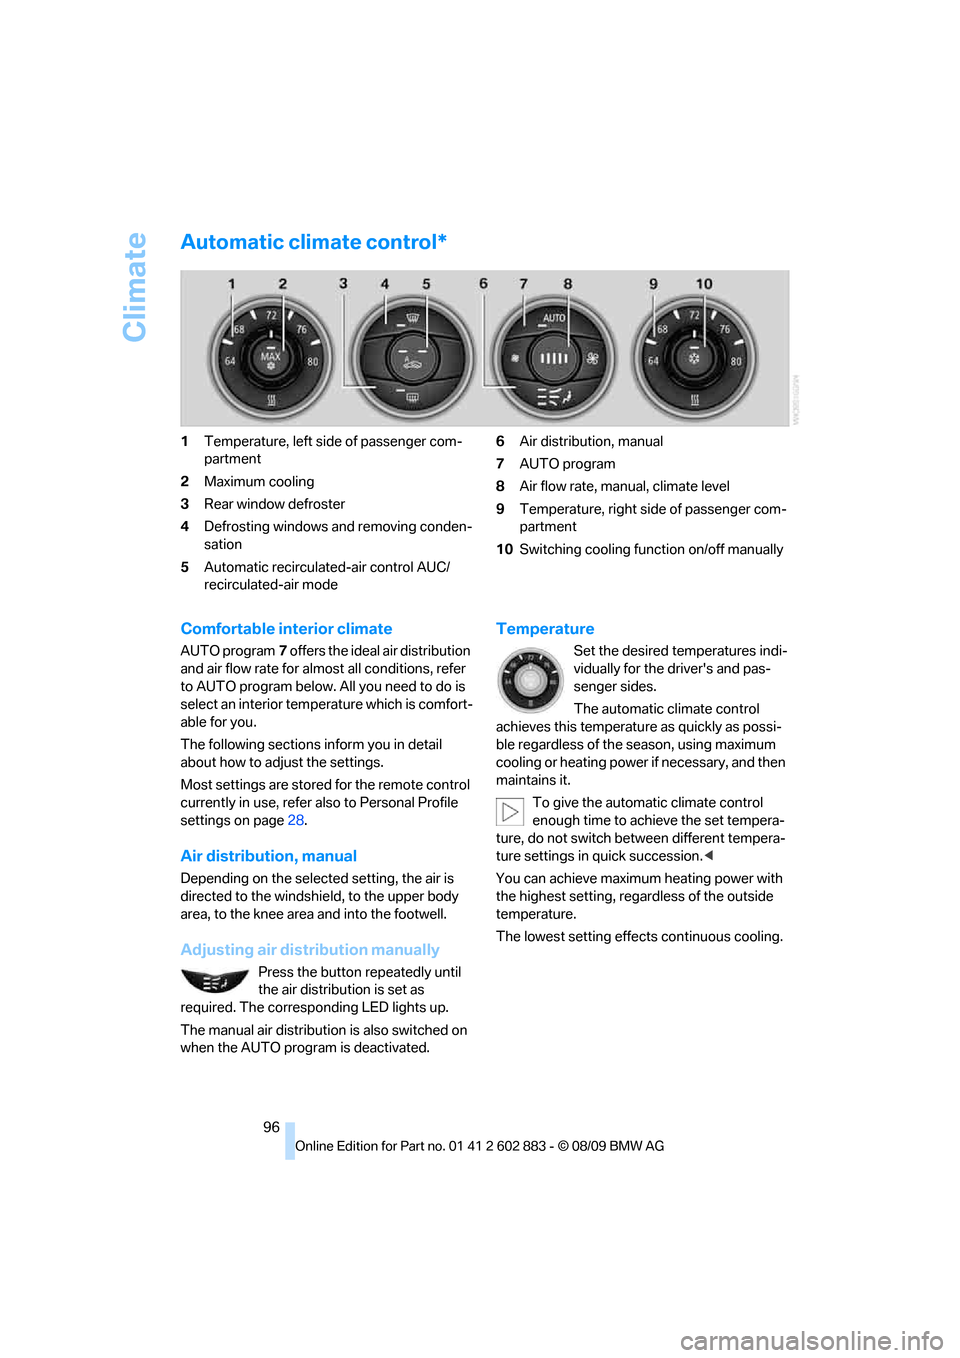
Automatic climate control*
1Temperature, left side of passenger com-
partment
2Maximum cooling
3Rear window defroster
4Defrosting windows and removing conden-
sation
5Automatic recirculated-air control AUC/
recirculated-air mode6Air distribution, manual
7AUTO program
8Air flow rate, manual, climate level
9Temperature, right side of passenger com-
partment
10Switching cooling function on/off manually
Comfortable interior climate
AUTO program7 offers the ideal air distribution
and air flow rate for almost all conditions, refer
to AUTO program below. All you need to do is
select an interior temperature which is comfort-
able for you.
The following sections inform you in detail
about how to adjust the settings.
Most settings are stored for the remote control
currently in use, refer also to Personal Profile
settings on page28.
Air distribution, manual
Depending on the selected setting, the air is
directed to the windshield, to the upper body
area, to the knee area and into the footwell.
Adjusting air distribution manually
Press the button repeatedly until
the air distribution is set as
required. The corresponding LED lights up.
The manual air distribution is also switched on
when the AUTO program is deactivated.
Temperature
Set the desired temperatures indi-
vidually for the driver's and pas-
senger sides.
The automatic climate control
achieves this temperature as quickly as possi-
ble regardless of the season, using maximum
cooling or heating power if necessary, and then
maintains it.
To give the automatic climate control
enough time to achieve the set tempera-
ture, do not switch between different tempera-
ture settings in quick succession.<
You can achieve maximum heating power with
the highest setting, regardless of the outside
temperature.
The lowest setting effects continuous cooling.
Page 99 of 254
Controls
97Reference
At a glance
Driving tips
Communications
Navigation
Entertainment
Mobility
Switching the cooling function on
and off
The cooling function cools and
dehumidifies the incoming air
before reheating it as required,
according to the temperature set-
ting. This function is only available while the
engine is running.
The cooling function helps prevent condensa-
tion on the windows or removes it quickly.
Depending on the weather, the windshield may
fog over briefly when the engine is started.
The cooling function is automatically switched
on along with the AUTO program.
Maximum cooling
Maximum cooling is achieved most
quickly at outside temperatures
above 327/06 and when the
engine is running.
The automatic climate control goes into recir-
culated-air mode at the lowest temperature. Air
flows at maximum rate from the vents for the
upper body area. You should therefore open the
vents for maximum cooling.
AUTO program
The AUTO program automatically adjusts the
air distribution to the windshield and side win-
dows, towards the upper body area, and into the
footwell and knee area.
The air flow rate and air distribution, in addition
to your temperature specifications, will be
adapted to outside influences as a result of sea-
sonal changes, e.g., sunlight or window con-
densation.
The cooling is switched on automatically with
the AUTO program.
Switching on/off
Press the button.
Manual air distribution and air flow rate are acti-
vated when the AUTO program is deactivated.
AUTO program climate level
The climate levels can be used to vary the inten-
sity when the AUTO program is switched on.
For example, air flow is adjusted automatically
to optimize climate control.
When the AUTO program is
switched on, you can select the cli-
mate level of the AUTO program
using the buttons for controlling the manual air
flow rate.
The selected climate level is displayed by
an LED.
Convertible program
When the hardtop is open, the convertible pro-
gram is activated as well. In the convertible pro-
gram, the automatic climate control is opti-
mized for driving with the hardtop open. In
addition, the air flow rate is increased as vehicle
speed increases.
The effectiveness of the convertible pro-
gram can be enhanced considerably by
installing the wind deflector.<
Adjusting air flow rate manually
Press the left side of the button to
reduce air flow. Press the right side
of the button to increase it.
The air flow rate may be reduced to save battery
power. The display remains the same.
Switching the system on/off
With the blower at its lowest setting, press the
left side of the button to switch off the auto-
matic climate control. All displays are cleared
except for the rear window defroster if it is
switched on.
Press any button except the rear window
defroster to reactivate the automatic climate
control.
Page 102 of 254
Practical interior accessories
100
Practical interior accessories
Integrated universal remote
control*
The concept
The integrated universal remote control can
replace as many as three hand-held transmit-
ters for various remote-controlled devices,
such as garage doors and gates or lighting sys-
tems. The integrated universal remote control
registers and stores signals from the original
hand-held transmitters.
The signal of an original hand-held transmitter
can be programmed on one of the three mem-
ory buttons1. After this, the programmed
memory button1 will operate the system in
question. The LED2 flashes to confirm trans-
mission of the signal.
Should you sell your vehicle one day, be sure to
delete the stored programs beforehand for your
safety, refer to page101.
To prevent possible damage or injury,
before programming or using the inte-
grated universal remote control, always inspect
the immediate area to make certain that no peo-
ple, animals or objects are within the pivoting or
travel range of the device being operated. Com-
ply also with the safety instructions supplied
with the original hand-held transmitter.<
Checking compatibility
If this symbol appears on the package
or in the instructions supplied with the
original hand-held transmitter, you can
assume that the radio remote control device will
be compatible with the integrated universal
remote control.For additional information, please contact your
BMW center or call: 1-800-355-3515.
You can also obtain information on the
Internet at:
www.bmwusa.com or
www.homelink.com.
HomeLink is a registered trademark of Johnson
Controls, Inc.<
Programming
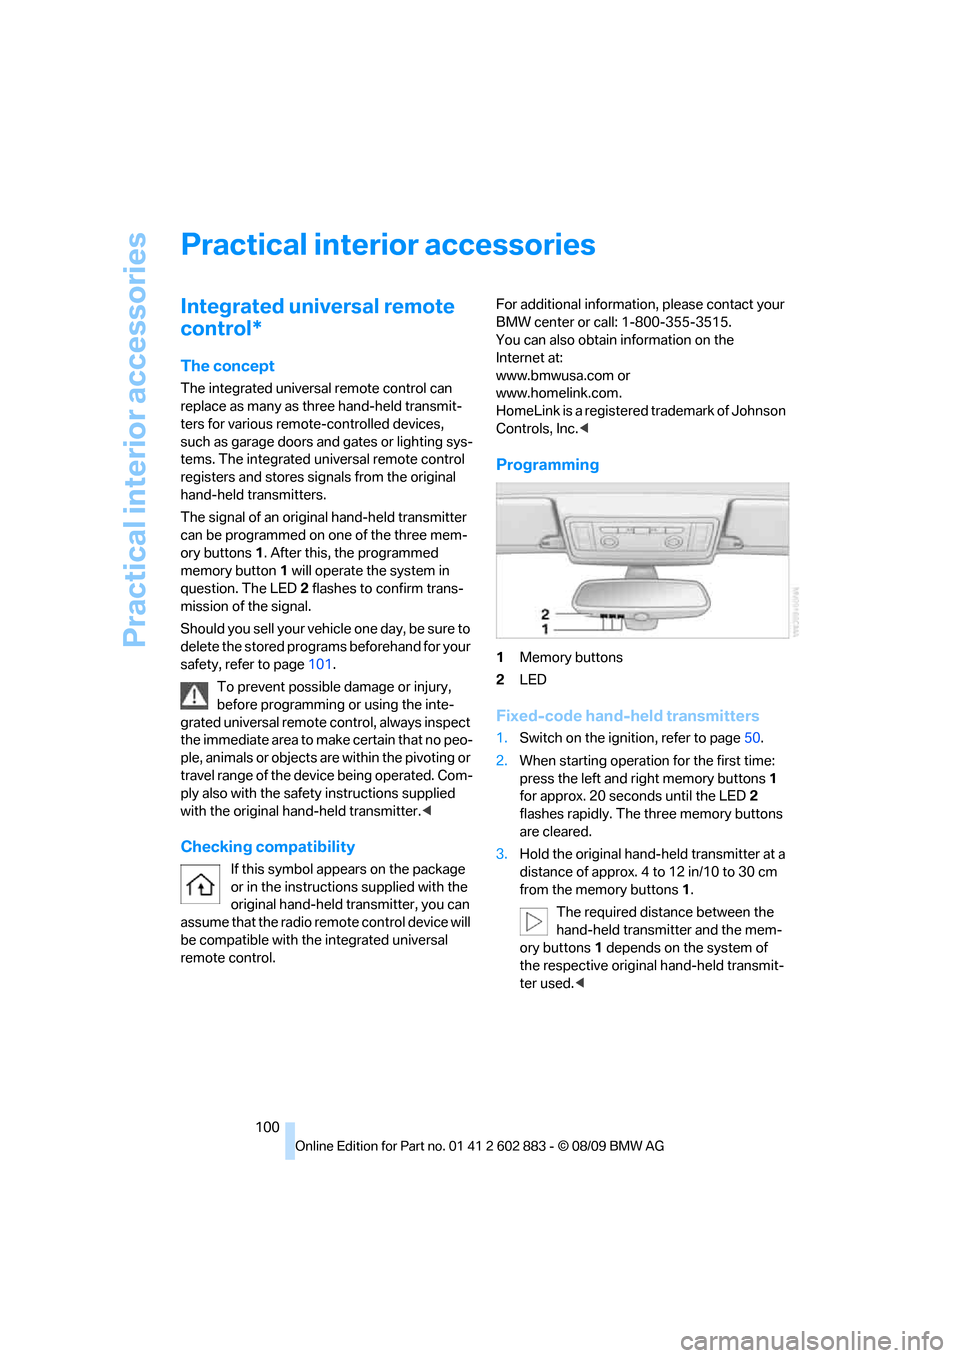
1Memory buttons
2LED
Fixed-code hand-held transmitters
1.Switch on the ignition, refer to page50.
2.When starting operation for the first time:
press the left and right memory buttons1
for approx. 20 seconds until the LED2
flashes rapidly. The three memory buttons
are cleared.
3.Hold the original hand-held transmitter at a
distance of approx. 4 to 12 in/10 to 30 cm
from the memory buttons1.
The required distance between the
hand-held transmitter and the mem-
ory buttons1 depends on the system of
the respective original hand-held transmit-
ter used.<
Page 105 of 254

Controls
103Reference
At a glance
Driving tips
Communications
Navigation
Entertainment
Mobility
Calibrating the digital compass
The digital compass must be calibrated in the
following situations:
>An incorrect compass direction is shown.
>The compass direction shown does not
change although the direction of
travel does.
>Not all compass directions are shown.
Procedure
1.Make sure that no large metal objects or
overhead power lines are in the vicinity of
your vehicle and that you have enough
space to drive in a circle.
2.Set the currently valid compass zone.
3.Ensure that the retractable hardtop is fully
closed.
4.Press the adjustment button for approx.
6-7 seconds to call up C. Drive at least one
full circle at a maximum speed of 7 km/h.
After the system is calibrated correctly, dis-
play C is replaced by the compass direc-
tions.
5.Open the retractable hardtop fully and
repeat step 4.
Setting right-hand/left-hand steering
Your digital compass is factory-set to right-
hand or left-hand steering, in accordance with
your vehicle.
Setting the language
You can set the language of the display:
Press the adjustment button for approx.
12-13 seconds. Briefly press the adjustment
button again to switch between English, "E",
and German, "O".
The setting is automatically saved after approx.
10 seconds.
Glove compartment
Opening
Pull the handle, arrow2.
The light in the glove compartment comes on.
To prevent injury in the event of an acci-
dent while the vehicle is being driven,
close the glove compartment immediately
after use.<
Closing
Fold cover up.
Locking
Lock with a key, arrow1.
If you hand out the remote control without
the integrated key, such as at a hotel,
refer to page28, the glove compartment cannot
be unlocked.
USB interface for data transmission
Port for importing and exporting data on a USB
device, e.g., music collections, refer to
page158.
Page 107 of 254
Controls
105Reference
At a glance
Driving tips
Communications
Navigation
Entertainment
Mobility
Removing the storage compartment
The storage compartment can be removed
completely to be able to use other inserts, for
example.
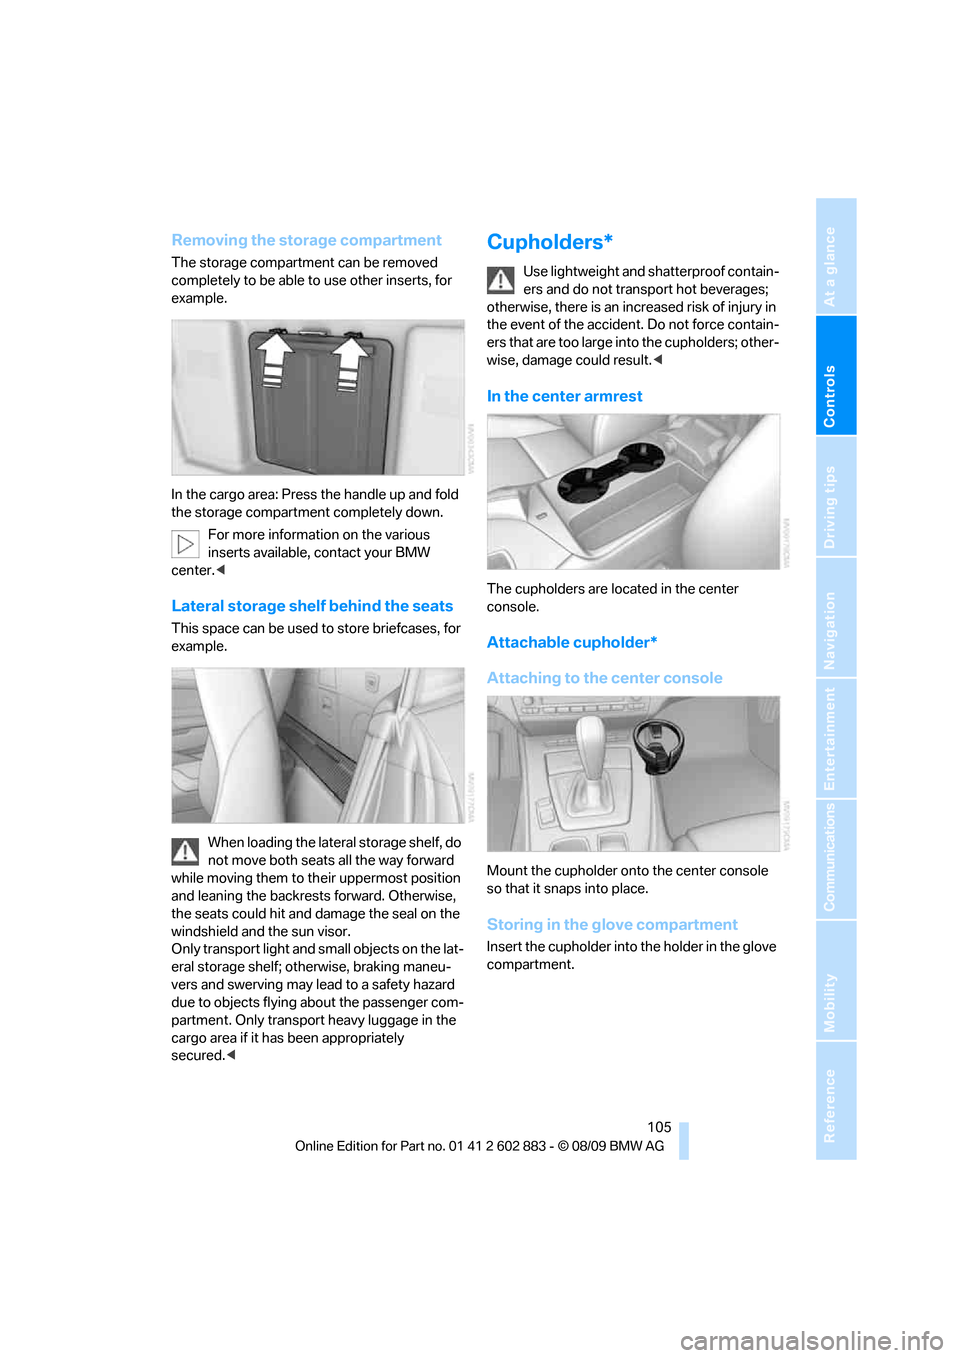
In the cargo area: Press the handle up and fold
the storage compartment completely down.
For more information on the various
inserts available, contact your BMW
center.<
Lateral storage shelf behind the seats
This space can be used to store briefcases, for
example.
When loading the lateral storage shelf, do
not move both seats all the way forward
while moving them to their uppermost position
and leaning the backrests forward. Otherwise,
the seats could hit and damage the seal on the
windshield and the sun visor.
Only transport light and small objects on the lat-
eral storage shelf; otherwise, braking maneu-
vers and swerving may lead to a safety hazard
due to objects flying about the passenger com-
partment. Only transport heavy luggage in the
cargo area if it has been appropriately
secured.<
Cupholders*
Use lightweight and shatterproof contain-
ers and do not transport hot beverages;
otherwise, there is an increased risk of injury in
the event of the accident. Do not force contain-
ers that are too large into the cupholders; other-
wise, damage could result.<
In the center armrest
The cupholders are located in the center
console.
Attachable cupholder*
Attaching to the center console
Mount the cupholder onto the center console
so that it snaps into place.
Storing in the glove compartment
Insert the cupholder into the holder in the glove
compartment.
Page 108 of 254
Practical interior accessories
106
Connecting electrical
appliances
Sockets
In your BMW, when the engine is running or the
ignition is switched on, you can use electrical
devices such as a flashlight, car vacuum
cleaner, etc., up to approx. 200 watts at
12 volts, as long as one of the following sockets
is available. Avoid damaging the sockets by
attempting to insert plugs of unsuitable shape
or size.
Cigarette lighter socket*
To access the socket: take the cigarette lighter
out of the socket.
Under the center armrest
External audio device, refer to page104.
In the passenger footwell*
A socket is located on the left below the glove
compartment.
Cargo area
Depending on your vehicle's equipment, the
following storage spaces can be found in the
cargo area:
>Rubber band
* for securing light objects
>Storage compartment
To open: turn the lock to the left, see arrow,
and fold the cover up.
Enlarging the cargo area
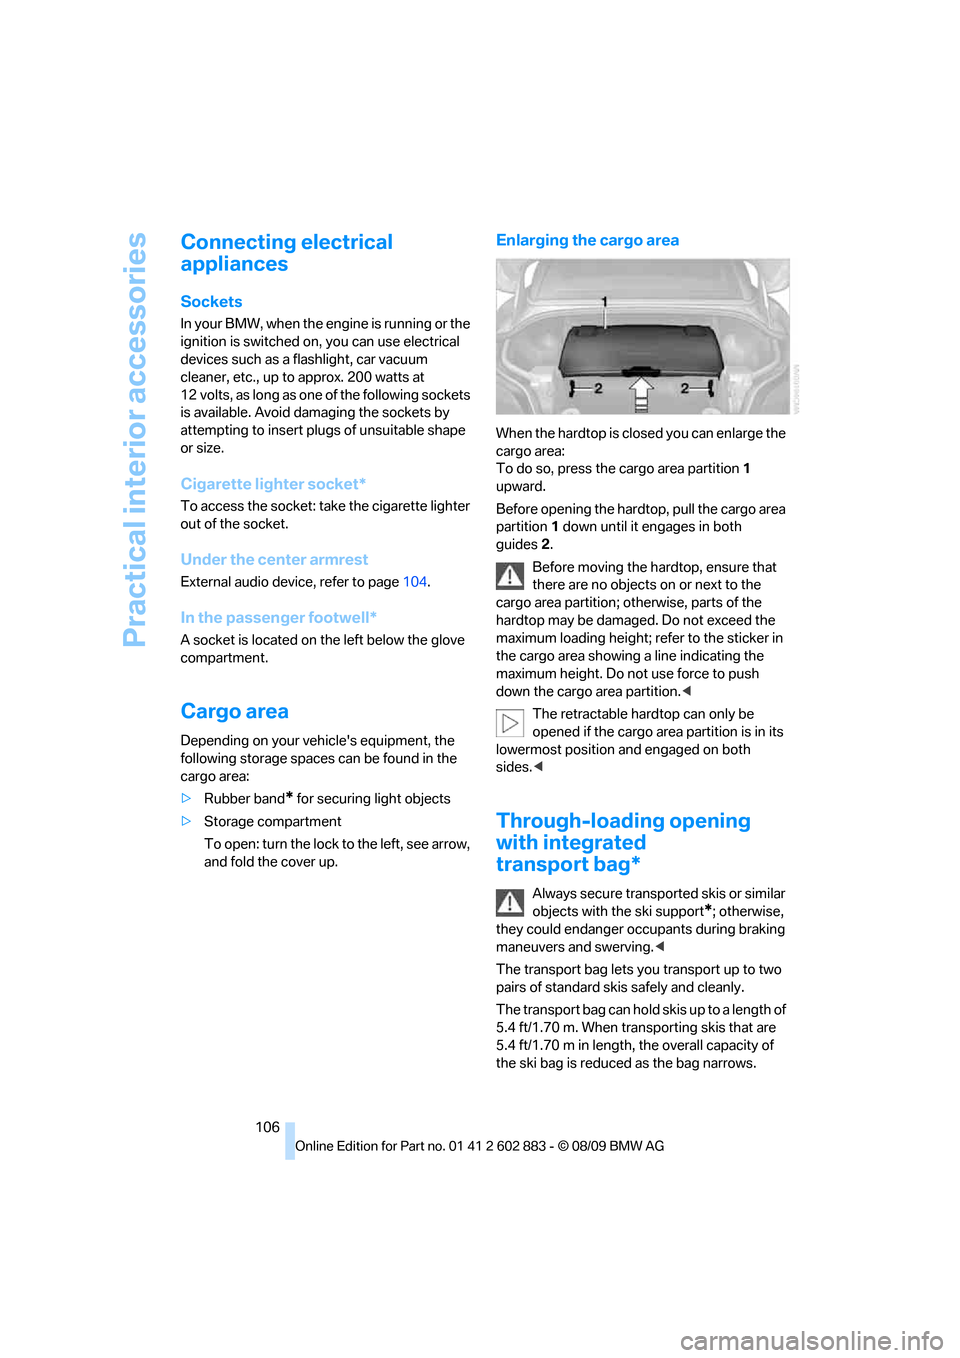
When the hardtop is closed you can enlarge the
cargo area:
To do so, press the cargo area partition 1
upward.
Before opening the hardtop, pull the cargo area
partition 1 down until it engages in both
guides2.
Before moving the hardtop, ensure that
there are no objects on or next to the
cargo area partition; otherwise, parts of the
hardtop may be damaged. Do not exceed the
maximum loading height; refer to the sticker in
the cargo area showing a line indicating the
maximum height. Do not use force to push
down the cargo area partition.<
The retractable hardtop can only be
opened if the cargo area partition is in its
lowermost position and engaged on both
sides.<
Through-loading opening
with integrated
transport bag*
Always secure transported skis or similar
objects with the ski support
*; otherwise,
they could endanger occupants during braking
maneuvers and swerving.<
The transport bag lets you transport up to two
pairs of standard skis safely and cleanly.
The transport bag can hold skis up to a length of
5.4 ft/1.70 m. When transporting skis that are
5.4 ft/1.70 m in length, the overall capacity of
the ski bag is reduced as the bag narrows.
Page 115 of 254
Driving tips
113Reference
At a glance
Controls
Communications
Navigation
Entertainment
Mobility
Drive defensively
Avoid unnecessary acceleration and braking
maneuvers. To do so, keep an adequate
distance to the forward vehicle. A defensive
and smooth driving style keeps fuel consump-
tion down.
Avoid high engine speeds
Only use first gear when setting off. In second
and higher gears, accelerate without hesitation
or pauses. When accelerating, shift up before
reaching high engine speeds.
When you reach the desired speed, shift into
the highest applicable gear and drive with the
engine speed as low as possible and at a con-
stant speed.
As a rule: driving at low engine speeds lowers
fuel consumption and reduces wear.
Coasting
When approaching a red light, take your foot off
the accelerator and coast to a stop in the high-
est applicable gear.
On a downhill slope, take your foot off the accel-
erator and coast in a suitable gear.
The fuel supply is interrupted when coasting.
Switch off the engine during lengthy
stops
Switch off the engine when stopping for lengthy
periods, e.g., at traffic lights, railroad crossings
or in traffic congestion. You achieve fuel sav-
ings even if standing time is as short as approx.
4 seconds.
Switch off functions you do not need at
the moment
Functions such as the air conditioner and the
seat or rear window heating draw large amounts
of power and consume additional fuel. Espe-
cially in city traffic and in stop-and-go driving
they have a considerable impact. Therefore,
switch these functions off when they are not
really needed.
Have the vehicle serviced
Have the vehicle serviced regularly to achieve
good economy and a long vehicle life. BMW
recommends having the vehicle serviced at a
BMW center. Also note the BMW service sys-
tem, refer to page206.
General driving notes
Close the luggage compartment lid
Operate the vehicle only when the lug-
gage compartment lid is closed. Other-
wise, exhaust fumes could enter the interior of
the vehicle.<
If the vehicle must be driven with the luggage
compartment lid open:
1.Close all windows.
2.Greatly increase the air volume of the
automatic climate control system, refer
to page97.
Hot exhaust system
In all vehicles, extremely high tempera-
tures are generated in the exhaust sys-
tem. Do not remove the heat shields installed
adjacent to various sections of the exhaust sys-
tem, and never apply undercoating to them.
When driving, standing at idle and while park-
ing, take care to avoid possible contact
between the hot exhaust system and any highly
flammable materials such as hay, leaves, grass,
etc. Such contact could lead to a fire, with the
risk of serious personal injuries and property
damage. Do not touch hot exhaust tail pipes.
Otherwise, there is a risk of burns.<
Hydroplaning
When driving on wet or slushy roads,
reduce road speed. If you do not, a wedge
of water can form between tires and road sur-
face. This situation, known as hydroplaning,
means that the tire can completely lose contact
with the road surface, so that neither the car can
be steered nor the brake be properly applied.<
Page 116 of 254
Things to remember when driving
114 The risk of hydroplaning increases with declin-
ing tread depth on the tires, refer also to Mini-
mum tread depth on page198.
Driving through water
Drive though calm water only if it is not
deeper than 1 ft/25 cm and at this height
no faster than walking speed, up to 6 mph/
10 km/h. Otherwise, the vehicle's engine, the
electrical systems and the transmission may be
damaged.<
Use the parking brake on inclines
On inclines, do not hold the vehicle for a
lengthy period using the clutch; use the
parking brake instead. Otherwise, greater
clutch wear will result.<
For more information about the drive-off assis-
tant, refer to page80.
Braking safely
Your BMW is equipped with ABS as a standard
feature. Applying the brakes fully is the most
effective way of braking in situations in which
this is necessary. Since the vehicle maintains
steering responsiveness, you can still avoid
possible obstacles with a minimum of steering
effort.
Pulsation of the brake pedal, combined with
sounds from the hydraulic circuits, indicate that
ABS is in its active mode.
Driving in wet conditions
When roads are wet or there is heavy rain,
briefly exert gentle pressure on the brake pedal
every few miles. Monitor traffic conditions to
ensure that this maneuver does not endanger
other road users. The heat generated in this
process helps dry the pads and rotors. Full
braking efficiency will then be available when
you need it.
Hills
To prevent overheating and the resulting
reduced efficiency of the brake system,
drive long or steep downhill gradients in the
gear in which the least braking is required. Even light but consistent brake pressure can lead to
high temperatures, brake wear and possibly
even brake failure.<
You can increase the engine's braking effect by
shifting down, all the way to first gear if neces-
sary. This strategy helps you avoid placing
excessive loads on the brake system. Down-
shifting in manual mode of the automatic trans-
mission, refer to page54.
7-gear sport automatic transmission with
dual clutch: Never drive with the trans-
mission in neutral or with the engine switched
off; otherwise, engine braking action will not be
present or there will be no power assistance to
the brakes or steering.
Manual transmission: Never drive with the
clutch held down, with the transmission in neu-
tral or with the engine switched off; otherwise,
engine braking action will not be present or
there will be no power assistance to the brakes
or steering.
Never allow floor mats, carpets or any other
objects to protrude into the area around the
pedals; otherwise, pedal function could be
impaired.<
Corrosion on brake rotors
When the vehicle is driven only occasionally,
during extended periods when the vehicle is not
used at all, and in operating conditions where
brake applications are less frequent, there is an
increased tendency for corrosion to form on
rotors, while contaminants accumulate on the
brake pads. This occurs because the minimum
pressure which must be exerted by the pads
during brake applications to clean the rotors is
not reached.
Should corrosion form on the brake rotors, the
brakes will tend to respond with a pulsating
effect that even extended application will fail
to cure.
When the vehicle is parked
Condensation forms while the automatic cli-
mate control is in operation, and then exits
under the vehicle. Traces of condensed water
under the vehicle are therefore normal.