2010 BMW 650I CONVERTIBLE light
[x] Cancel search: lightPage 139 of 252
Navigation
Driving tips
137Reference
At a glance
Controls
Communications
Entertainment
Mobility
Dynamic destination guidance
"Dynamic guidance" is switched on:
The route is automatically changed in the event
of traffic obstructions. The system does not
point out traffic obstructions along the original
route.
Depending on the type of road and the nature
and length of the traffic obstruction, the route
can also be calculated so that you travel
through the traffic obstruction.
1."Navigation"
2.Open "Options".
3."Dynamic guidance"
If the "Avoid highways", "Avoid toll roads"
or "Avoid ferries" route criteria are
selected, route calculation may take consider-
ably longer.<
Route
General information
Depending on the equipment in your vehicle,
different views of the route are available during
destination guidance:
>List of streets and towns/cities
>Map view, refer to page138
>Arrow view in the Head-up Display
*
Displaying a list of the streets or towns/
cities on the route
When destination guidance is started, a list of
the streets and towns/cities on the route is dis-
played. The driving distances and traffic bulle-
tins are displayed for each route section.
1."Navigation"
2."Route information"
3.Highlight a section.
The section is displayed in the preview map.
Bypassing a section of the route
During destination guidance, you can revise the
navigation system's route recommendations to
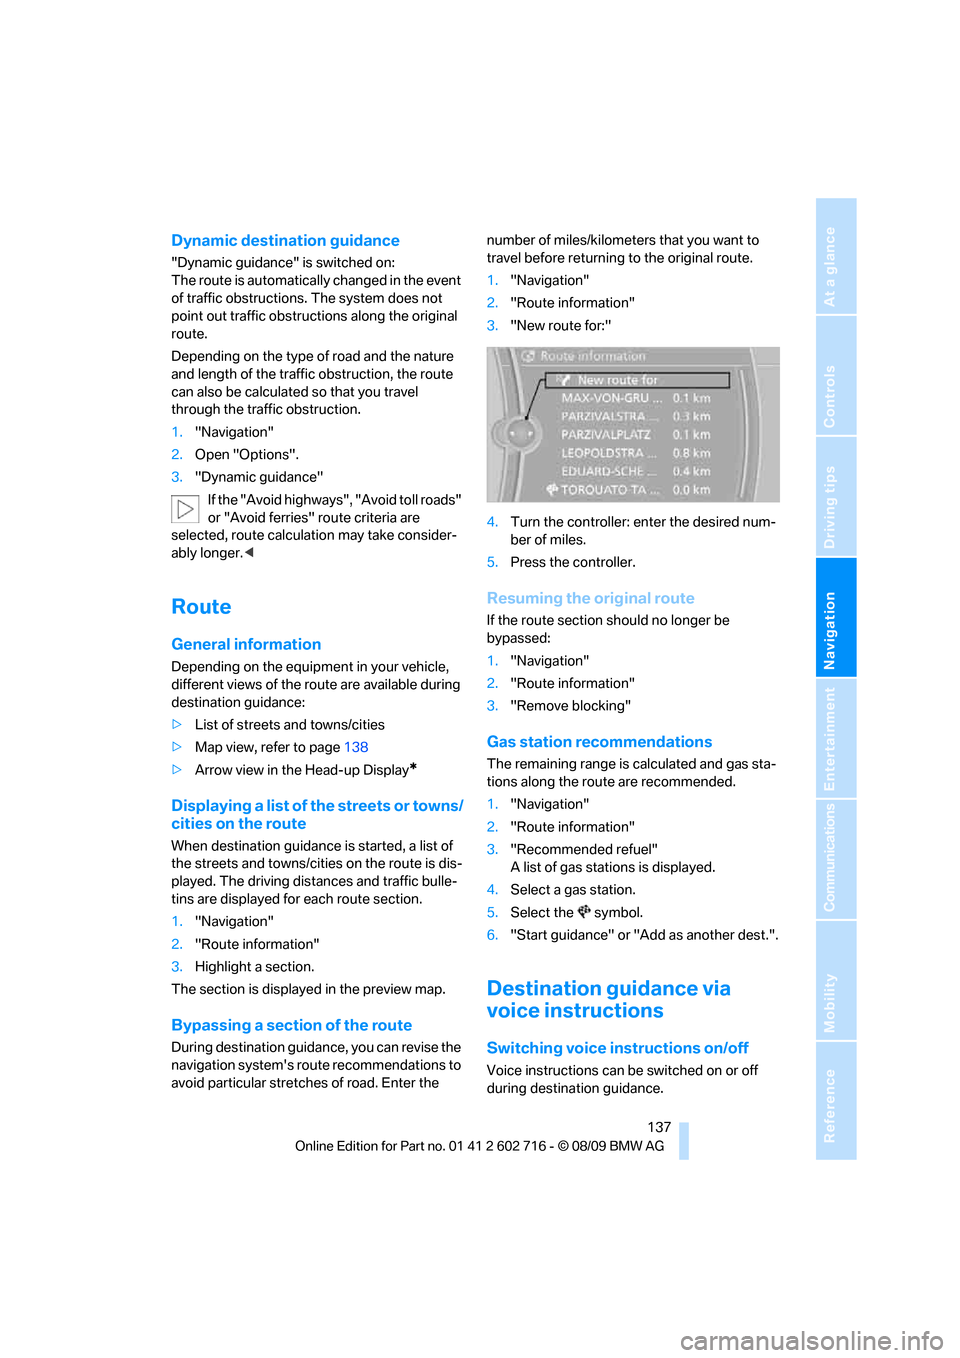
avoid particular stretches of road. Enter the number of miles/kilometers that you want to
travel before returning to the original route.
1."Navigation"
2."Route information"
3."New route for:"
4.Turn the controller: enter the desired num-
ber of miles.
5.Press the controller.
Resuming the original route
If the route section should no longer be
bypassed:
1."Navigation"
2."Route information"
3."Remove blocking"
Gas station recommendations
The remaining range is calculated and gas sta-
tions along the route are recommended.
1."Navigation"
2."Route information"
3."Recommended refuel"
A list of gas stations is displayed.
4.Select a gas station.
5.Select the symbol.
6."Start guidance" or "Add as another dest.".
Destination guidance via
voice instructions
Switching voice instructions on/off
Voice instructions can be switched on or off
during destination guidance.
Page 140 of 252
Destination guidance
138 1."Navigation"
2."Map"
3. Select the symbol.
For rapid access, the feature can be stored on a
programmable memory key, refer to page20.
Repeating a voice instruction
1."Navigation"
2."Map"
3. Highlight the symbol.
4.Press the controller twice.
Adjusting the volume of voice
instructions*
The volume can be adjusted only while a voice
instruction is being issued.
1.Repeat the last voice instruction, if neces-
sary.
2.Turn the knob during the voice instruction
to select the desired volume.
The setting is stored for the remote control cur-
rently in use.
Map display
Displaying map view
You can have your current position displayed on
a map. After starting the destination guidance,
the planned route is shown on the map.
1."Navigation"
2."Map"
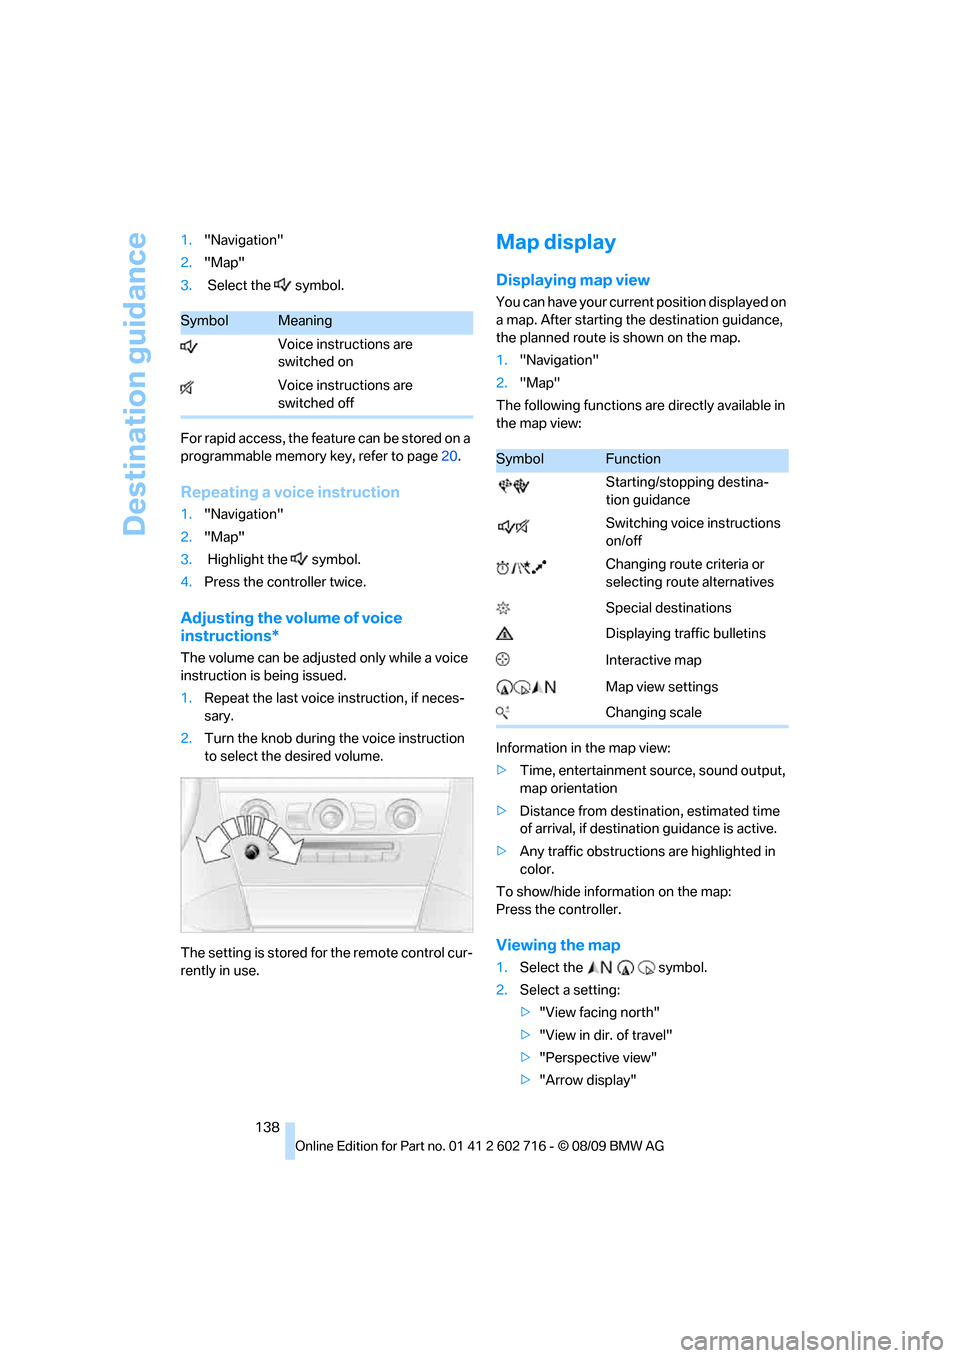
The following functions are directly available in
the map view:
Information in the map view:
>Time, entertainment source, sound output,
map orientation
>Distance from destination, estimated time
of arrival, if destination guidance is active.
>Any traffic obstructions are highlighted in
color.
To show/hide information on the map:
Press the controller.
Viewing the map
1.Select the symbol.
2.Select a setting:
>"View facing north"
>"View in dir. of travel"
>"Perspective view"
>"Arrow display"
SymbolMeaning
Voice instructions are
switched on
Voice instructions are
switched off
SymbolFunction
Starting/stopping destina-
tion guidance
Switching voice instructions
on/off
Changing route criteria or
selecting route alternatives
Special destinations
Displaying traffic bulletins
Interactive map
Map view settings
Changing scale
Page 141 of 252
Navigation
Driving tips
139Reference
At a glance
Controls
Communications
Entertainment
Mobility
3.Press the controller.
Changing the map section
Select the interactive map.
>To shift the map: move the controller in the
required direction.
>To shift the map diagonally: move the con-
troller in the required direction and turn it.
Changing the scale
1.Select the symbol.
2.Turn the controller to adjust the scale.
Automatic scaling of the map
In the map view facing north, turn the controller
in any direction until AUTO is displayed as the
map scale.
The map shows the entire range from your loca-
tion to the destination.
Settings for the map view
The map is shown on the Control Display.
1.Open "Options".
2."Settings"
3.Set the optimized map view.
>"Day/night mode"
Select and create the necessary settings
depending on the light conditions. When
the traffic bulletin map is activated, this
setting is disregarded.
>"Satellite images"
Satellite images
* are displayed depend-
ing on availability and resolution.
>"Perspective view in 3D"
Displays a spatial view. Prominent areas
that are contained in the navigation data
are displayed on the map in 3D.
>"Traffic Info map"
The map is optimized for displaying traf-
fic bulletins. Symbols for the special
destinations are no longer displayed.
Map view for the split screen display
The map view for the split screen can be
selected separately from the main screen.1.Open "Options".
2."Split screen"
The split screen is switched on.
3.Move the controller to the right repeatedly
until the split screen content is selected.
4.Select the map view:
>"Arrow display"
>"Map facing north"
>"Map direction of travel"
>"Map view with perspective"
>"Exit ramp view"
Changing the scale
1.Move the controller to the right until the
split screen is selected.
2.Turn the controller.
Traffic information*
You can display the traffic bulletins from radio
stations that broadcast the TMC (Traffic Mes-
sage Channel) of a traffic information service.
This information from the traffic information
service is continuously updated on the basis of
measurement data from traffic control centers
and information on traffic congestion.
During destination guidance, traffic bulletins
that are relevant to areas along the route are
automatically displayed and taken into account
in the route planning. You can open all traffic
bulletins manually via iDrive.
The traffic bulletins are shown in the map view.
Real Time Traffic Information End-User
Provisions
Certain BMW models equipped with navigation
have the capability to display real-time traffic
information. If your system has this capability
the following additional terms and conditions
apply:
An End-User shall no longer have the right to
use the Traffic Data in the event that the End-
User is in material breach of the terms and con-
ditions contained herein.
Page 155 of 252
Navigation
Entertainment
Driving tips
153Reference
At a glance
Controls
Communications
Mobility
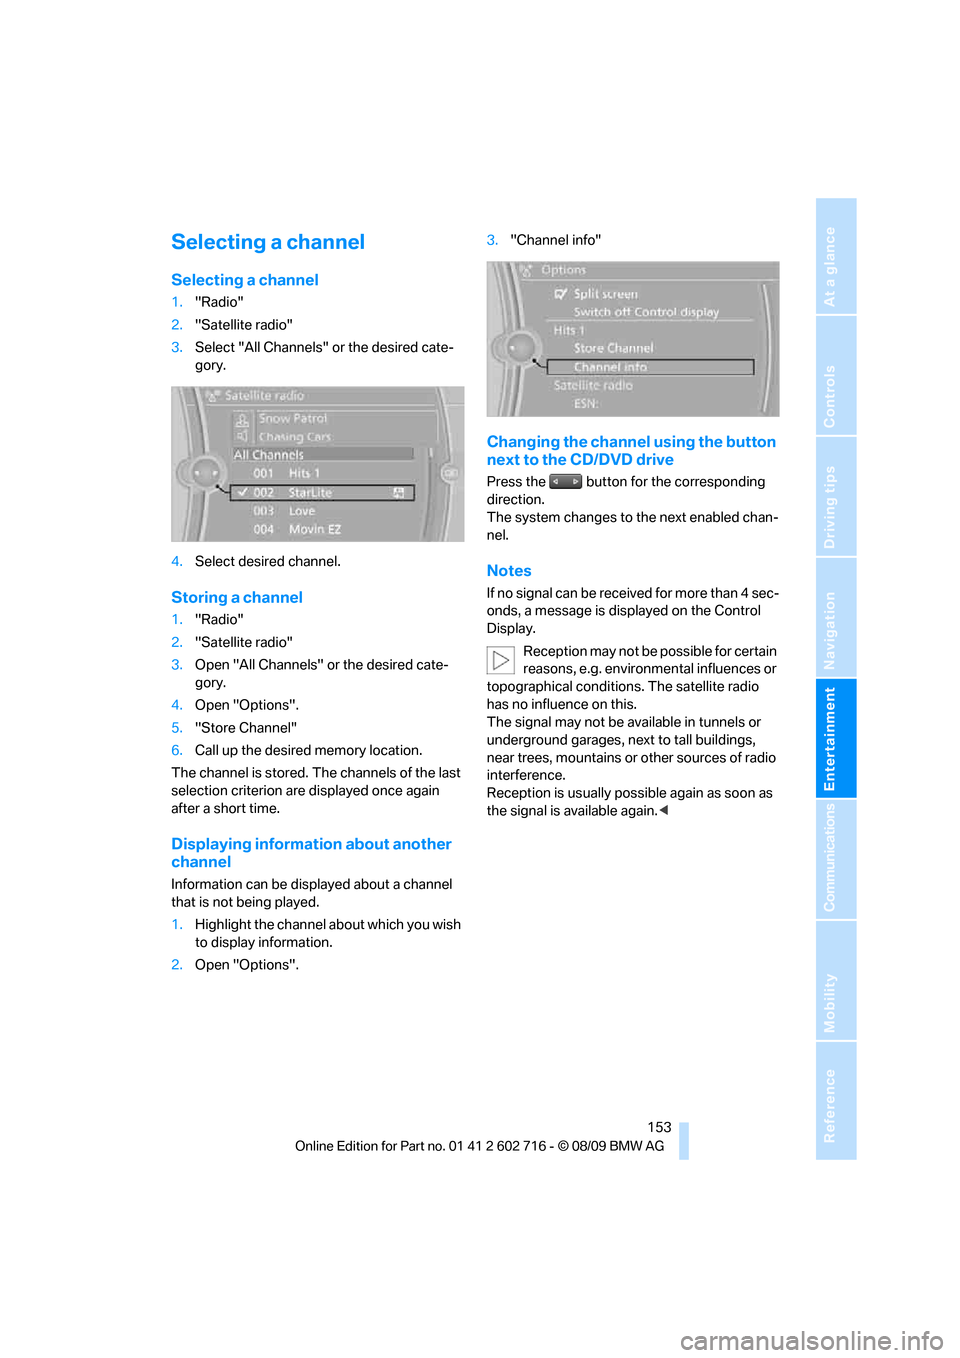
Selecting a channel
Selecting a channel
1."Radio"
2."Satellite radio"
3.Select "All Channels" or the desired cate-
gory.
4.Select desired channel.
Storing a channel
1."Radio"
2."Satellite radio"
3.Open "All Channels" or the desired cate-
gory.
4.Open "Options".
5."Store Channel"
6.Call up the desired memory location.
The channel is stored. The channels of the last
selection criterion are displayed once again
after a short time.
Displaying information about another
channel
Information can be displayed about a channel
that is not being played.
1.Highlight the channel about which you wish
to display information.
2.Open "Options".3."Channel info"
Changing the channel using the button
next to the CD/DVD drive
Press the button for the corresponding
direction.
The system changes to the next enabled chan-
nel.
Notes
If no signal can be received for more than 4 sec-
onds, a message is displayed on the Control
Display.
Reception may not be possible for certain
reasons, e.g. environmental influences or
topographical conditions. The satellite radio
has no influence on this.
The signal may not be available in tunnels or
underground garages, next to tall buildings,
near trees, mountains or other sources of radio
interference.
Reception is usually possible again as soon as
the signal is available again.<
Page 156 of 252
CD/DVD player and CD changer
154
CD/DVD player and CD changer
CD/DVD playback
Inserting a CD/DVD
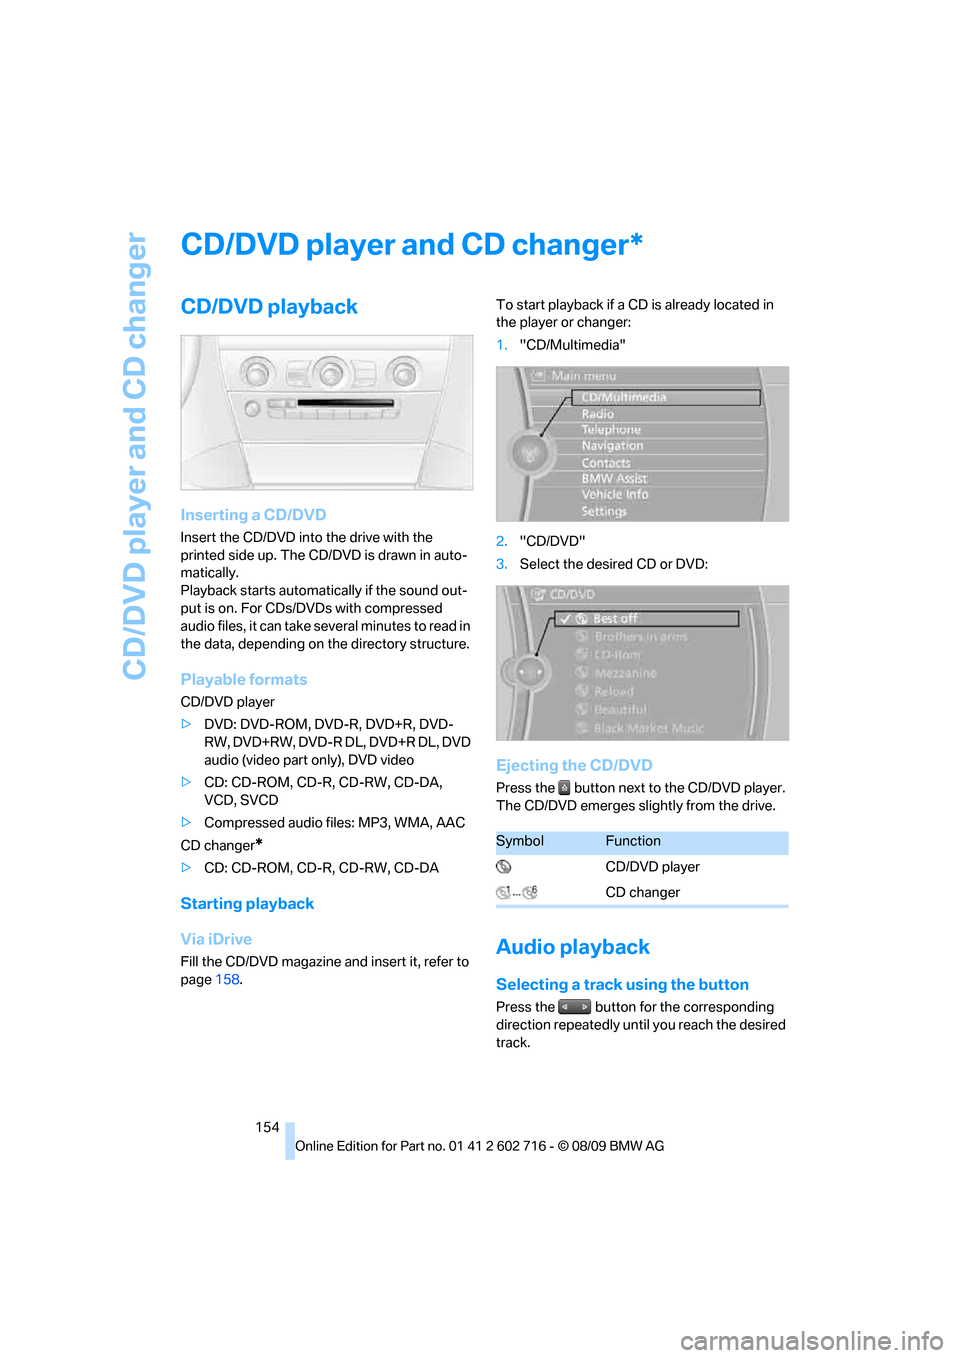
Insert the CD/DVD into the drive with the
printed side up. The CD/DVD is drawn in auto-
matically.
Playback starts automatically if the sound out-
put is on. For CDs/DVDs with compressed
audio files, it can take several minutes to read in
the data, depending on the directory structure.
Playable formats
CD/DVD player
>DVD: DVD-ROM, DVD-R, DVD+R, DVD-
RW, DVD+RW, DVD-R DL, DVD+R DL, DVD
audio (video part only), DVD video
>CD: CD-ROM, CD-R, CD-RW, CD-DA,
VCD, SVCD
>Compressed audio files: MP3, WMA, AAC
CD changer
*
>CD: CD-ROM, CD-R, CD-RW, CD-DA
Starting playback
Via iDrive
Fill the CD/DVD magazine and insert it, refer to
page158.To start playback if a CD is already located in
the player or changer:
1."CD/Multimedia"
2."CD/DVD"
3.Select the desired CD or DVD:
Ejecting the CD/DVD
Press the button next to the CD/DVD player.
The CD/DVD emerges slightly from the drive.
Audio playback
Selecting a track using the button
Press the button for the corresponding
direction repeatedly until you reach the desired
track.
*
SymbolFunction
CD/DVD player
CD changer
Page 161 of 252
Navigation
Entertainment
Driving tips
159Reference
At a glance
Controls
Communications
Mobility
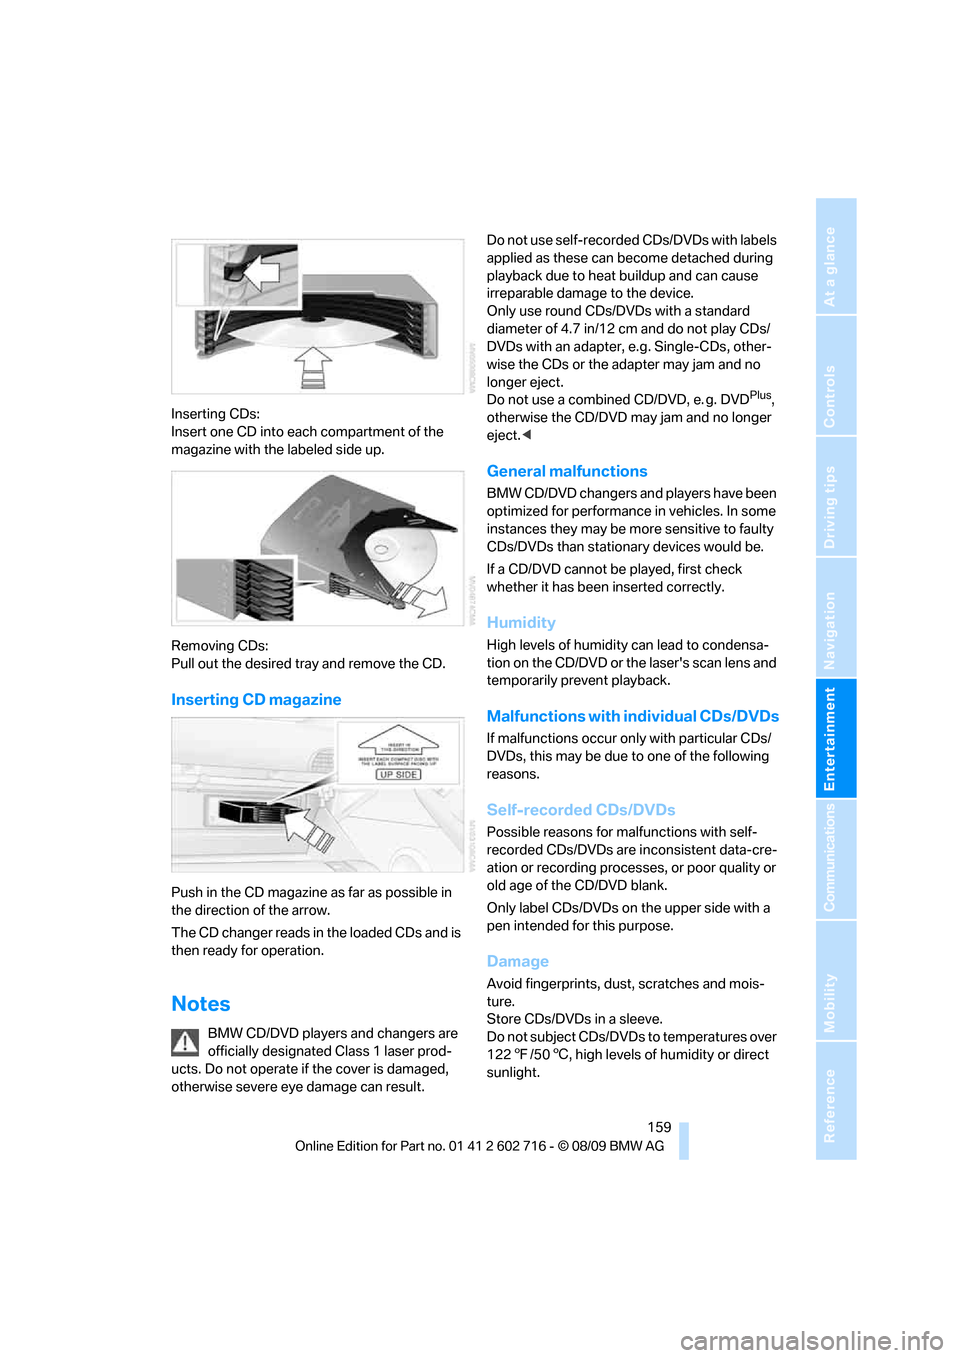
Inserting CDs:
Insert one CD into each compartment of the
magazine with the labeled side up.
Removing CDs:
Pull out the desired tray and remove the CD.
Inserting CD magazine
Push in the CD magazine as far as possible in
the direction of the arrow.
The CD changer reads in the loaded CDs and is
then ready for operation.
Notes
BMW CD/DVD players and changers are
officially designated Class 1 laser prod-
ucts. Do not operate if the cover is damaged,
otherwise severe eye damage can result.Do not use self-recorded CDs/DVDs with labels
applied as these can become detached during
playback due to heat buildup and can cause
irreparable damage to the device.
Only use round CDs/DVDs with a standard
diameter of 4.7 in/12 cm and do not play CDs/
DVDs with an adapter, e.g. Single-CDs, other-
wise the CDs or the adapter may jam and no
longer eject.
Do not use a combined CD/DVD, e. g. DVD
Plus,
otherwise the CD/DVD may jam and no longer
eject.<
General malfunctions
BMW CD/DVD changers and players have been
optimized for performance in vehicles. In some
instances they may be more sensitive to faulty
CDs/DVDs than stationary devices would be.
If a CD/DVD cannot be played, first check
whether it has been inserted correctly.
Humidity
High levels of humidity can lead to condensa-
tion on the CD/DVD or the laser's scan lens and
temporarily prevent playback.
Malfunctions with individual CDs/DVDs
If malfunctions occur only with particular CDs/
DVDs, this may be due to one of the following
reasons.
Self-recorded CDs/DVDs
Possible reasons for malfunctions with self-
recorded CDs/DVDs are inconsistent data-cre-
ation or recording processes, or poor quality or
old age of the CD/DVD blank.
Only label CDs/DVDs on the upper side with a
pen intended for this purpose.
Damage
Avoid fingerprints, dust, scratches and mois-
ture.
Store CDs/DVDs in a sleeve.
Do not subject CDs/DVDs to temperatures over
1227/506, high levels of humidity or direct
sunlight.
Page 166 of 252
Music collection
164 Depending on the album, the tracks or the
subdirectories of the album are displayed.
The first track is played automatically, if
possible.
4.To select tracks, change directories if
needed. To go up one level in the directory,
move the controller to the left.
Random play sequence
All tracks of the selection are played back in
random sequence.
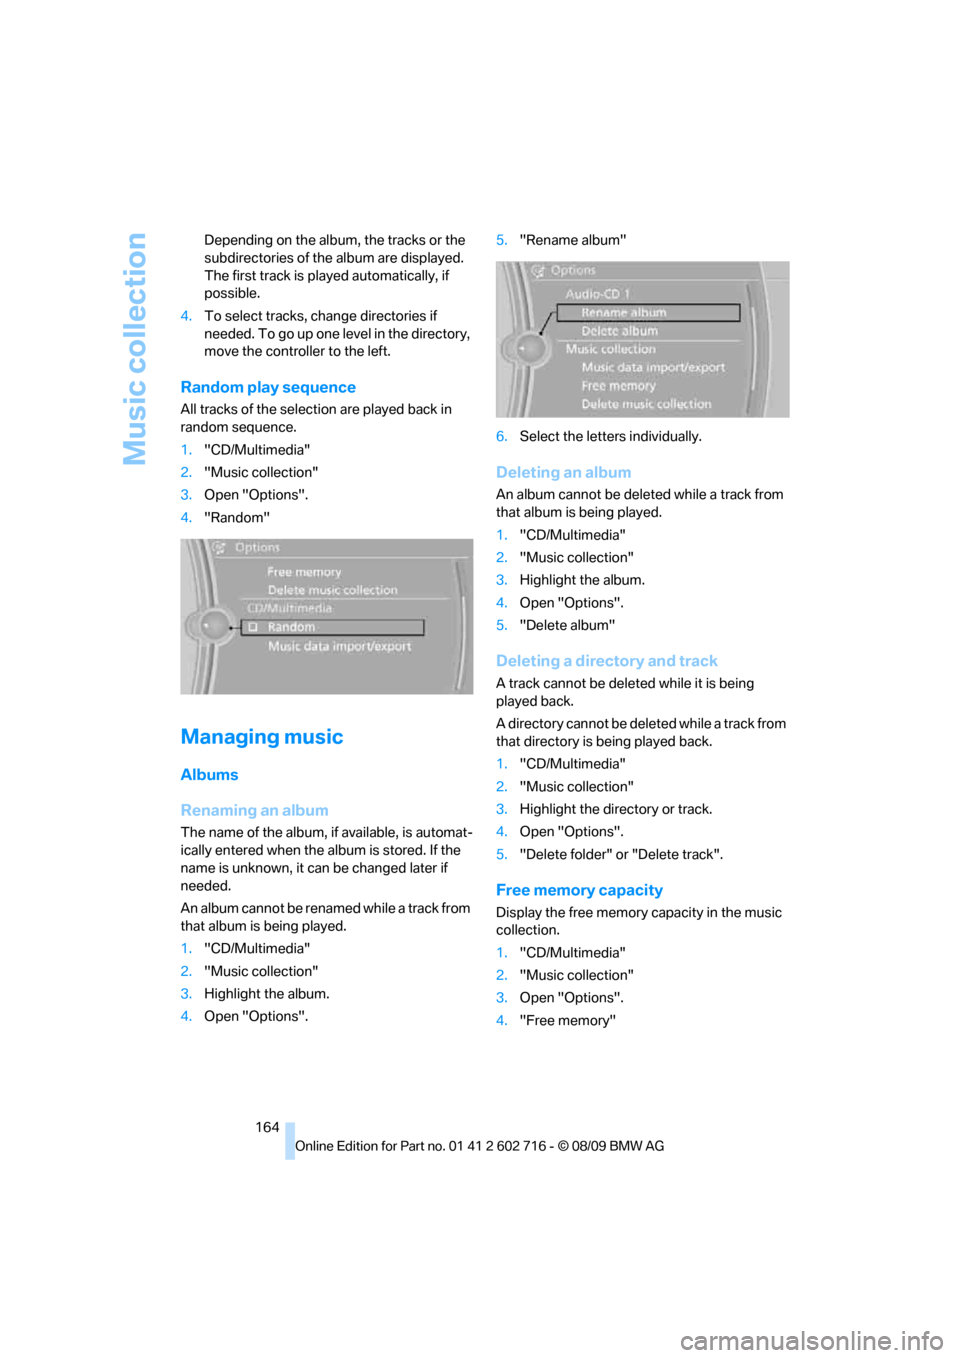
1."CD/Multimedia"
2."Music collection"
3.Open "Options".
4."Random"
Managing music
Albums
Renaming an album
The name of the album, if available, is automat-
ically entered when the album is stored. If the
name is unknown, it can be changed later if
needed.
An album cannot be renamed while a track from
that album is being played.
1."CD/Multimedia"
2."Music collection"
3.Highlight the album.
4.Open "Options".5."Rename album"
6.Select the letters individually.
Deleting an album
An album cannot be deleted while a track from
that album is being played.
1."CD/Multimedia"
2."Music collection"
3.Highlight the album.
4.Open "Options".
5."Delete album"
Deleting a directory and track
A track cannot be deleted while it is being
played back.
A directory cannot be deleted while a track from
that directory is being played back.
1."CD/Multimedia"
2."Music collection"
3.Highlight the directory or track.
4.Open "Options".
5."Delete folder" or "Delete track".
Free memory capacity
Display the free memory capacity in the music
collection.
1."CD/Multimedia"
2."Music collection"
3.Open "Options".
4."Free memory"
Page 176 of 252
Telephone
174 mobile phone if necessary, and can take
several minutes.
>Four mobile phones can be paired.
>Specific settings may be necessary in some
mobile phones, e.g. authorization or a
secure connection, refer to the mobile
phone operating instructions.
If not all phone book entries are displayed:
>Transfer all phone book entries from the
SIM card to the mobile phone if necessary.
>It may not be possible to display phone
book entries with special characters.
Checking if pairing is unsuccessful
>Is the mobile phone supported by the
mobile phone preparation package? Infor-
mation on this subject is also provided on
the Internet at: www.bmw.com/bluetooth.
>Do the Bluetooth passkeys on the mobile
phone and the vehicle match? The same
Bluetooth passkey must be entered both on
the mobile phone display and via iDrive.
>Have you required longer than 30 seconds
to enter the Bluetooth passkey? Then
repeat the pairing procedure.
>Are too many Bluetooth devices connected
to the mobile phone? If so, delete the con-
nections with other devices on the mobile
phone.
>The mobile phone no longer reacts? Switch
the mobile phone off and then on again or
disconnect the power supply.
>Repeat the pairing procedure.
>If all items on the list have been checked
and the mobile phone still cannot be paired,
please contact Customer Relations.
Connecting a particular mobile phone
If more than one mobile phone is detected by
the vehicle, the mobile phone at the top of the
list is connected. A different mobile phone can
be connected by selecting it.
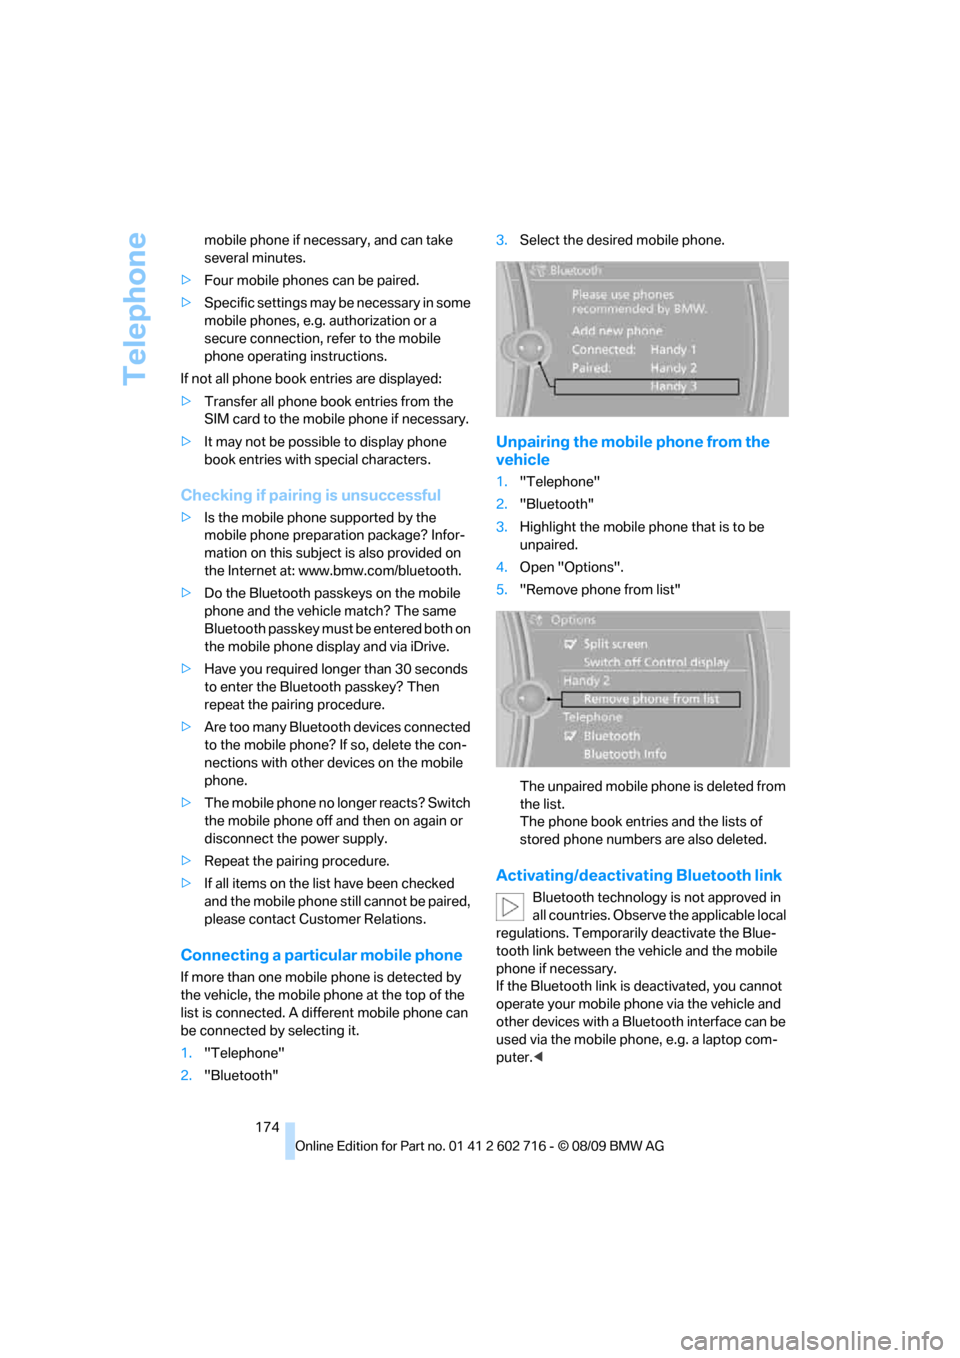
1."Telephone"
2."Bluetooth"3.Select the desired mobile phone.
Unpairing the mobile phone from the
vehicle
1."Telephone"
2."Bluetooth"
3.Highlight the mobile phone that is to be
unpaired.
4.Open "Options".
5."Remove phone from list"
The unpaired mobile phone is deleted from
the list.
The phone book entries and the lists of
stored phone numbers are also deleted.
Activating/deactivating Bluetooth link
Bluetooth technology is not approved in
all countries. Observe the applicable local
regulations. Temporarily deactivate the Blue-
tooth link between the vehicle and the mobile
phone if necessary.
If the Bluetooth link is deactivated, you cannot
operate your mobile phone via the vehicle and
other devices with a Bluetooth interface can be
used via the mobile phone, e.g. a laptop com-
puter.<