2010 BMW 650I CONVERTIBLE interior lights
[x] Cancel search: interior lightsPage 36 of 252

Opening and closing
34 objects, e.g. leaves, can trigger false alarms,
refer to Avoiding unintentional alarms.
Avoiding unintentional alarms
The tilt alarm sensor and interior motion sensor
may be switched off at the same time. This pre-
vents unintentional alarms, e.g. in the following
situations:
>In two-level garages
>When transporting on car-carrying trains,
by sea or on a trailer
>When animals are to remain in the vehicle
Switching off tilt alarm sensor and
interior motion sensor
Press the button on the remote control
again as soon as the vehicle is locked.
The indicator lamp lights up briefly and then
flashes continuously. The tilt alarm sensor and
the interior motion sensor are switched off until
the next time the vehicle is unlocked and subse-
quently locked again.
Comfort Access*
Comfort Access allows you to access your vehi-
cle without having to hold the remote control in
your hand. It is sufficient to carry the remote
control with you, e.g. in your jacket pocket. The
vehicle automatically detects the associated
remote control in the immediate vicinity or in
the interior.
Comfort Access supports the following func-
tions:
>Unlocking/locking vehicle
>Convenient closing with Coupe
>Opening luggage compartment lid sepa-
rately
>Starting engine
Functional requirement
>The vehicle or the luggage compartment lid
can only be locked if the vehicle detects that
the remote control you are carrying is out-
side the vehicle.>The next unlocking and locking cycle is not
possible until after approx. 2 seconds.
>The engine can only be started if the vehicle
detects that the remote control is located in
the vehicle.
Comparison with ordinary remote
control
You can control the functions mentioned previ-
ously with the Comfort Access or by pressing
the buttons on the remote control. Therefore,
please familiarize yourself with the information
on opening and closing beginning on page26
beforehand.
The special features when using Comfort
Access are described in the following.
Should a short delay occur when opening
or closing the windows, the glass sunroof
or the convertible top, the system is checking
whether a remote control is located in the vehi-
cle. Please repeat opening or closing if neces-
sary.<
Unlocking
Grasp a door handle fully, refer to arrow1, but
do not touch the surfaces, arrow2 or 3 when
doing so. This corresponds to pressing the
button.
Locking
>On the driver's door, touch the highlighted
surface, arrow2, with a finger for approx.
1 second, but do not grasp the door handle.
>On the front passenger door, touch the
highlighted surface, arrow3, with the back
of your hand for approx. 1 second, but do
not grasp the door handle.
Page 37 of 252

Controls
35Reference
At a glance
Driving tips
Communications
Navigation
Entertainment
Mobility
This corresponds to pressing the
button.
Please make sure that the ignition and all
electronic systems/consumers are
switched off before locking to save the bat-
tery.<
Coupe: Convenient closing
Hold a finger or the back of your hand against
the surface, arrow2 or 3, but do not grasp the
door handle while doing so.
The windows, the glass sunroof
* and the slid-
ing visor are closed.
Watch during the closing process to be
sure that no one is injured. Removing the
hand from the door handle stops the closing
process immediately.<
Opening luggage compartment lid
separately
Press the upper half of the BMW emblem. This
corresponds to pressing the button.
If a remote control accidentally left in the
luggage compartment is detected inside
the locked vehicle after the luggage compart-
ment lid has been closed, then the luggage
compartment lid opens again. The hazard warn-
ing flashers flash and a signal
* sounds.<
Switching on radio readiness
By pressing the Start/Stop button, you switch
on the radio readiness, refer to page56.
When doing so, do not depress the brake
or clutch pedal, otherwise the engine will
start immediately.<
Starting engine
You can start the engine or switch on the igni-
tion if a remote control is located in the interior
of the vehicle. It need not be inserted in the igni-
tion lock, refer to page56.
If you take the remote control with you when
leaving the vehicle with the engine running, a
warning lamp lights up. In addition, a message
appears on the Control Display. As long as no
remote control is detected, it is only possible to restart the engine within approx. 10 seconds
after it is switched off.
Switching off engine when equipped
with sport automatic transmission
The engine can only be switched off in trans-
mission position P, refer to page57.
To switch off the engine in transmission posi-
tion N, the remote control must be inserted in
the ignition lock.
Before driving into a car wash in
vehicles equipped with automatic
transmission
1.Insert remote control into ignition lock.
2.Depress brake pedal.
3.Engage transmission position N.
4.Switch off the engine.
The vehicle can roll.
Malfunction
The Comfort Access function may malfunction
due to local radio waves. If this occurs, then
open or close the vehicle with the buttons on
the remote control or with a key. To start the
engine following this, insert the remote control
in the ignition lock.
When unlocking or locking/convenient closing
do not simultaneously grasp the door handle
and touch the surfaces, arrow2 or 3. Other-
wise, you may limit the function.
Replacing battery
If the battery of the remote control is dead, a
message will appear in the Control Display.
Page 54 of 252

Adjusting
52
Interior and exterior mirrors,
automatic dimming feature
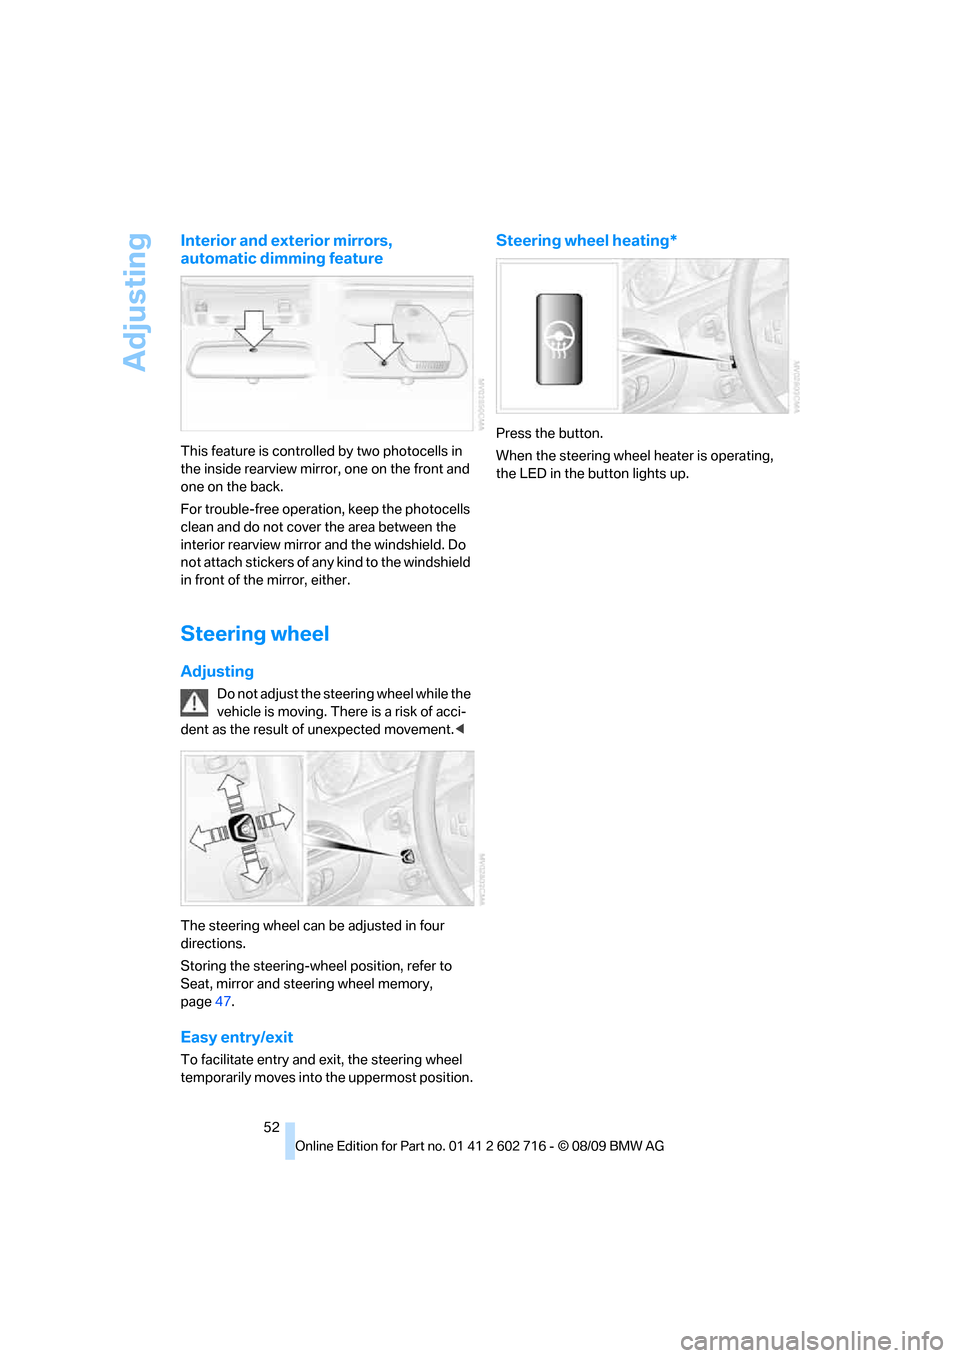
This feature is controlled by two photocells in
the inside rearview mirror, one on the front and
one on the back.
For trouble-free operation, keep the photocells
clean and do not cover the area between the
interior rearview mirror and the windshield. Do
not attach stickers of any kind to the windshield
in front of the mirror, either.
Steering wheel
Adjusting
Do not adjust the steering wheel while the
vehicle is moving. There is a risk of acci-
dent as the result of unexpected movement.<
The steering wheel can be adjusted in four
directions.
Storing the steering-wheel position, refer to
Seat, mirror and steering wheel memory,
page47.
Easy entry/exit
To facilitate entry and exit, the steering wheel
temporarily moves into the uppermost position.
Steering wheel heating*
Press the button.
When the steering wheel heater is operating,
the LED in the button lights up.
Page 64 of 252

Driving
62
Triple turn signal activation
Press the lever to the resistance point; the turn
signal flashes three times.
You can activate or deactivate this function.
iDrive, for operating principle refer to page16.
1."Settings"
2."Lighting"
3."Triple turn signal"
4. Triple turn signal activation is activated
and is stored for the remote control cur-
rently in use.
Wiper system
1Switching on wipers
2Switching off wipers or brief wipe
3Activating/deactivating rain sensor
4Cleaning windshield, headlamps and
BMW Night Vision camera
*
5Adjusting rain sensor sensitivity level
Switching on wipers
Pull the lever upward, arrow1.
The lever automatically returns to its initial posi-
tion when released.
Normal wiper speed
Press once.
The system reverts to operation in the intermit-
tent mode when the vehicle is stationary.
Fast wiper speed
Press twice or press beyond the resistance
point.
The system reverts to normal speed when the
vehicle is stationary.
Rain sensor
The wiper operation is controlled automatically
as a function of the rain intensity. The rain sen-
sor is located on the windshield, directly in front
of the interior rearview mirror.
Activating rain sensor
Press the button, arrow3. The LED in the but-
ton lights up.
Adjusting rain sensor sensitivity level
Turn the thumbwheel5.
Deactivating rain sensor
Press the button again, arrow3. The LED goes
out.
Deactivate the rain sensor when passing
through an automatic car wash. Failure to
do so could result in damage caused by undes-
ired wiper activation.<
Cleaning windshield, headlamps and
BMW Night Vision camera*
Pull the lever, arrow4.
Page 93 of 252

Controls
91Reference
At a glance
Driving tips
Communications
Navigation
Entertainment
Mobility
In the event of malfunctions, deactivation, or
triggering of the airbag restraint system, have
the testing, repair, removal, and disposal of air-
bag generators executed only by a BMW center
or a workshop that works according to BMW
repair procedures with correspondingly trained
personnel and has the required explosives
licenses. Otherwise unprofessional attempts to
service the system could lead to failure in an
emergency or undesired airbag triggering,
either of which could result in personal injury.<
Warnings and information on the airbags is also
provided on the sun visors.
Automatic deactivation of front
passenger airbags
The occupation of the seat is detected by eval-
uating the impression on the occupied seat sur-
face of the front passenger seat. The system
correspondingly activates or deactivates the
front, knee and side airbags on the front pas-
senger side.
The current status of the front passenger
airbag, i.e. deactivated or activated, is
indicated by the indicator lamp over the interior
rearview mirror, refer to Operating state of front
passenger airbags in the following.<
Before transporting a child in the front
passenger seat, read the safety informa-
tion and follow the instructions under Trans-
porting children safely, refer to page53.
The front, knee and side airbags on the front
passenger side can be deactivated for teenag-
ers and adults in certain sitting positions; the
indicator lamp for the front passenger airbags
lights up when this occurs. In these cases,
change the sitting position so that the front pas-
senger airbags are activated and the indicator
lamp goes out. If the desired status cannot be
produced by changing the sitting position,
transport the corresponding person in the rear
seat.
Do not fit seat covers, seat cushion padding,
ball mats or other items onto the front passen-
ger seat unless they are specifically recom-
mended by BMW. Do not lay objects under the
seat which could press against the seat from below. Otherwise a correct evaluation of the
occupied seat surface cannot be ensured.<
Operating state of front passenger
airbags
The illustration here shows a possible arrange-
ment in the Coupe. With some vehicle equip-
ment packages or in the Convertible, the
arrangement of the switches and indicator
lamps may differ somewhat.
The indicator lamp for the front passenger air-
bags indicates the operating status of the front,
knee and side airbags on the front passenger
side depending on whether the seat is occu-
pied. The indicator lamp shows whether the
front passenger airbags are activated or deacti-
vated.
>The indicator lamp lights up when a child in
a child restraint system intended for the
purpose is properly detected on the seat.
The front, knee and side airbags on the front
passenger side are deactivated.
Most child seats are detected by the sys-
tem, especially the child seats required by
the NHTSA at the time the vehicle is manufac-
tured. After installing a child seat, make sure
that the indicator lamp for the front passenger
airbags lights up. This indicates that the child
seat has been detected and the front passenger
airbags are not activated.<
>The indicator lamp does not light up if, for
example, the system detects a person of
sufficient size seated correctly on the seat.
The front, knee and side airbags on the front
passenger side are activated.
>The indicator lamp does not light up when
the seat is empty.
Page 100 of 252

Lamps
98
Lamps
Parking lamps/low beams
0Lights off and daytime running lamps*
1Parking lamps and daytime running lamps*
2Low beams and welcome lamps
3Automatic headlamp control, daytime run-
ning lamps
*, welcome lamps, Adaptive
Light Control
* and High-beam Assistant*
If you open the driver's door with the ignition
switched off, the exterior lighting is switched off
when the light switch is in position2 or 3. The
daytime running lamps have already been
switched off at the same time as the ignition.
For this reason, switch on the side marker
lamps as needed, switch position1; otherwise,
the vehicle is not lit.
Parking lamps
In switch position1, the front, rear and side
vehicle lighting is switched on. You can use the
parking lamps for parking.
The parking lamps drain the battery. Do
not leave them switched on for long peri-
ods of time, otherwise it may no longer be pos-
sible to start the engine. It is preferable to
switch on the roadside parking lamps on one
side, refer to page100.<
Low beams
The low beams light up when the light switch is
in position 2 and the ignition is on.
Automatic headlamp control
In switch position3, the system activates the
low beams and switches them on or off in
response to changes in ambient light condi-
tions, for instance, in a tunnel, at dawn and dusk
and in case of precipitation. Adaptive Light
Control
* is active. The LED next to the symbol
lights up when the low beams are on.
You can also change to the daytime running
lamps, refer to page99. In the situation
described above, the lamps switch to the low
beams.
A blue sky with the sun low on the horizon can
cause the lights to be switched on.
The low beams remain on independent of
the ambient lighting conditions when you
switch on the fog lamps.<
The automatic headlamp control cannot
serve as a substitute for your personal
judgment in determining when the lamps
should be switched on in response to ambient
lighting conditions. For example, the sensors
cannot detect fog of hazy weather. To avoid
safety risks, you should always switch on the
low beams manually under these conditions.<
Welcome lamps
If you leave the light switch in position2 or 3
when parking the vehicle, then when you unlock
the vehicle, the parking lamps and interior light-
ing remain illuminated for a brief time.
Activating/deactivating welcome
lamps
iDrive, for operating principle refer to page16.
1."Settings"
2."Lighting"
Page 104 of 252

Lamps
102
Fog lamps
First switch on the parking lamps or the low
beams. The green indicator lamp in the instru-
ment cluster lights up whenever the fog lamps
are on.
The fog lamps are switched off whenever the
high beams are switched on.
If the automatic headlamp control is acti-
vated, the low beams will come on when
you switch on the fog lamps.<
Instrument lighting
You can control the lighting intensity by using
the thumbwheel.
Interior lamps
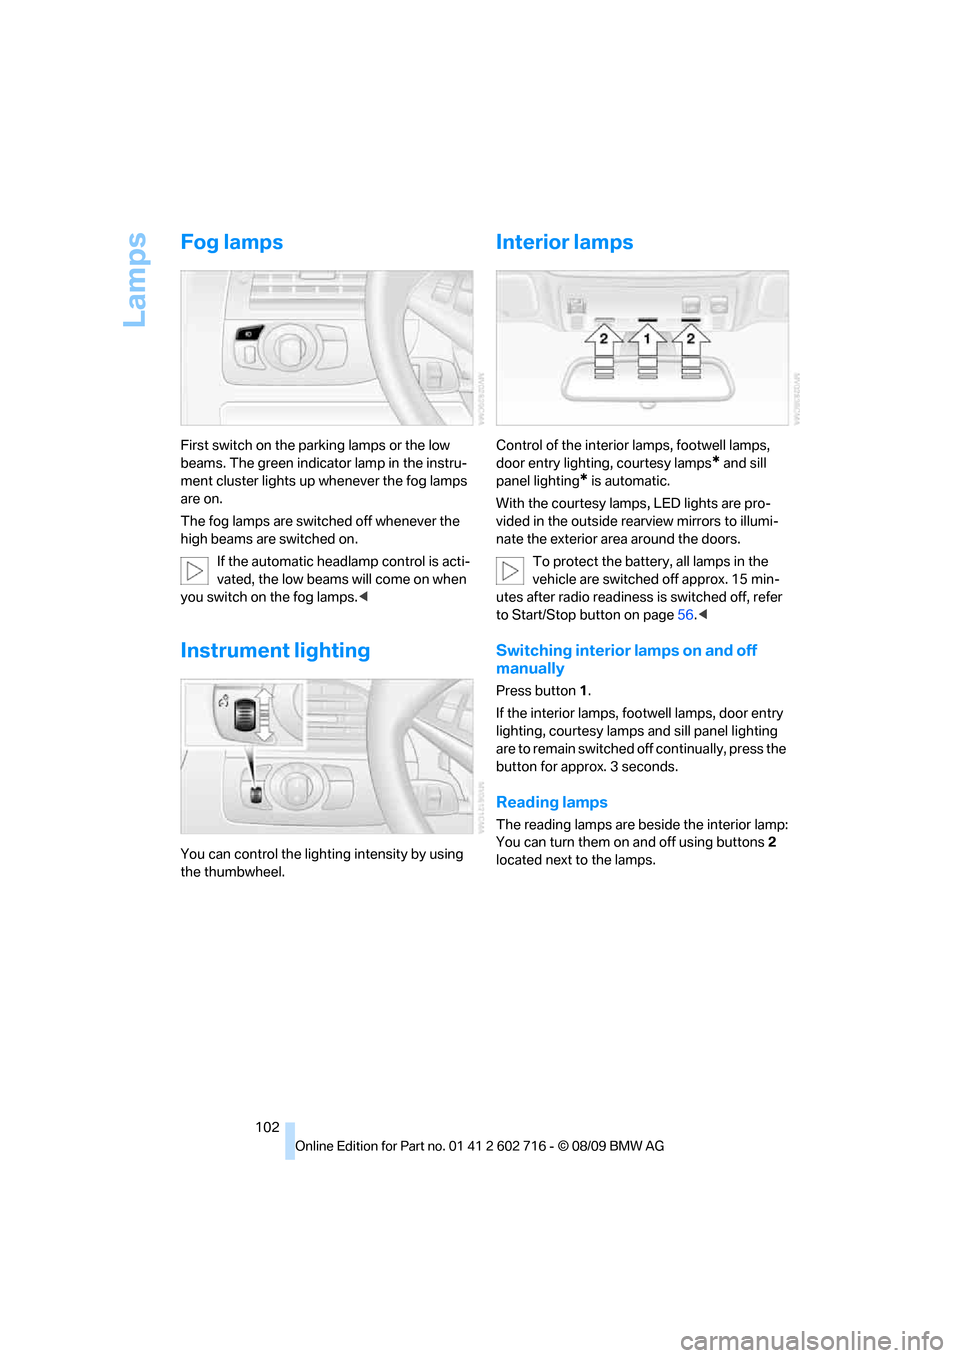
Control of the interior lamps, footwell lamps,
door entry lighting, courtesy lamps
* and sill
panel lighting
* is automatic.
With the courtesy lamps,
LED lights are pro-
vided in the outside rearview mirrors to illumi-
nate the exterior area around the doors.
To protect the battery, all lamps in the
vehicle are switched off approx. 15 min-
utes after radio readiness is switched off, refer
to Start/Stop button on page56.<
Switching interior lamps on and off
manually
Press button 1.
If the interior lamps, footwell lamps, door entry
lighting, courtesy lamps and sill panel lighting
are to remain switched off continually, press the
button for approx. 3 seconds.
Reading lamps
The reading lamps are beside the interior lamp:
You can turn them on and off using buttons2
located next to the lamps.
Page 109 of 252

Controls
107Reference
At a glance
Driving tips
Communications
Navigation
Entertainment
Mobility
4."Ventilation temperature"
Microfilter/activated-charcoal filter
The microfilter removes dust and pollen from
the incoming air. The activated-charcoal filter
provides additional protection by filtering gas-
eous pollutants from the outside air. Your BMW
center replaces this combined filter as a stan-
dard part of your scheduled maintenance.
You can have more detailed information shown
on the Control Display, refer to page75.
Parked car ventilation*
The concept
The parked car ventilation blows air into the
passenger compartment to lower interior tem-
peratures.
It is ready to use in the parked car mode at any
outside temperature.
You can set two different times for the system
to start. The parked car ventilation can also be
switched on and off directly. It remains
switched on for 30 minutes.
Since the system uses a substantial amount of
electrical current, you should refrain from acti-
vating it twice in succession without allowing
the battery to be recharged in normal operation
between use.
The air emerges through the upper body region
vent outlets in the instrument panel. These vent
outlets must be open for the system to operate.
Switching on and off directly
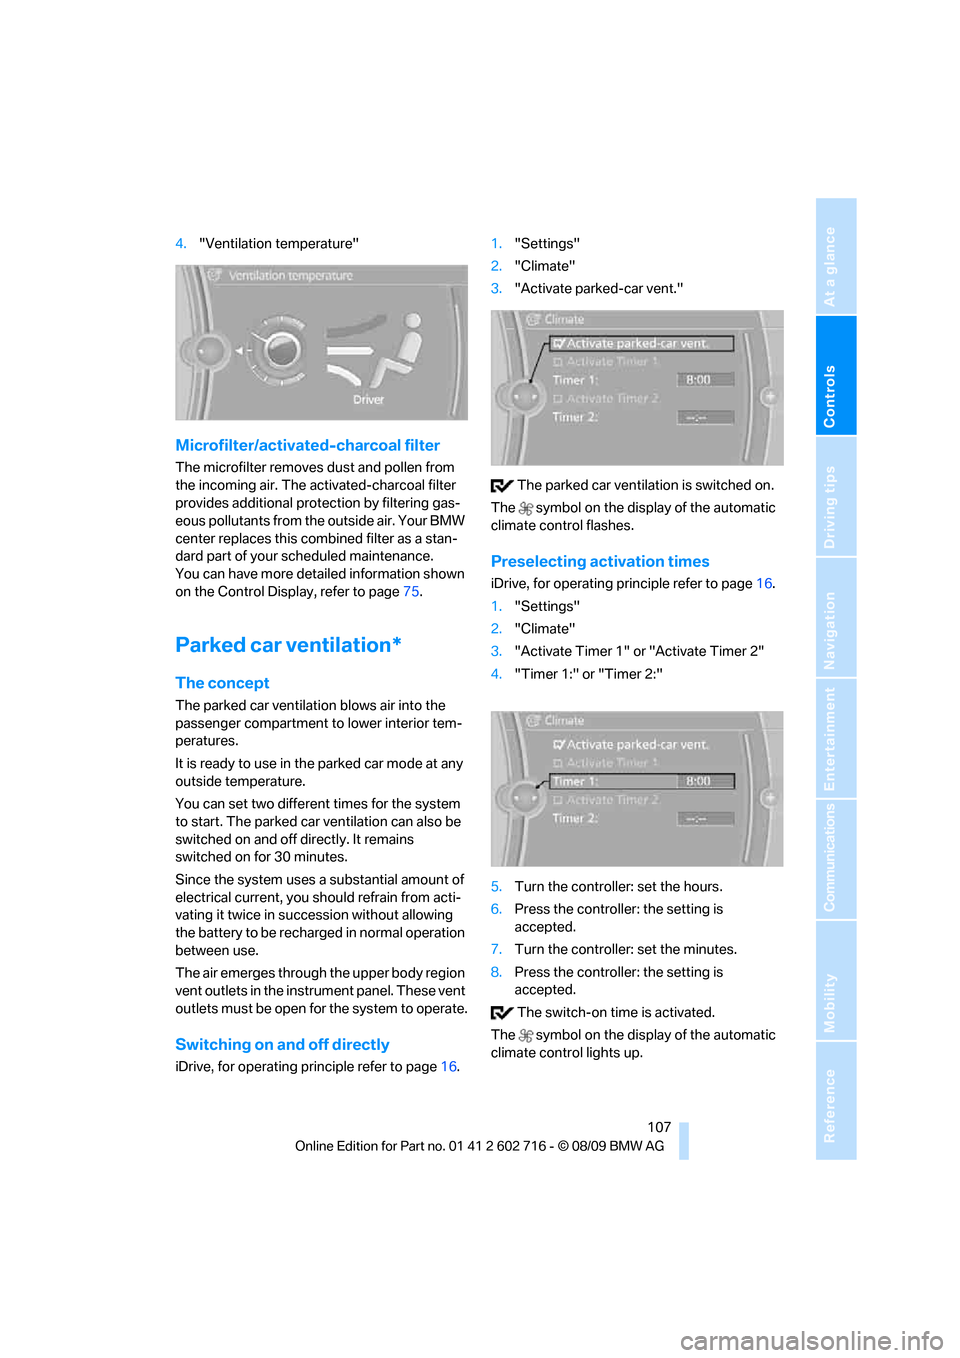
iDrive, for operating principle refer to page16.1."Settings"
2."Climate"
3."Activate parked-car vent."
The parked car ventilation is switched on.
The symbol on the display of the automatic
climate control flashes.
Preselecting activation times
iDrive, for operating principle refer to page16.
1."Settings"
2."Climate"
3."Activate Timer 1" or "Activate Timer 2"
4."Timer 1:" or "Timer 2:"
5.Turn the controller: set the hours.
6.Press the controller: the setting is
accepted.
7.Turn the controller: set the minutes.
8.Press the controller: the setting is
accepted.
The switch-on time is activated.
The symbol on the display of the automatic
climate control lights up.