2010 Alfa Romeo Brera/Spider mirror
[x] Cancel search: mirrorPage 8 of 271

6
SAFETY
DEVICES
WARNING
LIGHTS AND
MESSAGES
IN AN
EMERGENCY
CAR
MAINTENANCE
TECHNICAL
SPECIFICATIONS
INDEX
DASHBOARD
AND
CONTROLS
CORRECT USE
OF THE CAR
D D
A A
S S
H H
B B
O O
A A
R R
D D
A A
N N
D D
C C
O O
N N
T T
R R
O O
L L
S S
CEILING LIGHTS................................................ 75
CONTROLS....................................................... 77
INTERIOR FITTINGS............................................ 80
FIXED PANORAMA ROOF .................................... 84
DOORS ........................................................... 86
POWER WINDOWS........................................... 88
BOOT .............................................................. 90
BONNET.......................................................... 96
ROOF RACK/SKI RACK ...................................... 97
HEADLIGHTS..................................................... 97
ABS SYSTEM ................................................... 99
VDC SYSTEM ................................................... 100
EOBD SYSTEM ................................................. 104
SOUND SYSTEM............................................... 104
ACCESSORIES PURCHASED BY THE OWNER .......... 105
INSTALLATION OF ELECTRIC/ELECTRONIC DEVICES .. 105
PARKING SENSORS ........................................... 106
TYRE PRESSURE MONITORING SYSTEM (T.P.M.S.) .. 109
AT THE FILLING STATION .................................... 112
PROTECTING THE ENVIRONMENT ........................ 114 DASHBOARD.................................................... 7
INSTRUMENT PANEL ......................................... 8
SYMBOLS ....................................................... 9
THE ALFA ROMEO CODE SYSTEM ......................... 9
ELECTRONIC KEY .............................................. 11
ALARM ........................................................... 17
IGNITION DEVICE............................................... 19
INSTRUMENTS.................................................. 22
RECONFIGURABLE MULTIFUNCTION DISPLAY .......... 26
SEATS ............................................................ 41
HEAD RESTRAINTS............................................. 44
STEERING WHEEL ............................................. 45
REARVIEW MIRRORS ......................................... 46
CLIMATE CONTROL SYSTEM ............................... 49
MANUAL CLIMATE CONTROL SYSTEM ................... 51
AUTOMATIC TWO-ZONE CLIMATE CONTROL SYSTEM 54
ADDITIONAL HEATER ......................................... 64
EXTERNAL LIGHTS............................................ 65
WINDOW WASHING ......................................... 68
CRUISE CONTROL............................................. 72
Page 13 of 271

11
SAFETY
DEVICES
WARNING
LIGHTS AND
MESSAGES
IN AN
EMERGENCY
CAR
MAINTENANCE
TECHNICAL
SPECIFICATIONS
INDEX
DASHBOARD
AND
CONTROLS
CORRECT USE
OF THE CARButtonËshall be used for central open-
ing of doors and fuel cap with alarm de-
activation (for versions/markets, where
provided).
Button
`shall be used to open the
tailgate.
When unlocking the doors by pressing
button
Ë, if by 2.5 minutes no door or
the boot is opened, the system will au-
tomatically lock the car again.
When unlocking the doors, the driver's
window will slightly open to facilitate
door opening. If the door is not opened,
the window will re-close automatically
3 minutes after. If the door is opened,
the window will re-close when re-closing
the door.
ELECTRONIC KEY fig. 5
The car is delivered with two copies of
the key with remote control.
The electronic key operates the ignition
switch.
Button
Áshall be used for central lock-
ing of doors, tailgate and fuel cap with
alarm activation (for versions/markets,
where provided).
When doors are locked, door mirrors will
fold (for versions/markets, where pro-
vided); mirrors will be brought automati-
cally to driving position when refitting the
ignition key. This function can be deacti-
vated (see paragraph “Rearview mir-
rors”).
ELECTRONIC KEY
CODE CARD
(for versions/markets,
where provided)
The CODE card fig. 4, delivered with
the keys, contains the mechanical code
Aand the electronic one B.
The code numbers on the CODE card
must be kept in a safe place, not in the
car.
A0F0023mfig. 4A0F0021mfig. 5
If the car changes own-
er, the new owner must
be given the electronic
key and the CODE card.
Page 45 of 271
43
SAFETY
DEVICES
WARNING
LIGHTS AND
MESSAGES
IN AN
EMERGENCY
CAR
MAINTENANCE
TECHNICAL
SPECIFICATIONS
INDEX
DASHBOARD
AND
CONTROLS
CORRECT USE
OF THE CARSeat warming
(for versions/markets,
where provided)
With electronic key fitted into ignition
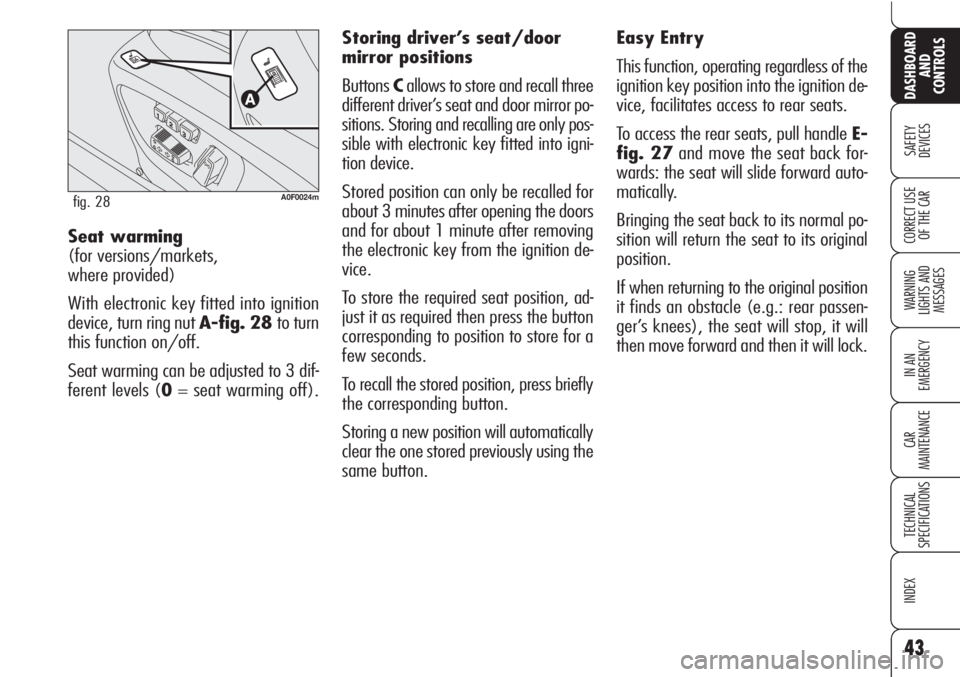
device, turn ring nut A-fig. 28 to turn
this function on/off.
Seat warming can be adjusted to 3 dif-
ferent levels (0= seat warming off).
A0F0024mfig. 28
Easy Entry
This function, operating regardless of the
ignition key position into the ignition de-
vice, facilitates access to rear seats.
To access the rear seats, pull handle E-
fig. 27and move the seat back for-
wards: the seat will slide forward auto-
matically.
Bringing the seat back to its normal po-
sition will return the seat to its original
position.
If when returning to the original position
it finds an obstacle (e.g.: rear passen-
ger’s knees), the seat will stop, it will
then move forward and then it will lock. Storing driver’s seat/door
mirror positions
ButtonsCallows to store and recall three
different driver’s seat and door mirror po-
sitions. Storing and recalling are only pos-
sible with electronic key fitted into igni-
tion device.
Stored position can only be recalled for
about 3 minutes after opening the doors
and for about 1 minute after removing
the electronic key from the ignition de-
vice.
To store the required seat position, ad-
just it as required then press the button
corresponding to position to store for a
few seconds.
To recall the stored position, press briefly
the corresponding button.
Storing a new position will automatically
clear the one stored previously using the
same button.
Page 48 of 271
46
SAFETY
DEVICES
WARNING
LIGHTS AND
MESSAGES
IN AN
EMERGENCY
CAR
MAINTENANCE
TECHNICAL
SPECIFICATIONS
INDEX
DASHBOARD
AND
CONTROLS
CORRECT USE
OF THE CARPowered mirror folding
(for versions/markets,
where provided)
When required (for example when the
mirror causes difficulty in narrow spaces)
it is possible to fold the mirrors by press-
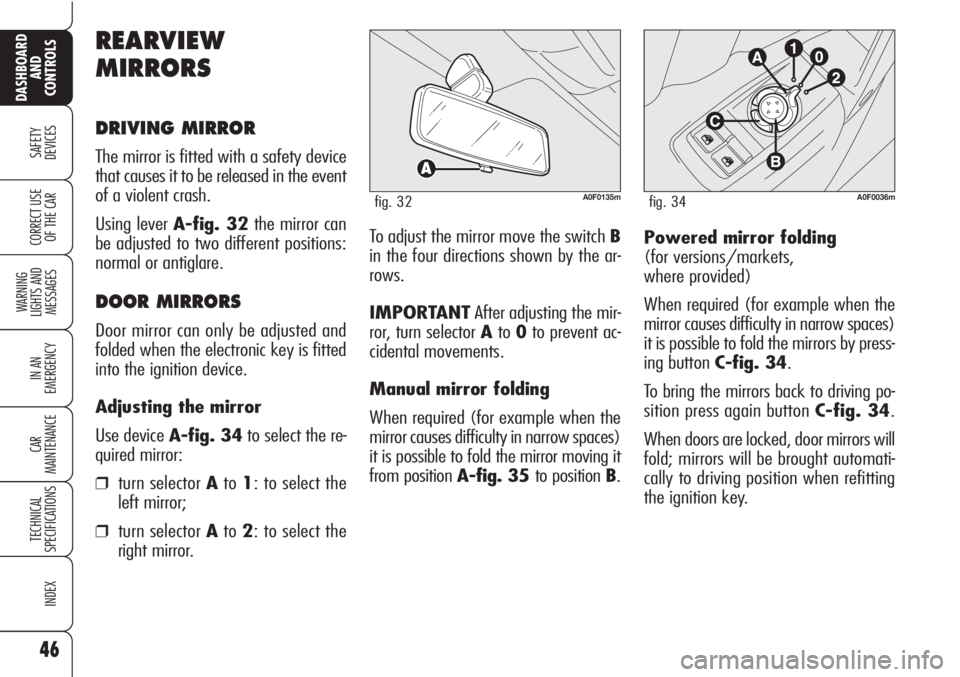
ing button C-fig. 34.
To bring the mirrors back to driving po-
sition press again button C-fig. 34.
When doors are locked, door mirrors will
fold; mirrors will be brought automati-
cally to driving position when refitting
the ignition key. To adjust the mirror move the switch B
in the four directions shown by the ar-
rows.
IMPORTANTAfter adjusting the mir-
ror, turn selector Ato0to prevent ac-
cidental movements.
Manual mirror folding
When required (for example when the
mirror causes difficulty in narrow spaces)
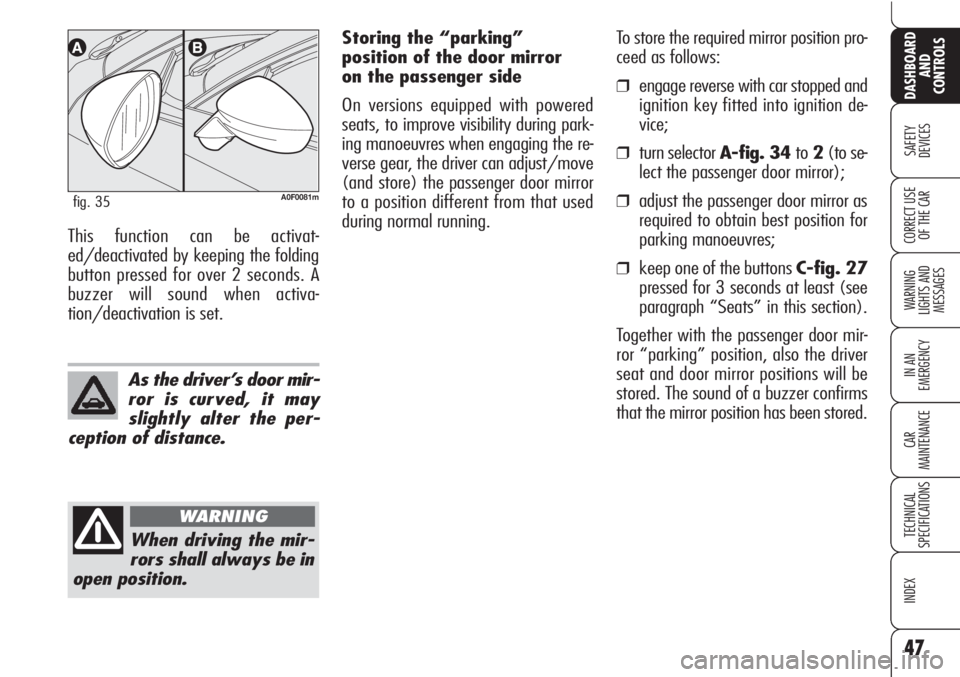
it is possible to fold the mirror moving it
from position A-fig. 35 to position B.
A0F0135mfig. 32
REARVIEW
MIRRORS
DRIVING MIRROR
The mirror is fitted with a safety device
that causes it to be released in the event
of a violent crash.
Using lever A-fig. 32the mirror can
be adjusted to two different positions:
normal or antiglare.
DOOR MIRRORS
Door mirror can only be adjusted and
folded when the electronic key is fitted
into the ignition device.
Adjusting the mirror
Use device A-fig. 34to select the re-
quired mirror:
❒turn selector Ato1: to select the
left mirror;
❒turn selector Ato2: to select the
right mirror.
A0F0036mfig. 34
Page 49 of 271
47
SAFETY
DEVICES
WARNING
LIGHTS AND
MESSAGES
IN AN
EMERGENCY
CAR
MAINTENANCE
TECHNICAL
SPECIFICATIONS
INDEX
DASHBOARD
AND
CONTROLS
CORRECT USE
OF THE CARThis function can be activat-
ed/deactivated by keeping the folding
button pressed for over 2 seconds. A
buzzer will sound when activa-
tion/deactivation is set.
A0F0081mfig. 35
As the driver’s door mir-
ror is curved, it may
slightly alter the per-
ception of distance.
When driving the mir-
rors shall always be in
open position.
WARNING
Storing the “parking”
position of the door mirror
on the passenger side
On versions equipped with powered
seats, to improve visibility during park-
ing manoeuvres when engaging the re-
verse gear, the driver can adjust/move
(and store) the passenger door mirror
to a position different from that used
during normal running. To store the required mirror position pro-
ceed as follows:
❒engage reverse with car stopped and
ignition key fitted into ignition de-
vice;
❒turn selector A-fig. 34 to2(to se-
lect the passenger door mirror);
❒adjust the passenger door mirror as
required to obtain best position for
parking manoeuvres;
❒keep one of the buttons C-fig. 27
pressed for 3 seconds at least (see
paragraph “Seats” in this section).
Together with the passenger door mir-
ror “parking” position, also the driver
seat and door mirror positions will be
stored. The sound of a buzzer confirms
that the mirror position has been stored.
Page 50 of 271
48
SAFETY
DEVICES
WARNING
LIGHTS AND
MESSAGES
IN AN
EMERGENCY
CAR
MAINTENANCE
TECHNICAL
SPECIFICATIONS
INDEX
DASHBOARD
AND
CONTROLS
CORRECT USE
OF THE CAR
Recallig the passenger door
mirror “parking”
Proceed as follows: fit the electronic key
into the ignition device; engage reverse;
turn selectorA-fig. 34to2(to select
the passenger door mirror).
The mirror will set automatically to the
previously stored position.
If no parking position has been stored,
when engaging reverse the passenger
door mirror will slightly lower to aid the
driver during parking.
The mirror will automatically return to
its original position 10 seconds after dis-
engaging reverse, when the car speed
exceeds 10 km/h in forward gear or
when turning selector A-fig. 34to0.Automatic door mirror
realignment
Each time the ignition key is fitted into
the ignition device, door mirrors return
automatically to the last position
reached and/or recalled at last key re-
moval.
This enables mirror alignment if when
leaving the car parked one of the door
mirrors has been moved manually
and/or accidentally.Defrosting/demisting
The electric mirrors are fitted with heating
coils which come into operation when turn-
ing on the heated rear window (by press-
ing button
().
IMPORTANTThis function is timed
and is deactivated after a few minutes.
Page 53 of 271
51
SAFETY
DEVICES
WARNING
LIGHTS AND
MESSAGES
IN AN
EMERGENCY
CAR
MAINTENANCE
TECHNICAL
SPECIFICATIONS
INDEX
DASHBOARD
AND
CONTROLS
CORRECT USE
OF THE CAR
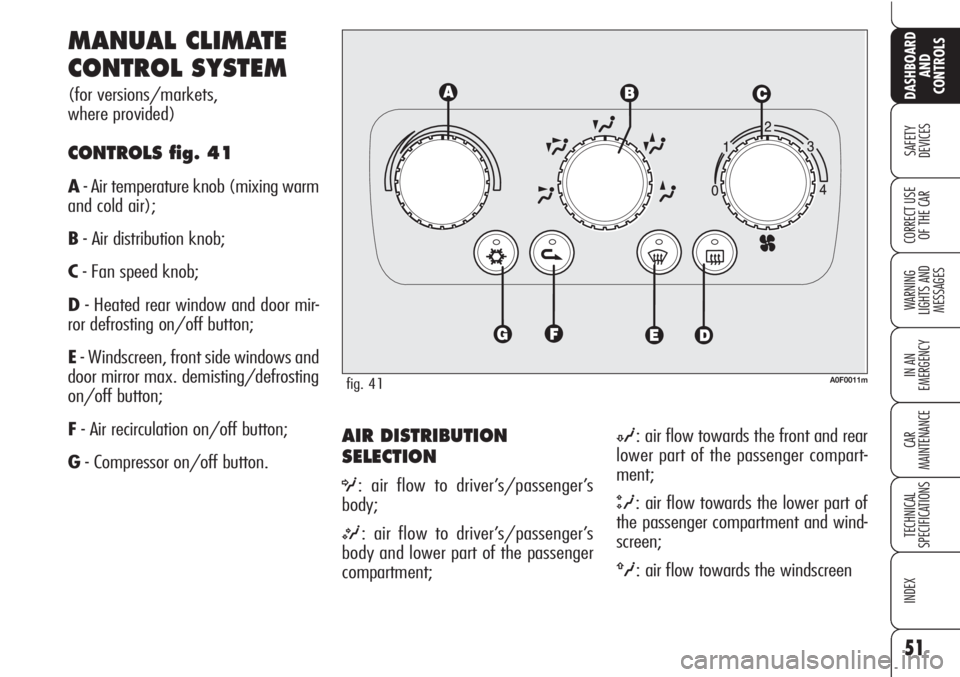
AIR DISTRIBUTION
SELECTION
O: air flow to driver’s/passenger’s
body;
M: air flow to driver’s/passenger’s
body and lower part of the passenger
compartment;
N: air flow towards the front and rear
lower part of the passenger compart-
ment;
Q: air flow towards the lower part of
the passenger compartment and wind-
screen;
ü: air flow towards the windscreen
MANUAL CLIMATE
CONTROL SYSTEM
(for versions/markets,
where provided)
CONTROLS fig. 41
A- Air temperature knob (mixing warm
and cold air);
B- Air distribution knob;
C- Fan speed knob;
D- Heated rear window and door mir-
ror defrosting on/off button;
E- Windscreen, front side windows and
door mirror max. demisting/defrosting
on/off button;
F- Air recirculation on/off button;
G- Compressor on/off button.
fig. 41A0F0011m
Page 54 of 271

52
SAFETY
DEVICES
WARNING
LIGHTS AND
MESSAGES
IN AN
EMERGENCY
CAR
MAINTENANCE
TECHNICAL
SPECIFICATIONS
INDEX
DASHBOARD
AND
CONTROLS
CORRECT USE
OF THE CAR
QUICK WINDSCREEN
AND FRONT SIDE WINDOW
DEMISTING/DEFROSTING
(MAX-DEF function)
To turn this function on press button -
: the button leds -,√and(will turn
on. To turn this function off press again
button
-the button led will turn off.
After demisting/defrosting, turn this
function off to keep perfect comfort con-
ditions.
Window demisting
Climate control system
√is very use-
ful to speed up window demisting and
it is therefore to be turned on in the
event of considerable moisture. In any
case it is recommended to perform the
following preventive demisting proce-
dure:
❒turn air recirculation off (if on);
❒turn knob Cto second speed;
❒turn knob BtoQ.
HEATED REAR WINDOW
AND DOOR MIRROR
DEMISTING/DEFROSTING
To turn this function on press button (
the button led will turn on. To turn this
function off press again button .
On certain versions, turning this function
on will also activate windscreen de-
frosting in the windscreen wiper area.
This function is timed and switches off
automatically after few minutes, or by
pressing again the button or by turning
the engine off. It will not be switched
on automatically when restarting the en-
gine.
IMPORTANTDo not apply stickers on
the inside of the heated rear window
over the heating filaments to avoid dam-
age that might cause it to stop work-
ing properly.
WARMING THE PASSENGER
COMPARTMENT
Proceed as follows:
❒turn knob Ato the required tem-
perature;
❒turn knob Cto the required speed;
❒turn knob Bto the required distrib-
ution:
N: to warm the feet of front and rear
passengers;
M: to warm the feet and keep the face
cool (bilevel function);
Q: to warm the feet and at the same
time demist the windscreen;
❒turn air recirculation off (if on).