Page 73 of 174

Driving to Your Destination
Navigation System73
When you say or select Avoid , the
display returns to the list screen. When
you move the Interface Dial down
on the list screen to select Reroute ,
the system recalculates a detour route
avoiding the road.
You can choose to avoid up to 10 traffi c
incidents.
NOTE:
• When you select the “All” tab, Avoid
is not displayed.
• To activate this function, you need to set Tr a f � c Rerouting to ON in the
Routing & Guidance settings (see
page 109 ).
• Because the criterion for whether the traffi c event is to be detoured or
not is included in the traffi c event
data itself, the traffi c rerouting is not
performed for all the traffi c incidents
ahead on the route.
• Even when the route recalculation is performed for a traffi c event, if the
system cannot fi nd any detour route
or a quicker detour route, the event
location is not always avoided.
• Traffi c rerouting is available only if you have a current traffi c /weather
subscription with XM. See page 120 . Changing the Route
While en route, you may wish to alter
your route, add an interim “Waypoint”
(pit stop), choose a different destination,
or cancel your current destination. To
change your present route, you can do
any of the following:
Say “Menu,” or press the MENU button
to view the MENU screen ( Route):
• Cancel Route (page 74 )
• Detour (page 74 )
• Avoid Streets (page 74 )
• Change Route Preference (page 74 )
• Waypoint (page 74 )
• Back to Route (page 75 )
Choose a different destination (other
methods) by:
• Saying, “Find nearest...” to fi nd a POI
(page 76 ).
• Saying, “Go home” (page 76 ). • Using the
Interface Dial to select a
different POI or address on the map
(page 76 ).
• Pressing the MENU button and
selecting the “Dest. MENU 1 or 2”
tab on the MENU screen (page 77 ).
MENU Screen (Route)
Pressing the MENU button displays the
MENU screen ( Route):
NOTE:
The “Route” tab can be selected only
when you are en route.
2010 TL
Page 74 of 174
 and returns you to the map
screen.
D e t o u r
Calculates a detour route for y")
Driving to Your Destination
74 Navigation System
Cancel Route
Cancels the current route (and any
waypoints) and returns you to the map
screen.
D e t o u r
Calculates a detour route for you if
you encounter an unexpected obstacle
such as a closed road or extremely
heavy traffi c congestion. If a detour
is selected, the system will attempt to
recalculate a new route, avoiding the
next 5 miles (while on a freeway) or 1
mile (while on a surface street).
Avoid Streets
From the MENU screen ( Route), if
you say or select Avoid Streets , the
system displays a list of streets that will
get you to your destination. This feature
allows you to avoid a street or streets
along your route. This is helpful if you
know of road construction, closures,
or excessive traffi c along the route.
Simply select the street or streets you
wish to avoid. You can store up to 10
streets to be avoided. You cannot avoid
your current street or the streets of your waypoint(s) or destination (system
beeps if selected).
NOTE:
Although you can choose streets to
avoid, you cannot choose specifi c
streets you want to use.
Change Route Preference
From the MENU screen (Route), if you
say or select
Change Route Pref. ,
then the Route Preference screen is
displayed. See Changing the Routing
Method on page 52 for details. W a y p o i n t
Waypoints allow you to add an
interim “pit stop” while traveling to
a destination. For instance, you may
want to stop for gas or food, and then
continue on to your destination.
Although you can enter up to fi ve places
including the destination at a time,
typically you may never use more than
one at a time.
Waypoints are routed to in the order
they were entered (number 1 fi rst, etc.),
with your fi nal destination routed to
last.
When you enter waypoints, they appear
on the map screen as small red fl ags
numbered 1-4.
2010 TL
Page 75 of 174
,
if you say or select Waypoint, the
Add Waypoint screen is displayed.
Select either SEARCH AROUND")
Driving to Your Destination
Navigation System75
Adding Waypoint
From the MENU screen ( Route),
if you say or select Waypoint, the
Add Waypoint screen is displayed.
Select either SEARCH AROUND
or SEARCH ALONG by rotating
Interface Dial knob . Next, select the category from the
“Originals” or “My Favorites” tab on
the Category screen, then follow the
menu prompts to select a destination.
When the system performs a search
from SEARCH ALONG, it displays
matches that lie within a corridor on
either side and in front of your route.
From SEARCH AROUND , the system
displays matches that are a uniform
distance from the departure point/
waypoint/destination.
The search “corridor” distance value
can be changed in Edit Waypoint
Search Area i n S E T U P ( s e e p a g e 10 8 ). If you add a waypoint, the Dest List
screen will be displayed. If you move
the Interface Dial down and select
OK , the addition is completed and
rerouting begins. Press the MAP/
GUIDE button to return to the map
screen without adding the waypoint.
To add another waypoint, press
the MENU button and repeat the
procedure.
If Waypoint is grayed out, the
maximum of fi ve places (including the
destination) has been entered.
NOTE:
The system does not allow you to select
the roads you want to use to get to a
destination. However, after you enter a
destination, you can select intersections
or POI waypoints that the system will
use to tailor your route.
Back to Route
R eturns you to the original
map screen.
2010 TL
Page 76 of 174

Driving to Your Destination
76 Navigation System
Changing Your Destination
There are four methods by which you
can change or add a waypoint to your
route. These are:
Find Nearest (Voice command)
From the map screen, say one of the
“Find Nearest...” voice commands to
locate the nearest gas station, ATM,
restaurant or other point of interest. See
the “Find Nearest” voice commands
listing on page 16 0 .
Go Home (Voice command)
From the map screen, say “Go Home
1” or “Go Home 2.” If an address has
been entered in both Home Address
1 and Home Address 2 , say “Go
Home” and the system will give
preference to Home Address 1 and
display the confi rmation screen.
Using Interface Dial to Change
Destination
While following a calculated route, you
can select a new destination with the
map screen and the Interface Dial .
With the map screen displayed,
use the Interface Dial to move the
cursor. It will change to crosshairs.
Use the Interface Dial to position
the crosshairs on your desired new
destination, street, or icon, then push in
on the Interface Dial . The Select an
item screen or a pop-up menu may be
displayed if there are multiple POIs in
the vicinity.
NOTE:
The Select an item screen will be
displayed when the crosshairs are
positioned near multiple icons or
locations. A pop-up menu will be
displayed when the crosshairs are
positioned on a particular street. If this is not your desired new
destination, press the CANCEL
button
or the BACK button to return to the
map screen. Reposition the crosshairs
with the Interface Dial , then push in
on the Interface Dial again to see the
new address.
When the Select an item screen is
displayed, select an item from the list,
and the Calculate route to screen is
displayed. Then select OK and push in
on the Interface Dial .
2010 TL
Page 77 of 174

Driving to Your Destination
Navigation System77
When the pop-up menu is displayed,
select New Dest . to set your location
as a replacement destination, or
Waypoint to set as a waypoint.
The system will return to the map
screen and recalculate the route to your
new destination or waypoint.
Entering a Destination from the
Menu Screen (while en route)
If you say “Menu”, or press the MENU
button and select the “Dest. MENU
1” or “Dest. MENU 2” tab, the system
displays the MENU screen. Follow
the procedure described in Entering a
Destination , which begins on page 28 .
When the Calculate route to screen is
displayed, select OK and push in on the
Interface Dial .
When the pop-up menu is displayed,
select New Dest . to set your location
as a replacement destination, or
Waypoint to set as a waypoint.
The system will return to the map
screen and recalculate the route to your
specifi ed new destination or waypoint.
Continue Trip to Screen
If you restart the vehicle without having
completed your prior trip, you will see
the following screen:
• To continue to your destination or
other waypoints, say or select OK.
• To cancel your destination, press the CANCEL button or the BACK
button on the steering wheel, or
using the voice control system, say
“Cancel” or “Back.”
• If you wish to change the routing method, select Route Pref. by using
the Interface Dial .
• For additional information on changing the routing method, see
Changing the Routing Method on
page 52 .
2010 TL
Page 78 of 174

Driving to Your Destination
78 Navigation System
AcuraLink Messages
AcuraLink enhances your ownership
experience by providing a direct
communication link between you
and Acura. AcuraLink messages are
displayed on the navigation screen.
Working through XM
® Satellite Radio,
AcuraLink works in conjunction with
your vehicle’s navigation, Bluetooth
®
HandsFreeLink® (HFL), and audio
systems to send and receive several
kinds of message. These include:
• Operating tips and information on your vehicle’s features.
• Important recall and safety information.
• Maintenance information to keep your vehicle in top condition.
• Diagnostic information to provide information about any problems with
your veh icle.
• Planned appointments with your Acura dealer. NOTE:
See your vehicle Owner’s manual for
more details on this feature.
When service information is received
from your vehicle or AcuraLink, an
envelope icon is displayed in the bottom
left corner of the navigation screen.
To view messages, press the
INFO
button and select or say “Message.” You
can also push in on the Interface Dial
on the map screen to get to the Map
menu , and select “New Messages.”
The Interface Dial controls most
AcuraLink functions. For more
information on AcuraLink, refer to:
• The Advanced Technology Guide for features and a function overview. • The vehicle Owner’s manual for a
detailed explanation of the system.
2010 TL
Page 79 of 174
, say “Information”
or press the INFO button. To change it
t")
Information Features
Navigation System79
The INFO function consists of two
main screens. To display the INFO
screen ( Main Info ), say “Information”
or press the INFO button. To change it
to the INFO screen ( Other), select the
“Other” tab. You can switch screens by
selecting the tab.
You can use the voice control system to
select any item on the INFO screen.
NOTE:
For information on the available voice
commands, see Voice Command Index
on page 158 . INFO Screen (Main Info)
When you say “Information” or press
the INFO button, the display changes to:
Move the Interface Dial to the left
and right to display Main Info or
Other .
Cellular Phone
The Cellular Phone option (available
on some phones) allows you to
import up to 1,000 names and 10,000
phone numbers to the phonebook of
Bluetooth ® HandsFreeLink® (HFL)
from your cellular phonebook.
Up to six phones can have their
phonebooks imported. With HFL, you
can then automatically dial any name or
number in the phonebook.
Say or select Cellular Phone from
the INFO screen ( Main Info ), and the
display changes to:
NOTE:
• For more information on this feature, see your vehicle Owner’s manual.
2010 TL
Page 80 of 174
 528-7876, or (888) 9-HONDA-
9 in Canada, or go to www.ac")
Information Features
80 Navigation System
• For questions about the HFL
Cellular Phonebook, call
HandsFreeLink customer support at
(888) 528-7876, or (888) 9-HONDA-
9 in Canada, or go to www.acura.
com/handsfreelink .
Messages
See A c u r a L i n k M e s s a g e s on page 78 .
Tr a ffi c Incidents
When you say or select Tr a f � c
Incidents , you can view a list of the
traffi c incidents near your current
position or along your calculated route.
See Viewing Incident Reports o n p a ge 2 5
and Traffi c Rerouting on page 72 .
NOTE:
To receive traffi c information, your XM
traffi c /weather subscription must be
paid. See page 120 for details. If you select an incident from the list
and push in on the Interface Dial
, the
detailed information and the map of the
surrounding area will appear.
NOTE:
When information regarding Traffi c
Incidents cannot be received, this
feature cannot be selected. After
a period of 15 minutes, Tr a f � c
Incidents may be selected but the
message “Traffi c information could not
be received” will be displayed. For an
explanation regarding the verifi cation
of reception status, please see Tra f fi c &
Weather Status on page 120 .
AcuraLink Weather
The Weather Info option allows you
to view the weather forecast, warning
list, warning map, and radar map.
When you say or select Weather
Information on the Map menu or
INFO screen, the following screen
appears:
NOTE:
• You can view the same screen by selecting Weather Info . from the
Map menu (see page 57 ) .
• To receive weather information, your XM traffi c /weather subscription must
be paid. See page 120 ��for details.
2010 TL
 1
1 2
2 3
3 4
4 5
5 6
6 7
7 8
8 9
9 10
10 11
11 12
12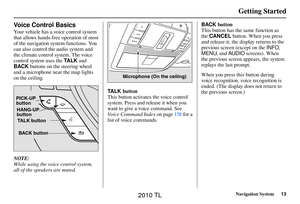 13
13 14
14 15
15 16
16 17
17 18
18 19
19 20
20 21
21 22
22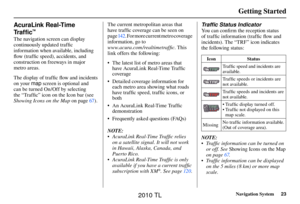 23
23 24
24 25
25 26
26 27
27 28
28 29
29 30
30 31
31 32
32 33
33 34
34 35
35 36
36 37
37 38
38 39
39 40
40 41
41 42
42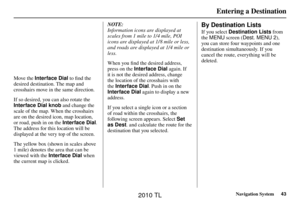 43
43 44
44 45
45 46
46 47
47 48
48 49
49 50
50 51
51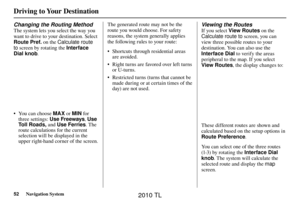 52
52 53
53 54
54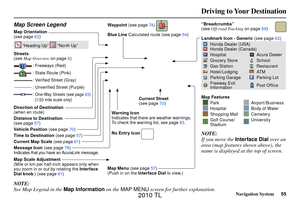 55
55 56
56 57
57 58
58 59
59 60
60 61
61 62
62 63
63 64
64 65
65 66
66 67
67 68
68 69
69 70
70 71
71 72
72 73
73 74
74 75
75 76
76 77
77 78
78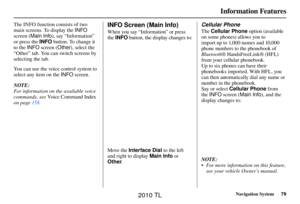 79
79 80
80 81
81 82
82 83
83 84
84 85
85 86
86 87
87 88
88 89
89 90
90 91
91 92
92 93
93 94
94 95
95 96
96 97
97 98
98 99
99 100
100 101
101 102
102 103
103 104
104 105
105 106
106 107
107 108
108 109
109 110
110 111
111 112
112 113
113 114
114 115
115 116
116 117
117 118
118 119
119 120
120 121
121 122
122 123
123 124
124 125
125 126
126 127
127 128
128 129
129 130
130 131
131 132
132 133
133 134
134 135
135 136
136 137
137 138
138 139
139 140
140 141
141 142
142 143
143 144
144 145
145 146
146 147
147 148
148 149
149 150
150 151
151 152
152 153
153 154
154 155
155 156
156 157
157 158
158 159
159 160
160 161
161 162
162 163
163 164
164 165
165 166
166 167
167 168
168 169
169 170
170 171
171 172
172 173
173