Page 97 of 166
89
4
EASE OF USE and COMFORT
Practical information
Smoker's kit
Located at the base of the centre console,
this consists of a cigar lighter and an
ashtray.
12 V socket (180 W max)
An accessory socket is provided next to the
cigar lighter.
FRONT FITTINGS
Folding writing table (Light van)
This is located in the centre of the fascia
panel. In the absence of a table, the vehicle
is fitted with a storage compartment.
The clip can be used to secure A5 format
documents, slips, etc.
Pull the top of the table to unfold it, push to
fold it. Storage compartment in the door trays
With recess for storing a 1 litre bottle.
Page 98 of 166
90
Practical information Sun visor
To avoid glare from ahead, fold and direct
the sun visor down.
Toll cards, tickets, etc. can be slipped into
the sun visor on the driver's side.
The sun visor on the passenger's side may
be fitted with a courtesy mirror.
Glove box
To open it raise the handle.
It can accommodate a laptop computer.
It provides storage for the handbook pack.
Spectacles storage (Combi)
There is a spectacles storage compartment
on the driver's side, above the door.
To open it, unclip the cover pulling at the
centre.
Page 99 of 166

91
4
EASE OF USE and COMFORT
Practical information
LOAD SPACE LAYOUT
Stowing rings
There are 6 stowing rings on the rear floor to
secure your loads.
As a safety precaution in case of sharp
braking, you are advised to place heavy
objects as far forwards towards the driver ’s
seat as possible. Storage tray
A storage tray is provided at the rear left of
the load space.
Torch
A magnetic torch is provided at the rear right
of the load space.
Remove the torch from its base by
pressing the button then pivoting the torch
downwards by 90 degrees.
To switch on the torch, slide the switch
forwards.
To change the 4 storage batteries (NiMH
type), remove the protective cover from the
torch.
To put the torch back in place, engage
it in the notches on the base and pivot it
upwards.
Ladder type vertical partition
Behind the driver ’s seat, a ladder type
vertical partition protects the driver against
the risk of load movement.
Partitions
Panel, glazed and mid-height panel
with grille type partitions are offered to
complement your light van.
The transportation of passengers in the
load space is not permitted.
You are advised to immobilise the load
by securing it firmly using the stowing
rings on the floor. The torch’s storage batteries recharge
automatically while driving.
An additional light is installed in the centre of
the torch base (refer to the "Interior lighting"
section).
Page 100 of 166
Page 101 of 166
93
4
EASE OF USE and COMFORT
Practical information
REAR LAYOUT
Stowing rings
There are 4 stowing rings on the rear floor to
secure your luggage.
Luggage retaining net
Hooked onto the stowing rings, this enables
you to secure your luggage. Rear shelf
Unfold the shelf to conceal the contents of
the boot from sight from the outside.
Fold the shelf back on itself for easier
access to the contents of the boot.
Store the shelf behind the rear bench seat
when loading bulky items vertically.
Removing the shelf
Fold the shelf back on itself.
Lift the shelf to approximately 60°.
Unclip the shelf's side fixings from its
supports.
Remove the shelf.
Store the folded shelf in the location behind
the rear bench seat.
To put the shelf back in place, carry out
these operations in reverse order.
Page 102 of 166
94
Practical information
Retaining straps
There are two retaining straps on the left-
hand side of the boot.
They secure the tool kit. Torch
A magnetic torch is provided on the right-
hand side of the boot.
Remove the torch from its base by
pressing the button then pivoting the torch
downwards by 90 degrees.
To switch on the torch, slide the switch
forwards.
To change the 4 storage batteries
(NiMH type), remove the protective cover,
located on the torch.
To put the torch back in place, engage it in
the notches on the base and pivot it upwards.
The torch's storage batteries recharge
automatically while driving.
A boot lamp is installed in the centre of
the torch base (refer to the "Interior lighting"
section).
Page 103 of 166

95
4
EASE OF USE and COMFORT
Practical information
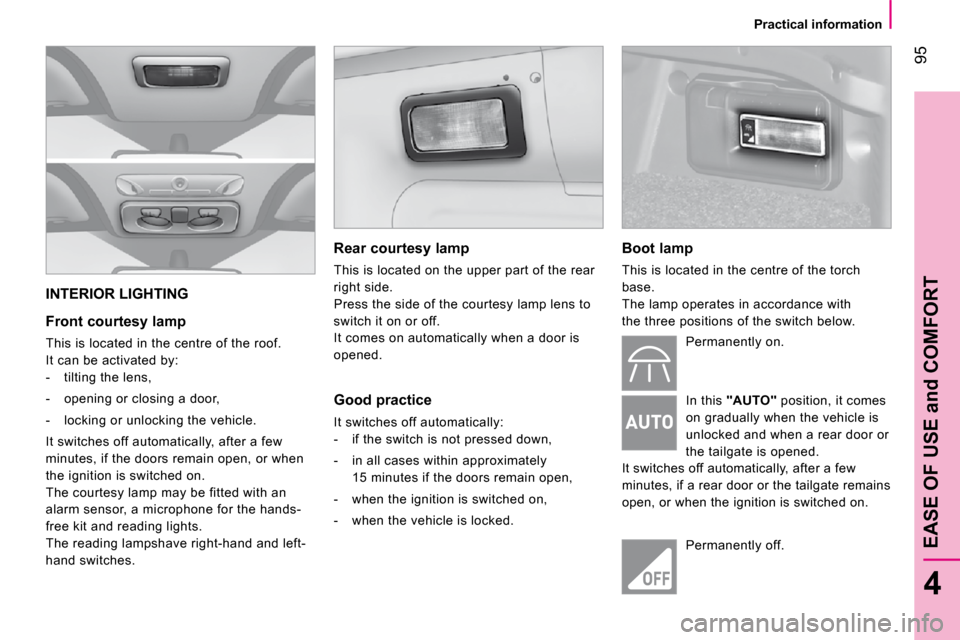
INTERIOR LIGHTING
Front courtesy lamp
This is located in the centre of the roof.
It can be activated by:
- tilting the lens,
- opening or closing a door,
- locking or unlocking the vehicle.
It switches off automatically, after a few
minutes, if the doors remain open, or when
the ignition is switched on.
The courtesy lamp may be fitted with an
alarm sensor, a microphone for the hands-
free kit and reading lights.
The reading lampshave right-hand and left-
hand switches. Rear courtesy lamp
This is located on the upper part of the rear
right side.
Press the side of the courtesy lamp lens to
switch it on or off.
It comes on automatically when a door is
opened.
Good practice
It switches off automatically:
- if the switch is not pressed down,
- in all cases within approximately
15 minutes if the doors remain open,
- when the ignition is switched on,
- when the vehicle is locked. Boot lamp
This is located in the centre of the torch
base.
The lamp operates in accordance with
the three positions of the switch below.
Permanently on.
In this "AUTO" position, it comes
on gradually when the vehicle is
unlocked and when a rear door or
the tailgate is opened.
It switches off automatically, after a few
minutes, if a rear door or the tailgate remains
open, or when the ignition is switched on.
Permanently off.
Page 104 of 166
96
Driving safely
PARKING BRAKE
Applying
Pull the parking brake lever up to immobilise
your vehicle.
Check that the parking brake is applied
firmly before leaving the vehicle. If the parking brake is still on or
has not been released properly,
this is indicated by this warning
lamp which comes on on the
instrument panel.
When parking on a slope, direct your wheels
towards the pavement and pull the parking
brake lever up.
There is no advantage in engaging a gear
after parking the vehicle, particularly if the
vehicle is loaded. Releasing
Pull the lever and press the button to lower
the parking brake lever.
HAZARD WARNING LIGHTS
Press this button, the two direction
indicators flash.
They operate with the ignition off.
When the hazard warning lights are switched
on, the change of direction function, via the
right-hand or left-hand direction indicator, is
deactivated.