Page 78 of 150

7-20
1
2
3
4
5
67
8
9
10
11
RIDING OVER ROUGH TERRAIN
Riding over rough terrain should be done with cau-
tion. Look out for obstacles which could cause
damage to the ATV or could lead to an upset or ac-
cident. Be sure to keep your feet firmly mounted on
the footboards at all times. Avoid jumping the ATV
as loss of control and damage to the ATV may re-
sult.
WARNING
EWB01650
Before operating in a new area, check for ob-
stacles. Never attempt to ride over large obsta-
cles, such as large rocks or fallen trees. Whenyou go over obstacles, always follow proper
procedures as described in the Owner’s Manu-
al.
SLIDING AND SKIDDING
Care should be used when riding on loose or slip-
pery surfaces since the ATV may slide. If unex-
pected and uncorrected, sliding could lead to an
accident.
To reduce the tendency for the front wheels to slide
in loose or slippery conditions, positioning your
weight over the front wheels will sometimes help.
If the rear wheels of your ATV start to slide side-
ways, control can usually be regained (if there is
room to do so) by steering in the direction of the
1. Air filter case check hose
1
Page 79 of 150

7-21
1
2
3
4
5
67
8
9
10
11
slide. Applying the brakes or accelerating is not
recommended until you have corrected the slide.
With practice, over a period of time, skill at con-
trolled sliding can be developed. The terrain
should be chosen carefully before attempting such
maneuvers, since both stability and control are re-
duced. Bear in mind that sliding maneuvers should
always be avoided on extremely slippery surfaces
such as ice, since all control may be lost.
WARNING
EWB01661
Learn to safely control skidding or sliding by
practicing at low speeds and on level, smoothterrain.
On extremely slippery surfaces, such as ice,
go slowly and be very cautious in order to re-
duce the chance of skidding or sliding out of
control.
WHAT TO DO IF...
This section is designed to be a reference guide
only. Be sure to read each section on riding tech-
niques completely.
WHAT TO DO...
�
If your ATV doesn’t turn when you want it to:
Bring the ATV to a stop and practice the turning
maneuvers again. Be sure you are putting your
weight on the footboard to the outside of the
turn. Position your weight over the front wheels
for better control. (See page 7-12.)
�
If your ATV begins to tip while turning:
Lean more into the turn to regain balance. If nec-
essary, gradually let off the throttle and/or steer
to the outside of the turn. (See page 7-12.)
�
If your ATV starts to slide sideways:
Steer in the direction of the slide if you have the
room. Applying the brakes or accelerating is not
recommended until you have corrected the
Page 81 of 150

8-1
1
2
3
4
5
6
78
9
10
11
EBU28781
PERIODIC MAINTENANCE AND MINOR REPAIR
EBU21670
Safety is an obligation of the owner. Periodic in-
spection, adjustment and lubrication will keep your
ATV in the safest and best operating condition
possible. The most important points of inspection,
adjustment, and lubrication are explained on the
following pages.
The intervals given in the periodic maintenance
and lubrication chart should be considered as a
general guide under normal riding conditions.
However, DEPENDING ON THE WEATHER,
TERRAIN, GEOGRAPHICAL LOCATION, AND
INDIVIDUAL USE, THE MAINTENANCE INTER-
VALS MAY NEED TO BE SHORTENED.
WARNING
EWB01840
Never service an engine while it is running.
Moving parts can catch clothing or parts of the
body, causing injury. Electrical components
can cause shocks or start fires. Turn off the en-
gine when performing maintenance unless
otherwise specified. Have a Yamaha dealer
perform the service if you are not familiar with
maintenance work.
EBU27110
Owner’s manual and tool kit
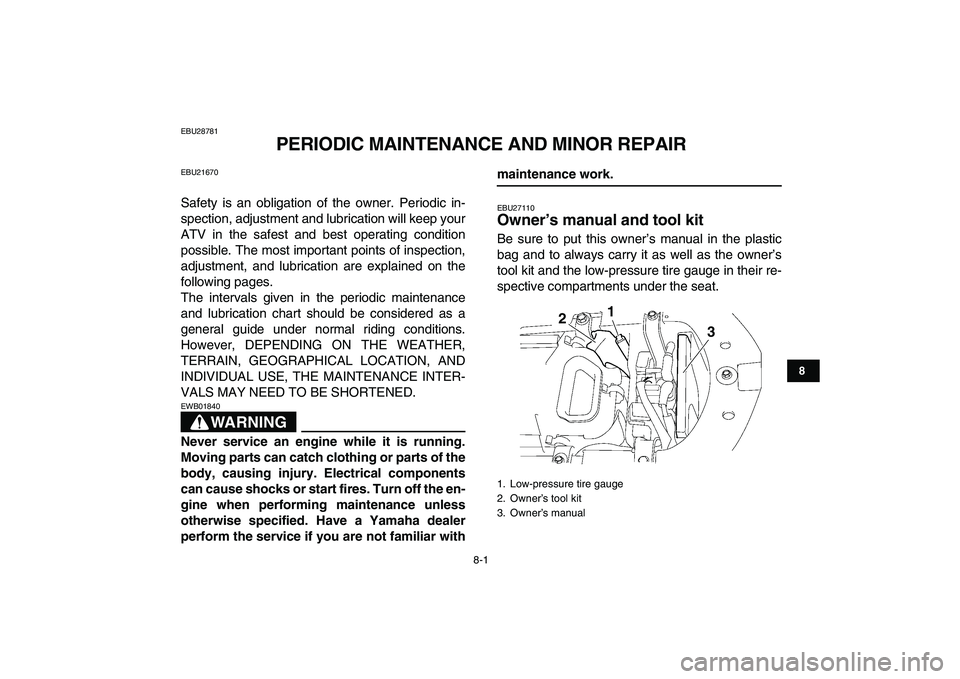
Be sure to put this owner’s manual in the plastic
bag and to always carry it as well as the owner’s
tool kit and the low-pressure tire gauge in their re-
spective compartments under the seat.
1. Low-pressure tire gauge
2. Owner’s tool kit
3. Owner’s manual
3 21
Page 82 of 150
8-2
1
2
3
4
5
6
78
9
10
11
The service information included in this manual
and the tools provided in the owner’s tool kit are in-
tended to assist you in the performance of preven-
tive maintenance and minor repairs. However,
additional tools such as a torque wrench may be
necessary to perform certain maintenance work
correctly.
TIP
If you do not have the tools or experience required
for a particular job, have a Yamaha dealer perform
it for you.
WARNING
EWB01850
Never modify this ATV through improper in-
stallation or use of accessories, as it may
cause changes in handling, which in some sit-
uations could lead to an accident. All parts and
accessories added to this ATV should be gen-
uine Yamaha or equivalent components de-
signed for use on this ATV and should be
installed and used according to instructions. If
you have questions, consult an authorized
Yamaha ATV dealer.
Page 91 of 150

8-11
1
2
3
4
5
6
78
9
10
11
dance with the periodic maintenance and lubrica-
tion chart. In addition, the condition of the spark
plug can reveal the condition of the engine.
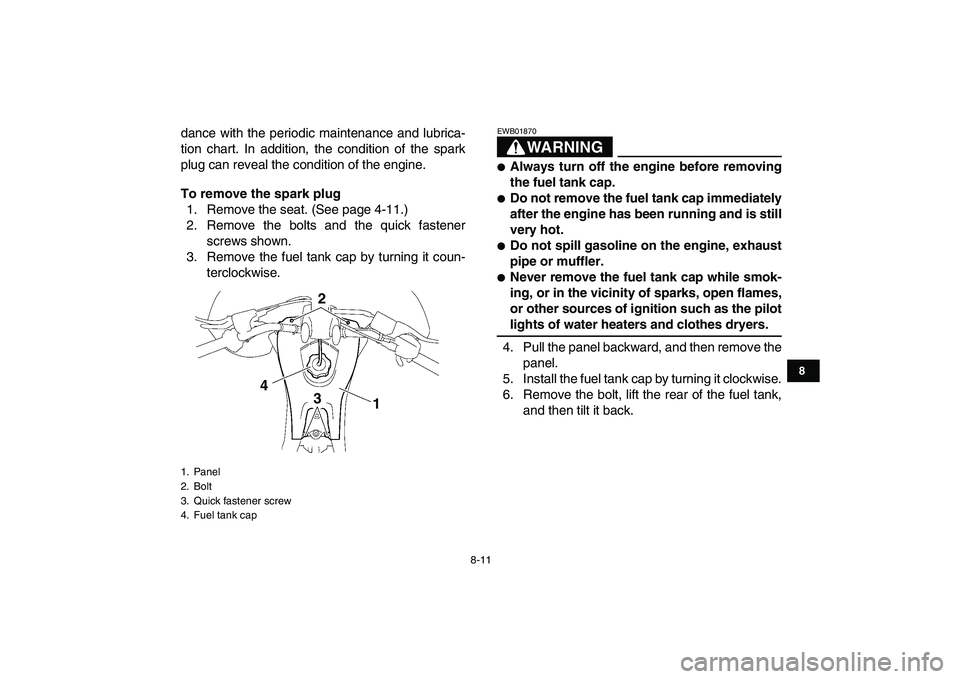
To remove the spark plug
1. Remove the seat. (See page 4-11.)
2. Remove the bolts and the quick fastener
screws shown.
3. Remove the fuel tank cap by turning it coun-
terclockwise.WARNING
EWB01870
�
Always turn off the engine before removing
the fuel tank cap.
�
Do not remove the fuel tank cap immediately
after the engine has been running and is still
very hot.
�
Do not spill gasoline on the engine, exhaust
pipe or muffler.
�
Never remove the fuel tank cap while smok-
ing, or in the vicinity of sparks, open flames,
or other sources of ignition such as the pilot
lights of water heaters and clothes dryers.
4. Pull the panel backward, and then remove the
panel.
5. Install the fuel tank cap by turning it clockwise.
6. Remove the bolt, lift the rear of the fuel tank,
and then tilt it back.
1. Panel
2. Bolt
3. Quick fastener screw
4. Fuel tank cap
2
4
3
1
Page 101 of 150

8-21
1
2
3
4
5
6
78
9
10
11
3. If the coolant is at or below the minimum level
mark, remove panel A. (See page 8-9.)
4. Remove the reservoir cap, add coolant or dis-
tilled water to the maximum level mark, install
the reservoir cap, and then install the panel.NOTICE
ECB00401
�
If coolant is not available, use distilled water
or soft tap water instead. Do not use hard wa-
ter or salt water since it is harmful to the en-
gine.
�
If water has been used instead of coolant, re-
place it with coolant as soon as possible,
otherwise the cooling system will not be pro-
tected against frost and corrosion.
�
If water has been added to the coolant, have
a Yamaha dealer check the antifreeze con-
tent of the coolant as soon as possible, oth-
erwise the effectiveness of the coolant will
be reduced.
TIP
If the engine overheats, see page 8-55 for further
instructions.
EBU23561
To change the coolant
WARNING
EWB01890
Wait for the engine and radiator to cool before
removing the radiator cap. You could be
1. Maximum level mark
2. Minimum level mark
3. Coolant reservoir
4. Coolant reservoir cap
Coolant reservoir capacity (up to the maximum
level mark):
0.29 L (0.31 US qt, 0.26 Imp.qt)
1
24
3
Page 106 of 150
8-26
1
2
3
4
5
6
78
9
10
11
8. Wash the sponge material gently but thor-
oughly in solvent.
WARNING
EWB01940
Always use parts cleaning solvent to clean the
sponge material. Never use low-flash-point
solvents or gasoline to clean the sponge mate-
rial because the engine could catch fire or ex-
plode.
9. Squeeze the excess solvent out of the sponge
material and let it dry.
NOTICE
ECB00440
Do not twist the sponge material when squeez-
ing it.
10. Check the sponge material and replace it if
damaged.
11. Apply a quality foam air filter oil to the sponge
material.
TIP
The sponge material should be wet but not drip-
ping.
12. Pull the sponge material over the air filter ele-
ment frame.
1. Sponge material
2. Air filter element frame
1 2
Page 109 of 150

8-29
1
2
3
4
5
6
78
9
10
11
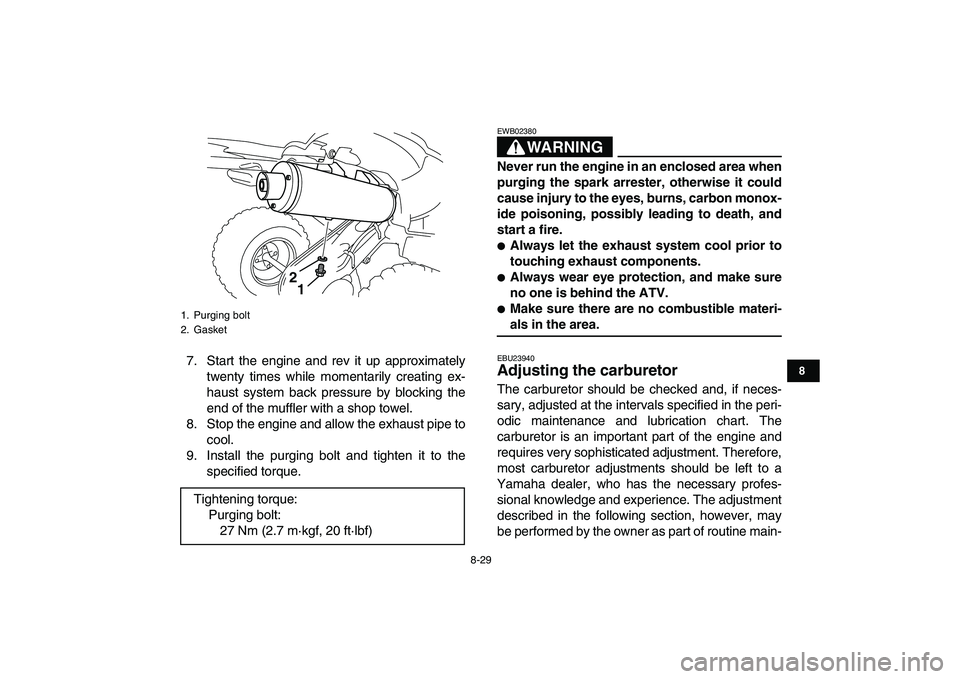
7. Start the engine and rev it up approximately
twenty times while momentarily creating ex-
haust system back pressure by blocking the
end of the muffler with a shop towel.
8. Stop the engine and allow the exhaust pipe to
cool.
9. Install the purging bolt and tighten it to the
specified torque.WARNING
EWB02380
Never run the engine in an enclosed area when
purging the spark arrester, otherwise it could
cause injury to the eyes, burns, carbon monox-
ide poisoning, possibly leading to death, and
start a fire.
�
Always let the exhaust system cool prior to
touching exhaust components.
�
Always wear eye protection, and make sure
no one is behind the ATV.
�
Make sure there are no combustible materi-
als in the area.
EBU23940
Adjusting the carburetor
The carburetor should be checked and, if neces-
sary, adjusted at the intervals specified in the peri-
odic maintenance and lubrication chart. The
carburetor is an important part of the engine and
requires very sophisticated adjustment. Therefore,
most carburetor adjustments should be left to a
Yamaha dealer, who has the necessary profes-
sional knowledge and experience. The adjustment
described in the following section, however, may
be performed by the owner as part of routine main-
1. Purging bolt
2. Gasket
Tightening torque:
Purging bolt:
27 Nm (2.7 m·kgf, 20 ft·lbf)
1 2