Page 110 of 148
8-35
83. Tap the tailpipe lightly, and then use a wire
brush to remove any carbon deposits from the
spark arrester portion of the tailpipe and inside
of the tailpipe housing.
4. Insert the tailpipe into the muffler and align the
bolt holes.
5. Install the tailpipe cover by installing the bolts,
and then tighten them to the specified torque.
WARNING
EWB02340Do not start the engine when cleaning the
spark arrester, otherwise it could cause injury
to the eyes, burns, carbon monoxide poison-
ing, possibly leading to death, and start a fire.
Always let the exhaust system cool prior totouching exhaust components.EBU23920V-belt cooling duct check hose If dust or water collects in the V-belt cooling duct
check hose, remove the hose and clean it.
1. Tailpipe
2. Spark arresterTightening torque:
Tailpipe bolt:
10 Nm (1.0 m·kgf, 7.2 ft·lbf)
1. V-belt cooling duct check hose (left front side of ATV)
U3C263E0.book Page 35 Thursday, May 15, 2008 10:44 AM
Page 111 of 148

8-36
8
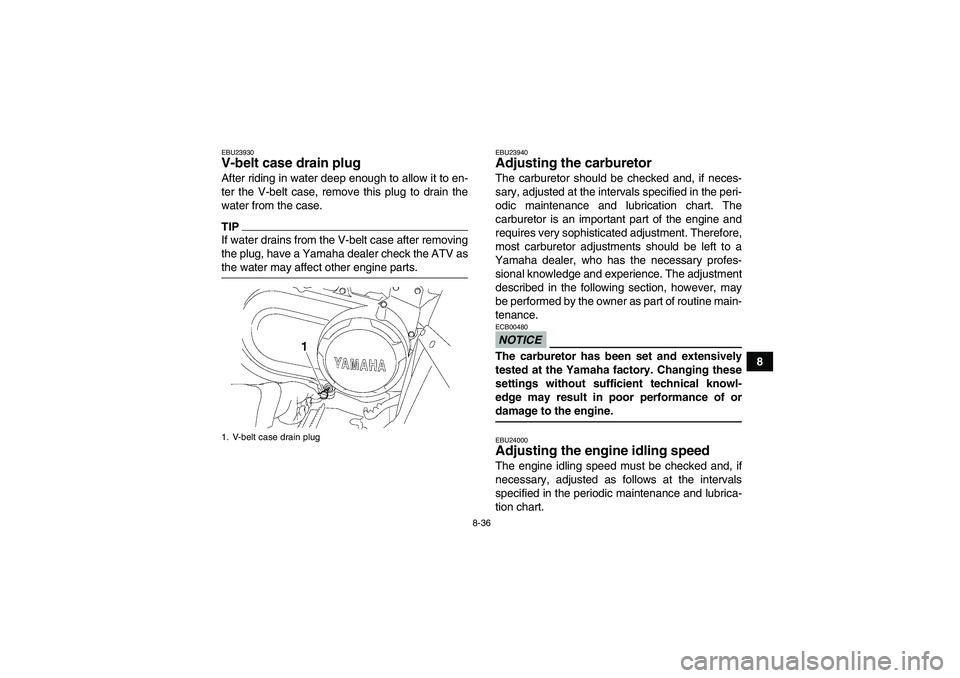
EBU23930V-belt case drain plug After riding in water deep enough to allow it to en-
ter the V-belt case, remove this plug to drain the
water from the case.TIPIf water drains from the V-belt case after removing
the plug, have a Yamaha dealer check the ATV asthe water may affect other engine parts.
EBU23940Adjusting the carburetor The carburetor should be checked and, if neces-
sary, adjusted at the intervals specified in the peri-
odic maintenance and lubrication chart. The
carburetor is an important part of the engine and
requires very sophisticated adjustment. Therefore,
most carburetor adjustments should be left to a
Yamaha dealer, who has the necessary profes-
sional knowledge and experience. The adjustment
described in the following section, however, may
be performed by the owner as part of routine main-
tenance.NOTICEECB00480The carburetor has been set and extensively
tested at the Yamaha factory. Changing these
settings without sufficient technical knowl-
edge may result in poor performance of ordamage to the engine.EBU24000Adjusting the engine idling speed The engine idling speed must be checked and, if
necessary, adjusted as follows at the intervals
specified in the periodic maintenance and lubrica-
tion chart.
1. V-belt case drain plugU3C263E0.book Page 36 Thursday, May 15, 2008 10:44 AM
Page 112 of 148
8-37
8
TIPA diagnostic tachometer is needed to make thisadjustment.
1. Start the engine and warm it up.TIPThe engine is warm when it quickly responds to thethrottle.
2. Attach the tachometer to the spark plug lead.
3. Check the engine idling speed and, if neces-
sary, adjust it to specification by turning the
throttle stop screw at the carburetor. To in-
crease the engine idling speed, turn the throt-
tle stop screw in direction (a), and to decrease
it, turn the screw in direction (b).
TIPIf the specified idling speed cannot be obtained as
described above, have a Yamaha dealer make theadjustment.1. Throttle stop screwEngine idling speed:
1450–1550 r/min
U3C263E0.book Page 37 Thursday, May 15, 2008 10:44 AM
Page 113 of 148

8-38
8
EBU24044Adjusting the throttle cable free play The throttle cable free play should be checked
and, if necessary, adjusted at the intervals speci-
fied in the periodic maintenance and lubrication
chart.
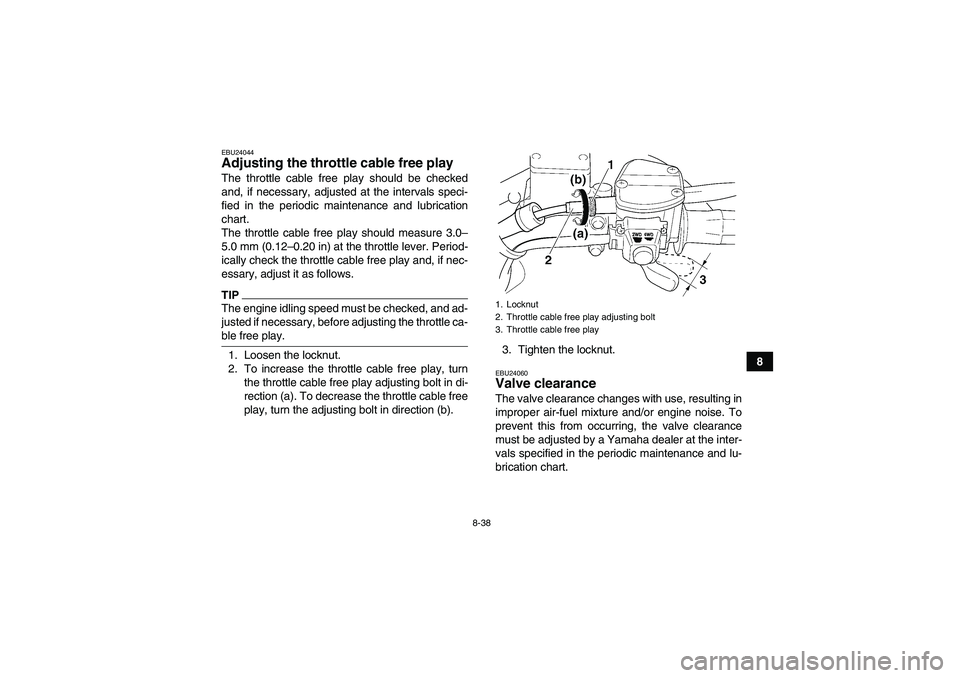
The throttle cable free play should measure 3.0–
5.0 mm (0.12–0.20 in) at the throttle lever. Period-
ically check the throttle cable free play and, if nec-
essary, adjust it as follows.TIPThe engine idling speed must be checked, and ad-
justed if necessary, before adjusting the throttle ca-ble free play.
1. Loosen the locknut.
2. To increase the throttle cable free play, turn
the throttle cable free play adjusting bolt in di-
rection (a). To decrease the throttle cable free
play, turn the adjusting bolt in direction (b).3. Tighten the locknut.
EBU24060Valve clearance The valve clearance changes with use, resulting in
improper air-fuel mixture and/or engine noise. To
prevent this from occurring, the valve clearance
must be adjusted by a Yamaha dealer at the inter-
vals specified in the periodic maintenance and lu-
brication chart.1. Locknut
2. Throttle cable free play adjusting bolt
3. Throttle cable free play
U3C263E0.book Page 38 Thursday, May 15, 2008 10:44 AM
Page 120 of 148

8-45
8
EBU24752Brake light switches The operation of the brake light switches must be
checked and, if necessary, adjusted at the inter-
vals specified in the periodic maintenance and lu-
brication chart.
The brake light switch for the brake pedal can be
adjusted as follows, but the other brake light
switches should be adjusted by a Yamaha dealer.
1. Remove panel A. (See page 8-9.)TIPThe brake light switch is properly adjusted when
the brake light comes on just before braking takeseffect.
2. Turn the brake light switch adjusting nut while
holding the brake light switch in place. To
make the brake light come on earlier, turn the
adjusting nut in direction (a). To make the
brake light come on later, turn the adjusting
nut in direction (b).3. Install the panel.
EBU24900Checking and lubricating the cables The operation and the condition of all control ca-
bles should be checked before each ride, and the
cables and cable ends should be lubricated if nec-
essary. If a cable is damaged or does not move
smoothly, have a Yamaha dealer check or replace
it.1. Brake light switch
2. Brake light switch adjusting nutRecommended lubricant:
Engine oil
U3C263E0.book Page 45 Thursday, May 15, 2008 10:44 AM
Page 132 of 148

8-57
8
EBU25782Troubleshooting charts Starting problems or poor engine performance
Check the fuel level in
the fuel tank.1. Fuel
There is enough fuel.
There is no fuel.
Check the compression.
Supply fuel.
The engine does not start.
Check the compression.
Operate the electric starter.2. Compression
There is compression.
There is no compression.
Check the ignition.
Have a Yamaha dealer
check the ATV.
Remove the spark plug
and check the electrodes.3. Ignition
Wipe off with a dry cloth and correct the
spark plug gap, or replace the spark plug.
Have a Yamaha dealer check the ATV.
The engine does not start.
Have a Yamaha dealer
check the ATV.
The engine does not start.
Check the battery.
Operate the electric starter.4. Battery
The engine turns over
quickly.
The engine turns over
slowly.
The battery is good.Check the battery lead connections,
and charge the battery if necessary.
DryWet
Open the throttle halfway and operate
the electric starter.
U3C263E0.book Page 57 Thursday, May 15, 2008 10:44 AM
Page 133 of 148
8-58
8 Engine overheating
WARNING
EWB02290Wait for the engine and radiator to cool before removing the radiator cap. You could be burned by
hot fluid and steam blown out under pressure. Always put a thick rag over the cap when opening.Allow any remaining pressure to escape before completely removing the cap.TIPIf coolant is not available, tap water can be temporarily used instead, provided that it is changed to the rec-ommended coolant as soon as possible.Wait until the
engine has cooled.
Check the coolant level in the
reservoir and radiator.
The coolant level
is OK.The coolant level is low.
Check the cooling system
for leakage.
Have a Yamaha dealer check
and repair the cooling system.Add coolant. (See TIP.)
Start the engine. If the engine overheats again, have a
Yamaha dealer check and repair the cooling system.
There is
leakage.
There is
no leakage.
U3C263E0.book Page 58 Thursday, May 15, 2008 10:44 AM
Page 136 of 148

9-3
9c. Install the spark plug cap onto the spark
plug, and then place the spark plug on the
cylinder head so that the electrodes are
grounded. (This will limit sparking during
the next step.)
d. Turn the engine over several times with the
starter. (This will coat the cylinder wall with
oil.)
e. Remove the spark plug cap from the spark
plug, and then install the spark plug and
the spark plug cap.
6. Lubricate all control cables and the pivoting
points of all levers and pedals.
7. Check and, if necessary, correct the tire air
pressure, and then block up the ATV so that
all of its wheels are off the ground. Alternative-
ly, turn the wheels a little every month in order
to prevent the tires from becoming degraded
in one spot.
8. Cover the muffler outlet with a plastic bag to
prevent moisture from entering it.
9. Remove the battery and fully charge it. Store
it in a cool, dry place and charge it once a
month. Do not store the battery in an exces-
sively cold or warm place [less than 0 °C (30°F) or more than 30 °C (90 °F)]. For more in-
formation on storing the battery, see page
8-47.
TIPMake any necessary repairs before storing theATV.
U3C263E0.book Page 3 Thursday, May 15, 2008 10:44 AM