Page 9 of 130

Parking on a slope .................................... 6-5
Accessories and loading ........................... 6-6
RIDING YOUR ATV ...................................... 7-1
GETTING TO KNOW YOUR ATV.............. 7-2
RIDE WITH CARE AND GOOD
JUDGEMENT ........................................... 7-2
BE CAREFUL WHERE YOU RIDE ............ 7-9
TURNING YOUR ATV ............................. 7-13
CLIMBING UPHILL .................................. 7-14
RIDING DOWNHILL................................. 7-17
CROSSING A SLOPE.............................. 7-18
CROSSING THROUGH SHALLOW
WATER .................................................. 7-19
RIDING OVER ROUGH TERRAIN .......... 7-21
SLIDING AND SKIDDING ........................ 7-21
WHAT TO DO IF... ................................... 7-22
WHAT TO DO... ....................................... 7-22
PERIODIC MAINTENANCE AND MINOR
REPAIR .......................................................... 8-1
Owner’s manual and tool kit ...................... 8-1
Periodic maintenance chart for the
emission control system .......................... 8-3
General maintenance and lubrication
chart ........................................................ 8-5
Checking the spark plug ............................ 8-8
Engine oil .................................................. 8-9
Transmission oil ...................................... 8-12Cleaning the engine and V-belt case air
filter elements ........................................ 8-15
V-belt case drain plug .............................. 8-21
Adjusting the carburetor ........................... 8-22
Adjusting the engine idling speed ............ 8-22
Adjusting the throttle cable free play ........ 8-23
Valve clearance ....................................... 8-24
Checking the front and rear brake
shoes ..................................................... 8-24
Adjusting the front brake lever free
play ........................................................ 8-25
Adjusting the rear brake lever free
play ........................................................ 8-30
Drive chain slack ...................................... 8-32
Lubricating the drive chain ....................... 8-34
Checking and lubricating the cables ........ 8-35
Checking and lubricating the front and
rear brake levers .................................... 8-36
Checking the wheel hub bearings ............ 8-36
Lubricating the upper and lower arm
pivots ..................................................... 8-36
Lubricating the front knuckle pivots ......... 8-37
Lubricating the steering shaft ................... 8-38
Battery ..................................................... 8-38
Replacing the fuse ................................... 8-41
Replacing a headlight bulb ...................... 8-42
Adjusting a headlight beam ..................... 8-44
Replacing the tail/brake light bulb ............ 8-44
Removing a wheel ................................... 8-45
Page 65 of 130
7-20
1
2
3
4
5
67
8
9
10
11
NOTICE
ECB00800
After riding your ATV in water, be sure to drain
the trapped water by removing the check hose
at the bottom of the air filter case and the V-belt
case drain plug. Wash the ATV in fresh water if
it has been operated in salt water or muddy
conditions.
1. Air filter case check hose
1. V-belt case drain plug
1
1
Page 75 of 130
8-7
1
2
3
4
5
6
78
9
10
11
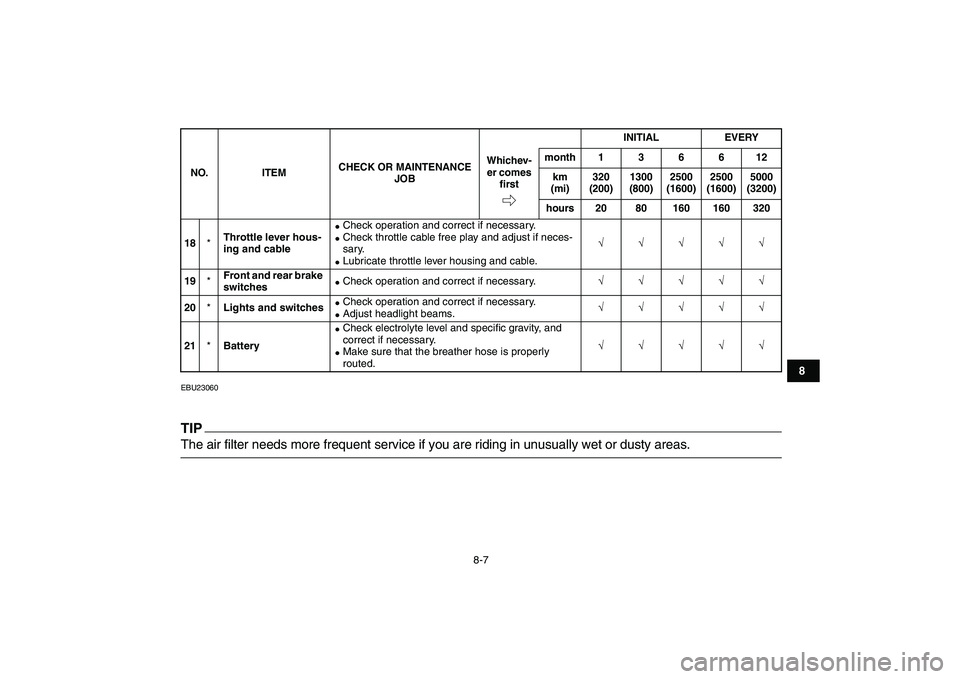
EBU23060
TIP
The air filter needs more frequent service if you are riding in unusually wet or dusty areas.
18
*
Throttle lever hous-
ing and cable
�
Check operation and correct if necessary.
�
Check throttle cable free play and adjust if neces-
sary.
�
Lubricate throttle lever housing and cable.
√√√√√
19
*
Front and rear brake
switches
�
Check operation and correct if necessary.
√√√√√
20
*
Lights and switches
�
Check operation and correct if necessary.
�
Adjust headlight beams.
√√√√√
21
*
Battery
�
Check electrolyte level and specific gravity, and
correct if necessary.
�
Make sure that the breather hose is properly
routed.
√√√√√
NO. ITEMCHECK OR MAINTENANCE
JOBINITIAL EVERY
Whichev-
er comes
firstmonth136612
km
(mi)320
(200)1300
(800)2500
(1600)2500
(1600)5000
(3200)
hours 20 80 160 160 320
Page 83 of 130
8-15
1
2
3
4
5
6
78
9
10
11
minutes while checking the transmission for
oil leakage. If oil is leaking, immediately turn
off the engine and check for the cause.
8. Turn the engine off, and then check the oil lev-
el and correct it if necessary.
EBU23841
Cleaning the engine and V-belt case air
filter elements
Both air filter elements should be cleaned at the
specified intervals in the periodic maintenance
chart.
Engine air filter element
TIP
There is a check hose at the bottom of the air filter
case. If dust or water collects in this hose, empty
the hose and clean the air filter element and air fil-
ter case.1. Remove the seat. (See page 4-9.)
2. Remove the breather hose, and then loosen
the clamp screw.
1. Check hose
1
Page 84 of 130
8-16
1
2
3
4
5
6
78
9
10
11
3. Remove the air filter case cover by removing
the screws.4. Pull the air filter element out of the air filter
case.
5. Remove the bolt and washer shown, and then
pull the sponge material off from the air filter
element frame.
1. Breather hose
2. Clamp screw
1
2
1. Air filter case cover
2. Screw
1 22
2
2
Page 85 of 130
8-17
1
2
3
4
5
6
78
9
10
11
6. Wash the sponge material gently but thor-
oughly in solvent.
WARNING
EWB01940
Always use parts cleaning solvent to clean the
sponge material. Never use low-flash-point
solvents or gasoline to clean the sponge mate-
rial because the engine could catch fire or ex-
plode.
7. Squeeze the excess solvent out of the spongematerial and let it dry.
NOTICE
ECB00440
Do not twist the sponge material when squeez-
ing it.
8. Check the sponge material and replace it if
damaged.
9. Apply a quality foam air filter oil to the sponge
material.
TIP
The sponge material should be wet but not drip-
ping.
10. Pull the sponge material over the air filter ele-
1. Bolt
2. Washer
3. Sponge material
4. Air filter element frame
3 4
21
Page 86 of 130

8-18
1
2
3
4
5
6
78
9
10
11
ment frame.
11. Install the washer and bolt.
NOTICE
ECB00450
Be sure to install the washer with the bent edge
facing upward as shown.
12. Install the air filter element into the air filter
case.
13. Install the air filter case cover by installing the
screws.
14. Install the breather hose and then tighten the
clamp screw.15. Install the seat.TIP
The air filter element should be cleaned every 20–
40 hours. It should be cleaned and lubricated more
often if the ATV is operated in extremely dusty ar-
eas. Each time the air filter element maintenance
is performed, check the air inlet of the air filter case
for obstructions. Check the air filter case rubber
joint to the carburetor fittings and the rubber joint
manifold fittings for an air-tight seal. Tighten all fit-
tings securely to avoid the possibility of unfiltered
air entering the engine.NOTICE
ECB00460
�
Make sure that the air filter element is prop-
erly seated in the air filter case.
�
Never operate the engine with the air filter el-
ement removed. This will allow unfiltered air
to enter the engine, causing rapid engine
wear and possible engine damage. Addition-
ally, operation without the air filter element
will affect carburetor jetting with subsequent
poor performance and possible engine over-
heating.
1. Washer
1
Page 87 of 130
8-19
1
2
3
4
5
6
78
9
10
11
V-belt case air filter element
1. Remove the front carrier by removing the
bolts.
2. Remove the panel shown by removing the
quick fasteners.3. Disconnect the coupler shown.
1. Bolt
2. Front carrier
2
11
1
1. Panel
2. Quick fastener
122
1