Page 33 of 130

5-1
1
2
3
45
6
7
8
9
10
11
EBU19200
PRE-OPERATION CHECKS
EBU19222
Pre-operation check list
Before operating this ATV, be sure to check the items listed in the following table.
WARNING
EWB00480
Always inspect your ATV each time you use it to make sure it is in safe operating condition.
Always follow the inspection and maintenance procedures and schedules described in the Owner’s
Manual. Failure to inspect increases the possibility of an accident or equipment damage.
TIP
The maintenance of some items in the table has to be performed by a Yamaha dealer. Refer to the periodic
maintenance charts on page 8-3 to determine which service should be performed by a Yamaha dealer.
ITEM ROUTINE PAGE
Fuel
�
Check fuel level in fuel tank, and add recommended fuel if neces-
sary.
�
Check fuel line for leakage. Correct if necessary.4-6, 5-3
Engine oil
�
Check oil level in engine, and add recommended oil to specified
level if necessary.
�
Check ATV for oil leakage. Correct if necessary.5-3, 8-9
Transmission oil
�
Check oil level in transmission case, and add recommended oil to
specified level if necessary.
�
Check ATV for oil leakage. Correct if necessary.5-3, 8-12
Front brake
�
Check operation, and correct if necessary.
�
Lubricate cable if necessary.
�
Check lever free play, and adjust if necessary.5-3, 8-24, 8-25
Page 69 of 130

8-1
1
2
3
4
5
6
78
9
10
11
EBU28781
PERIODIC MAINTENANCE AND MINOR REPAIR
EBU21670
Safety is an obligation of the owner. Periodic in-
spection, adjustment and lubrication will keep your
ATV in the safest and best operating condition
possible. The most important points of inspection,
adjustment, and lubrication are explained on the
following pages.
The intervals given in the periodic maintenance
and lubrication chart should be considered as a
general guide under normal riding conditions.
However, DEPENDING ON THE WEATHER,
TERRAIN, GEOGRAPHICAL LOCATION, AND
INDIVIDUAL USE, THE MAINTENANCE INTER-
VALS MAY NEED TO BE SHORTENED.
WARNING
EWB01840
Never service an engine while it is running.
Moving parts can catch clothing or parts of the
body, causing injury. Electrical components
can cause shocks or start fires. Turn off the en-
gine when performing maintenance unless
otherwise specified. Have a Yamaha dealer
perform the service if you are not familiar with
maintenance work.
EBU27110
Owner’s manual and tool kit
Be sure to put this owner’s manual in the plastic
bag and to always carry it as well as the owner’s
tool kit and the low-pressure tire gauge in their re-
spective compartments under the seat.
1. Owner’s manual
2. Low-pressure tire gauge
3. Owner’s tool kit
1
2 3
Page 70 of 130
8-2
1
2
3
4
5
6
78
9
10
11
The service information included in this manual
and the tools provided in the owner’s tool kit are in-
tended to assist you in the performance of preven-
tive maintenance and minor repairs. However,
additional tools such as a torque wrench may be
necessary to perform certain maintenance work
correctly.
TIP
If you do not have the tools or experience required
for a particular job, have a Yamaha dealer perform
it for you.
WARNING
EWB01850
Never modify this ATV through improper in-
stallation or use of accessories, as it may
cause changes in handling, which in some sit-
uations could lead to an accident. All parts and
accessories added to this ATV should be gen-
uine Yamaha or equivalent components de-
signed for use on this ATV and should be
installed and used according to instructions. If
you have questions, consult an authorized
Yamaha ATV dealer.
Page 75 of 130
8-7
1
2
3
4
5
6
78
9
10
11
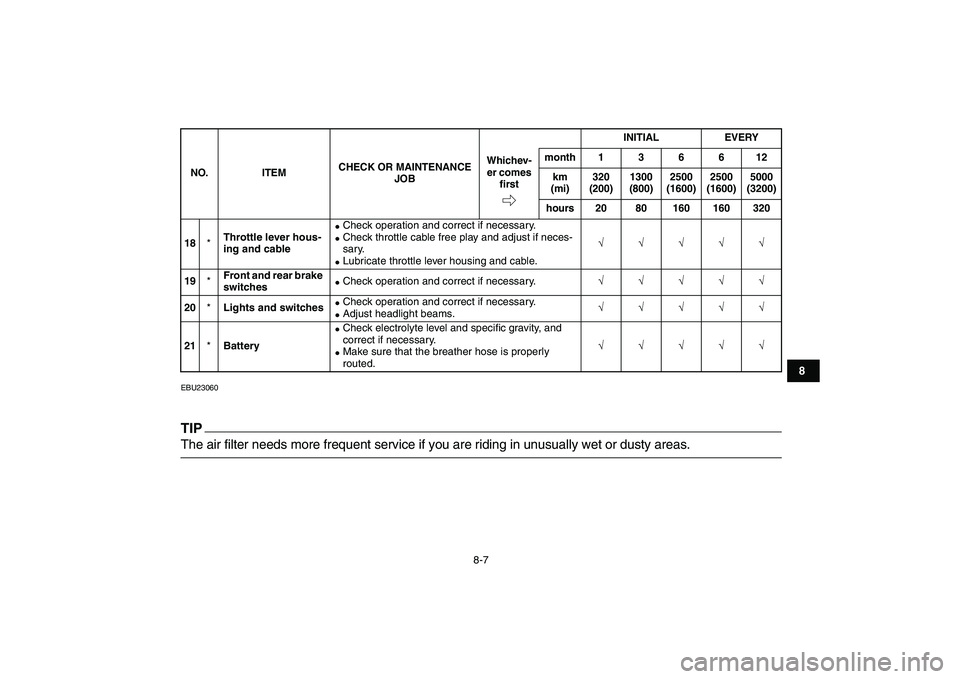
EBU23060
TIP
The air filter needs more frequent service if you are riding in unusually wet or dusty areas.
18
*
Throttle lever hous-
ing and cable
�
Check operation and correct if necessary.
�
Check throttle cable free play and adjust if neces-
sary.
�
Lubricate throttle lever housing and cable.
√√√√√
19
*
Front and rear brake
switches
�
Check operation and correct if necessary.
√√√√√
20
*
Lights and switches
�
Check operation and correct if necessary.
�
Adjust headlight beams.
√√√√√
21
*
Battery
�
Check electrolyte level and specific gravity, and
correct if necessary.
�
Make sure that the breather hose is properly
routed.
√√√√√
NO. ITEMCHECK OR MAINTENANCE
JOBINITIAL EVERY
Whichev-
er comes
firstmonth136612
km
(mi)320
(200)1300
(800)2500
(1600)2500
(1600)5000
(3200)
hours 20 80 160 160 320
Page 98 of 130

8-30
1
2
3
4
5
6
78
9
10
11
8. Tighten the locknut at the brake lever.
9. Install the V-belt air filter element cover by in-
stalling the screw.
10. Connect the coupler, and then install the pan-
el by installing the quick fasteners.
11. Install the front carrier by installing the bolts.
WARNING
EWB02080
Operating with improperly serviced or adjust-
ed brakes could cause loss of braking ability,
which could lead to an accident.After servicing:
�
Make sure the brakes operate smoothly and
that the free play is correct.
�
Make sure the brakes do not drag.
Replacement of brake components requires
professional knowledge. These procedures
should be performed by a Yamaha dealer.
EBU24491
Adjusting the rear brake lever free play
The brake lever free play must be checked and, if
necessary, adjusted at the intervals specified in
the periodic maintenance and lubrication chart.
TIP
Before adjusting the brake lever free play, check
the rear brake shoes for wear.
The brake lever free play should measure 5.0–8.0
mm (0.20–0.31 in) as shown. If the free play is in-
correct, adjust it as follows.
1. Locknut
2. Brake lever free play adjusting bolt
3. Brake lever free play
3
1
2
(b)
(a)
Page 99 of 130
8-31
1
2
3
4
5
6
78
9
10
11
Turn the brake lever free play adjusting nut on the
rear wheel hub in direction (a) to increase the free
play, and in direction (b) to decrease it.
If the correct free play cannot be obtained, have a
Yamaha dealer adjust it.
WARNING
EWB02080
Operating with improperly serviced or adjust-
ed brakes could cause loss of braking ability,
which could lead to an accident.
After servicing:
�
Make sure the brakes operate smoothly and
that the free play is correct.
�
Make sure the brakes do not drag.
Replacement of brake components requires
professional knowledge. These procedures
1. Brake lever free play
1
1. Brake lever free play adjusting nut
1
(a)
(b)
Page 102 of 130
8-34
1
2
3
4
5
6
78
9
10
11
NOTICE
ECB00550
If measurement “A” of the drive chain adjust-
ing bolt is less than 27 mm (1.06 in), have a
Yamaha dealer replace the drive chain.
6. Tighten the hub stopper bolt, and then its lock-
nut.
EBU24880
Lubricating the drive chain
The drive chain must be cleaned and lubricated at
the intervals specified in the periodic maintenance
and lubrication chart, otherwise it will quickly wear
out, especially when riding in dusty or wet areas.
Service the drive chain as follows. Tightening torques:
Chain adjusting bolt locknut:
15.5 Nm (1.6 m·kgf, 11.2 ft·lbf)
Axle holding bolt (upper):
85 Nm (8.5 m·kgf, 61.5 ft·lbf)
Axle holding bolt (lower):
60 Nm (6.0 m·kgf, 43.4 ft·lbf)
1. Measurement A
1
Page 115 of 130

8-47
1
2
3
4
5
6
78
9
10
11
EBU25720
Troubleshooting
Although Yamaha ATVs receive a thorough in-
spection before shipment from the factory, trouble
may occur during operation. Any problem in the fu-
el, compression, or ignition systems, for example,
can cause poor starting and loss of power.
The following troubleshooting chart represents a
quick and easy procedure for checking these vital
systems yourself. However, should your ATV re-
quire any repair, take it to a Yamaha dealer, whose
skilled technicians have the necessary tools, expe-
rience, and know-how to service the ATV properly.
Use only genuine Yamaha replacement parts. Im-
itation parts may look like Yamaha parts, but they
are often inferior, have a shorter service life and
can lead to expensive repair bills.
WARNING
EWB02280
Do not smoke when checking the fuel system.
Fuel can ignite or explode, causing severe inju-
ry or property damage. Make sure there are no
open flames or sparks in the area, including pi-
lot lights from water heaters or furnaces.
Tightening torques:
Front wheel nut:
55 Nm (5.5 m·kgf, 39.8 ft·lbf)
Rear wheel nut:
55 Nm (5.5 m·kgf, 39.8 ft·lbf)

 to increase the free
play, and in direction (b) to decrease it.
If the correct free")
, have a
Yamaha dealer replace the drive chain.
6. Tighten t")