2009 YAMAHA GIGGLE50 fuel
[x] Cancel search: fuelPage 6 of 74

1
2
3
4
5
6
7
8
9
EAU10210
TABLE OF CONTENTSSAFETY INFORMATION .................... 1-1
Further safe-riding points ................ 1-5
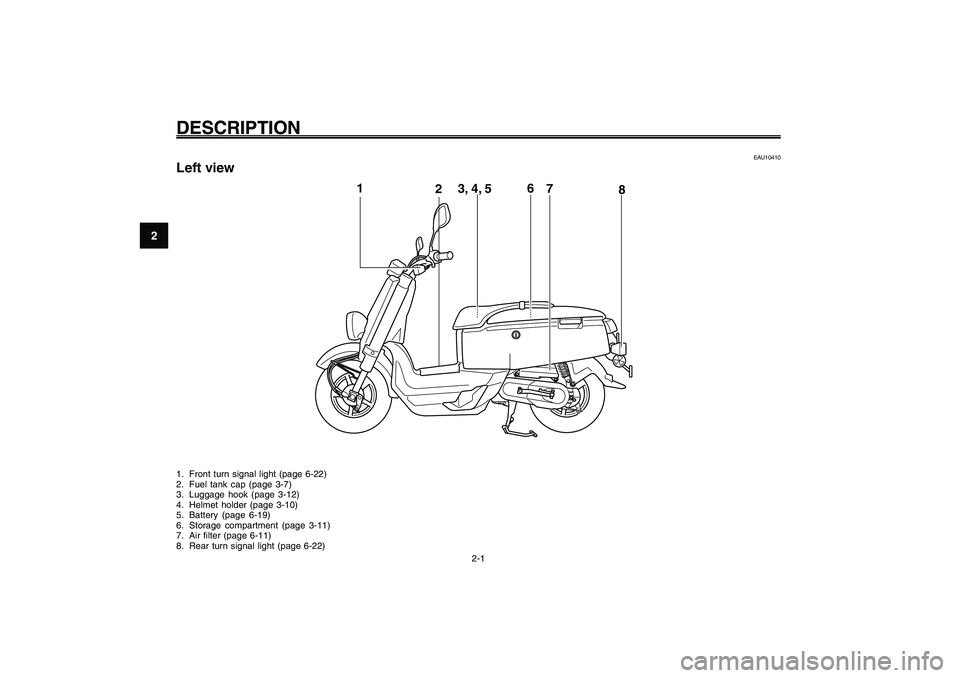
DESCRIPTION ................................... 2-1
Left view .......................................... 2-1
Right view ........................................ 2-2
Controls and instruments ................ 2-3
INSTRUMENT AND CONTROL FUNC-
TIONS................................................. 3-1
Main switch/steering lock ................ 3-1
Keyhole cover ................................. 3-2
Indicator and warning lights ............ 3-3
Speedometer unit............................ 3-4
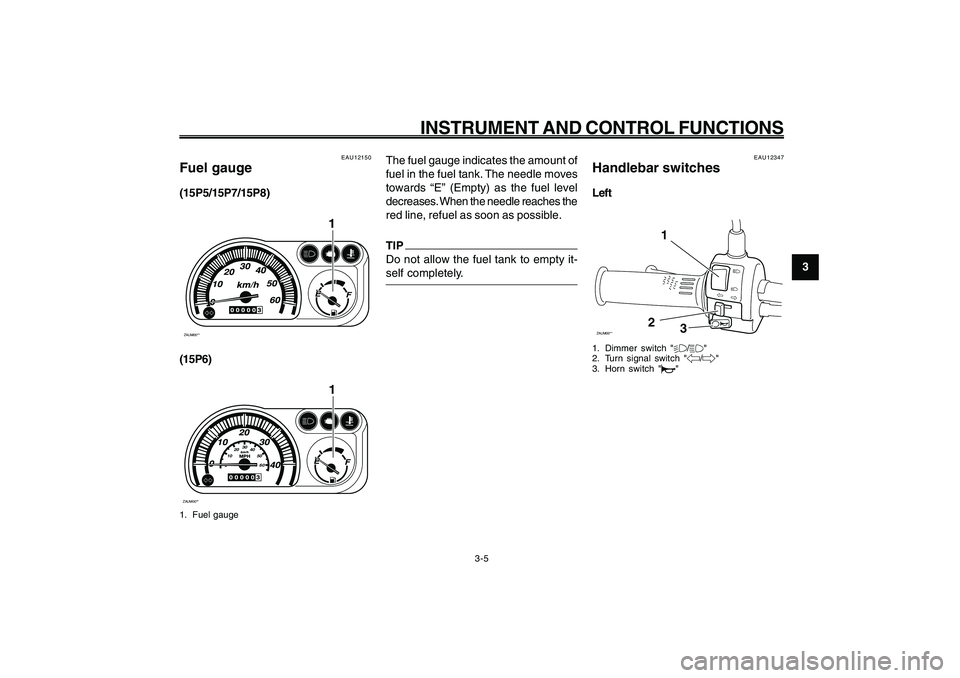
Fuel gauge ...................................... 3-5
Handlebar switches........................ 3-5
Front brake lever ............................. 3-6
Rear brake lever ............................. 3-7
Fuel tank cap ................................... 3-7
Fuel................................................. 3-8
Catalytic converters ......................... 3-9
Kickstarter......................................3-10
Seat...............................................3-10
Helmet holder................................3-10
Storage compartment ....................3-11
Luggage hook...............................3-12
FOR YOUR SAFETY - PRE-OPERATION
CHECKS............................................ 4-1
Pre-operation check list .................. 4-2OPERATION AND IMPORTANT RIDING
POINTS............................................... 5-1
Starting the engine .......................... 5-1
Starting off ....................................... 5-2
Acceleration and deceleration........ 5-2
Braking............................................ 5-2
Tips for reducing fuel consumption . 5-3
Engine break-in............................... 5-3
Parking............................................ 5-4
PERIODIC MAINTENANCE AND
ADJUSTMENT................................... 6-1
Periodic maintenance and lubrication
chart............................................. 6-2
Removing and installing panels ..... 6-5
Checking the spark plug ................. 6-6
Engine oil........................................ 6-7
Final transmission oil ...................... 6-9
Coolant..........................................6-10
Replacing the air filter element .....6-11
Checking the throttle cable free
play............................................6-12
Valve clearance.............................6-12
Tires...............................................6-12
Cast wheels ...................................6-14
Adjusting the front and rear brake lever
free play .....................................6-14
Checking the front and rear brake
shoes.........................................6-15Checking and lubricating the throttle
grip and cable ............................6-16
Lubricating the front and rear brake
levers.........................................6-16
Checking and lubricating the
centerstand................................6-17
Checking the front fork ..................6-17
Checking the steering ...................6-18
Checking the wheel bearings .......6-18
Battery ...........................................6-19
Replacing the fuse ........................6-20
Replacing the headlight bulb ........6-21
Replacing the tail/brake light
bulb............................................6-22
Replacing a turn signal light
bulb............................................6-22
Troubleshooting............................6-23
Troubleshooting charts.................6-24
SCOOTER CARE AND STORAGE .... 7-1
Matte color caution .......................... 7-1
Care................................................. 7-1
Storage............................................ 7-4
SPECIFICATIONS.............................. 8-1
CONSUMER INFORMATION ............. 9-1
Identification numbers..................... 9-1
Page 14 of 74

2-14
1
2
3
4
5
6
7
8
9
EAU10401
DESCRIPTION
EAU10401
DESCRIPTION
2-1
EAU10410
Left view1. Front turn signal light (page 6-22)
2. Fuel tank cap (page 3-7)
3. Luggage hook (page 3-12)
4. Helmet holder (page 3-10)
5. Battery (page 6-19)
6. Storage compartment (page 3-11)
7. Air filter (page 6-11)
8. Rear turn signal light (page 6-22)Part locations
1
23, 4, 56
8
7
Page 16 of 74

2-16
1
2
3
4
5
6
7
8
9
EAU10401
DESCRIPTION
2-3
EAU10430
Controls and instruments1. Rear brake lever (page 3-7)
2. Left handlebar switches (page 3-5)
3. Speedometer unit (page 3-4)
4. Fuel gauge (page 3-5)
5. Right handlebar switch (page 3-5)
6. Front brake lever (page 3-6)
7. Throttle grip (page 5-2)
8. Main switch/steering lock (page 3-1)
1
2
3
4
5
6
7
8
Page 21 of 74

3-21
1
2
3
4
5
6
7
8
9
EAU1044E
INSTRUMENT AND CONTROL FUNCTIONS
3-5
The fuel gauge indicates the amount of
fuel in the fuel tank. The needle moves
towards “E” (Empty) as the fuel level
decreases. When the needle reaches the
red line, refuel as soon as possible.TIP
Do not allow the fuel tank to empty it-
self completely.
EAU12347
Handlebar switchesLeftZAUM00**
1
2
3
1. Dimmer switch "%/&"
2. Turn signal switch "4/6"
3. Horn switch "*"
Fuel gauge
Handlebar switches
EAU12150
Fuel gauge(15P5/15P7/15P8)ZAUM00**
1
(15P6)ZAUM00**
1
0102030
40
50
60
1. Fuel gauge
Page 23 of 74

3-23
1
2
3
4
5
6
7
8
9
EAU1044E
INSTRUMENT AND CONTROL FUNCTIONS
3-7
Brake lever, rear
Fuel tank cap
EAUT2281
Fuel tank capZAUM00**
3
1
2
1. Fuel tank cap lid
2. Fuel tank cap
3. Match marksTo remove the fuel tank cap
Open the lid, insert the key into the lock,
and then turn it 1/4 turn clockwise. The
lock will be released and the fuel tank
cap can be removed.
To install the fuel tank cap
1. Inser t the fuel tank cap into the tank
opening with the key inserted in the
lock and the match marks aligned.2. Turn the key counterclockwise to
the original position, remove it, and
then close the lid.
TIP
The fuel tank cap cannot be installed
unless the key is in the lock. In addi-
tion, the key cannot be removed if the
cap is not properly installed and locked.
EWA10131
WARNING
Make sure that the fuel tank cap is
properly installed before riding. Leak-
ing fuel is a fire hazard.
EAU12950
Rear brake lever
1
ZAUM00**1. Rear brake leverThe rear brake lever is located on the
left handlebar grip. To apply the rear
brake, pull this lever toward the handle-
bar grip.
Page 24 of 74

3-24
1
2
3
4
5
6
7
8
9
EAU1044E
INSTRUMENT AND CONTROL FUNCTIONS
3-8
smoking, or while in the vicinity of
sparks, open flames, or other
sources of ignition such as the pi-
lot lights of water heaters and
clothes dryers.
2. Do not overfill the fuel tank. Stop
filling when the fuel reaches the
bottom of the filler tube. Because
fuel expands when it heats up, heat
from the engine or the sun can
cause fuel to spill out of the fuel
tank.
3. Wipe up any spilled fuel immedi-
ately.
NOTICE:
Immediately wipe
off spilled fuel with a clean, dry,
soft cloth, since fuel may dete-
riorate painted surfaces or plas-
tic parts.
[ECA10071]
4. Be sure to securely close the fuel
tank cap.
EWA15151
WARNING
Gasoline is poisonous and can
cause injury or death. Handle gaso-
line with care. Never siphon gasoline
by mouth. If you should swallowsome gasoline or inhale a lot of gaso-
line vapor, or get some gasoline in
your eyes, see your doctor immedi-
ately. If gasoline spills on your skin,
wash with soap and water. If gaso-
line spills on your clothing, change
your clothes.
EAU33520
Recommended fuel:
REGULAR UNLEADED GASOLINE
ONLY
Fuel tank capacity:
4.5 L (1.19 US gal) (0.99 Imp.gal)
ECA11400
NOTICEUse only unleaded gasoline. The use
of leaded gasoline will cause severe
damage to internal engine parts, such
as the valves and piston rings, as well
as to the exhaust system.Your Yamaha engine has been designed
to use regular unleaded gasoline with a
research octane number of 91 or higher.
If knocking (or pinging) occurs, use a
EAU13212
FuelZAUM00**
1
1. Fuel tank filler tubeMake sure there is sufficient gasoline
in the tank.
EWA10881
WARNING
Gasoline and gasoline vapors are
extremely flammable. To avoid fires
and explosions and to reduce the
risk of injury when refueling, follow
these instructions.1. Before refueling, turn off the engine
and be sure that no one is sitting
on the vehicle. Never refuel while Fuel
Page 25 of 74

3-25
1
2
3
4
5
6
7
8
9
EAU1044E
INSTRUMENT AND CONTROL FUNCTIONS
3-9
Catalytic converters
EAU13445
Catalytic convertersThis vehicle is equipped with catalytic
converters in the exhaust system.
EWA10862
WARNING
The exhaust system is hot after op-
eration. To prevent a fire hazard or
burns:● ●● ●
●
Do not park the vehicle near pos-
sible fire hazards such as grass
or other materials that easily
burn.
● ●● ●
●
Park the vehicle in a place where
pedestrians or children are not
likely to touch the hot exhaust
system.
● ●● ●
●
Make sure that the exhaust sys-
tem has cooled down before do-
ing any maintenance work.
● ●● ●
●
Do not allow the engine to idle
more than a few minutes. Long
idling can cause a build-up of
heat.
ECA10701
NOTICEUse only unleaded gasoline. The use
of leaded gasoline will cause
unrepairable damage to the catalytic
converter.
gasoline of a different brand or premium
unleaded fuel. Use of unleaded fuel will
extend spark plug life and reduce main-
tenance costs.
Page 30 of 74

4-30
1
2
3
4
5
6
7
8
9
EAU15582
FOR YOUR SAFETY - PRE-OPERATION CHECKS
4-2
EAU15605
Pre-operation check listPre-operation check list
ITEM CHECKS PAGE
Fuel• Check fuel level in fuel tank.
• Refuel if necessary.
• Check fuel line for leakage.3-5, 3-7
~3-8
Engine oil• Check oil level in engine.
• If necessary, add recommended oil to specified level.
• Check vehicle for oil leakage.6-7
Final transmission oil• Check vehicle for oil leakage. 6-9
Coolant• Check coolant level in reservoir
• If necessary, add recommended coolant to specified level.
• Check cooling system for leakage.6-10
Front brake• Check operation.
• Lubricate cable if necessary.
• Check lever free play.
• Adjust if necessary.6-14
~6-15
Rear brake• Check operation.
• Lubricate cable if necessary.
• Check lever free play.
• Adjust if necessary.6-14~6-15
Throttle grip• Make sure that operation is smooth.
• Check cable free play.
• If necessary, have Yamaha dealer adjust cable free play and lubricate cable and
grip housing.6-16
Wheels and tires• Check for damage.
• Check tire condition and tread depth.
• Check air pressure.
• Correct if necessary.6-12~6-14
Brake levers• Make sure that operation is smooth.
• Lubricate lever pivoting points if necessary.6-16