Page 53 of 68
PERIODIC MAINTENANCE AND ADJUSTMENT
6-22
6
EAU24133
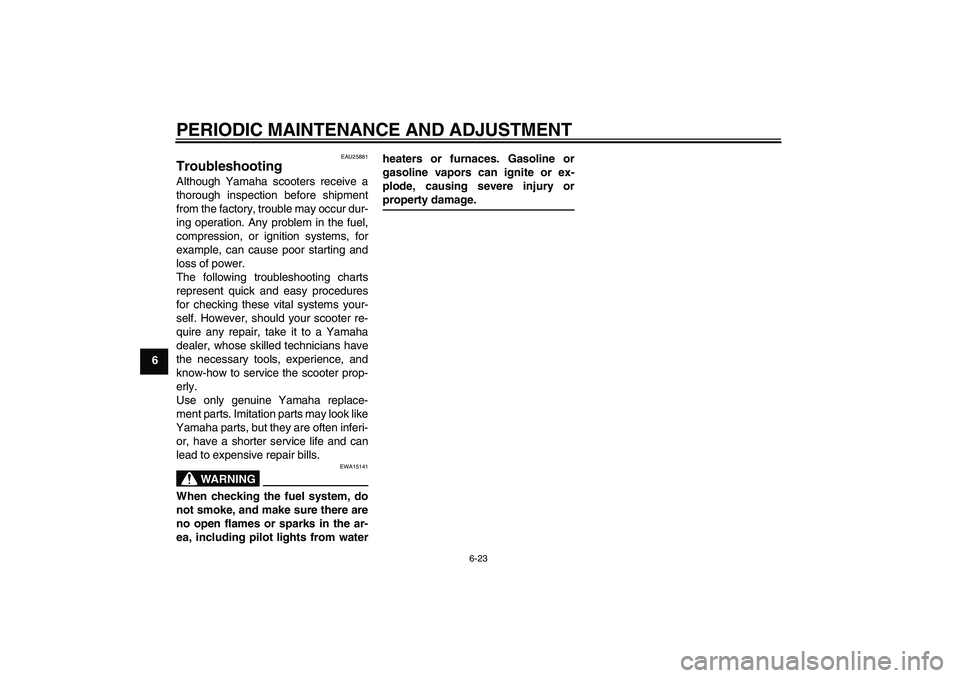
Replacing the tail/brake light
bulb 1. Remove the tail/brake light lens by
removing the screws.
2. Remove the burnt-out bulb by
pushing it in and turning it counter-
clockwise.
3. Insert a new bulb into the socket,
push it in, and then turn it clock-
wise until it stops.
4. Install the lens by installing the
screws. NOTICE: Do not over-
tighten the screws, otherwise
the lens may break.
[ECA10681]EAU24204
Replacing a turn signal light
bulb 1. Remove the turn signal light lens
by removing the screw.
2. Remove the burnt-out bulb by
pushing it in and turning it counter-
clockwise.3. Insert a new bulb into the socket,
push it in, and then turn it clock-
wise until it stops.
4. Install the lens by installing the
screw. NOTICE: Do not over-
tighten the screw, otherwise the
lens may break.
[ECA11191]
ZAUM0284
ZAUM0285ZAUM0286
U3C6E1E0.book Page 22 Friday, August 8, 2008 10:09 AM
Page 54 of 68

PERIODIC MAINTENANCE AND ADJUSTMENT
6-23
6
EAU25881
Troubleshooting Although Yamaha scooters receive a
thorough inspection before shipment
from the factory, trouble may occur dur-
ing operation. Any problem in the fuel,
compression, or ignition systems, for
example, can cause poor starting and
loss of power.
The following troubleshooting charts
represent quick and easy procedures
for checking these vital systems your-
self. However, should your scooter re-
quire any repair, take it to a Yamaha
dealer, whose skilled technicians have
the necessary tools, experience, and
know-how to service the scooter prop-
erly.
Use only genuine Yamaha replace-
ment parts. Imitation parts may look like
Yamaha parts, but they are often inferi-
or, have a shorter service life and can
lead to expensive repair bills.
WARNING
EWA15141
When checking the fuel system, do
not smoke, and make sure there are
no open flames or sparks in the ar-
ea, including pilot lights from waterheaters or furnaces. Gasoline or
gasoline vapors can ignite or ex-
plode, causing severe injury or
property damage.
U3C6E1E0.book Page 23 Friday, August 8, 2008 10:09 AM
Page 55 of 68

PERIODIC MAINTENANCE AND ADJUSTMENT
6-24
6
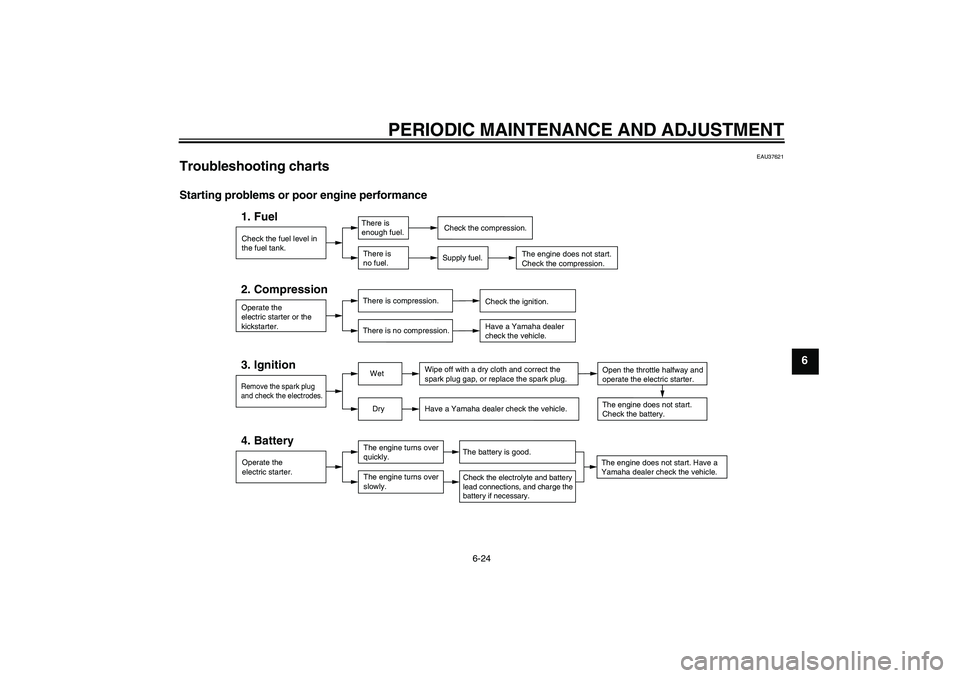
EAU37621
Troubleshooting charts Starting problems or poor engine performance
Check the fuel level in
the fuel tank.1. Fuel
There is
enough fuel.
There is
no fuel.
Check the compression.
Supply fuel.
The engine does not start.
Check the compression.
Operate the
electric starter or the
kickstarter.2. Compression
There is compression.
There is no compression.
Check the ignition.
Have a Yamaha dealer
check the vehicle.
Remove the spark plug
and check the electrodes.3. Ignition
Wet
Dry
Wipe off with a dry cloth and correct the
spark plug gap, or replace the spark plug.
Have a Yamaha dealer check the vehicle.
The engine does not start. Have a
Yamaha dealer check the vehicle.The engine does not start.
Check the battery.Open the throttle halfway and
operate the electric starter.
Operate the
electric starter.4. Battery
The engine turns over
quickly.
The engine turns over
slowly.
The battery is good.Check the electrolyte and battery
lead connections, and charge the
battery if necessary.
U3C6E1E0.book Page 24 Friday, August 8, 2008 10:09 AM
Page 56 of 68

PERIODIC MAINTENANCE AND ADJUSTMENT
6-25
6Engine overheating
WARNING
EWA10400
�
Do not remove the radiator cap when the engine and radiator are hot. Scalding hot fluid and steam may be
blown out under pressure, which could cause serious injury. Be sure to wait until the engine has cooled.
�
After removing the radiator cap retaining bolt, place a thick rag, like a towel, over the radiator cap, and then
slowly rotate the cap counterclockwise to the detent to allow any residual pressure to escape. When the hissingsound has stopped, press down on the cap while turning it counterclockwise, and then remove the cap.
TIPIf coolant is not available, tap water can be temporarily used instead, provided that it is changed to the recommended coolantas soon as possible.
Wait until the
engine has cooled.
Check the coolant level in the
reservoir and radiator.
The coolant level
is OK.The coolant level is low.
Check the cooling system
for leakage.
Have a Yamaha dealer checkand repair the cooling system.Add coolant. (See TIP.)
Start the engine. If the engine overheats again,
have a
Yamaha dealer check
and repair the cooling system.
There is
leakage.
There is
no leakage.
U3C6E1E0.book Page 25 Friday, August 8, 2008 10:09 AM
Page 66 of 68

INDEXAAcceleration and deceleration................. 5-2
Air filter element, cleaning..................... 6-10BBattery................................................... 6-19
Brake fluid, changing ............................ 6-16
Brake fluid level, checking .................... 6-15
Brake lever, front..................................... 3-5
Brake lever, rear ..................................... 3-5
Brake levers, lubricating........................ 6-16
Braking .................................................... 5-2CCarburetor,adjusting ............................. 6-11
Care ........................................................ 7-1
Catalytic converters ................................ 3-7
Centerstand, checking and
lubricating ........................................... 6-17
Coolant.................................................... 6-9
Coolant temperature warning light .......... 3-2
Cowling and panel, removing and
installing................................................ 6-6DDimmer switch ........................................ 3-4EEngine break-in ....................................... 5-3
Engine oil ................................................ 3-8FFinal transmission oil .............................. 6-8
Front and rear brake lever free play,
checking ............................................. 6-14
Front and rear brake pads, checking .... 6-14
Front fork, checking .............................. 6-17
Fuel ......................................................... 3-6
Fuel consumption, tips for reducing ........ 5-3Fuel gauge.............................................. 3-4
Fuel tank cap .......................................... 3-5
Fuse, replacing ..................................... 6-20
HHandlebar switches ................................ 3-4
Headlight bulb, replacing ...................... 6-21
High beam indicator light ........................ 3-2
Horn switch ............................................. 3-4IIdentification numbers ............................ 9-1
Indicator and warning lights .................... 3-2KKey identification number ....................... 9-1
Kickstarter............................................... 3-9MMain switch/steering lock........................ 3-1
Model label ............................................. 9-2OOil level warning light.............................. 3-2PParking ................................................... 5-4
Part locations .......................................... 2-1
Periodic maintenance and lubrication
chart ..................................................... 6-2RRider seat ............................................... 3-9SSafe-riding points.................................... 1-5
Safety information................................... 1-1
Shock absorber assembly, adjusting
(if equipped) ....................................... 3-11
Spark plug, checking .............................. 6-7
Specifications ......................................... 8-1
Speedometer unit ................................... 3-3Starting a cold engine ............................. 5-1
Starting off ............................................... 5-2
Start switch.............................................. 3-4
Steering, checking................................. 6-18
Storage.................................................... 7-3
Storage compartments .......................... 3-10
TTachometer (if equipped) ........................ 3-3
Tail/brake light bulb, replacing .............. 6-22
Throttle cable free play, checking ......... 6-11
Throttle grip and cable, checking and
lubricating ........................................... 6-16
Tires ...................................................... 6-12
Troubleshooting .................................... 6-23
Troubleshooting charts.......................... 6-24
Turn signal indicator light ........................ 3-2
Turn signal light bulb, replacing ............ 6-22
Turn signal switch ................................... 3-4VVehicle identification number .................. 9-1WWheel bearings, checking ..................... 6-18
Wheels .................................................. 6-13
U3C6E1E0.book Page 1 Friday, August 8, 2008 10:09 AM