2009 VOLVO XC60 roof
[x] Cancel search: roofPage 5 of 297
Contents* Option/accessory, for more information, see Introduction. 3
03
03
Your driving environment
Instruments and controls ..........................72
Ignition modes .......................................... 79
Seats......................................................... 81
Steering wheel .......................................... 86
Lighting ..................................................... 87
Wipers and washers................................. 93
Power windows......................................... 96
Mirrors....................................................... 98
Power panorama moonroof*................... 100
HomeLink® Wireless Control System* ...102
Starting the engine .................................. 105
Transmission ........................................... 109
Brakes..................................................... 112
Hill Descent Control (HDC) .....................114
Parking brake .......................................... 116
04
04Comfort and driving pleasure
Menus and messages .............................122
Climate system ....................................... 126
Audio system.......................................... 133
Bluetooth ® hands-free connection......... 147
Trip computer......................................... 153
Compass................................................. 154
Stability system....................................... 155
Active chassis system–Four C ................157
Cruise control.......................................... 158
Collision warning with Auto-brake*......... 160
City Safety™ .......................................... 166
Adaptive Cruise Control (ACC)* ..............172
Distance alert ......................................... 179
Driver Alert System*................................ 182
Park assist*............................................. 187
Park Assist Camera (PAC)* .................... 190
Blind Spot Information System*.............. 193
Passenger compartment convenience ...197
05
05 During your trip
Driving recommendations .......................202
Refueling ................................................. 206
Loading ................................................... 210
Cargo area .............................................. 213
Towing a trailer ....................................... 217
Emergency towing .................................. 220
Page 30 of 297
01 SafetyVolvo Inflatable Curtain (VIC) 01
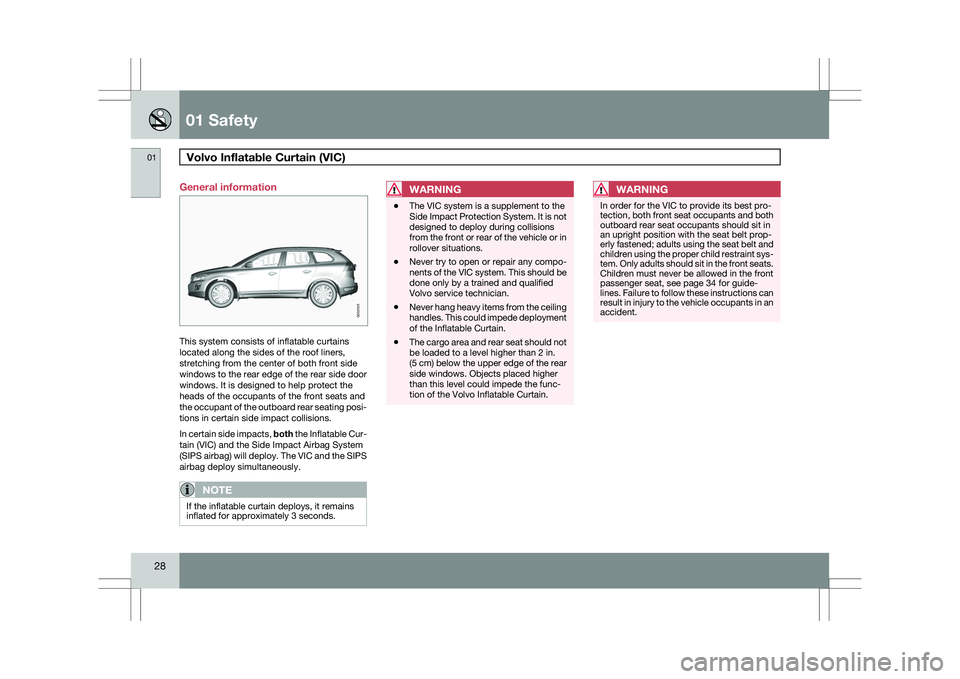
28 General information
This system consists of inflatable curtains
located along the sides of the roof liners,
stretching from the center of both front side
windows to the rear edge of the rear side door
windows. It is designed to help protect the
heads of the occupants of the front seats and
the occupant of the outboard rear seating posi-
tions in certain side impact collisions.
In certain side impacts, both the Inflatable Cur-
tain (VIC) and the Side Impact Airbag System
(SIPS airbag) will deploy. The VIC and the SIPS
airbag deploy simultaneously.
NOTE
If the inflatable curtain deploys, it remains
inflated for approximately 3 seconds.
WARNING \b
The VIC system is a supplement to the
Side Impact Protection System. It is not
designed to deploy during collisions
from the front or rear of the vehicle or in
rollover situations.
\b Never try to open or repair any compo-
nents of the VIC system. This should be
done only by a trained and qualified
Volvo service technician.
\b Never hang heavy items from the ceiling
handles. This could impede deployment
of the Inflatable Curtain.
\b The cargo area and rear seat should not
be loaded to a level higher than 2 in.
(5 cm) below the upper edge of the rear
side windows. Objects placed higher
than this level could impede the func-
tion of the Volvo Inflatable Curtain.WARNING In order for the VIC to provide its best pro-
tection, both front seat occupants and both
outboard rear seat occupants should sit in
an upright position with the seat belt prop-
erly fastened; adults using the seat belt and
children using the proper child restraint sys-
tem. Only adults should sit in the front seats.
Children must never be allowed in the front
passenger seat, see page 34 for guide-
lines. Failure to follow these instructions can
result in injury to the vehicle occupants in an
accident. G032025
Page 72 of 297
70
* Option/accessory, for more information, see Introduction. Instruments and controls
........................................................................\
72
Ignition modes ........................................................................\
................ 79
Seats........................................................................\
............................... 81
Steering wheel ........................................................................\
................ 86
Lighting ........................................................................\
........................... 87
Wipers and washers......................................................\
..........................
93
Power windows........................................................................\
............... 96
Mirrors........................................................................\
............................. 98
Power panorama moonroof*................................................................. 100
HomeLink® Wireless Control System* .................................................102
Starting the engine ........................................................................\
........ 105
Transmission ........................................................................\
................. 109
Brakes........................................................................\
........................... 112
Hill Descent Control (HDC).................................................................... 114
Parking brake ........................................................................\
................ 116
G02091
2
Page 81 of 297

03 Your driving environment
Ignition modes03
}}
79
Functions
Ignition slot with remote key, start/stop button
Inserting and removing the remote keyThe various ignition modes are accessed by
inserting the remote key into the ignition slot.
The remote key can be removed from the igni-
tion slot by pressing the key in. It will then be
ejected slightly and can be removed from the
slot. The gear selector must be in position
P
(Park).
NOTE The brake pedal must not be depressed
when accessing ignition modes
I or II.
CAUTION Foreign objects in the ignition slot can
impair function or damage the lock.
Ignition mode 0–
Insert the remote key in the ignition slot.
Ignition mode I–Press the remote key into the ignition slot
and press START/STOP ENGINE.
Ignition mode II–Press the remote key into the ignition slot
and press START/STOP ENGINE for
approx. 2 seconds.
Ignition mode III (engine start)Start the engine, see page 105.
Stopping the engine–
Press START/STOP ENGINE. (If the
engine is running and the vehicle is mov-
ing, keep the button depressed until the
engine stops).
Return to ignition mode 0–Press START/STOP ENGINE to return
from I, II, or III to ignition mode 0. Posi-
tion Function
0 Odometer, clock and tempera-
ture gauge are illuminated. Steer-
ing lock is deactivated. The audio
system can be used.
I Moonroof, power windows, cli-
mate system blower, ECC, wind-
shield wipers can be used.
II The headlights come on. Warn-
ing/indicator lights come on for
5 seconds. All equipment oper-
ates apart from heated seats and
rear window defroster, which
only work when the engine is run-
ning.
III The starter motor will operate
until the engine has started.
Functions with timerThe audio system can be operated without a
key for 15 minutes at a time by pressing the
POWER button. The power windows work for
several minutes after the key has been
removed, although not after the door has been
opened.
Page 92 of 297
03 Your driving environmentLighting 03
90
NOTE \b
Regulations regarding the use of the
hazard warning flasher may vary,
depending on where you live.
\b The hazard warning flashers will be acti-
vated automatically if an airbag
deploys. Turn signals
Turn signals
When changing lanes
The driver can automatically flash the turn
signals 3 times by moving the turn signal lever
up or down to the first position and releasing it.
When turning Move the lever as far up or down as possi-
ble to start the turn signals. The turn signals will
be cancelled automatically by the movement of
the steering wheel, or the lever can be returned
to its initial position by hand.
NOTE \b
This automatic flashing sequence can
be interrupted by immediately moving
the lever in the opposite direction.
\b If the turn signal indicator flashes faster
than normal, check for a burned-out
turn signal bulb. Interior lighting, front
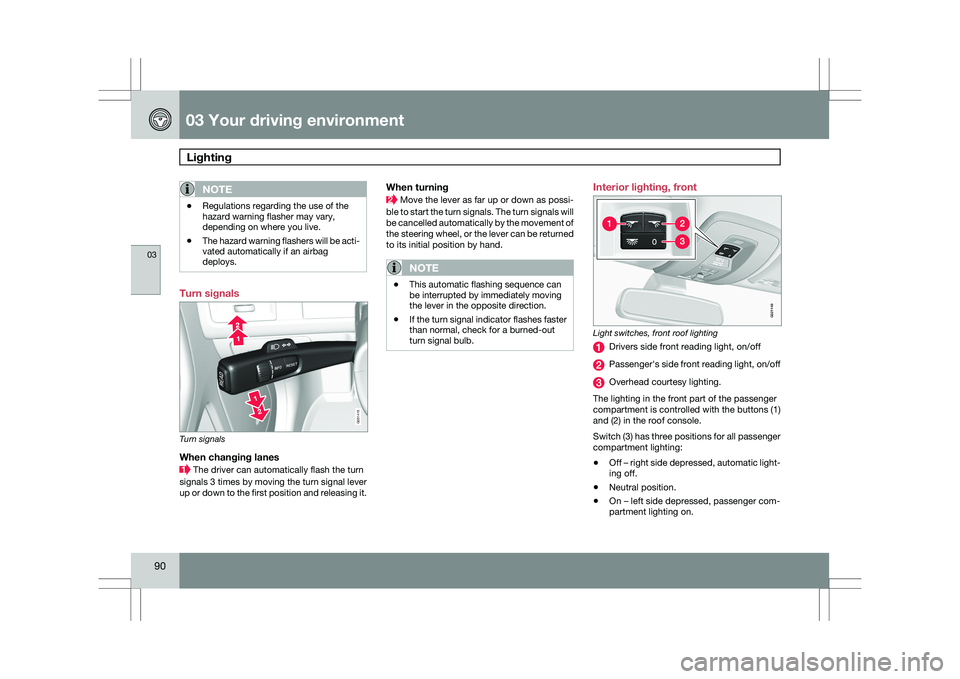
Light switches, front roof lighting
Drivers side front reading light, on/off
Passenger\fs side front reading light, on/off
Overhead courtesy lighting.
The lighting in the front part of the passenger
compartment is controlled with the buttons (1)
and (2) in the roof console.
Switch (3) has three positions for all passenger
compartment lighting:
\b Off – right side depressed, automatic light-
ing off.
\b Neutral position.
\b On – left side depressed, passenger com-
partment lighting on. G031415 G02114
9
Page 93 of 297

03 Your driving environment
Lighting03
}}
* Option/accessory, for more information, see Introduction. 91
Interior lighting, rear
Rear reading lights (models with the optional pan-
orama moonroof)
Rear reading lights (models without the panorama
moonroof) The lights are switched on or off by pressing
each respective button.
Courtesy lights/door step lighting*The courtesy lights/door step lighting switch
on/off automatically when one of the front
doors is opened/closed.
Glove compartment lightingThe glove compartment lighting switches on/
off automatically when the lid is opened/
closed.
Overhead courtesy lightingThe passenger compartment lighting is
switched on and off automatically when button
(3) is in the neutral position.
The lighting comes on and remains on for
30 seconds if:
\b
the vehicle is unlocked from the outside
with the key or remote control
\b the engine is switched off and the ignition
is in mode 0.
The lighting switches off when:
\b the engine is started
\b the vehicle is locked from the outside.
The lighting comes on and remains on for two
minutes if one of the doors is open. The passenger compartment lighting can be
switched on and off manually within 30 minutes
after the vehicle has been unlocked.
If the lighting is switched on manually and the
vehicle is locked, the courtesy lighting will
switch off automatically after one minute.
Home safe lighting
When you leave your vehicle at night, you can
make use of the home safe lighting function to
illuminate the area in front of the vehicle.
1. Remove the key from the ignition slot.
2. Pull the direction indicator lever as far as
possible towards the steering wheel and
release it.
3. Exit the vehicle and lock the doors.
The headlights, parking lights, turn signals,
lights in the door mirrors, license plate lights,
and footwell lighting will illuminate and remain
on for 30 1
, 60 or 90 seconds. The time interval
can be set under Car settings Light
settings Home safe lighting. For a
description of the menu system, see
page 122. 1
Factory setting G031416 G021150
Page 102 of 297
03 Your driving environmentPower panorama moonroof* 03
100
* Option/accessory, for more information, see Introduction.
Introduction
The panorama moonroof is divided into two
sections.
\b
The rear glass section is fixed in place and
cannot be moved.
\b The front glass section can be slid hori-
zontally to the open or closed positions or
its rear edge can be raised and lowered to
allow ventilation.
All references in this section to opening or clos-
ing the panorama moonroof pertain to the front
glass section.
The panorama moonroof also has a sun shade
made of perforated fabric that is located below
the sections of glass. This shade can be
opened or closed, for example when driving in
bright sunlight.
Both the panorama moonroof and the sun
shade are operated by the controls in the ceil-
ing console, near the rear-view mirror. The
vehicle\fs ignition must be in mode I or II before
the moonroof/sun shade can be operated.
CAUTION \b
Remove ice and snow before opening
the moonroof.
\b Do not operate the moonroof if it is fro-
zen closed.
\b Never place heavy objects on the
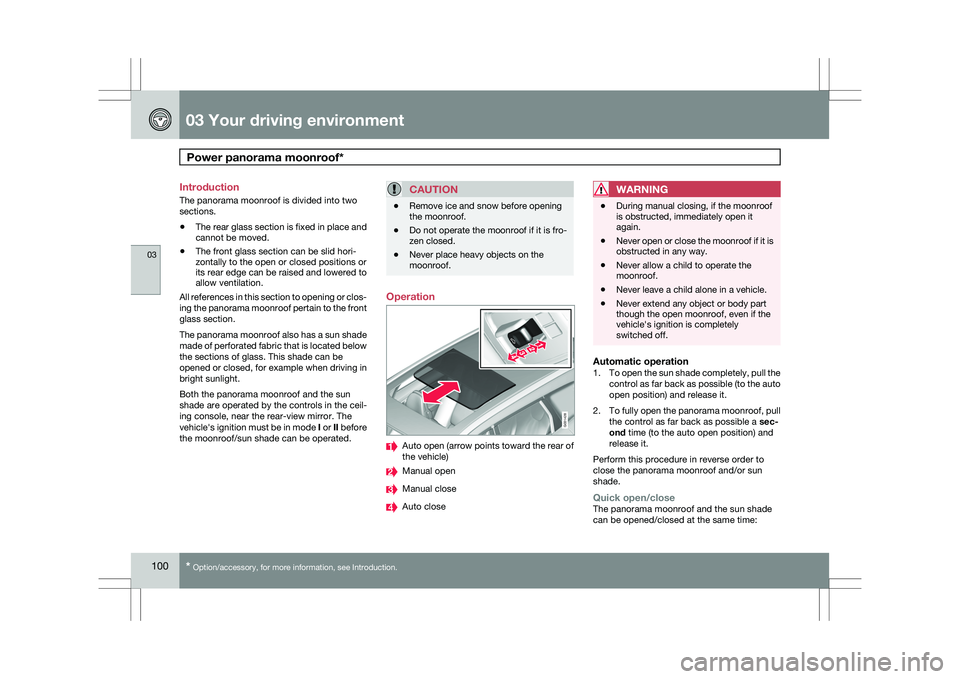
moonroof. Operation
Auto open (arrow points toward the rear of
the vehicle)
Manual open
Manual close
Auto closeWARNING \b
During manual closing, if the moonroof
is obstructed, immediately open it
again.
\b Never open or close the moonroof if it is
obstructed in any way.
\b Never allow a child to operate the
moonroof.
\b Never leave a child alone in a vehicle.
\b Never extend any object or body part
though the open moonroof, even if the
vehicle\fs ignition is completely
switched off.
Automatic operation1.
To open the sun shade completely, pull the
control as far back as possible (to the auto
open position) and release it.
2. To fully open the panorama moonroof, pull
the control as far back as possible a sec-
ond time (to the auto open position) and
release it.
Perform this procedure in reverse order to
close the panorama moonroof and/or sun
shade.
Quick open/closeThe panorama moonroof and the sun shade
can be opened/closed at the same time: G031428
Page 103 of 297
03 Your driving environment
Power panorama moonroof*03
* Option/accessory, for more information, see Introduction. 101
\b
Open - pull the control back (to the auto
open position) twice in quick succession
and release it.
\b Close - push the control forward (to the
auto close position) twice in quick succes-
sion and release it.
Manual operation1.
Opening the sun shade: Pull the control
back to the first stop (the manual open
position) and hold it until the sun shade has
opened to the position of your choice.
2. Opening the rear edge of the panorama
moonroof: Pull the control back to the first
stop (the manual open position) a second
time to open the rear edge of the panorama
moonroof.
3. Opening the front glass section: Pull the
control back to the first stop (the manual
open position) a third time and hold it until
the panorama moonroof has opened to the
position of your choice.
Perform this procedure in reverse order to
close the panorama moonroof and/or sun
shade.
NOTE For manual opening, the sun shade must
first be fully open before it will be possible
to open the panorama moonroof. When
closing, the panorama moonroof must be
fully closed before the sun shade can be
closed.
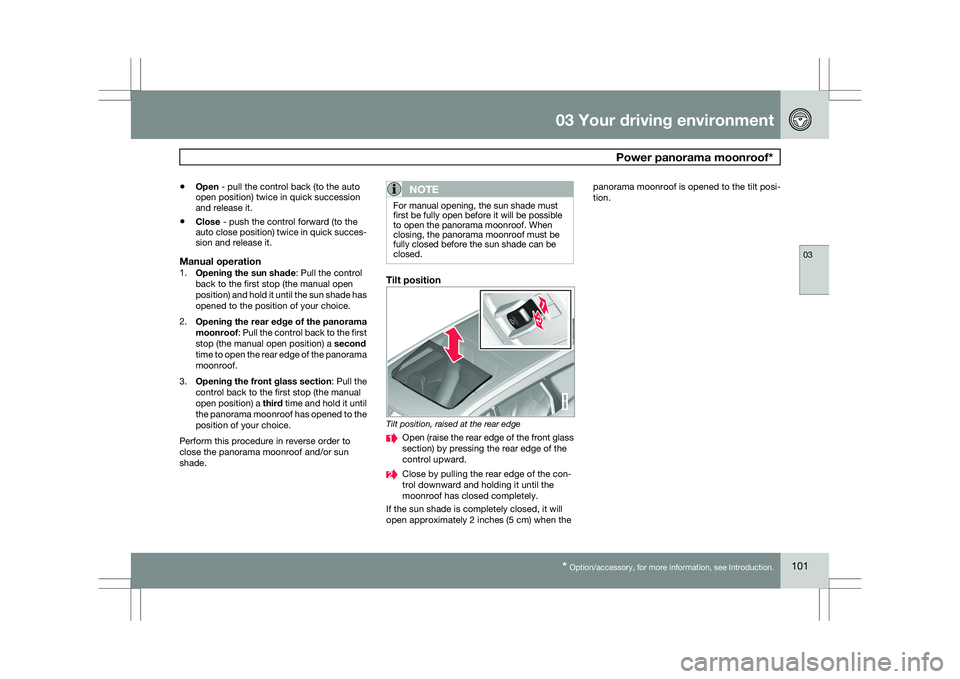
Tilt position
Tilt position, raised at the rear edge
Open (raise the rear edge of the front glass
section) by pressing the rear edge of the
control upward.
Close by pulling the rear edge of the con-
trol downward and holding it until the
moonroof has closed completely.
If the sun shade is completely closed, it will
open approximately 2 inches (5 cm) when the panorama moonroof is opened to the tilt posi-
tion. 1
2
G031429