2009 VOLKSWAGEN SCIROCCO tow
[x] Cancel search: towPage 36 of 138
Downloaded from www.Manualslib.com manuals search engine Central locking system
c:DJ Introduction
This chapter contains information on the following
subjects:
Description
of the central locking system 46
Locking and unlocking the vehicle from the
outside . . . . . . . . . . . . . . . . . . . . . . . . . . . . . . . .
47
Locking and unlocking the vehicle from the
inside . . . . . . . . . . . . . . . . . . . . . . . . . . . . . . . . .
48
Locking and unlocking the vehicle with
Keyless Access . . . . . . . . . . . . . . . . . . . . . . . . . 49
SAFELOCK mechanism . . . . . . . . . . . . . . . . . . 51
Anti-theft alarm . . . . . . . . . . . . . . . . . . . . . . . . . 52
Interior monitoring system and anti-tow alarm 53
The central locking system
will only work correctly
when all doors and the tailgate are closed properly.
The
vehicle cannot be locked with the key if the
driver door is open .
In vehicles with the Keyless Access locking and
starting system, the
veh icle can only be locked
when the ignition has been switched
off and the
driver door is closed .
If the vehicle is unlocked and not used for a long
time (e.g. in your own garage) the
vehicle battery
could discharge
or the engine may not start.
Additional information and warnings:
• Exterior views ~page 6
• lnfotainment system ~page 31
• Vehicle key set ~page 43
• Doors ~page 55
• Tailgate ~page 57
• Electric windows ~page 60 •
Electric
panorama sliding/tilting roof
~page 63
• Towing a trailer ~page 140
•
Manual opening or closing ~page 339
A WARNING
Improper use of the central locking system
could cause serious injury.
• The central locking system locks all
doors. Locking the vehicle from the inside
may prevent the doors from being opened
unintentionally and unauthorised persons
from entering the vehicle . However, locked
doors can delay assistance to passengers in
side the vehicle in the event of an accident or
emergency.
• Never leave children or people requiring
assistance alone in the vehicle. All doors can
be
locked from the inside using the central
locking button. This may mean that people
lock themselves in the vehicle. People locked
in the vehicle may be subjected to very high
or very low temperatures.
• Depending on the time of year, locked ve
hicles can be subjected to very high or very
low temperatures. This can cause serious in
juries and illness or fatalities, especially for
small children.
• Never leave anyone inside a locked vehi
cle. People in the vehicle could become trap
ped in an emergency and may not be able to
get themselves to safety.
Description of the central locking system
r-('n First read and observe the introductory
L-Jr=JJ information and safety warnings & on
page 46.
The central locking system enables you to lock and
unlock
all the doors, the tailgate and tank flap from
one central point:
• From outside the vehi cle with the vehicle key
~page 47.
• From outside the vehicle with Keyless-Access
~page 49.
• From inside the vehicle with the central locking
button ~page 48.
Certain central locking functions can be activated
or deactivated in the infotainm ent system using the
@ill button and the~ and (Open and Clos e) function
buttons =>page 31, or the vehicle can be taken to a~
qualifi ed work shop .
--~--------------------~~
Page 42 of 138
Downloaded from www.Manualslib.com manuals search engine Anti-theft alarm
r-f'n First read and observe the introductory
L-.bll information and safety warnings&. on
page 46.
The anti-th eft ala rm make s it more difficult to break
into the ve hi cle or steal it.
The anti-theft alarm is activated automatically
when the vehicle is locked using the vehicle key.
When does the system trigger an alarm?
The anti-theft alarm will sound an acoustic alarm
for approximately
30 seconds and trigger a visible
warning for up to 5 minutes if any of the following
unauthorised actions are pe rformed while the ve hi
cle is locked :
• In vehicles with an open lock cylinder : a door
unlocked mechanically with the vehicle key is
opened and the ignition is not switched on within
approximately 15 seconds.
• In vehicles with a covered lock cylinder : a door
unlocked mechanically with the vehicle key is
opened .
• A door is opened .
• The bonnet is opened.
• The tailgate is opened.
• The ignition is switched on using an inval id key .
• The vehicle battery is disconnected.
• There is movement inside the vehicle (in vehi
cles with interior monitoring)
~page 53.
• The vehicle is towed (vehicles with anti-tow
alarm)~ page 53.
• The vehicle is lifted (vehicles with anti-tow
alarm)~ page 53.
• The vehicle is transported on a car ferry or by
rail (vehicles with anti-tow alarm or interior moni tor
ing)~ page 53.
• A trai ler that is connected to the anti- theft alarm
system is removed ~page 140.
Switching off the alarm
Unlock the vehicle using the release button on the
vehicle key or switch on the ignition using a valid
vehicle key.
In vehicles with Keyless Acc ess , the
alarm can be switched off by
gripp ing the door
handle
~page 49.
r::l The alarm will be triggered again if a person
L!J gains access to the same or a differen t se
cured zone after the alarm has been
switched off .
For example , if the tailgate is opened after a door
had been opened .
r::l The anti-theft alarm will not be activated if
l!J the vehicle is locked from the inside using the
central locking button
@.
r::l If you unlock the driver door mechanically us
L!J ing the vehicle key, only the driver door is un
locked , and not the whole vehicle . The
SAFELOCK
mechanism on all doors is not deactivated and the
central locking button is not activated until you
switch on the ignit ion (however the doors
will not
be unlocked) .
r::l !he anti-~heft alarm will not function correctly
L!J 1f the veh1cle battery is weak or discharged .
Page 43 of 138
Downloaded from www.Manualslib.com manuals search engine Interior monitoring system and anti-tow alarm
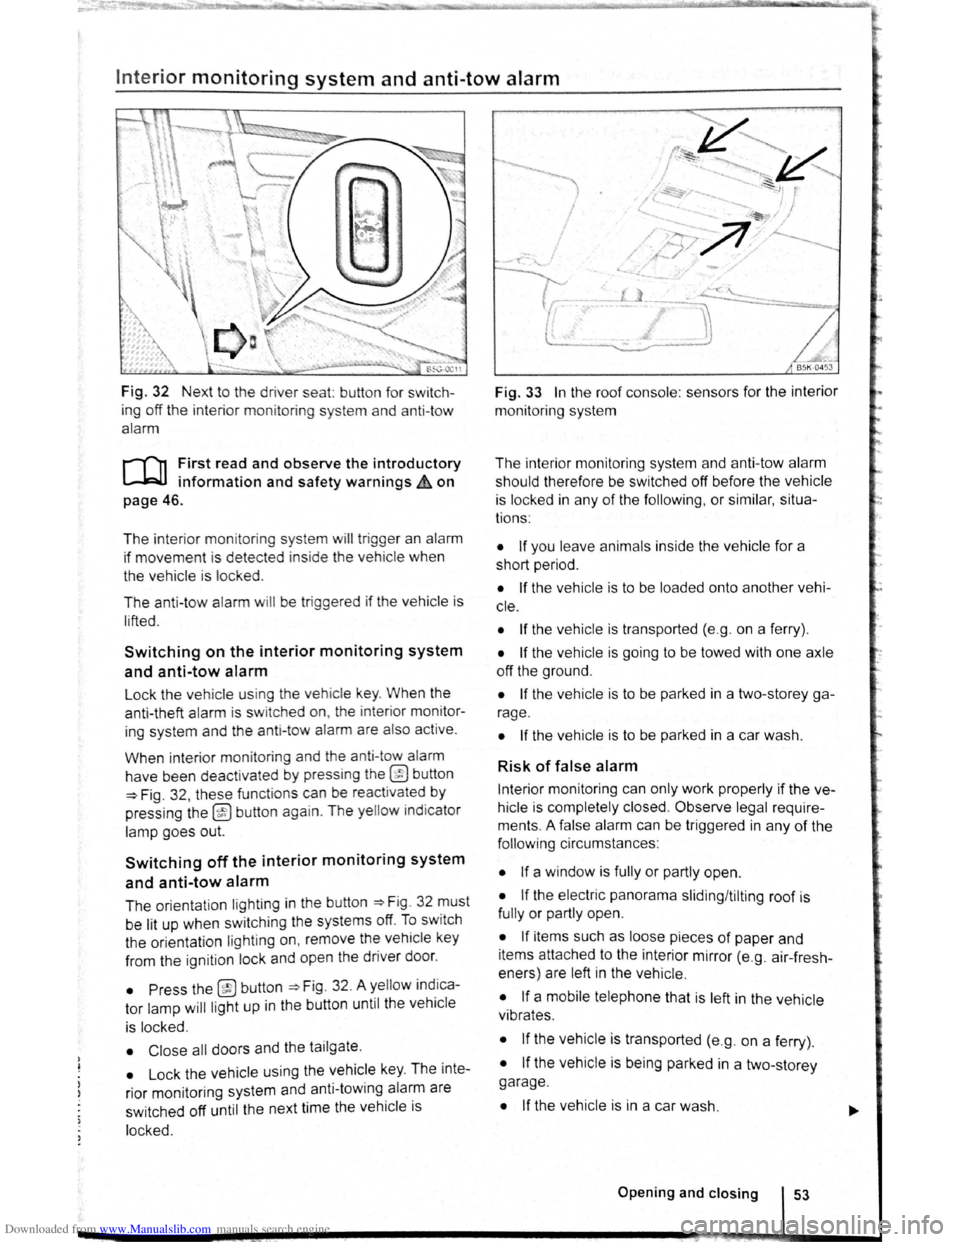
Fig. 32 Next to the driver seat: button for switch
ing off the interior moni
toring system and anti-tow
alarm
r-T'n First read and observe the introductory
L-l=JJ information and safety warnings Lh on
page 46.
The interior monitoring system will trigge r an alarm
if movement is dete cted inside the vehicle when
the vehicle is locked .
The anti-tow alarm
will be trig gered if the vehicle is
l ifted .
Switching on the interior monitoring system
and anti-tow alarm
Lock the vehicle using th e veh icle key . When the
anti-theft alarm is sw itched on, the inter ior monitor
ing system and th e anti-tow alarm are also active .
When interior monitoring and the anti-tow alarm
have been deactivated
by press ing the @ button
=>Fig . 32 , these functions can be reactivated by
pressing the
@ button again . The yellow indicator
lamp goe s out.
Switching off the interior monitoring system
and anti-tow alarm
The orientation lighting in the button ~Fig. 32 must
be lit up when swit ching the systems off.
To sw itch
the orientation lighting
on , remove the vehicle key
from the ignition lock and open the driver door.
• Press the @button =>Fig. 32. A yellow indica
tor lamp
will ligh t up in the button until the veh icle
is locked.
• Close all doors and the tailgate .
• Lock the vehicle using the vehicle key. The inte
rior mon itoring system and anti-towing alarm are
sw itched off until the next time the
vehicle is
locked.
~
I
I
Fig. 33 In the roof console : sensors for the interior
monitoring system
The interior monitoring system and anti-tow alarm
should therefore be switched off before the
vehicle
is locked in any of the following , or similar, situa
tions :
• If you leave animals inside the vehicle for a
short period .
• If the vehicle is to be loaded onto another vehi
c le .
• If the vehicle is transported (e.g . on a ferry) .
• If the vehicle is going to be towed with one axle
off the ground .
• If the vehicle is to be parked in a two-storey ga
rage .
• If the vehicle is to be parked in a car wash.
Risk of false alarm
Interior monitoring can only work properly if the ve
hicle is completely closed.
Observe legal require
ments . A false alarm can be triggered in any
of the
foll owi ng circumstances :
• If a window is fully or partly open.
• If the electric panorama sliding/tilting roof is
fully or partly open.
• If items such as loose pieces of paper and
items attached to the interior mirror (e.g . air-fresh
eners) are left in the vehicle .
• If a mobile telephone that is left in the vehicle
vibrates .
• If the vehicle is transported (e.g. on a ferry) .
• If the vehicle is being parked in a two-storey
garage .
• If the vehicle is in a car wash .
Opening and closing 53
Page 53 of 138
Downloaded from www.Manualslib.com manuals search engine -
When removing or fitting head restraints, make
sure that they do not hit the roof or other parts
of the vehicle. The roof and other vehicle parts
could otherwise be damaged.
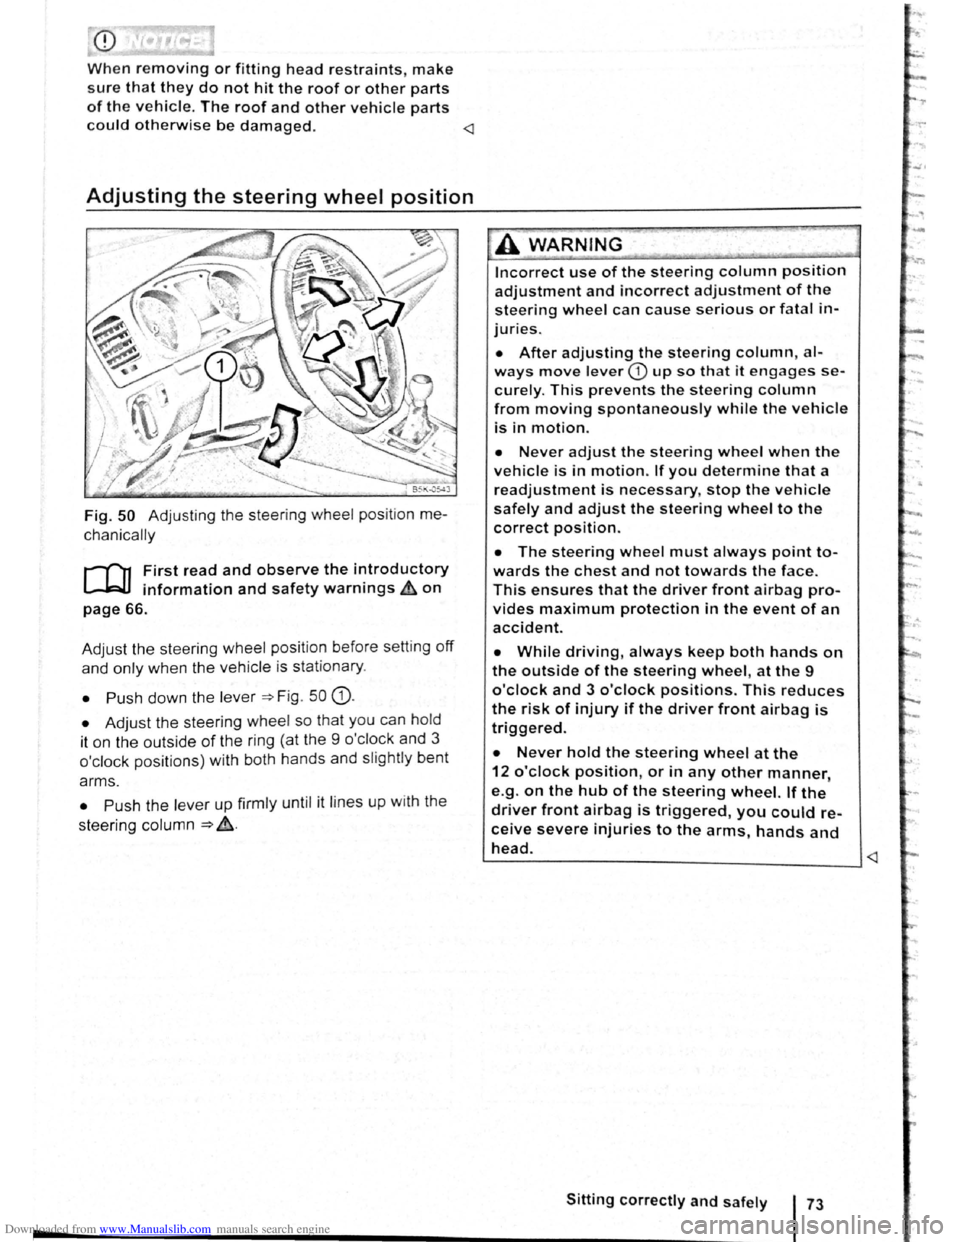
Fig. 50 Adjusting the steering wheel position me
chanically
r-f"'n First read and observe the i~troductory
~ information and safety warnmgs ~on
page 66.
Adjust the steering wheel position before setting
off
and only when the vehicle is sta tionary.
• Push down the lever =>Fig . 50 G).
• Adjust the steering wheel so that you can hold
it on the outside
of the ring (at the 9 o'cl ock and 3
o'clock positions) with both hands and slightly bent
arms.
• Push the lever up firmly until it lines up with the
steering column
=> ~-
Incorrect use of the steering column position
adjustment and incorrect adjustment of the
steering wheel can cause serious or fatal in
juries.
• After adjusting the steering column, al
ways move lever CD up so that it engages se
curely. This prevents the steering column
from moving spontaneously while the vehicle
is in motion.
• Never adjust the steering wheel when the
vehicle is in motion. If you determine that a
readjustment is necessary, stop the vehicle
safely and adjust the steering wheel to the
correct position.
• The steering wheel must always point to
wards the chest and not towards the face.
This ensures that the driver front airbag pro
vides maximum protection in the event of an
accident.
• While driving, always keep both hands on
the outside of the steering wheel, at the 9
o'clock and 3 o'clock positions. This reduces
the risk of injury if the driver front airbag is
triggered.
• Never hold the steering wheel at the
12 o'clock position, or in any other manner,
e.g .
on the hub of the steering wheel. If the
driver front airbag is triggered, you could re
ceive severe injuries to the arms, hands and
head. ~--------------------------____ _j
Page 54 of 138
Downloaded from www.Manualslib.com manuals search engine Centre armrest
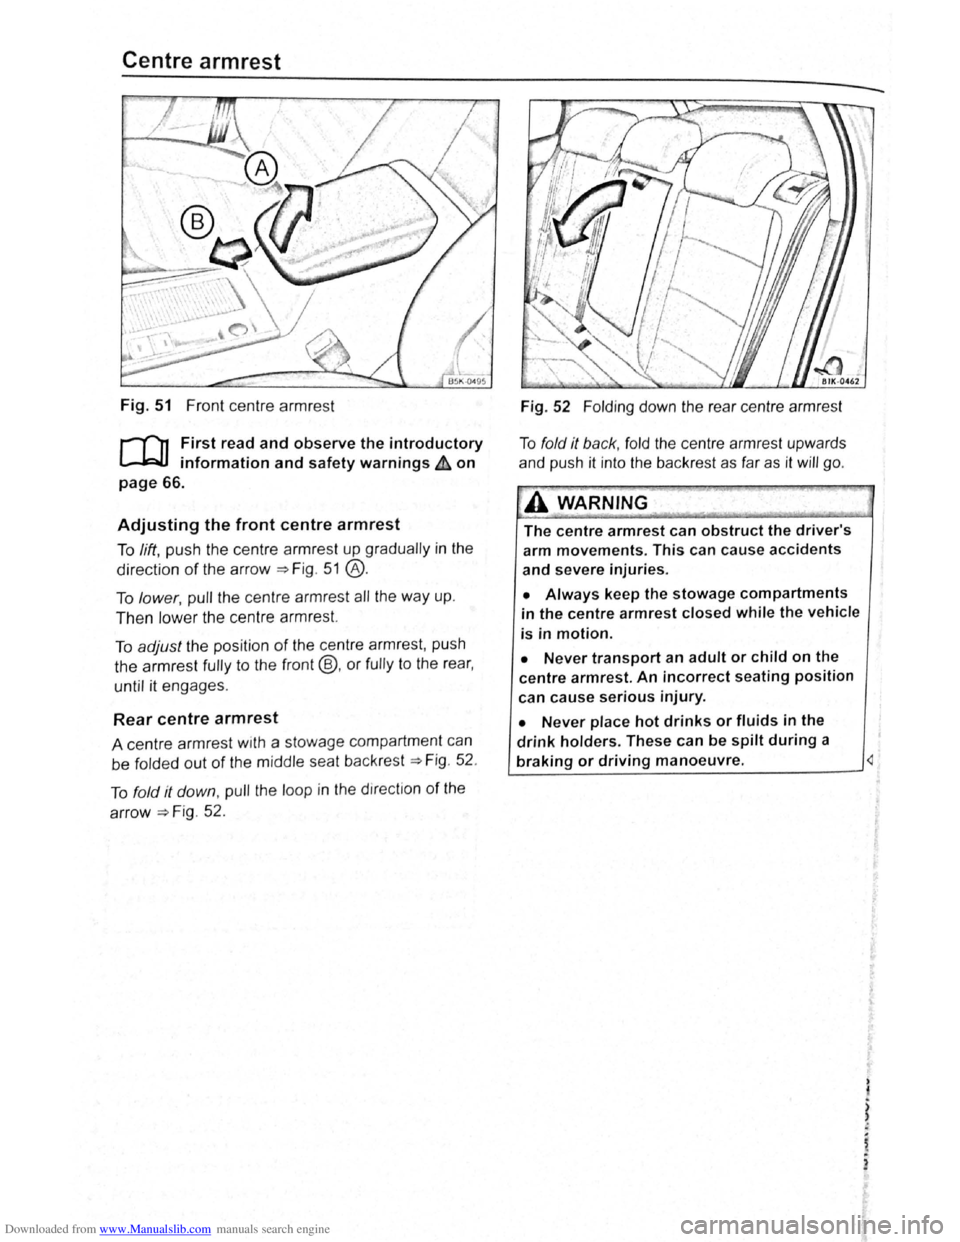
Fig. 51 Front centre armr est
r-T'n First read and observe the introductory
L-.!::J.I information and safety warnings & on
page 66.
Adjusting the front centre armrest
To lift , pu sh th e ce ntr e a rmres t up grad ua lly in the
directio n of th e arrow~ Fig . 5 1 @ .
To lower, pull th e ce ntre armr est all the way up .
Then low er th e ce ntr e a rmr est.
To adjust the posi tio n of the ce ntr e a rmr est, pu sh
th e
armrest fully to the front@, or fully to the rea r,
until it engages .
Rear centre armrest
A centre armr est w1th a stowage compartmen t can
be
f o lded out of the m idd le sea t back rest~ Fig . 52 .
T o
fo ld it down , pull the loop in t he direc tio n of the
arrow~ F ig. 52 .
Fig . 52 Folding d o wn the rea r cen tre a rmr est
T o
fo ld it back , fo ld the ce ntr e a rmr est upw ards
a nd pu sh it int o
the bac kres t as fa r as it will go .
A WARNING~
The centre armrest can obstruct the driver's
arm movements. This can cause accidents
and severe injuries.
• Always keep the stowage compartments
in the centre armrest closed while the vehicle
is in motion.
• Never transport an adult or child on the
centre armrest. An incorrect seating position
can
cause serious injury.
• Never place hot drinks or fluids in the
drink holders. These can be spilt during a
braking or driving manoeuvre.
)
i
,.
2
Page 59 of 138
Downloaded from www.Manualslib.com manuals search engine ..,
of turn signals, a failure to use
r f rg tting to switch off a turn
nfuse other road users. This can
nt and serious Injuries.
• lw. y activate the turn signal In good
tim wh n ch anging lanes and performing
'lt king or turning manoeuvres.
• Alw ys switch off the turn signal once the
le ne change or overtaking or turning ma-
n euvre has been completed.
A W~RNING
In correct use of the main beam headlights
ca n lead to accidents and serious injuries as
the main beam headlights can distract and
dazzle other road users.
Switching lights on and off
m The turn signal will only work when the igni
W tion is switched on. The hazard warning lights
a ls o work
when the ignition is switched off
=>page 336.
m If one turn signal fails, the indicator lamp will
W start flashing twice as fast.
m The main beam headlights can only be
W switched on if the dipped beam headlights
are already on.
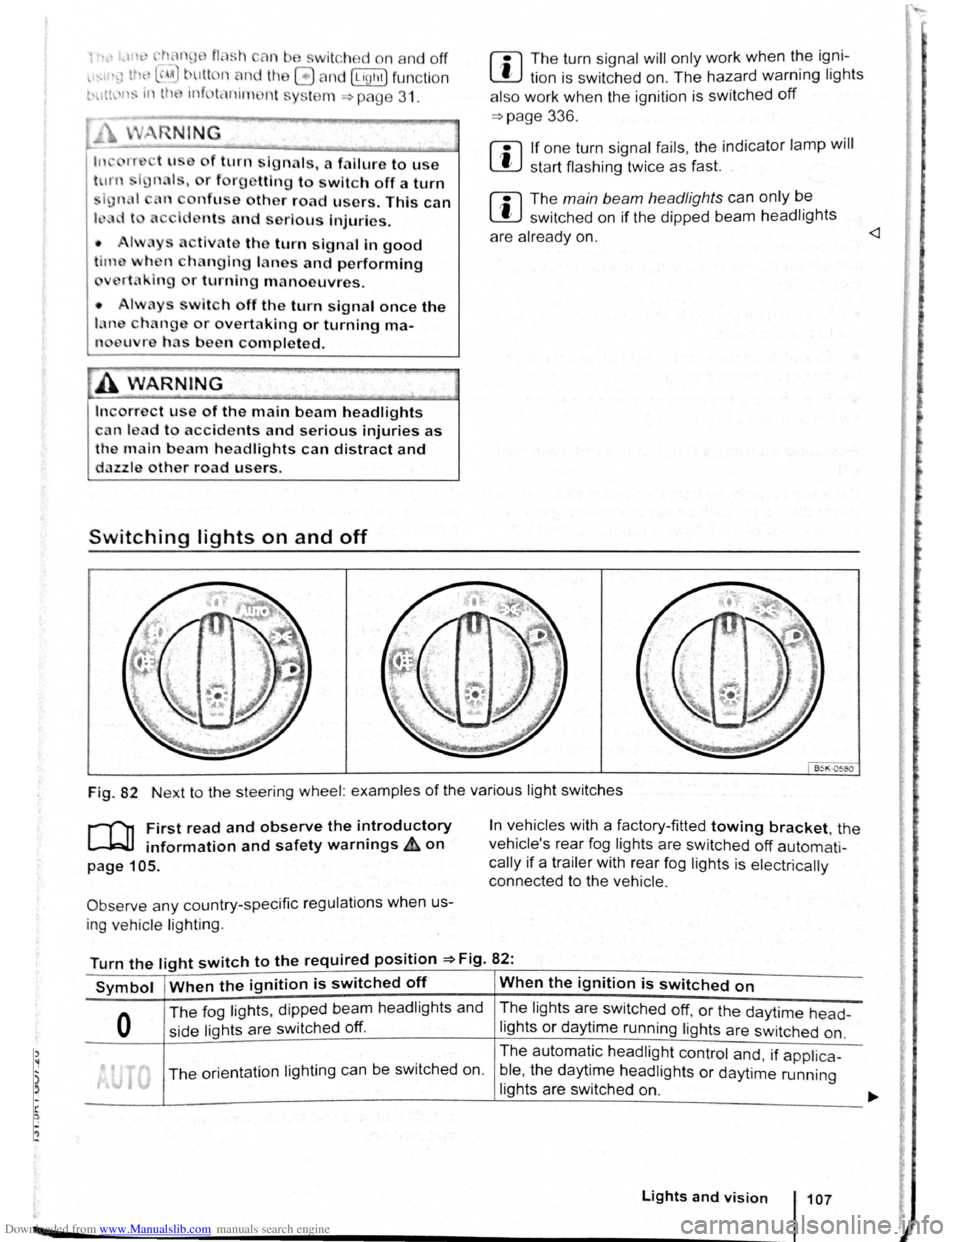
Fig. 82 Next to the steering wheel: examples of the various light switches
r-("n First read and observe the introductory
L-.W1 information and safety warnings ~on
page 105.
Observe any country-specific regulations when us
ing ve hic le lighting .
In vehicles with a factory-fitted towing bracket, the
vehicle's rear fog lights are switched
off automati
cally if a trailer with rear fog lights is electrically
connected to the vehicle .
Turn the light switch to the required position =>Fig. 82:
Symbol When the ignition is switched off When the ignition is switched on
0
The fog lights, dipped bea m headlights and
side lights are switched
off.
The lights are switched off, or the daytime head-
lights or daytime running lights are switched on.
The orientation lighting ca n be switched on. The
automatic
headlight control and, if applica -
ble ,
the daytime headlights or daytime running
lights are switched
on.
Lights and vision 107
Page 65 of 138

Downloaded from www.Manualslib.com manuals search engine To adjust, turn the control CD to:
-Set~ng I Vehicle load lev~la) -------
1
2
3
Fron t seats occupied and luggage
compa rtment
empty.
All seats occupied and luggage com
partment empty.
All sea ts occ upi ed and luggage com
partm ent fully loaded . Towing a trai le r
wit h a
lo w drawbar load .
Only the driver sea t occupi ed and lug
ga ge compartm ent fully load ed . Tow
ing a trai le r w ith maximum drawbar
l
oad.
a) If you have diff ere nt loads. you can select a positi on be
tween th e settings.
Dynamic headlight range control
Th ere is no control CD for headlight range if the ve
hicle
has dynamic headli ght control. The head light
r ange is
automatically adapted to suit the ve hicle
load level as soon as the headli ghts are switched
on~&.
Instrument and switch lighting
The brightness of the in strument and switch li gh t
ing can be adjusted using the @ill button and the
~and !Ltght] function buttons in the infot ainm ent
system
~page 31 .
Depending on the vehicle equipment level, it may
be possible to adjust the brightness of the instru
ment and switch lighting to suit your requirements
by turning control® when the headlights are
switched on.
Interior and reading lights
Instrument cluster lighting
The instrumen t cl uste r ligh ting sw it c hes off auto
mati cally
in darkness and at other times, e.g . when
driving through a tunnel. This is in tended to prompt
the driver to switch on the dipped beam so that the
v e hi cle' s rea r l
ights are swit c hed on ~page 109.
.A WARNING
-
Heavy objects in the vehicle can cause the
headlights to dazzle and distract other road
users. This can lead to accidents and serious
injuries.
• The light cone should always be adjusted
to the load level of the vehicle to ensure that
other road users are not dazzled.
A WARNING
A failure or malfunction in the dynamic head
light range control can cause the headlights
to dazzle or distract other road users. This
can lead to accidents and serious injuries.
• Proceed to a qualified workshop to have
the headlight range control checked immedi
I
ately. ~--------------- --------------------~
ClJ] First read and observe the introductory information and safety warnings & on page 105.
Button
~REAR
Function
Switches the front interior lights on or off.
Switches the rear interior lights on or off.
Switches the door contact switch on or off.
The interior lights are switche d on automatically when the vehicle is unlocked , a door
is opened, or the ve hicle key is removed from the ignition lock.
The light will go out a few seconds after all doors are closed, the vehicle is locked, or
the ignition is switched on.
/q'j/
---------j Switches the reading lights on or off.
Lights and vision 113
Page 71 of 138
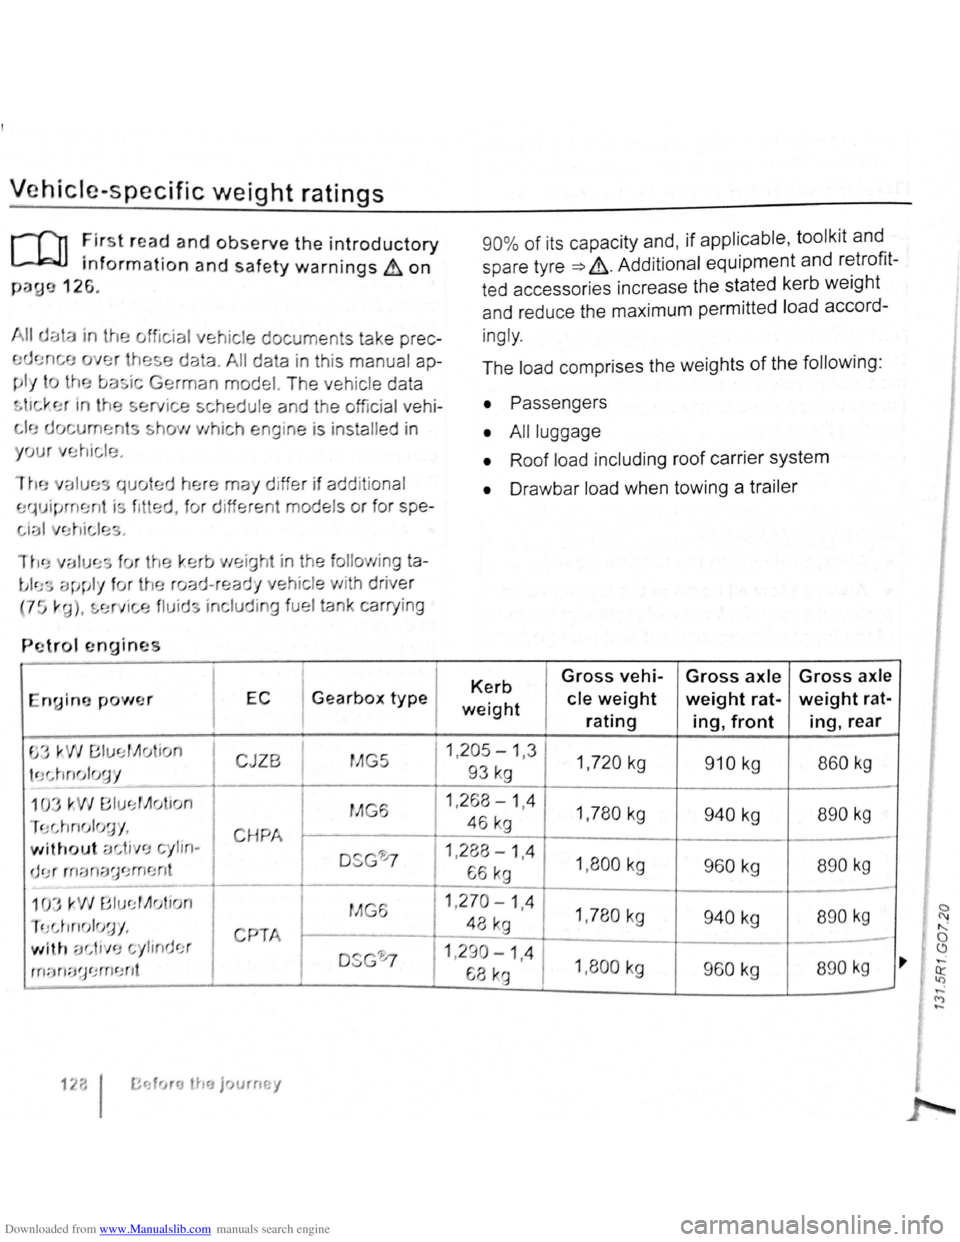
Downloaded from www.Manualslib.com manuals search engine Vehicle·specific weight ratings
r-f11 First r ea d and observe the introductory
L.J,:JJ information and safety warnings & on
paue 126.
ial vehicle document s tak e
prec
data. All data in this manu al ap
man model. T he veh ic le data
ted h
, f
ng ine is inst alled in
may d iffer if add it ional
d ifferent models
or for spe-
a
EC I Gearbox type I
90
% of its capacity and, if applicable , tool kit and
spare tyre
=> &. Addit ional equipment and retrofit
ted accessories increase the stated kerb
weight
and reduce the maximum permitted load accord-
ingly .
The load comprises the weights
of the following :
• Passengers
•
Al l luggage
• Roof load including roof carrier system
• Drawbar load when towing a trailer
Kerb Gross vehi-Gross axle Gross axle
weight cle weight weight rat-weight rat-
rating ing, front ing, rear
JZB I MG5 11 .29~ ~ 1 ,3 1 1 ,720 kg 910 kg I 860 kg
1 ,780 kg 940 kg I 890 kg
H I - -_r.~-I 1 ?P.R -1 Ll. I
1,8 00 kg I 960 kg 890 kg
1,780kg 940 kg 890 kg
I
"', , , 9
I
-ylimJc.:r DSG'0 11,290-1,4 rn ::m:;~~ '.J rn CJ nt 68 ka 1,800 kg 960 kg 890 k g
1 2;; I fr~rcJ tha jr> u rm. y
0 (\1
" 0 ~ ,.. ,...;
~
-<"')
-