Page 434 of 592
434
4-3. Do-it-yourself maintenance
Hood
Release the lock from the inside of the vehicle to open the hood.
Pull the hood release lever.
The hood will pop up slightly.
Lift the auxiliary catch lever
and lift the hood.
Hold the hood open by insert-
ing the supporting rod into the
slot.
STEP1
STEP2
STEP3
Page 435 of 592
435
4-3. Do-it-yourself maintenance
4
Maintenance and care
CAUTION
■
Pre-driving check
Check that the hood is fully closed and locked.
If the hood is not locked properly, it may open while the vehicle is in motion
and cause an accident, which may result in death or serious injury.
■ After installing the support rod into the slot
Make sure the rod supports the hood securely from falling down on to your
head or body.
NOTICE
■When closing the hood
Be sure to return the support rod to its clip before closing the hood. Closing
the hood with the support rod up could cause the hood to bend.
Page 440 of 592
440 4-3. Do-it-yourself maintenance
■Adding engine oil
If the oil level is below or near
the low level mark, add engine
oil of the same type as already in
the engine.
Make sure to check the oil type and prepare the items needed before
adding oil. Remove the oil filler cap by turning it counterclockwise.
Add engine oil slowly, checking the dipstick.
Install the oil filler cap by turning it clockwise.
The approximate quantity of oil needed to raise the level from low to full on
the dipstick is indicated as follows:
1.6 qt. (1.5 L, 1.3 lmp. qt.)
Oil grade ILSAC multi-grade engine oil
Items Clean funnel
STEP1
STEP2
STEP3
Page 442 of 592

442 4-3. Do-it-yourself maintenance
■Engine oil consumption
●The amount of engine oil consumed depends on the oil viscosity, the
quality of the oil and the way the vehicle is driven.
● More oil is consumed under driving conditions such as high speeds and
frequent acceleration and deceleration.
● A new engine consumes more oil.
● When judging the amount of oil consumption, keep in mind that the oil
may have become diluted, making it difficult to judge the true level accu-
rately.
● Oil consumption: Max. 1.1 qt./600 miles, 0.9 lmp.qt./600 miles (1.0 L per
1000 km)
● If your vehicle consumes more than 1.1 qt. (1.0 L, 0.9 lmp.qt.) every 600
miles (1000 km), contact your Toyota dealer.
■ Changing the engine oil (U.S.A. only)
To reset the oil change system, follow the procedure below:
Turn the engine switch to the “ACC” or “LOCK” position with the
odometer reading shown. ( P. 174)
While pressing the trip meter reset button, turn the engine switch to
the “ON” position.
Continue to press and hold the button until the trip meter displays
“000000”.
CAUTION
■ Used engine oil
●Used engine oil contains potentially harmful contaminants which may
cause skin disorders such as inflammation or skin cancer, so care should
be taken to avoid prolonged and repeated contact. To remove used engine
oil from your skin, wash thoroughly with soap and water.
● Dispose of used oil and filters only in a safe and acceptable manner. Do
not dispose of used oil and filters in household trash, in sewers or onto the
ground. Call your Toyota dealer, service station or auto parts store for
information concerning recycling or disposal.
● Do not leave used engine oil within the reach of children.
STEP1
STEP2
STEP3
Page 446 of 592

446 4-3. Do-it-yourself maintenance
Radiator and condenserCheck the radiator and condenser, and clear any foreign objects.
If either of the above parts are ex tremely dirty or you are not sure of
their condition, have your vehicl e checked by your Toyota dealer.
Brake fluid
■ Checking fluid level
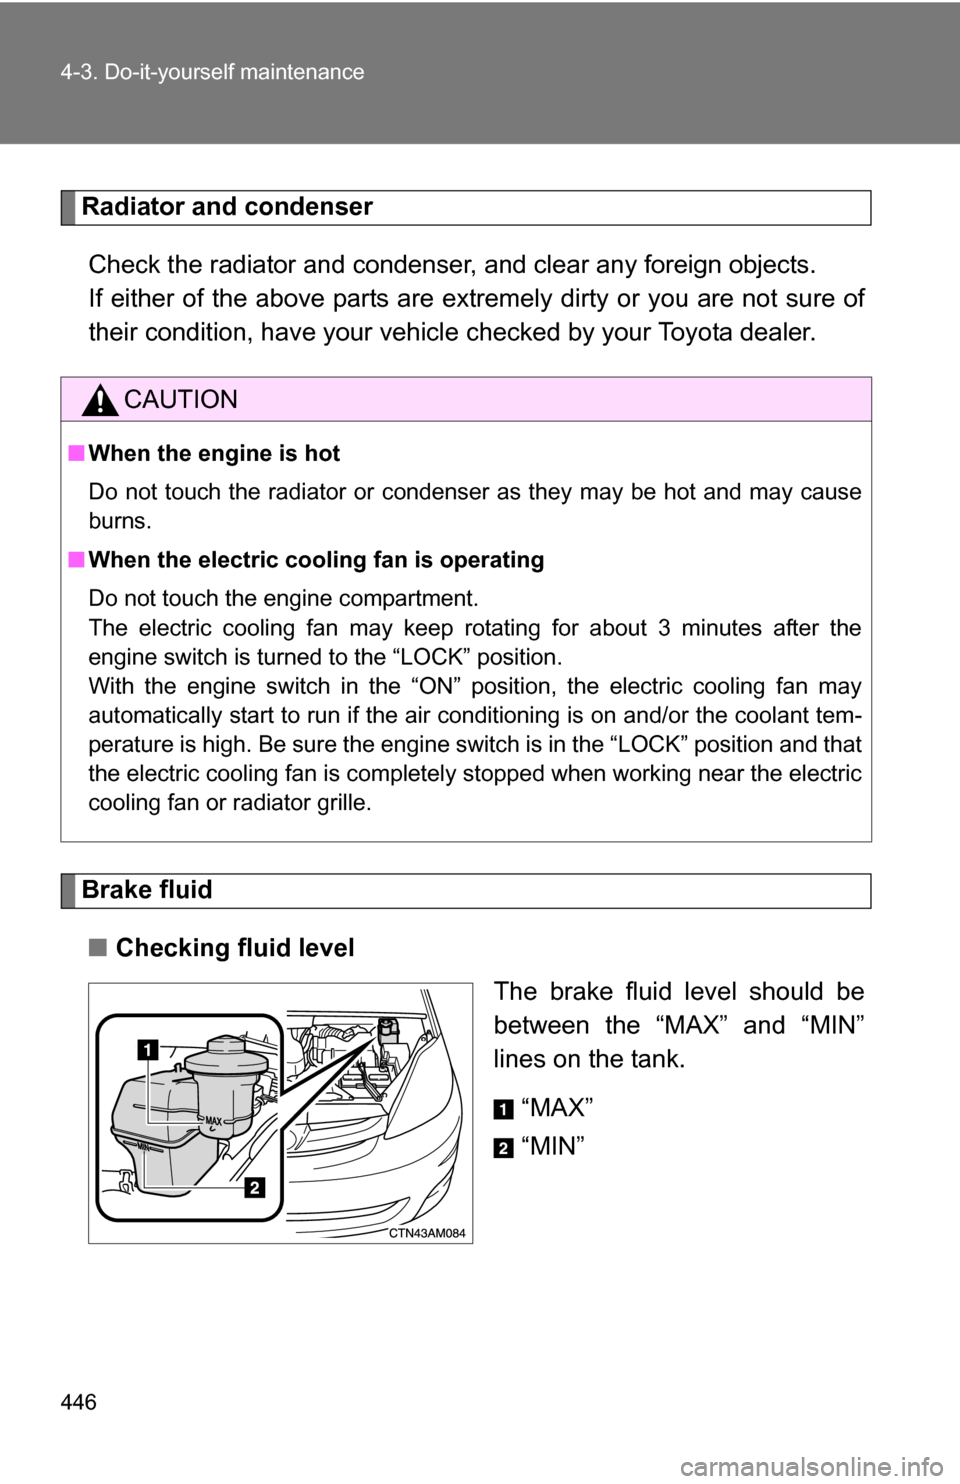
The brake fluid level should be
between the “MAX” and “MIN”
lines on the tank.
“MAX”
“MIN”
CAUTION
■When the engine is hot
Do not touch the radiator or condenser as they may be hot and may cause
burns.
■ When the electric cooling fan is operating
Do not touch the engine compartment.
The electric cooling fan may keep rotating for about 3 minutes after the
engine switch is turned to the “LOCK” position.
With the engine switch in the “ON” position, the electric cooling fan may
automatically start to run if the air conditioning is on and/or the coolant tem-
perature is high. Be sure the engine switch is in the “LOCK” position and that
the electric cooling fan is completely stopped when working near the ele\
ctric
cooling fan or radiator grille.
Page 448 of 592
448 4-3. Do-it-yourself maintenance
Power steering fluid■ Fluid level
The fluid level should be within the appropriate range.
Full (when cold)
Add fluid (when cold)
Full (when hot)
Add fluid (when hot)
Hot: Vehicle has been driven around 50 mph (80 km/h) for 20 minutes, or slightly longer in cold temperatures. (Fluid tem-
perature, 140 F - 175F [60C - 80 C])
Cold: Engine has not been run for about 5 hours. (Room tempera- ture, 50 F - 85F [10C - 30C])
■ Checking the fluid level
Make sure to check the fluid type and prepare the necessary items.
Clean all dirt off the reservoir.
Remove the reservoir cap by turning it counterclockwise and
wipe the dipstick clean.
Reinstall the reservoir cap.
Remove the reservoir cap again and look at the fluid level.
Fluid type Automatic transmission fluid DEXRON II or III
Items• Rag or paper towel
• Funnel (used only for adding power steering fluid)
STEP1
STEP2
STEP3
STEP4
Page 455 of 592

455
4-3. Do-it-yourself maintenance
4
Maintenance and care
Installing tire pressure warning valves and transmitters
When replacing tires or wheels, tire pressure warning valves and
transmitters must also be installed.
When new tire pressure warning valves and transmitters are
installed, new tire pressure warning valve and transmitter ID codes
must be registered in the tire pr essure warning computer and tire
pressure warning system must be initialized. Have tire pressure
warning valve and transmitter ID codes registered by your Toyota
dealer. ( P. 456)
Initializing the tire pressure warning system
■ The tire pressure warning system must be initialized when the
tire size is changed
When the tire pressure warning syst em is initialized, the current tire
inflation pressure is set as the pressure benchmark.
■ How to initialize the tire pressure warning system
Park the vehicle in a safe plac e and turn the engine switch to
the “ACC” or “LOCK” position.
While the vehicle is moving, in itialization is not performed.
Adjust the tire inflation pressure to the specified cold tire infla-
tion pressure level. ( P. 548)
Make sure to adjust the tire pressure to the specified cold tire
inflation pressure level. The ti re pressure warning system will
operate based on this pressure level.
Turn the engine switch to the “ON” position.
STEP1
STEP2
STEP3
Page 456 of 592
456 4-3. Do-it-yourself maintenance
Push and hold the tire pressure
warning reset switch until the tire
pressure warning light blinks
slowly three times.
Wait for several minutes with the engine switch in the “ON”
position, and then turn the engine switch to the “ACC” or
“LOCK” position.
Registering ID codes The tire pressure warning valve and transmitter is equipped with a
unique ID code. When replacing a tire pressure warning valve and
transmitter, it is necessary to regi ster the ID code of tire pressure
warning valve and transmitter. Have the ID code registered by your
Toyota dealer.
STEP4
STEP5