2009 TOYOTA SEQUOIA fuel pressure
[x] Cancel search: fuel pressurePage 5 of 612

1
2
3
4
5
6
7
5
4-2. Maintenance ...................... 439Maintenance requirements ..................... 439
General maintenance.......... 441
Emission inspection and maintenance (I/M)
programs........................... 444
4-3. Do-it-yourself maintenance .................... 445
Do-it-yourself service precautions ....................... 445
Hood ................................... 449
Engine compartment ........... 450
Tires .................................... 466
Tire inflation pressure ......... 473
Wheels ................................ 477
Air conditioning filter............ 479
Wireless remote control battery ............................... 482
Checking and replacing fuses ................................. 484
Light bulbs........................... 495
5-1. Essential information ....... 508 Emergency flashers ............ 508
If your vehicle needs to be towed ................................ 509
If you think something is wrong ................................ 514
Fuel pump shut off system .............................. 515
Event data recorder ............ 516 5-2. Steps to take in an
emergency ...................... 518
If a warning light turns on or a warning buzzer
sounds... .......................... 518
If a warning message is displayed (vehicles with
multi-information
display) ............................. 527
If you have a flat tire ........... 532
If the engine will not start.... 542
If the shift lever cannot be shifted from P ................... 544
If you lose your keys........... 545
If the vehicle battery is discharged........................ 546
If your vehicle overheats .... 550
If the vehicle becomes stuck ................................. 553
6-1. Specifications ................... 556 Maintenance data (fuel, oil level, etc.) ........... 556
Fuel information.................. 569
Tire information .................. 573
6-2. Customization................... 584 Customizable features........ 584
Items to initialize ................. 588
5When trouble arises
6Vehicle specifications
Page 9 of 612

9
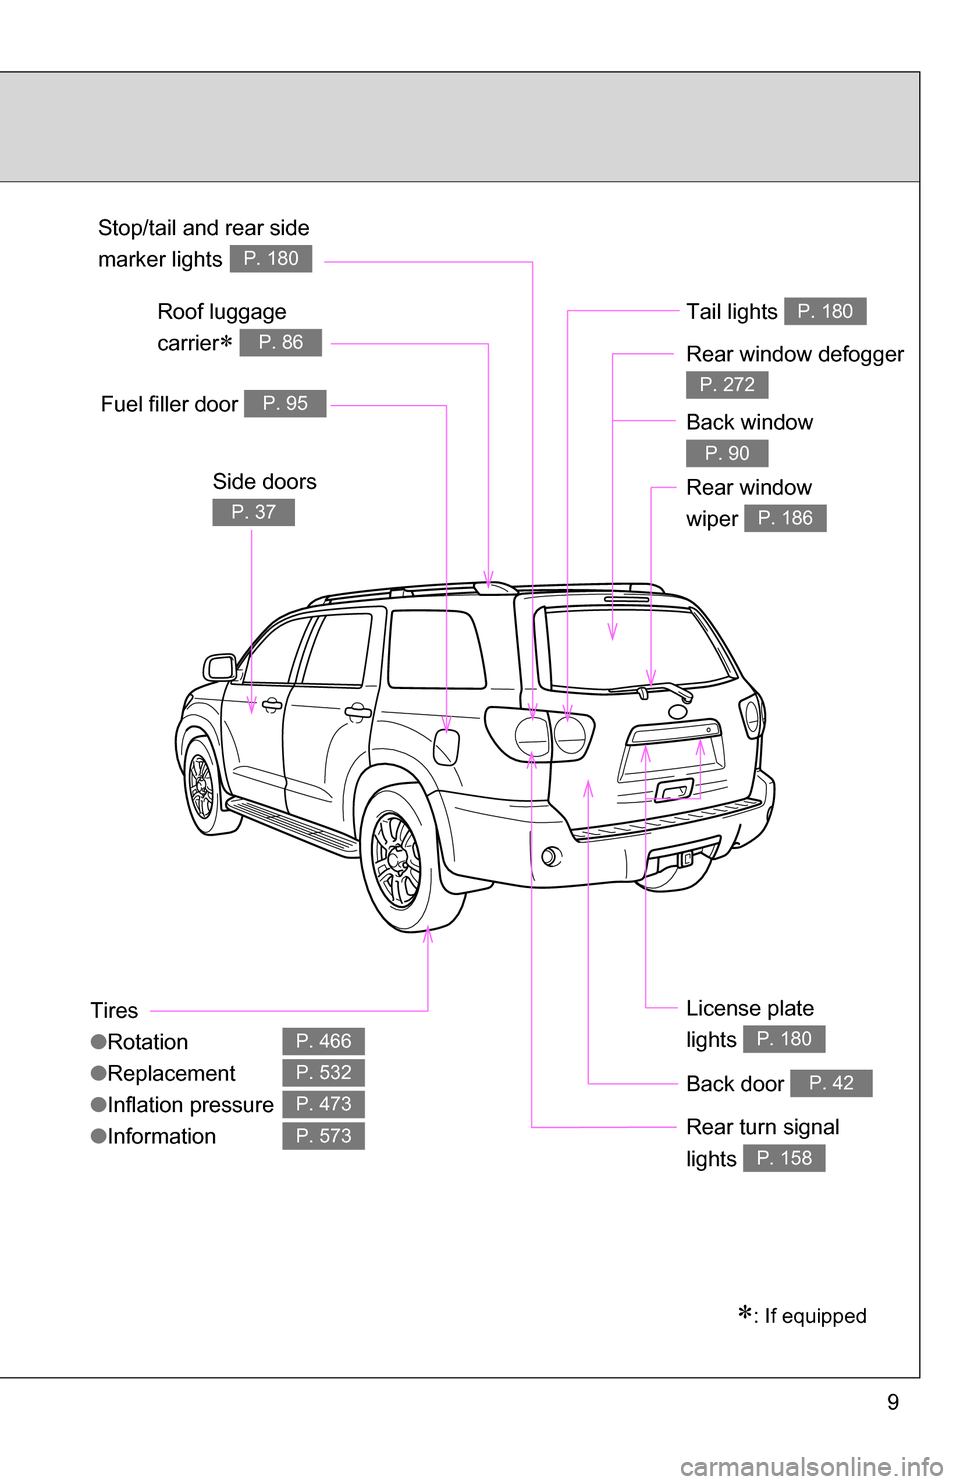
Tires
●Rotation
● Replacement
● Inflation pressure
● Information
P. 466
P. 532
P. 473
P. 573
Fuel filler door P. 95
Rear turn signal
lights
P. 158
Stop/tail and rear side
marker lights
P. 180
Side doors
P. 37
: If equipped
Back door P. 42
License plate
lights
P. 180
Tail lights P. 180
Rear window defogger
P. 272
Rear window
wiper
P. 186
Roof luggage
carrier
P. 86
Back window
P. 90
Page 161 of 612

161
2
When driving
2-2. Instrument cluster
Gauges and meters
Vehicles with multi-information display
The following gauges, meters and displays illuminate when the
engine switch is in the ON position. Tachometer
Displays the engine speed in revolutions per minute.
Speedometer
Displays the vehicle speed.
Fuel gauge
Displays the quantity of fuel remaining in the tank.
Vo l t m e t e r
Displays the charge state.
Engine oil pressure gauge
Displays the engine oil pressure.
Engine coolant temperature gauge
Displays the engine coolant temperature.
Odometer/trip meter switching and trip meter resetting button
Switches between odometer and trip meter displays. Pushing and hold-
ing the button will reset the trip meter when the trip meter is being dis-
played.
Page 163 of 612

163
2-2. Instrument cluster
2
When driving
Vehicles without multi-information display
The following gauges, meters and displays illuminate when the
engine switch is in the ON position. Tachometer
Displays the engine speed in revolutions per minute.
Speedometer
Displays the vehicle speed.
Fuel gauge
Displays the quantity of fuel remaining in the tank.
Vo l t m e t e r
Displays the charge state.
Engine oil pressure gauge
Displays the engine oil pressure.
Engine coolant temperature gauge
Displays the engine coolant temperature.
Odometer/trip meter switching and trip meter resetting button
Switches between odometer and trip meter displays. Pushing and hold-
ing the button will reset the trip meter when the trip meter is being dis-
played.
Page 434 of 612

434
4-1. Maintenance and care
Cleaning and protecting the vehicle exterior
■Automatic car washes
●Fold the mirrors back before washing the vehicle.
● Brushes used in automatic car washes may scratch the vehicle surface
and harm your vehicle’s paint.
■ High pressure car washes
Do not allow the nozzles of the car wash to come within close proximity \
of
the windows. Before entering an automatic car wash, check that the fuel filler
door on your vehicle is closed properly.
■ Aluminum wheels
Remove any dirt immediately by using a neutral detergent. Do not use har\
d
brushes or abrasive cleaners. Do not use strong or harsh chemical cleaners.
Use the same mild detergent and wax as used on the paint.
■ Bumpers and side moldings
Do not scrub with abrasive cleaners.
Perform the following to protect the vehicle and maintain it in prime
condition.
● Working from top to bottom, liber ally apply water to the vehicle
body, wheel wells and underside of the vehicle to remove any
dirt and dust.
Wash the vehicle body using a sponge or soft cloth, such as a
chamois.
● For hard-to-remove marks, use car wash soap and rinse thor-
oughly with water.
● Wipe away any water.
● Wax the vehicle when the waterproof coating deteriorates.
If water does not bead on a clean surface, apply wax when the vehicle
body is cool.
Page 474 of 612

474 4-3. Do-it-yourself maintenance
■Tire inflation pressure check interval
You should check tire pressure every two weeks, or at least once a
month.
Do not forget to check the spare.
■Effects of incorrect tire inflation pressure
Driving with incorrect tire inflation pressure ma y result in the following:
●Reduced fuel efficiency
●Reduced driving comfort and tire life
●Reduced safety
●Damage to the drive train
If a tire needs frequent re filling, have it checked by your Toyota dealer.
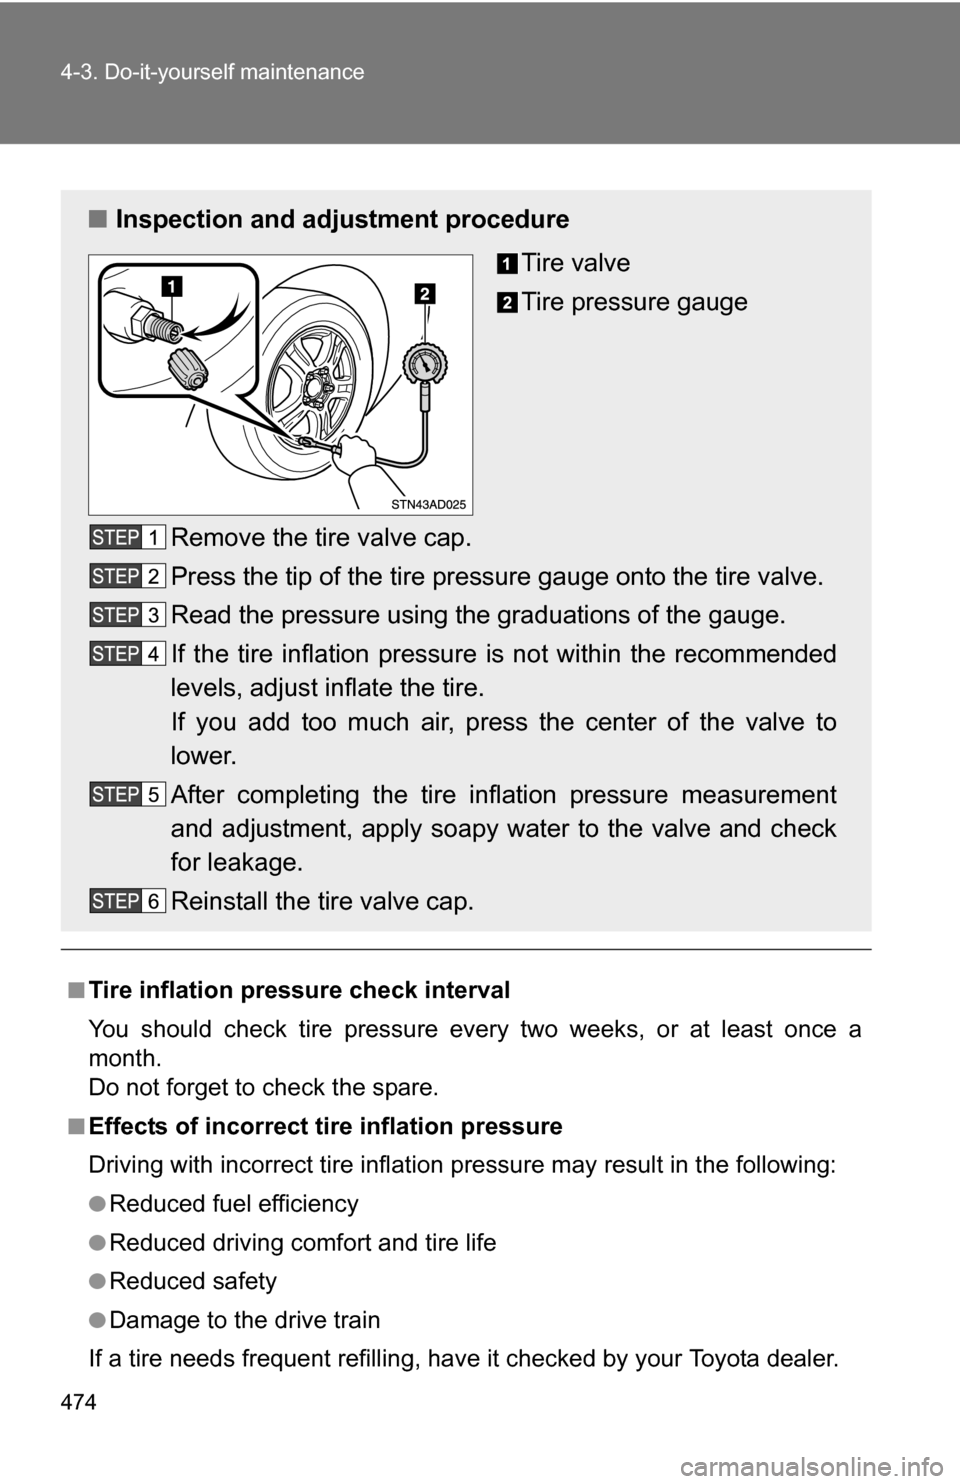
■Inspection and adjustment procedure
Tire valve
Tire pressure gauge
Remove the tire valve cap.
Press the tip of the tire pressure gauge onto the tire valve.
Read the pressure using the graduations of the gauge.
If the tire inflation pressure is not within the recommended
levels, adjust inflate the tire.
If you add too much air, pres s the center of the valve to
lower.
After completing the tire inflation pressure measurement
and adjustment, apply soapy water to the valve and check
for leakage.
Reinstall the tire valve cap.
Page 521 of 612

5
When trouble arises
521
5-2. Steps to take in an emergency
Tire pressure warning
light
• When the light comes on:
Low tire inflation pres-
sure. Adjust the tire
inflation pressure.
• When the light comes on after blinking for 1
minute: Malfunction in
the tire pressure warning
system. Have the system
checked by your
Toyota dealer.
Low fuel level warning
light
Low level of fuel. Refuel the vehicle.
*4Low washer fluid warn-
ing light
Low level of washer fluid. Fill the tank.
*4
(U.S.A.)Engine oil replacement
reminder light
• Illuminates for about 3
seconds and then flashes
for about 12 seconds: Indi-
cates that the engine oil is
scheduled to be changed. Check the engine oil,
and change if neces-
sary.
• Comes on and remains: Indicates that the engine
oil should be changed. Check and change the
engine oil.
*5
Master warning light
A buzzer sounds and the
warning light comes on
and flashes to indicate
that the master warning
system has detected a
malfunction. P. 527
Warning lightWarning light/DetailsCorrection procedure
Page 525 of 612

5
When trouble arises
525
5-2. Steps to take in an emergency
CAUTION
■Maintenance of the tire
Each tire, including the spare (if provided), should be checked monthly
when cold and inflated to the inflation pressure recommended by the
vehicle manufacturer on the vehicle
placard or tire inflation pressure
label (tire and load information label). (If your vehicle has tires of a differ-
ent size than the size indicated on the vehicle placard or tire inflation
pressure label [tire and load information label], you should determine the
proper tire inflation pr essure for those tires.)
As an added safety feature, your vehicle has been equipped with a tire
pressure monitoring system (TPMS-ti re pressure warning system) that
illuminates a low tire pressure telltal e (tire pressure warning light) when
one or more of your tires is significantly under-inflated. Accordingly,
when the low tire pressure telltale (tire pre ssure warning light) illumi-
nates, you should stop and check your tires as soon as possible, and
inflate them to the proper pressure. Driving on a significantly under-
inflated tire causes the tire to overheat and can lead to tire failure.
Under-inflation also reduces fuel effi ciency and tire tread life, and may
affect the vehicle’s handling and stopping ability.
Please note that the TPMS (tire pressure warning system) is not a sub-
stitute for proper tire ma intenance, and it is the driver’s responsibility to
maintain correct tire pressure, even if under-inflation has not reached the
level to trigger illu mination of the TPMS low ti re pressure telltale (tire
pressure warning light).
Your vehicle has also been equipped with a TPMS (tire pressure warning
system) malfunction indicator to indi cate when the system is not operat-
ing properly. The TPMS (tire pressure warning system) malfunction indi-
cator is combined with the low tire pressure telltale (tire pressure
warning light). When the system det ects a malfunction, the telltale will
flash for approximately one minute an d then remain continuously illumi-
nated. This sequence will continue upon subsequent vehicle start-ups as
long as the malfunction exists. When the malfunction indi cator is illumi-
nated, the system may not be able to detect or signal low tire pressure
as intended.