2009 SUBARU OUTBACK Key
[x] Cancel search: KeyPage 128 of 447

&Key reminder chime
The reminder chime sounds when the driver ’s door opens and the key is in the
“ LOCK ”or “Acc ”positions. The chime
stops when the key is removed from the
ignition switch. & Ignition switch light
For easy access to the ignition switch in
the dark, the ignition switch light illumi-
nates when any of the doors are opened.
The light remains on for a several seconds
and gradually goes out after all doors are
closed or if the key is inserted in the
ignition switch. Hazard warning flasher
The hazard warning flasher is used to
warn other drivers when you have to park
your vehicle under emergency conditions.
The hazard warning flasher works with the
ignition switch in any position.
To turn on the hazard warning flasher,
push the hazard warning button on the
instrument panel. To turn off the flasher,
push the button again. NOTE
When the hazard warning flasher is on,
the turn signals do not work.Meters and gauges (vehicle
with SI-DRIVE) NOTE
Liquid-crystal displays are used in
some of the meters and gauges in the
combination meter. You will find their
indications hard to see if you wear
polarized glasses. &
Combination meter illumina- tion
When the ignition switch is turned to the “ ON ”position, the various parts of the
combination meter are illuminated in the
following sequence:
1. Meter needles, gauge needles and
multi-information display light up.
2. Meter needles and gauge needles
each show MAX position.
3. Meter needles and gauge needles
each show MIN position.
4. Dials in meters and gauges light up.
5. Regular illumination (for driving) be- gins.
NOTE
The above sequence of operations may
not take place if you quickly turn the Instruments and controls
3-5
– CONTINUED –
Page 161 of 447

3-38Instruments and controls
may be considered normal. . The warning light illuminates right
after the engine is started but goes out
immediately, remaining off.. The warning light illuminates after
engine startup and goes off while the
vehicle is subsequently being driven.. The warning light illuminates during
driving, but it goes out immediately and
remains off. ! Vehicle Dynamics Control OFF in-
dicator light
. It illuminates when the Vehicle Dy-
namics Control OFF switch is pressed. . It also illuminates when the Vehicle
Dynamics Control system is deactivated. NOTE . The light may stay on for a while
after the engine has been started,
especially in cold weather. This does
not indicate the existence of a problem.
The light should go out as soon as the
engine has warmed up.. The indicator light illuminates when
the engine has developed a problem
and the CHECK ENGINE warning light/
malfunction indicator lamp is on.
The Vehicle Dynamics Control system is
probably faulty under the following condi-
tion. Have your vehicle checked at a SUBARU dealer as soon as possible. .
The light does not go out even after the
lapse of several minutes (the engine has
warmed up) after the engine has started.
& Security indicator light
This indicator light shows the status of the
alarm system. It also indicates operation
of the immobilizer system. !Alarm system
It blinks to show the driver the operational
status of the alarm system. For detailed
information, refer to the “Alarm system ”
section in chapter 2. ! Immobilizer system
This light blinks approximately 60 seconds
after the ignition switch is turned from“ ON ”position to the “Acc ”or “LOCK ”
position or immediately after the key is
pulled out. Refer to the “Door locks ”
section in chapter 2.
If the indicator light does not flash, it may
indicate that immobilizer system may be
faulty. Contact your nearest SUBARU
dealer immediately.
In the event that an unauthorized key (for
example, an unauthorized duplicate) is
used, the security indicator light illumi-nates. &
SPORT mode indicator
light (4-speed AT mod-els)
This light illuminates when the ignition
switch is turned to the “ON ”position and
goes out after the engine has started.
When the selector lever is moved to the
manual gate, the SPORT mode is se-
lected and the indicator light illuminates.
Refer to the “Automatic transmission –4-
speed ”section in chapter 7.
& Shift-up indicator light
(MT models with SI- DRIVE)
When the ignition switch is turned to the “ON ”position, the indicator light illumi-
nates for 3 seconds, and then turns off.
While selecting the Intelligent (I) mode of
SI-DRIVE, this indicator light illuminates
and informs the upshift timing to the driver
for fuel-efficient driving.
Page 225 of 447

6-2Interior equipment
Interior light
When leaving your vehicle, make sure the
light is turned off to avoid battery dis-charge. &Dome light
1) ON
2) DOOR
3) OFF
The dome light switch has three positions: ON: The light stays on continuously.
OFF: The light stays off.
DOOR: The light illuminates when any of
the doors or the rear gate (Station wagon)
is opened. The light remains on for several
seconds and gradually turns off after all
doors and the rear gate are closed. Also, the light turns off when the key is turned to the
“Acc ”or “ON ”position.
When the dome light switch is in theDOOR position, the dome light also
illuminates by use of the remote keyless
entry system.
The setting of the period for which the light
stays on can be changed as follows. . Vehicles with genuine SUBARU na-
vigation system:
The setting can be changed using the
monitor. For details, please refer to theOwner ’s Manual supplement for the moni-
tor system. Also, the setting can be
changed by a SUBARU dealer. Contact
the nearest SUBARU dealer for details. . Vehicles without genuine SUBARU
navigation system:
The setting can be changed by a
SUBARU dealer. Contact the nearest
SUBARU dealer for details. &
Cargo area light (Station wa- gon)
1) DOOR
2) OFF
3) ON
The cargo area light switch has three positions. DOOR: The light illuminates only when
the rear gate is opened.OFF: The light stays off.
ON: The light stays on continuously.
Page 226 of 447

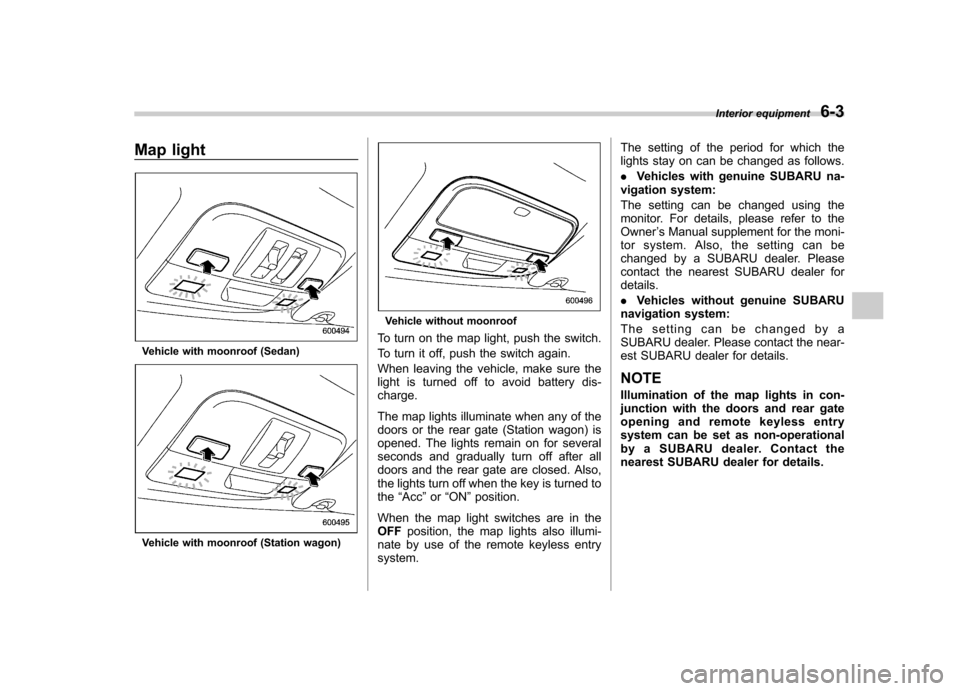
Map light
Vehicle with moonroof (Sedan)
Vehicle with moonroof (Station wagon)
Vehicle without moonroof
To turn on the map light, push the switch.
To turn it off, push the switch again.
When leaving the vehicle, make sure the
light is turned off to avoid battery dis-charge.
The map lights illuminate when any of the
doors or the rear gate (Station wagon) is
opened. The lights remain on for several
seconds and gradually turn off after all
doors and the rear gate are closed. Also,
the lights turn off when the key is turned tothe “Acc ”or “ON ”position.
When the map light switches are in theOFF position, the map lights also illumi-
nate by use of the remote keyless entrysystem. The setting of the period for which the
lights stay on can be changed as follows. .
Vehicles with genuine SUBARU na-
vigation system:
The setting can be changed using the
monitor. For details, please refer to theOwner ’s Manual supplement for the moni-
tor system. Also, the setting can be
changed by a SUBARU dealer. Please
contact the nearest SUBARU dealer fordetails. . Vehicles without genuine SUBARU
navigation system:
The setting can be changed by a
SUBARU dealer. Please contact the near-
est SUBARU dealer for details.
NOTE
Illumination of the map lights in con-
junction with the doors and rear gate
opening and remote keyless entry
system can be set as non-operational
by a SUBARU dealer. Contact the
nearest SUBARU dealer for details. Interior equipment
6-3
Page 228 of 447

&Vanity mirror with light
CAUTION
Keep the vanity mirror cover closed
while the car is being driven to avoiddazzle.
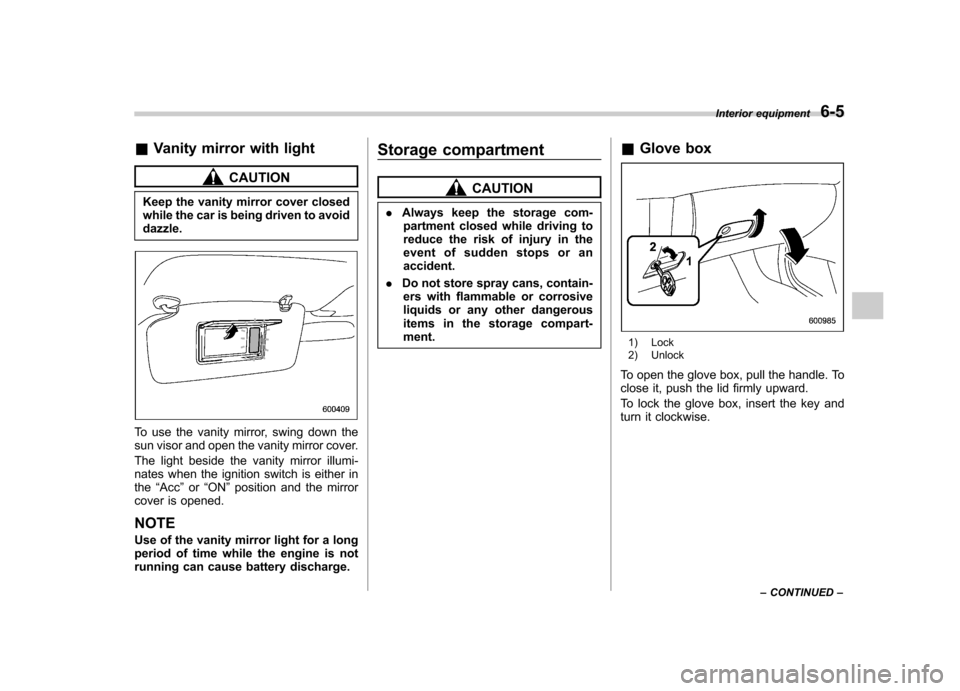
To use the vanity mirror, swing down the
sun visor and open the vanity mirror cover.
The light beside the vanity mirror illumi-
nates when the ignition switch is either inthe “Acc ”or “ON ”position and the mirror
cover is opened.
NOTE
Use of the vanity mirror light for a long
period of time while the engine is not
running can cause battery discharge. Storage compartment
CAUTION
. Always keep the storage com-
partment closed while driving to
reduce the risk of injury in the
event of sudden stops or anaccident.
. Do not store spray cans, contain-
ers with flammable or corrosive
liquids or any other dangerous
items in the storage compart-ment. &
Glove box
1) Lock
2) Unlock
To open the glove box, pull the handle. To
close it, push the lid firmly upward.
To lock the glove box, insert the key and
turn it clockwise. Interior equipment
6-5
– CONTINUED –
Page 242 of 447

HomeLink®Wireless Control
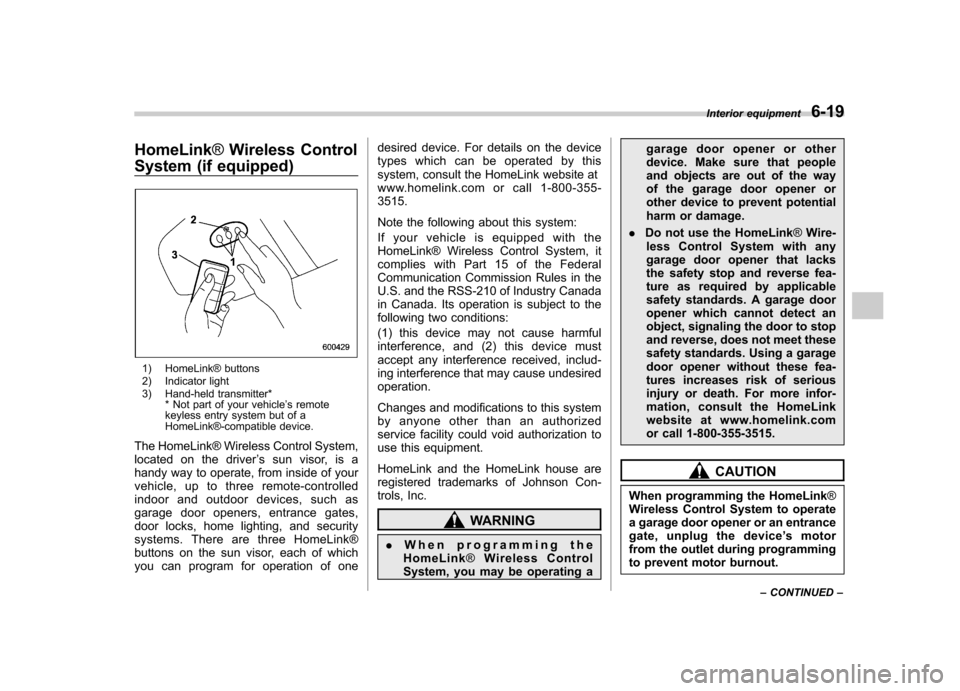
System (if equipped)
1) HomeLink® buttons
2) Indicator light
3) Hand-held transmitter* * Not part of your vehicle ’s remote
keyless entry system but of a
HomeLink®-compatible device.
The HomeLink® Wireless Control System,
located on the driver ’s sun visor, is a
handy way to operate, from inside of your
vehicle, up to three remote-controlled
indoor and outdoor devices, such as
garage door openers, entrance gates,
door locks, home lighting, and security
systems. There are three HomeLink®
buttons on the sun visor, each of which
you can program for operation of one desired device. For details on the device
types which can be operated by this
system, consult the HomeLink website at
www.homelink.com or call 1-800-355-3515.
Note the following about this system:
Ifyourvehicleisequippedwiththe
HomeLink® Wireless Control System, it
complies with Part 15 of the Federal
Communication Commission Rules in the
U.S. and the RSS-210 of Industry Canada
in Canada. Its operation is subject to the
following two conditions:
(1) this device may not cause harmful
interference, and (2) this device must
accept any interference received, includ-
ing interference that may cause undesiredoperation.
Changes and modifications to this system
by anyone other than an authorized
service facility could void authorization to
use this equipment.
HomeLink and the HomeLink house are
registered trademarks of Johnson Con-
trols, Inc.
WARNING
. When programming the
HomeLink ®Wireless Control
System, you may be operating a garage door opener or other
device. Make sure that people
and objects are out of the way
of the garage door opener or
other device to prevent potential
harm or damage.
. Do not use the HomeLink ®Wire-
less Control System with any
garage door opener that lacks
the safety stop and reverse fea-
ture as required by applicable
safety standards. A garage door
opener which cannot detect an
object, signaling the door to stop
and reverse, does not meet these
safety standards. Using a garage
door opener without these fea-
tures increases risk of serious
injury or death. For more infor-
mation, consult the HomeLink
website at www.homelink.com
or call 1-800-355-3515.
CAUTION
When programming the HomeLink ®
Wireless Control System to operate
a garage door opener or an entrance
gate, unplug the device ’s motor
from the outlet during programming
to prevent motor burnout. Interior equipment
6-19
– CONTINUED –
Page 255 of 447

NOTE
Engine oil, engine coolant, brake fluid,
washer fluid and other fluid levels
should be checked daily, weekly or at
fuel stops.Starting the engine &
Manual transmission vehicle
1. Apply the parking brake.
2. Turn off unnecessary lights and ac- cessories.
3. Depress the clutch pedal to the floor
and shift the shift lever into neutral. Hold
the clutch pedal to the floor while starting
the engine. The starter motor will only
operate when the clutch pedal is pressed
fully to the floor.
4. Turn the ignition switch to the “ON ”
position and check the operation of the
warning and indicator lights. Refer to the“ Warning and indicator lights ”section in
chapter 3.
CAUTION
Do not operate the starter motor
continuously for more than 10 sec-
onds. If the engine fails to start after
operating the starter for 5 to 10
seconds, wait for 10 seconds or
more before trying again.
5. Turn the ignition switch to the “START ”
position without depressing the accelera-
tor pedal. Release the key immediately
after the engine has started.
If the engine does not start, perform the following procedure.
(1) Turn the ignition switch to the “LOCK ”position and wait for at least
10 seconds. After checking that the
parking brake is firmly set, turn the
ignition switch to the “START ”position
while depressing the accelerator pedal
slightly (approximately a quarter of the
full stroke). Release the accelerator
pedal as soon as the engine starts.
(2) If this fails to start the engine, turn
the ignition switch back to the “LOCK ”
position and wait for at least 10
seconds. Then fully depress the accel-
erator pedal and turn the ignition
switch to the “START ”position. If the
engine starts, quickly release the
accelerator pedal.
(3) If this does not start the engine,
turn the ignition switch again to the“ LOCK ”position. After waiting for 10
seconds or longer, turn the ignition
switch to the “START ”position without
depressing the accelerator pedal.
(4) If the engine still refuses to start,
contact your nearest SUBARU dealer
for assistance. Starting and operating
7-9
– CONTINUED –
Page 256 of 447

7-10Starting and operating
6. Confirm that all warning and indicator
lights have gone off after the engine has
started. The fuel injection system auto-
matically lowers the idle speed as the
engine warms up.
NOTE (2.5 L non-turbo models)
To protect the engine while the shift
lever is in the neutral position, the
engine is controlled so that the engine
speed may not become too high even if
the accelerator pedal is depressedhard. &Automatic transmission ve- hicle
CAUTION
If you restart the engine while the
vehicle is moving, shift the selector
lever into the “N ” position. Do not
attempt to place the selector lever of
a moving vehicle into the “P ” posi-
tion.
1. Apply the parking brake.
2. Turn off unnecessary lights and ac- cessories.
3. Shift the selector lever to the “P ”or “N ”
position (preferably “P ” position). The
starter will only operate when the select lever is at the
“P ”or “N ”position.
4. Turn the ignition switch to the “ON ”
position and check the operation of the
warning and indicator lights. Refer to the“ Warning and indicator lights ”section in
chapter 3.
CAUTION
Do not operate the starter motor
continuously for more than 10 sec-
onds. If the engine fails to start after
operating the starter for 5 to 10
seconds, wait for 10 seconds or
more before trying again.
5. Turn the ignition switch to the “START ”
position without depressing the accelera-
tor pedal. Release the key immediately
after the engine has started.
If the engine does not start, perform the
following procedure.
(1) Turn the ignition switch to the“LOCK ”position and wait for at least
10 seconds. After checking that the
parking brake is firmly set, turn the
ignition switch to the “START ”position
while depressing the accelerator pedal
slightly (approximately a quarter of the
full stroke). Release the accelerator
pedal as soon as the engine starts.
(2) If this fails to start the engine, turn the ignition switch back to the
“LOCK ”
position and wait for at least 10
seconds. Then fully depress the accel-
erator pedal and turn the ignition
switch to the “START ”position. If the
engine starts, quickly release the
accelerator pedal.
(3) If this fails to start the engine, turn
the ignition switch again to the “LOCK ”
position. After waiting for 10 seconds
or longer, turn the ignition switch to the“ START ”position without depressing
the accelerator pedal.
(4) If the engine still refuses to start,
contact your nearest SUBARU dealer
for assistance.
6. Confirm that all warning and indicator
lights have gone out after the engine has
started. The fuel injection system auto-
matically lowers the idle speed as the
engine warms up.
While the engine is warming up, make
sure that the selector lever is at the “P ”or
“ N ”position and that the parking brake is
applied.
NOTE (2.5 L non-turbo and 3.0 L models)
To protect the engine while the selector
lever is in the “P ” or “N ” position, the
engine is controlled so that the engine