2009 SKODA SUPERB light
[x] Cancel search: lightPage 87 of 294

Seats and Stowage
86
– With repeated pressing of the switch, the intensity of the heating is
down-regulated up to the switch-off. The intensity of the heating is indicated by the number of illuminated warning lights in the switch.
WARNING
If you have a subdued pain and/or temperature sensitivity, e.g. through medication, paralysis or because of chronic illness (e.g. diabetes), we recommend not to use the seat heating. This can lead to burns on the back, the posterior and the legs which are diff
icult to heal. If the seat heating is
used, we recommend to make regular br
eaks in your journey when driving
long distances, so that in specific cases as mentioned above the body can recuperate from the stress of the journey. Please consult your doctor, who can evaluate your specific condition.
Caution
•
You should not kneel on the seats or otherwise apply pressure at specific points
in order to avoid damaging the heating elements of the seat heaters.•
Do not use the seat heating if the seats are not occupied by persons or if objects
are fastened or stored on them, for exampl
e a child seat, a bag etc. A fault of the
heating elements in the seat heating can occur.•
Do not clean the seats moist
⇒page 216.
Note
•
The seat heating should only be switched
on when the engine is running. This
has a significant effect of sa
ving on the battery capacity.
•
If the on-board voltage drops, the seat
heating is switched off automatically, in
order to provide sufficient electrical energy for the engine control.PedalsConcerning a secure depressi
ng of the pedal, you should use only footmats from
the Škoda genuine
accessories.
Operation of the pedals must not be hindered!
WARNING
•
Greater pedal distances may be needed when there is a fault in the brake
system.•
Do not place any footmats or other additional floor coverings in the area
of the pedals in order to ensure that all the pedals can be fully depressed and are able to return unobstructed to thei
r initial position - risk of accident!
•
There must be no objects on the floor which could roll under the pedals.
You would then no longer be able to
apply the brakes, operate the clutch or
accelerator - risk of accident!luggage compartmentLoading the luggage compartmentPlease observe the following in the inte
rest of having good handling char-
acteristics of
your vehicle:
– Distribute the items of luggage as evenly as possible. – Place heavy objects as far forward as possible.– Attach the items of luggage to the lashing eyes or the safety net*
⇒
page 87.
In the event of an accident, there is such a
high kinetic energy which is produced by
small and light objects that they can caus
e severe injuries. The magnitude of the
kinetic energy depends on the speed at wh
ich the vehicle is travelling and on the
weight of the object. The speed at which the
vehicle is travelling
is in this case the
more significant factor. Example: In the event of a frontal collision at a speed of 50 km/h, an unsecured object with a weight of 4.5 kg produces
an energy, which corresponds to 20 times
its own weight. This means that it results in a weight of approx. 90 kg. You can
s2dk.1.book Page 86 Wednesday, April 8, 2009 12:23 PM
Page 88 of 294

Seats and Stowage
87
Using the system
Safety
Driving Tips
General Maintenance
Breakdown assistance
Technical Data
imagine the injuries that can occur, if this “bullet” is flying through the interior compartment and hits an occupant.
WARNING
•
Store the objects in the luggage comp
artment and attach them to the
lashing eyes.•
Loose objects in the passenger compartment can be thrown forward
during a sudden manoeuvre or in case
of an accident and can injure the
occupants or other oncoming traffic. This risk is still increased, if the objects which are flying around are hit by a depl
oyed airbag. In this case, the objects
which are thrown back can injure the occupants - hazard.•
Please note that the handling properti
es of your vehicle may be affected
when transporting heavy objects as a result of the displacement of the centre of gravity. The speed and style
of driving must be adjusted accord-
ingly.•
The items carried in the luggage compar
tment should be stored in such
a way that no objects are
able to slip forw
ard if there are any sudden driving
or braking manoeuvres undertaken - risk of injury!•
Never drive with the boot lid fully opened or slightly ajar otherwise
exhaust gases may get into the interior of the vehicle - risk of poisoning!•
On no account exceed the permissi
ble axle loads and the permissible
gross weight of the vehi
cle - risk of accident!
•
Never transport occupants in the luggage compartment!Caution
Please ensure that the heating elements of the rear window heater are not damaged as a result of objects sliding in this area.
Note
Tyre pressure must be adjusted to the load
⇒page 235, fig. 210
.
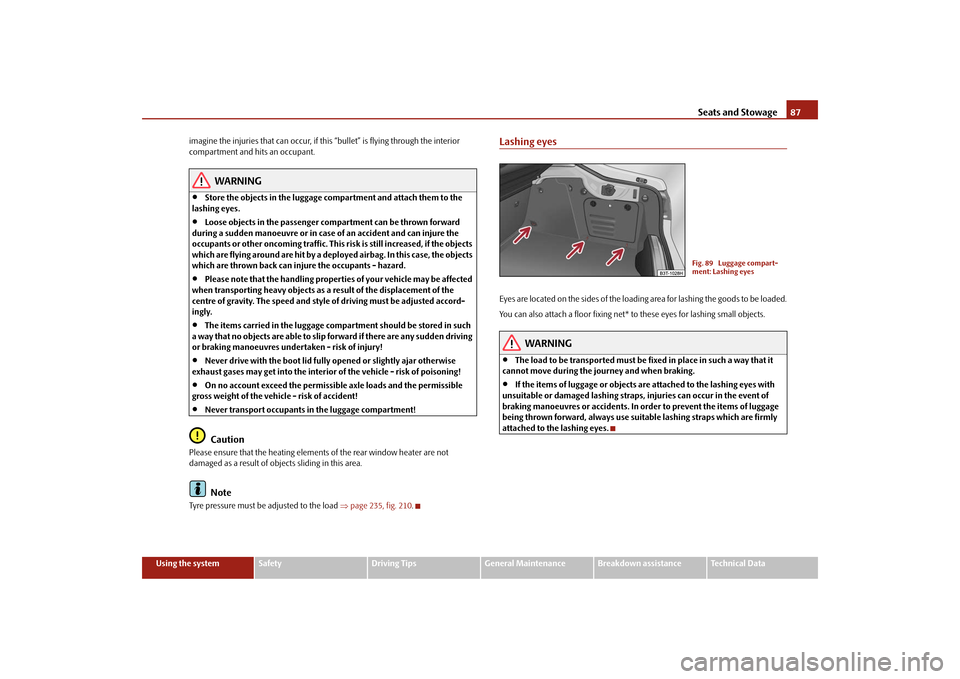
Lashing eyesEyes are located on the sides of the loading area for lashing the goods to be loaded. You can also attach a floor fixing net*
to these eyes for lashing small objects.
WARNING
•
The load to be transported must be fixed in place in such a way that it
cannot move during the journey and when braking.•
If the items of luggage or objects ar
e attached to the lashing eyes with
unsuitable or damaged lashing straps,
injuries can occur in the event of
braking manoeuvres or accidents. In
order to prevent the items of luggage
being thrown forward, always use suit
able lashing straps which are firmly
attached to the lashing eyes.
Fig. 89 Luggage compart- ment: Lashing eyes
s2dk.1.book Page 87 Wednesday, April 8, 2009 12:23 PM
Page 90 of 294

Seats and Stowage
89
Using the system
Safety
Driving Tips
General Maintenance
Breakdown assistance
Technical Data
A loop is located on the floor covering of the luggage compartment
⇒fig. 93
. When
handling the spare whee
l, you can raise the floor covering and fix it on a hook at the
luggage compartment cover.Luggage net*The luggage net is designed for the tranportation of lighter objects.
WARNING
•
In the storage net you must only store objects (up to a total weight of 1.5
kg). Heavy objects are not secured sufficiently - risk of injury!•
No objects with sharp edges should be
stored in the luggage net, because
they can damage the luggage net.
The luggage compartment cover You can use the luggage compar
tment cover behind the head
restraints for storing
light and soft items.
The luggage compartment cover can be
removed as required if one must
transport bulky goods. – Unhook the support straps on the boot lid
⇒
fig. 95
.
– Place the cover on the side supports. – Pull the cover out of the holder
horizontally to the rear.
– Install again by pushing the luggage compartment cover forwards into
the holder and hanging the suppo
rt straps on the boot lid.
You can stow the removed luggage compartment cover behind the rear seat back- rest.
WARNING
No objects should be placed on the
luggage compartment cover, the vehicle
occupants could be endangered if th
ere is sudden braking or the vehicle
collides with something.
Fig. 94 Luggage compart- ment: Luggage net
Fig. 95 Removing the luggage compartment coverA1
A2
A2
A1
s2dk.1.book Page 89 Wednesday, April 8, 2009 12:23 PM
Page 95 of 294

Seats and Stowage
94
Removing ashtray insert – Open the ashtray
⇒
page 97, fig. 110
.
– Grasp the ashtray insert at the point
⇒
fig. 104
and take it out in
direction of arrow.
Insert ashtray insert – Insert the ashtray vertically downwards.
WARNING
Never lay flammable objects in the ashtray basin - risk of fire!Rear ashtray*Removing ashtray insert– Open the ashtray
⇒
page 99, fig. 117
.
– Grasp the insert at the points marked with the arrows
⇒
fig. 105
and
take it out.
Insert ashtray insert – Insert the ashtray insert into the mount and press it in.
WARNING
Never lay flammable objects in the ashtray basin - risk of fire!Cigarette lighter*, power socketsCigarette lighter You can also use the socket on th
e cigarette lighter for other elec-
trical appliances.Using the cigarette lighter – Press the button of the lighter
⇒
fig. 105
or
⇒
page 93, fig. 104
.
– Wait until the button jumps forward. – Remove the cigarette lighter immediately and use it. – Insert the cigarette lighter again into the socket. Using the socket – Remove the cover. – Connect the plug of the electr
ical appliance to the socket.
The 12 volt power socket can also be used
to supply power to el
ectrical accessories
with a power uptake up to 180 watts.
WARNING
•
Take care when using the cigarette li
ghter! Not paying proper attention
or incorrect use the cigarette lighter in
an uncontrolled manner may result in
burns.
AA
Fig. 105 Centre console: Rear ashtray
AA
AB
s2dk.1.book Page 94 Wednesday, April 8, 2009 12:23 PM
Page 96 of 294

Seats and Stowage
95
Using the system
Safety
Driving Tips
General Maintenance
Breakdown assistance
Technical Data
•
The cigarette lighter and the power so
cket also operates when the igni-
tion is switched off or the ignition key withdrawn. You should therefore never leave children unattended in the vehicle.
Caution
Always use matching plugs to av
oid damaging the power socket.
Note
•
Connecting electrical components when
the engine is not running will
drain the battery of the vehicl
e - risk of battery draining!
•
Further information
⇒page 241.
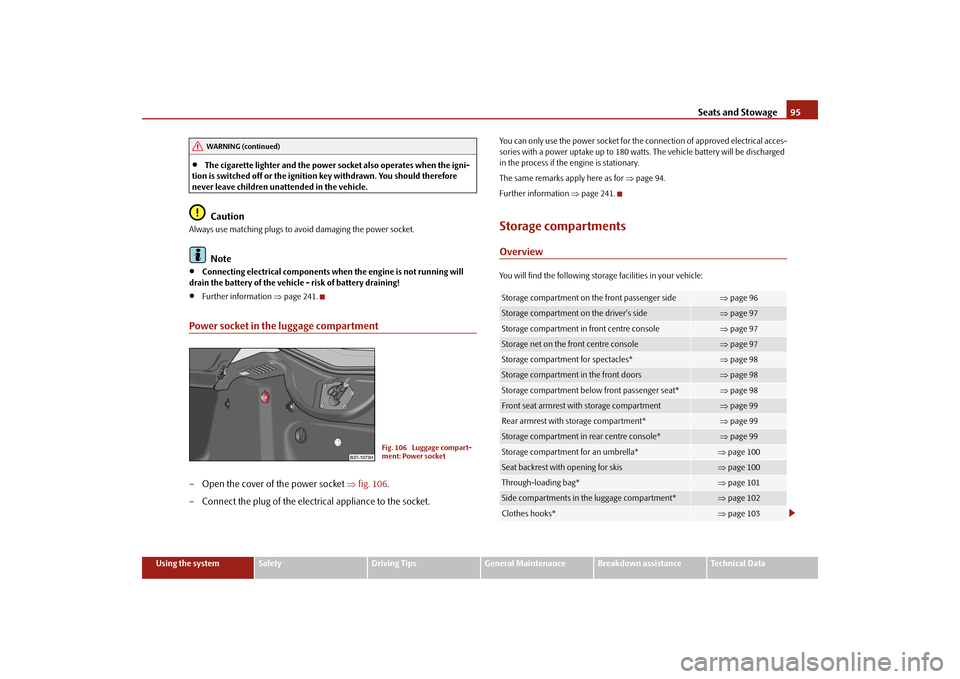
Power socket in the luggage compartment– Open the cover of the power socket
⇒
fig. 106
.
– Connect the plug of the electr
ical appliance to the socket.
You can only use the power socket for the connection of approved electrical acces- sories with a power uptake up to 180 watt
s. The vehicle battery will be discharged
in the process if the engine is stationary. The same remarks apply here as for
⇒page 94.
Further information
⇒page 241.
Storage compartmentsOverviewYou will find the following storag
e facilities in
your vehicle:
WARNING (continued)
Fig. 106 Luggage compart- ment: Power socket
Storage compartment on the front passenger side
⇒ page 96
Storage compartment on the driver's side
⇒page 97
Storage compartment in front centre console
⇒page 97
Storage net on the front centre console
⇒page 97
Storage compartment for spectacles*
⇒page 98
Storage compartment in the front doors
⇒page 98
Storage compartment below front passenger seat*
⇒page 98
Front seat armrest with storage compartment
⇒page 99
Rear armrest with storage compartment*
⇒page 99
Storage compartment in rear centre console*
⇒page 99
Storage compartment for an umbrella*
⇒page 100
Seat backrest with opening for skis
⇒page 100
Through-loading bag*
⇒page 101
Side compartments in the luggage compartment*
⇒page 102
Clothes hooks*
⇒page 103
s2dk.1.book Page 95 Wednesday, April 8, 2009 12:23 PM
Page 104 of 294

Seats and Stowage
103
Using the system
Safety
Driving Tips
General Maintenance
Breakdown assistance
Technical Data
Clothes hooksThe clothes hooks are located on the middle
pillar and on the handle of the head-
liner above each of the rear doors.
WARNING
•
Ensure that any clothes hanging from the hooks do not impair your
vision to the rear.•
Use the hooks for hanging only light
items of clothing and ensure that
there are no heavy or sharp-
edged objects in the pockets.
•
The maximum permissable load of the hooks is 2 kg.
•
Do not use clothes hangers for hanging up items of clothing otherwise
this will interfere with the protection offered by the head airbag*.
s2dk.1.book Page 103 Wednesday, April 8, 2009 12:23 PM
Page 105 of 294

Air conditioning system
104
Air conditioning systemIntroductionDescription and informationIf the cooling system is switched on, the temperature and air humidity drops in the vehicle. The wellbeing of the occupants of
the car is enhanced as a result of this
particularly at high outside temperatures and a high air humidity. The system prevents the windows misting up during the cold season of the year. The heating effect is dependent upon th
e coolant temperature, thus full heat
output only occurs when the engine
has reached its operating temperature.
It is possible to briefly activate recirc
ulated air mode in order to enhance the
cooling effect - Climatic
⇒page 108, Climatronic
⇒page 111.
The air inlet in front of the windscreen must be free of ice, snow or leaves in order to ensure that the heating and cooling systems operate properly. After switching on the cooling
Condensation
from the evaporator of the air condi-
tioning may drip down and form a puddle
below the vehicle. This is quite normal
and not an indication of a leak!
WARNING
•
For your own safety and that of other road users, ensure that all the
windows are free of ice, snow and mistin
g. Please familiarize yourself about
how to correctly operate th
e heating and ventilation systems, how to demist
and defrost the windows, as well as with the cooling mode.•
You should not leave recirculated air mode on over a longer period of
time, as “stale” air may result in fatigue in the driver and occupants, divert your attention and also cause the windows to mist up. The risk of having an accident increases. Switch recirculated air mode off as soon as the windows begin misting up.
Note
•
The used air streams out through the air removal openings in the luggage
compartment.•
If the cooling system has not been switched on for a lengthy period, odours may
be produced at the evaporator because of
deposits. Switch the cooling system on
at least once a month for approximately 5 mi
nutes at the highest blower stage - also
during the cold season of the year - in order to avoid such odours. Also open a window for a short time.•
We recommend that you do not smoke in the vehicle when the recirculating air
mode is operating since the smoke which is drawn at the evaporator from the inte-rior of the vehicle forms deposits in the
evaporator of the air conditioning system.
This produces a permanent odour when th
e air conditioning system is operating
which can only be eliminated through co
nsiderable effort and expense (replace-
ment of compressor).•
Please refer to the information regarding the recirculated air mode for Climatic
⇒ page 108 or for Climatronic
⇒page 111.
Using the air conditioning system economicallyThe compressor on the air co
nditioning system uses po
wer from the engine when
in cooling mode which will effect the fuel consumption. It recommended to open the windows or the doors of a vehicle for which the inte- rior has been strongly heated through the ef
fect of direct sunlight in order to allow
the heated air to escape. The cooling system should not be switched on while travelling when the window is open. The desired interior temperature can also be achieved without switching in the cooling system just by switching to fresh air mode.
s2dk.1.book Page 104 Wednesday, April 8, 2009 12:23 PM
Page 108 of 294

Air conditioning system
107
Using the system
Safety
Driving Tips
General Maintenance
Breakdown assistance
Technical Data
switching cooling on and off – Press the button
⇒
page 106, fig. 127
. The warning light lights
up in the button.
– When you again press the switch , the cooling system is switched
off. The warning light in the button goes out.
Rear window heater – Press button . Further information
⇒
page 70.
Auxiliary heating (auxiliary heating) – Press the button in order to directly switch on/off the auxiliary
heating (auxiliary heating and ventilation. Further information ⇒
page 112.
The set temperature will be automatica
lly maintained other than when the
control dial is on the extreme
right or extreme left position:
•
Extreme right position - full heating,
•
Extreme left position - full cooling,
•
The blower should aways be on to prevent the windows from misting up.Note
The whole heat output will be needed to
unfrost the windscreen
and side windows.
No warm air will be fed to the footwell. Th
is can lead to restriction of the heating
comfort.
Set ClimaticRecommended settings of Climatic controls for the respective operating modes:
AC
A1
AC
A2A3
s2dk.1.book Page 107 Wednesday, April 8, 2009 12:23 PM