2009 SKODA ROOMSTER door lock
[x] Cancel search: door lockPage 48 of 263

Unlocking and locking47
Using the system
Safety
Driving Tips
General Maintenance
Breakdown assistance
Praktik
Technical Data
Unlocking and locking carThe remote control key differs depending on the vehicle equipment.
Unlocking the vehicle
– Press button for about 1 second.
Locking the vehicle
– Press button for about 1 second.
Deactivating safe securing system
– Press button twice in 1 seconds. Further information ⇒page 42.
Boot lid remote release
– Press button for about 1 second ⇒fig. 41.
Folding out of the key
– Press button .
Folding up of the key
– Press button and collapse the key bit in the housing.
The turn signal lights flash twice as confirmation that the vehicle has been
unlocked. The vehicle will lock again automatically if you unlock the vehicle using
button but do not open a door or the boot lid within the next 30 seconds. This
function is intended to prevent the car being unlocked unintentionally.
The safe securing system along with the anti-theft alarm system* are, however,
deactivated during these 30 seconds.
When the vehicle is unlocked or locked, the interior lights in the door contact are
automatically switched on or off.
The turn signal lights flash once to confirm that the vehicle has been correctly
locked.
If the turn signal lights do not flash, check the doors, bonnet and boot lid again to
ensure that they are closed. If the doors, the bonnet or the boot lid remain open
when the anti-theft alarm system* is activated, the turn signal lights do not flash
until after they have been closed.
WARNING
If the vehicle is locked from the outside and the safe securing system is acti-
vated, there must not be any person in the vehicle as it is then not possible
to open either a door or a window from the inside. The locked doors make it
more difficult for rescuers to get into the vehicle in an emergency - hazard!
Note
•
Operate the radio remote control only when the doors and boot lid are closed
and you have visual contact with the vehicle.
•
Once in the vehicle, you must not press the lock button
of the master key
before inserting the key into the ignition lock in order to avoid the vehicle being
inadvertently locked and the anti-theft alarm system* being switched on. Should
this happen, press the unlock button
of the master key.
Fig. 41 Remote control key
A1A3A2A2A4A4
A1
s29g.4.book Page 47 Wednesday, June 17, 2009 9:54 AM
Page 49 of 263
Unlocking and locking 48Synchonisation of the remote controlIf the vehicle cannot be unlocked by actuating the remote control system then it is
possible that the code in the key and the control unit in the vehicle are no longer
synchronised. This can occur when the buttons on the radio-operated key are actu-
ated a number of times outside of the operative range of the equipment or the
battery on the remote control was replaced.
This means it is necessary to synchronise the code as follows:•
press any button on the remote control;
•
pressing of the button means that the door will unlock with the key within 1
minute.
Anti-theft alarm system*The anti-theft alarm system increases the level of protection against people seeking
to break into the vehicle. The system triggers audible and visual warning signals if
an attempt is made to break into the vehicle.
How is the alarm system switched on?
The anti-theft alarm system is activated automatically when the vehicle is locked
with the key in the driver's door or when locking with the remote control. It is acti-
vated 30 seconds after locking the door.
How is the alarm system switched off?
The anti-theft alarm system is switched off if the vehicle is unlocked by only using
the remote control. The vehicle is automatically locked again if the vehicle is not
opened within 30 seconds after reactivating the anti-theft alarm system.
Once you unlock the vehicle by inserting the key into the driver door you then have
to insert the key into the ignition lock and switch the ignition on within 15 seconds
after unlocking the door in order to deactivate the anti-theft alarm system. The
alarm will be triggered if you do not switch on the ignition within 15 seconds.
When is the alarm triggered?
The following security areas of the locked vehicle are monitored:
•
bonnet;
•
boot lid;
•
doors;
•
ignition lock;
•
vehicle interior* ⇒page 49;
•
angle of the vehicle*;
•
A drop in voltage of the on-board power supply.
An alarm is immediately triggered if either of the two battery terminals is discon-
nected while the anti-theft alarm system is activated.
How is the alarm switched off?
You switch the alarm off if you unlock the car with the radio remote control in the
key or if you switch the ignition on.Note
•
The working life of the alarm siren is 5 years. More detailed information is avail-
able by a specialist garage.
•
Before leaving the vehicle, check that all the doors and windows are closed in
order to ensure that the anti-theft alarm system is fully operational.
•
Coding of the radio remote control and the receiver unit precludes the use of
the radio remote control from other vehicles.
s29g.4.book Page 48 Wednesday, June 17, 2009 9:54 AM
Page 50 of 263

Unlocking and locking49
Using the system
Safety
Driving Tips
General Maintenance
Breakdown assistance
Praktik
Technical Data
Interior monitor*
and towing protection
monitoring*The interior monitor and the towing protection monitoring detect
movements inside the vehicle interior and then trigger the alarm.The interior monitor and the towing protection monitoring are operated
with the button
. You can switch the interior monitor and the towing
protection monitoring off if there is a possibility that movements from
(e.g. children or animals) inside the vehicle interior or if the vehicle must
be transported (e.g. by train or ship) or towed, might trigger the alarm.
Switch off the interior monitor and towing protection monitoring
– Switch off the ignition.
– Press the button
on the driver door ⇒fig. 42.
– Lock the vehicle within 30 seconds. The interior monitor and the
towing protection monitoring are switched off.
The interior monitor and the towing protection monitoring are switched on again
automatically the next time the car is locked.
Note
•
You can also switch off the interior monitor and the towing protection moni-
toring, by deactivating the safe securing system ⇒page 43.
•
When the ignition key is removed or a door is opened, the symbol in the button
lights up red.
•
Lighting up of the symbol in the button does not confirm that the interior
monitor and the towing protection monitoring are switched on.
Electrical power windows*Buttons for electrical power windows
Fig. 42 Interior monitor
pushbutton
Fig. 43 Buttons on the
driver's doorFig. 44 Button on the rear
door
s29g.4.book Page 49 Wednesday, June 17, 2009 9:54 AM
Page 51 of 263
Unlocking and locking 50
The power windows operate only when ignition is switched on.
Opening a window
– A window is opened by pressing lightly on the respective button in the
door. The process stops when one releases the button.
– Additionally you can open the window automatically (fully opened) by
pressing the button up to the stop. Renewed pressing of the button
causes the window to stop immediately.
Closing a window
– A window is closed through pulling lightly on the respective button in
the door. The closing process stops when one releases the button.
– Additionally you can close the window automatically (fully closed) by
pulling the button up to the stop. Renewed pulling of the button
causes the window to stop immediately.The buttons for the individual windows are located in the operating part in the
driver's door ⇒page 49, fig. 43, front passenger door and in the rear doors*.
If the buttons for the rear doors are deactivated, the indicator light
in the safety
switch lights up.
The buttons for power windows in the operating part in the driver's door
Button for the power window in the driver's door
Button for the power window in the front passenger's door
Button for the power window in the rear door on the right*
Button for the power window in the rear door on the left*
Safety pushbutton*
Safety pushbutton*
You can deactivate the buttons for power windows at rear doors by pressing the
safety pushbutton ⇒page 49, fig. 43. The buttons for power windows at rear
doors are activated again by pressing the safety pushbutton again.
WARNING
•
If you lock the vehicle from the outside, do not leave any person in the
vehicle since it is no longer possible to open the windows from the inside in
an emergency.
•
The system is fitted with a force limiter. If there is an obstacle, the closing
process is stopped and the window goes down by several centimeters. You
should then take particular care when closing the windows! You may other-
wise suffer severe injuries as a result of getting an arm, for example, jammed
in the window!
•
It is recommended to deactivate the electrically operated power
windows in the rear doors (safety pushbutton) ⇒page 49, fig. 43 when
children are being transported on the rear seats.
•
In the event of a freezing up of the windscreen, first of all eliminate the ice
⇒page 176 and then operate the power windows otherwise the power
window mechanism could be damaged.Note
•
After switching the ignition off, it is still possible to open or close the windows
for a further 10 minutes. The automatic closing and opening functions will not
operate during this time. The power windows are switched off completely once you
open the driver or front passenger door.
•
When driving always use the existing heating, air conditioning and ventilation
system for ventilating the interior of the vehicle. If the windows are opened, dust as
well as other dirt can get into the vehicle and in addition the wind noise is more at
certain speeds.
Force limiter of the power windowsThe electrically operated power windows are fitted with a force limiter. It reduces
the risk of bruises or injuries when closing the windows.
If there is an obstacle, the closing process is stopped and the window goes down by
several centimeters.
AS
AAABACADAS
AS
AS
AS
s29g.4.book Page 50 Wednesday, June 17, 2009 9:54 AM
Page 52 of 263

Unlocking and locking51
Using the system
Safety
Driving Tips
General Maintenance
Breakdown assistance
Praktik
Technical Data You must try to close the window again within 10 seconds, even if the obstacle was
not yet removed, the closing process is stopped. During this time it is not possible
to automatically close the window. The force limiter is still switched on.
The force limiter is only switched off, if you attempt to close the window within the
next 10 seconds - the window closes now with full strength!
If you wait longer than 10 seconds, the force limiter is switched on again.
WARNING
You should take particular care when closing the windows! You may other-
wi se s uffe r s e ve re i njur ie s a s a re sul t of getting an arm, for example, jammed
in the window!Window convenience operationYou can open and close the window with power windows as follows
when unlocking and locking the vehicle.
Opening windows with the key
– Hold the key in the locking cylinder of the driver's door in the unlock
position until all the windows are opened.
Closing windows with the key
– Hold the key in the locking cylinder of the driver's door in the lock
position until all the windows are closed.You can interrupt the opening or closing operation of the windows immediately by
releasing the key.
WARNING
•
Obstruction protection is not active during the convenience operating
feature ⇒ in “Buttons for electrical power windows” on page 49.
•
You should take particular care when closing the windows! You may
otherwise suffer severe injuries as a result of getting an arm, for example,
jammed in the window!
Operational faultsElectrically operated power windows do not operate
If the battery of the car has been disconnected and then reconnected, the electri-
cally operated power windows do not operate. The system must be activated.
Proceed as follows in order to re-establish the function:•
Hold the key in the locking cylinder of the driver's door in the lock position until
all the windows are closed;
•
release the key;
•
Hold the key again in the locking position for about 3 seconds.
Operation in winter
Ice accumulating on the surface of the windows during the winter may result in a
greater resistance when closing the windows and the window may stop and go
down several centimetres
Proceed as follows to close the window fully:
•
Hold the key in the locking cylinder of the driver's door in the lock position until
all the windows are closed;
•
Repeat this operatiive cycle when the window stops.
WARNING
•
Obstruction protection is not active during the closing of the windows
⇒ in “Buttons for electrical power windows” on page 49.
•
You should take particular care when closing the windows! You may
otherwise suffer severe injuries as a result of getting an arm, for example,
jammed in the window!WARNING (continued)
s29g.4.book Page 51 Wednesday, June 17, 2009 9:54 AM
Page 59 of 263
Lights and Visibility 58
Lighting of storage compartment on the front passenger side
– When opening the flap of the storage compartment on the front
passenger side the lighting in the storage compartment comes on.
– The light switches on automatically when the parking light is switched
on and goes out when the flap is closed.On vehicles with central locking, the interior light is switched on for about 20
seconds when the vehicle is unlocked, when a door is opened or after withdrawing
the ignition key (if the relevant switch is in the door contact position). The inner light
goes out out immediately after the ignition is switched on.
A time delay switch* causes the inner lighting on vehicles without a central locking
system stays on for a few seconds after the doors have been closed. The inner light
goes out out immediately after the ignition is switched on.
The interior lighting is switched off after about 30 minutes when a door has been
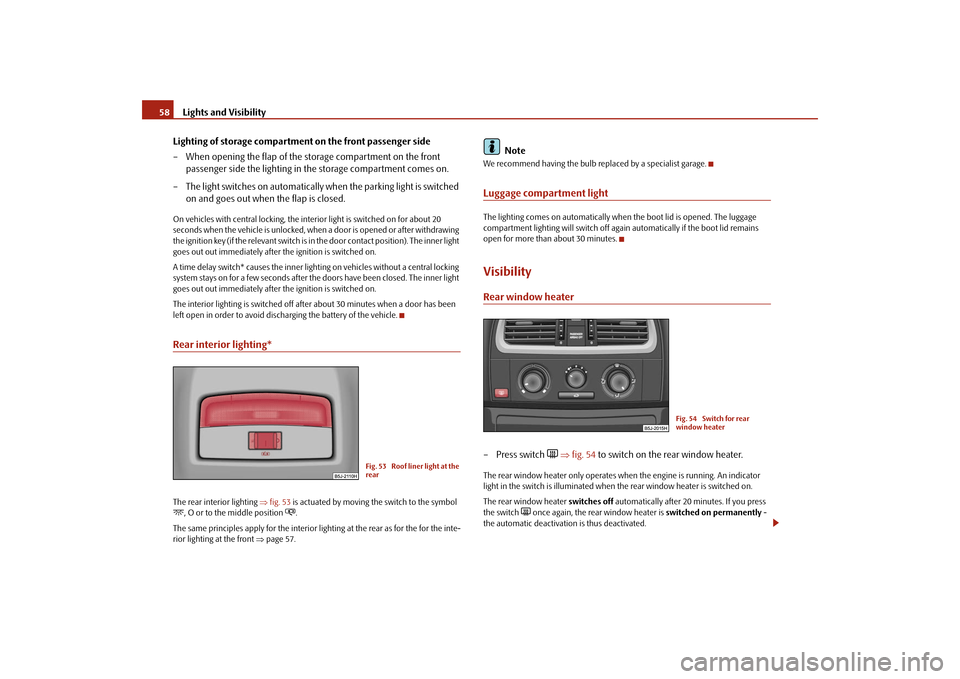
left open in order to avoid discharging the battery of the vehicle.Rear interior lighting*The rear interior lighting ⇒fig. 53 is actuated by moving the switch to the symbol , O or to the middle position
.
The same principles apply for the interior lighting at the rear as for the for the inte-
rior lighting at the front ⇒page 57.
Note
We recommend having the bulb replaced by a specialist garage.Luggage compartment lightThe lighting comes on automatically when the boot lid is opened. The luggage
compartment lighting will switch off again automatically if the boot lid remains
open for more than about 30 minutes.VisibilityRear window heater– Press switch
⇒fig. 54 to switch on the rear window heater.
The rear window heater only operates when the engine is running. An indicator
light in the switch is illuminated when the rear window heater is switched on.
The rear window heater switches off automatically after 20 minutes. If you press
the switch
once again, the rear window heater is switched on permanently -
the automatic deactivation is thus deactivated.
Fig. 53 Roof liner light at the
rear
Fig. 54 Switch for rear
window heater
s29g.4.book Page 58 Wednesday, June 17, 2009 9:54 AM
Page 63 of 263
Lights and Visibility 62
Attaching a wiper blade
– Position the wiper blade onto the wiper arm and lock the locking
button .
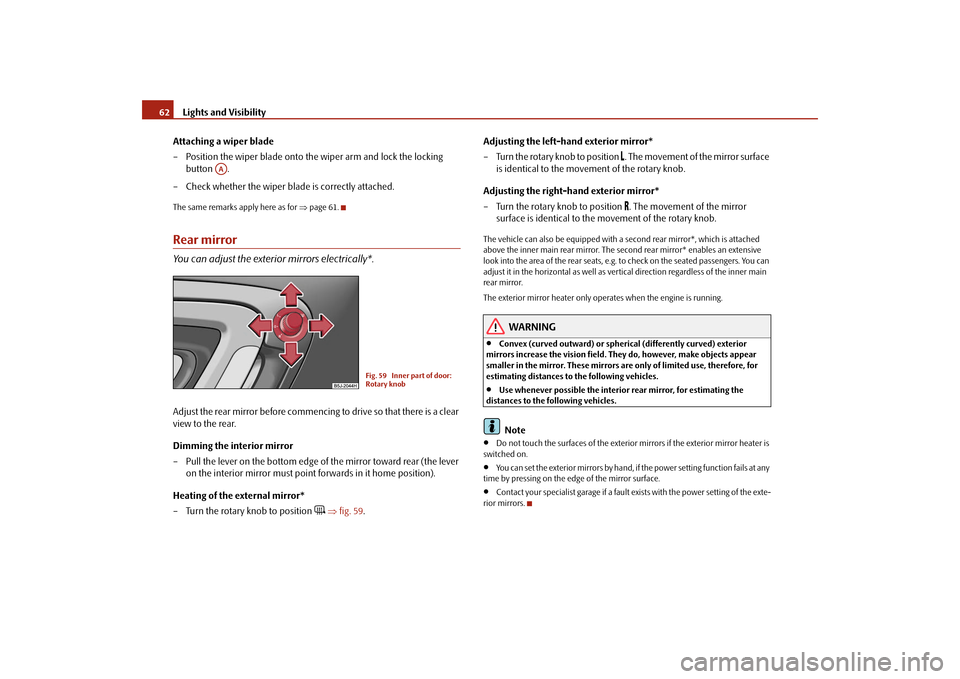
– Check whether the wiper blade is correctly attached.The same remarks apply here as for ⇒page 61.Rear mirrorYou can adjust the exterior mirrors electrically*.Adjust the rear mirror before commencing to drive so that there is a clear
view to the rear.
Dimming the interior mirror
– Pull the lever on the bottom edge of the mirror toward rear (the lever
on the interior mirror must point forwards in it home position).
Heating of the external mirror*
– Turn the rotary knob to position
⇒fig. 59.Adjusting the left-hand exterior mirror*
– Turn the rotary knob to position
. The movement of the mirror surface
is identical to the movement of the rotary knob.
Adjusting the right-hand exterior mirror*
– Turn the rotary knob to position . The movement of the mirror
surface is identical to the movement of the rotary knob.
The vehicle can also be equipped with a second rear mirror*, which is attached
above the inner main rear mirror. The second rear mirror* enables an extensive
look into the area of the rear seats, e.g. to check on the seated passengers. You can
adjust it in the horizontal as well as vertical direction regardless of the inner main
rear mirror.
The exterior mirror heater only operates when the engine is running.
WARNING
•
Convex (curved outward) or spherical (differently curved) exterior
mirrors increase the vision field. They do, however, make objects appear
smaller in the mirror. These mirrors are only of limited use, therefore, for
estimating distances to the following vehicles.
•
Use whenever possible the interior rear mirror, for estimating the
distances to the following vehicles.Note
•
Do not touch the surfaces of the exterior mirrors if the exterior mirror heater is
switched on.
•
You can set the exterior mirrors by hand, if the power setting function fails at any
time by pressing on the edge of the mirror surface.
•
Contact your specialist garage if a fault exists with the power setting of the exte-
rior mirrors.
AA
Fig. 59 Inner part of door:
Rotary knob
s29g.4.book Page 62 Wednesday, June 17, 2009 9:54 AM
Page 87 of 263
Seats and Storage 86
The storage compartment is foreseen for storing small objects of up to 1
kg. in weight.
– Tilt the lock to open the flap and pull out the flap ⇒page 85, fig. 108.
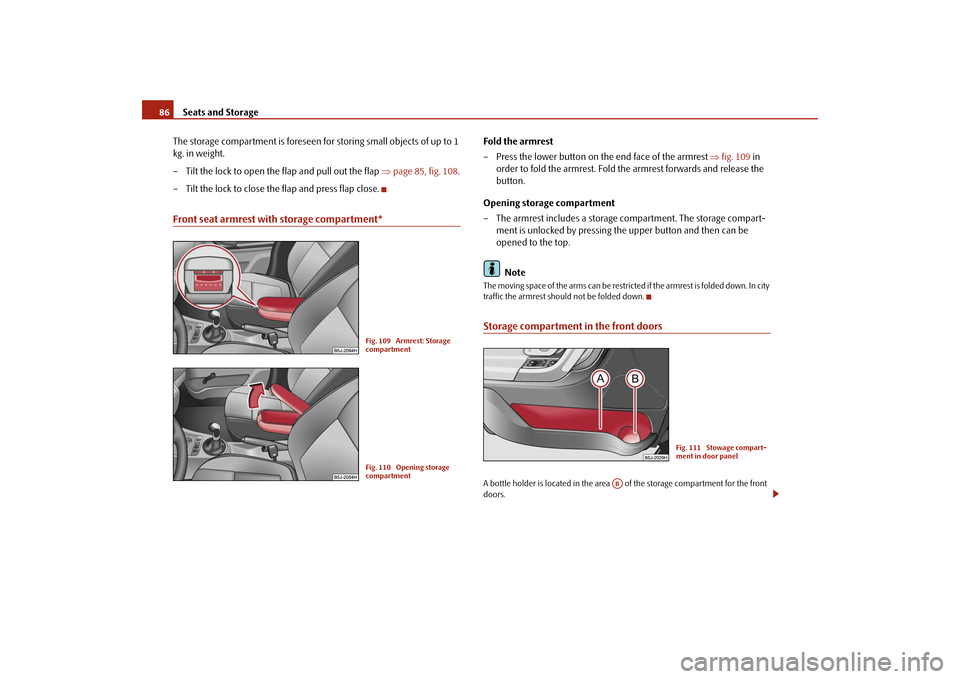
– Tilt the lock to close the flap and press flap close.Front seat armrest with storage compartment*
Fold the armrest
– Press the lower button on the end face of the armrest ⇒fig. 109 in
order to fold the armrest. Fold the armrest forwards and release the
button.
Opening storage compartment
– The armrest includes a storage compartment. The storage compart-
ment is unlocked by pressing the upper button and then can be
opened to the top.
NoteThe moving space of the arms can be restricted if the armrest is folded down. In city
traffic the armrest should not be folded down.Storage compartment in the front doorsA bottle holder is located in the area of the storage compartment for the front
doors.
Fig. 109 Armrest: Storage
compartmentFig. 110 Opening storage
compartment
Fig. 111 Stowage compart-
ment in door panel
AB
s29g.4.book Page 86 Wednesday, June 17, 2009 9:54 AM