2009 SKODA ROOMSTER height
[x] Cancel search: heightPage 13 of 263

The brief instruction 12The brief instructionBasic functions and important informationIntroduction
The chapter of the brief instruction is only used as a quick reference
of the most important operating elements of the vehicle. It is neces-
sary to observe all the information which is contained in the
following chapters of the Owner's Manual.Unlocking and locking the vehicle Unlocking the vehicle
Unlocking the boot lid
Locking the vehicle
Folding out/folding up of the key
Further information ⇒page 47, “Unlocking and locking car”.
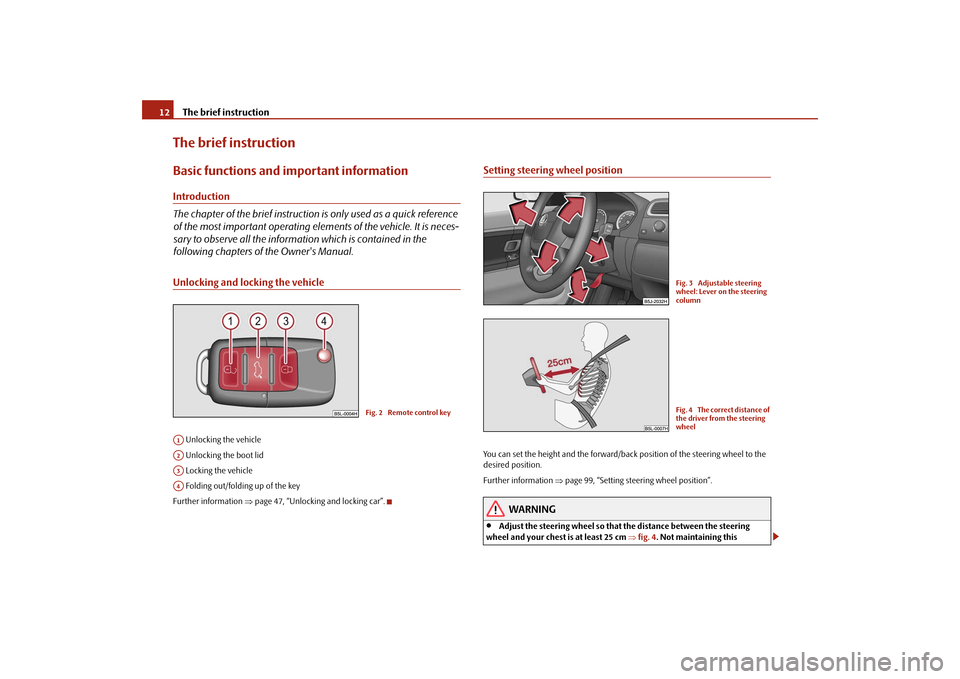
Setting steering wheel positionYou can set the height and the forward/back position of the steering wheel to the
desired position.
Further information ⇒page 99, “Setting steering wheel position”.
WARNING
•
Adjust the steering wheel so that the distance between the steering
wheel and your chest is at least 25 cm ⇒fig. 4. Not maintaining this
Fig. 2 Remote control key
A1A2A3A4
Fig. 3 Adjustable steering
wheel: Lever on the steering
columnFig. 4 The correct distance of
the driver from the steering
wheel
s29g.4.book Page 12 Wednesday, June 17, 2009 9:54 AM
Page 14 of 263

The brief instruction13
Using the system
Safety
Driving Tips
General Maintenance
Breakdown assistance
Praktik
Technical Data minimum distance will mean that the airbag system will not be able to prop-
erly protect you - hazard!
•
You must not adjust the steering wheel when the vehicle is moving!
•
For safety reasons the lever must always be firmly pushed up to avoid the
steering wheel altering its position unintentionally when driving - risk of
accident!
Seat belt height adjuster– To adjust the belt height press the height adjuster and move it up or
down ⇒fig. 5.
– Then pull firmly on the belt to ensure that the seat belt height adjuster
has correctly locked in place.Further information ⇒page 135.
WARNING
Adjust the height of the belt in such a way that the shoulder part of the belt
is positioned approximately across the middle of your shoulder - on no
account across your neck!
Adjusting the front seats Adjusting a seat in a forward/back direction
Adjusting height of seat*
Adjust the angle of the seat backrest
Further information ⇒page 63, “Adjusting the front seats”.
WARNING
Only adjust the driver seat when the vehicle is stationary - risk of injury!
WARNING (continued)
Fig. 5 Front seat: Seat belt
height adjuster
Fig. 6 Controls at seat
A1A2A3
s29g.4.book Page 13 Wednesday, June 17, 2009 9:54 AM
Page 65 of 263

Seats and Storage 64
Adjusting height of seat*
– Lift the seat if required by pulling or pumping lever upwards.
– Lower the seat if required by pushing or pumping lever down-
wards.
Adjust the angle of the seat backrest
– Relieve any pressure on the seat backrest (do not lean on it) and turn
the handwheel to adjust the angle of the backrest.The driver's seat should be adjusted in such a way that the pedals can be fully
pressed to the floor with slightly bent legs.
The seat backrest on the driver's seat should be adjusted in such a way that the
upper point of the steering wheel can be easily reached with slightly bent arms.
WARNING
•
Only adjust the driver seat when the vehicle is stationary - risk of injury!
•
Take care when adjusting the seat! Adjusting the seat without care can
lead to bruises or injuries.
•
The seat backrests must not be angled too far back when driving other-
wise this will affect proper operation of the seat belts and of the airbag
system - risk of injury!
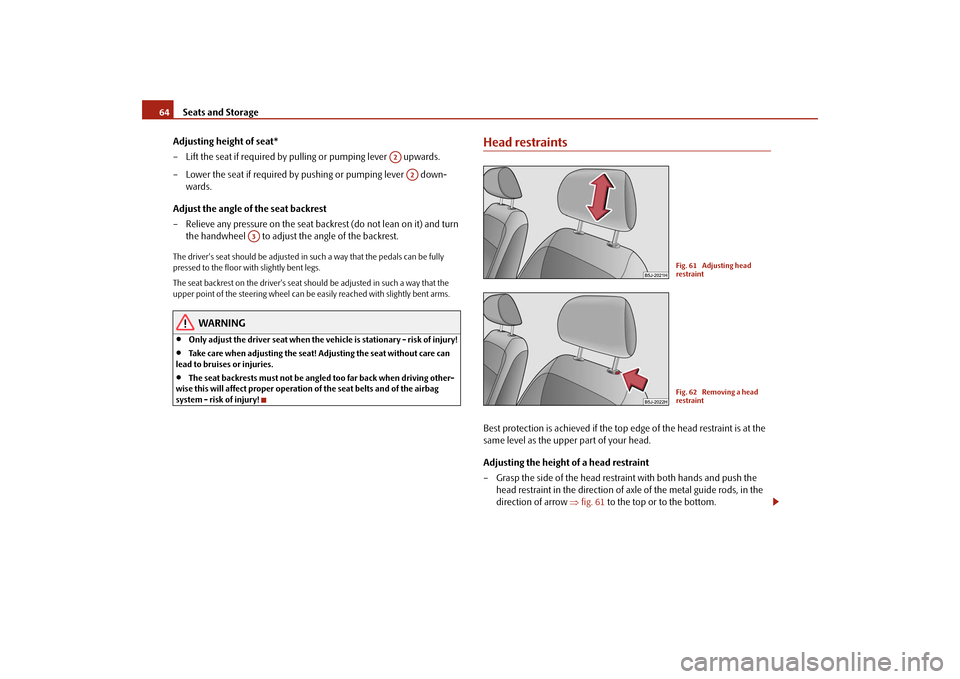
Head restraintsBest protection is achieved if the top edge of the head restraint is at the
same level as the upper part of your head.
Adjusting the height of a head restraint
– Grasp the side of the head restraint with both hands and push the
head restraint in the direction of axle of the metal guide rods, in the
direction of arrow ⇒fig. 61 to the top or to the bottom.
A2
A2
A3
Fig. 61 Adjusting head
restraintFig. 62 Removing a head
restraint
s29g.4.book Page 64 Wednesday, June 17, 2009 9:54 AM
Page 66 of 263

Seats and Storage65
Using the system
Safety
Driving Tips
General Maintenance
Breakdown assistance
Praktik
Technical Data
– Move the head restraint downwards if required by pressing the locking
button ⇒fig. 62 and by pressing with the other hand the head
restraint downwards.
Removing and installing a head restraint
– Pull the head restraint out of the seat backrest as far as the stop.
– Press the locking button in the direction of arrow ⇒fig. 62 and pull
the head restraint out.
– To re-insert the head restraint, push it down into the seat backrest far
enough until you hear the locking button engage.The position of the front, rear outer head restraints and the rear middle head
restraint* is adjustable for height.
The head restraints must be adjusted to match the size of the seat occupant.
Correctly adjusted head restraints together with the seat belts offer effective
protection for the occupants ⇒page 128.
WARNING
•
The head restraints must be correctly adjusted in order to offer effective
protection for the occupants in the event of an accident.
•
Do not drive under any circumstance with removed head restraints - risk
of injury!
Heating the front seats*The seating and leaning surfaces of the driver and front passenger seat
can be heated when the ignition is switched on.
Front seats
– By pressing the rocker switch in the position or switch on the
front seat heating to 25 % or 100 % of its power output ⇒fig. 63.
– To switch off the heating shift the rocker switch into the horizontal
position.
WARNING
•
If, as an occupant, you have a subdued pain and/or temperature sensi-
tivity, e.g. through medication, paralysis or because of chronic illness (e.g.
diabetes), we recommend not to use the seat heating of the driver or front
passenger seat. This can lead to burns on the back, the posterior and the legs
which are difficult to heal. If the seat heating is used, we recommend to make
regular breaks in your journey when driving long distances, so that the body
can recuperate from the stress of the journey. Please consult your doctor,
who can evaluate your specific condition.
Fig. 63 Rocker switch: Front
seat heatingA1
A2
s29g.4.book Page 65 Wednesday, June 17, 2009 9:54 AM
Page 100 of 263

Starting-off and Driving99
Using the system
Safety
Driving Tips
General Maintenance
Breakdown assistance
Praktik
Technical Data
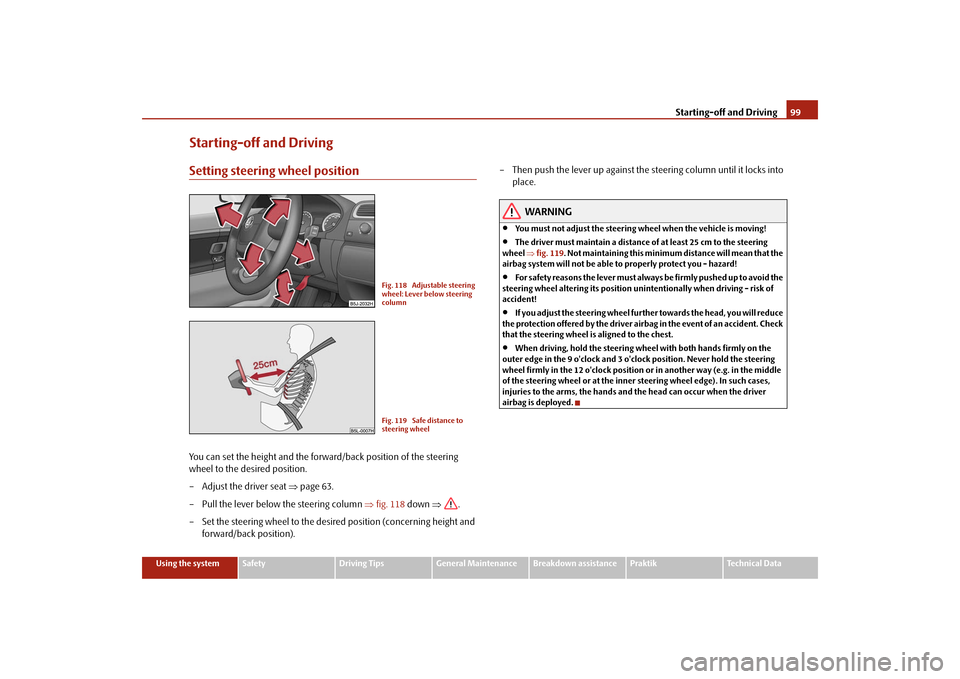
Starting-off and DrivingSetting steering wheel positionYou can set the height and the forward/back position of the steering
wheel to the desired position.
– Adjust the driver seat ⇒page 63.
– Pull the lever below the steering column ⇒fig. 118 down ⇒.
– Set the steering wheel to the desired position (concerning height and
forward/back position).– Then push the lever up against the steering column until it locks into
place.
WARNING
•
You must not adjust the steering wheel when the vehicle is moving!
•
The driver must maintain a distance of at least 25 cm to the steering
wheel ⇒fig. 119. Not maintaining this minimum distance will mean that the
airbag system will not be able to properly protect you - hazard!
•
For s a fe t y re a s ons the le v e r m ust a lwa y s b e fi rm l y pus he d up t o a vo id the
steering wheel altering its position unintentionally when driving - risk of
accident!
•
If you adjust the steering wheel further towards the head, you will reduce
the protection offered by the driver airbag in the event of an accident. Check
that the steering wheel is aligned to the chest.
•
When driving, hold the steering wheel with both hands firmly on the
outer edge in the 9 o'clock and 3 o'clock position. Never hold the steering
wheel firmly in the 12 o'clock position or in another way (e.g. in the middle
of the steering wheel or at the inner steering wheel edge). In such cases,
injuries to the arms, the hands and the head can occur when the driver
airbag is deployed.
Fig. 118 Adjustable steering
wheel: Lever below steering
columnFig. 119 Safe distance to
steering wheel
s29g.4.book Page 99 Wednesday, June 17, 2009 9:54 AM
Page 128 of 263

Passive Safety127
Using the system
Safety
Driving Tips
General Maintenance
Breakdown assistance
Praktik
Technical Data
SafetyPassive SafetyBasic informationDriving the safe way
Passive safety measures reduce the risk of injury in accident situa-
tions.In this section you will find important information, tips and notes on the subject of
passive safety in your vehicle. We have combined everything here which you
should be familiar with, for example, regarding seat belts, airbags, child seats and
safety of children. It is therefore important, in particular, to comply with the notes
and warnings in this section for your own interest and in the interest of those trav-
elling with you.
WARNING
•
This chapter contains important information on how to use the vehicle
for the driver and his occupants. You will find further information on safety,
which concerns you and those travelling with you, in the following chapters
of this Owner's Manual.
•
The complete on-board literature should always be in the vehicle. This
applies in particular, if you rent out or sell the vehicle.
Safety equipment
The safety equipment is part of the occupant protection and it can
reduce the risk of injuries in accident situations.“Do not put at risk” your safety and the safety of those travelling with you . In the
event of an accident, the safety equipment can reduce the risk of injuries. The
following list contains part of the safety equipment in your vehicle:
•
three-point seat belts for all the seats;
•
belt force limiters for front seats;
•
belt tensioners for front seats;
•
seat belt height adjusters for front seats;
•
front airbags for the driver and the front passenger*;
•
side airbags*;
•
head airbags*;
•
anchoring points for child seat using the “ISOFIX” system;
•
anchoring points for child seat using the “Top Tether” system;
•
head restraints adjustable for height;
•
adjustable steering column.
The specified safety equipment works together, in order to optimally protect you
and those travelling with you in accident situations. The safety equipment does not
protect you or the people travelling with you, if you or your occupants adopt an
incorrect seated position or the equipment is not correctly adjusted or used.
Fo r t h i s re a s o n y o u w i l l b e p ro v i d e d w i th i n fo rm a ti o n o n w hy t h i s e q u i p m e nt i s v e r y
important, how it protects you and the occupants, what should be observed when
using the equipment and how you and the people travelling with you can make full
use of the existing safety equipment. This Owner's Manual contains important
warning notes, which you and those travelling with you should pay attention to in
order to reduce a risk of injury.
Safety concerns everybody!
s29g.4.book Page 127 Wednesday, June 17, 2009 9:54 AM
Page 136 of 263

Seat belts135
Using the system
Safety
Driving Tips
General Maintenance
Breakdown assistance
Praktik
Technical Data
– Slowly pull the belt webbing at the tongue of the lock over your chest
and pelvis ⇒.
– Insert the tongue of the lock into the seat belt buckle belonging to the
seat until it is heard to lock in place.
– Pull on the belt to check that it has also reliably engaged in the lock.Each three-point seat belt is equipped with an inertia reel. This inertia reel offers
you complete freedom of movement if the belt is unreeled slowly. If the brakes are
applied suddenly, the inertia reel will block. The belts also block when the car accel-
erates, when driving downhill and when cornering.
Expectant mothers must also wear the seat belt ⇒.
WARNING
•
The shoulder part of the seat belt must never run across your neck but
must run approximately over the middle of the shoulder and fit snugly
against the chest. The lap part of the belt must run across the hip and must
never be routed across the stomach. It must always fit snugly ⇒page 134,
fig. 141. Adjust the belt webbing as required.
•
The lap part of the belt should be positioned as low as possible at the
pelvis of an expectant mother in order to avoid exerting any pressure on the
lower abdomen.
•
Always ensure that the webbing of the seat belts is properly routed. Seat
belts which are not correctly adjusted can themselves cause injuries even in
minor accidents.
•
A seat belt which is hanging too loose can result in injuries as your body
is moved forward by the kinetic energy produced in an accident and is then
suddenly held firm by the belt.
•
Only insert the lock tongue into the lock which is the correct one for your
seat. This will affect the protection which the belt offers and increase the risk
of an injury.
Seat belt height adjuster on the front seatsThe seat belt height adjuster makes it possible for you to adapt the
routing of the front three-point seat belt in the area of the shoulder to
match your body size.
– To adjust the belt height press the height adjuster and move it up or
down ⇒fig. 143.
– Then pull firmly on the belt to ensure that the seat belt height adjuster
has correctly locked in place.
WARNING
Adjust the height of the belt in such a way that the shoulder part of the belt
is positioned approximately across the middle of your shoulder - on no
account across your neck.
Note
It is also possible to adapt the routing of the belt webbing on the front seats by
adjusting the height of the seat*.
Fig. 143 Front seat: Seat belt
height adjuster
s29g.4.book Page 135 Wednesday, June 17, 2009 9:54 AM
Page 148 of 263

Transporting children safely147
Using the system
Safety
Driving Tips
General Maintenance
Breakdown assistance
Praktik
Technical Data
Transporting children safelyWhat you should know about transporting children!An introduction to the subject
Accident statistics have revealed that children are generally more
safely transported on the rear seats than on the front passenger seat.Children younger than 12 years of age should normally travel on the rear seat of the
vehicle (take note of any national legal provisions which differ from this). They
should be secured there by means of a child restraint system or by using the existing
seat belts depending on their age, body size and weight. The child seat should be
mounted behind the front passenger seat for safety reasons.
The physical principle of an accident does, of course, also apply to children
⇒page 133, “The physical principle of a frontal collision”. They differ from adults in
that their muscles and bone structure of children are not yet fully developed. Thus
children are exposed to increased risk of injury.
Children should be transported by using special child safety seats in order to
reduce this risk of injury.
Only use child safety seats which are officially approved, suitable for children and
which comply with the standard ECE-R 44, which classifies child safety seats into 5
groups ⇒page 150, “Classification of child seats into groups”. Child restraint
systems which have been tested for conformity to ECE-R 44 standard have a non-
detachable test seal (a large E within a circle and below this the test number)
attached to the seat.
We recommend that you use child safety seats from the Škoda genuine accessories.
These child seats were developed and also tested for use in Škoda vehicles. They
fulfil the ECE-R 44 standard.
WARNING
Always comply with national legal provisions and instructions from the rele-
vant child safety seat manufacturer when installing and using a child seat ⇒ in “Important safety information regarding the use of child safety
seats”.
Note
National legal provisions, which deviate from the information contained in these
operating instructions, take precedence over the information contained in the
operating instructions.Important safety information regarding the use of child safety seats
Correct use of child safety seats considerably reduces the risk of
injury!
WARNING
•
All the occupants of the vehicle - particularly children - must wear a seat
belt when the vehicle is moving.
•
Children who are less than 1.50 m in height and who weigh less than 36
kg must not use a normal seat belt without a child restraint system other-
wise this may result in injuries to the stomach and neck areas. Comply with
the national legal requirements.
•
One should never carry children, and also not babies! - on one's lap.
•
You can transport a child safely in a suitable child safety seat ⇒page 150,
“Child seat”!
•
Only one child may be fastened with a seat belt into a child safety seat.
•
Never leave the child sitting unattended in the seat.
•
Certain outside climatic conditions can cause life-threatening tempera-
tures in the vehicle.WARNING (continued)
s29g.4.book Page 147 Wednesday, June 17, 2009 9:54 AM