Page 265 of 304

Fuses and light bulbs
264
– Unplug the plug connector and carefully take out the headlight in the
direction of arrow .
Installation takes place in the reverse order.
Note
We recommend that you have the headlight
setting checked by a specialist garage
after installing the headlight.Turn signal light at the frontChanging light bulb for turn signal light (at the front) – Switch the ignition and all lights off. – Remove the headlight
⇒
page 263.
– Turn the socket in the direction of arrow
OPEN (open)
and take it out
together with the light bulb for the turn signal light
⇒
fig. 243
.
– Press the defective light bulb into the socket, turn to the left and
remove.
– Press a new light bulb into the socket and turn the light bulb to the
right as far as the stop.
– Insert the socket with the changed light bulb into the headlight and
secure it by turning in the direction of arrow
CLOSE (close)
to the
right. Note
We recommend that you have the headlight
setting checked by a specialist garage
after installing the headlight.Front parking lights and low beamRemoving the light bulb for the parking light – Switch the ignition and all lights off. – Remove the headlight
⇒
page 263.
– Remove the protective cap
⇒
page 263, fig. 241
.
– Remove the socket
⇒
fig. 244
.
– Take the faulty bulb out of the socket and insert a new one. – Insert the protective cap.
A2
Fig. 243 Removing the light bulb for the turn signal light
Fig. 244 Removing the bulbs for the parking and low beam light
AB
AA
se0.1.book Page 264 Frida
y, April 10, 2009 3:19 PM
Page 266 of 304

Fuses and light bulbs
265
Using the system
Safety
Driving Tips
General Maintenance
Breakdown assistance
Technical Data
Removing the light bulb for the low beam light – Switch the ignition and all lights off. – Remove the headlight
⇒
page 263.
– Remove the protective cap
⇒
page 263, fig. 241
.
– Turn the connector with the light bulb up to the stop towards the
left and remove
⇒
page 264, fig. 244
.
– Replace the lamp, insert the connector with the new lamp and turn to
the right up to the stop.
– Insert the protective cap.
Note
•
In order to facilitate the removal of the socket with the bulb for the parking light,
we recommend to remove first of al
l the bulb for the low beam light.
•
We recommend that you have the headli
ght setting checked by a specialist
garage after installing the headlight.Main beam light– Switch the ignition and all lights off.
– Remove the headlight
⇒
page 263.
– Remove the protective cap
⇒
page 263, fig. 241
.
– Unplug plug
⇒
fig. 245
.
– Press the wire clamps in the direction of the headlight and then
unhook them to the side.
– Remove the light bulb and insert the new light bulb in such a way
that the fixing lugs of the light bulb
socket fit into the recesses at the
reflector.
Installation takes place in the reverse order.
Note
We recommend that you have the headlight setting checked by a specialist garage after installing the headlight.Fog lights and daylight driving lights*
AB
AB
Fig. 245 Removing the light bulb for the main beam light
AC
AA
ABAC
Fig. 246 Front bumper: Protective grille
se0.1.book Page 265 Frida
y, April 10, 2009 3:19 PM
Page 267 of 304

Fuses and light bulbs
266
Connector - bulb for daylight driving lights*
⇒
fig. 247
. Connector
- bulb for fog lights. Removing the cover – Switch the ignition and all lights off. – Guide the fingers into the opening
⇒
page 265, fig. 246
.
– By pulling in the direction of arrow , first of all slacken the cover in
the upper area on the side to the fog lights.
– Afterwards, also slacken the cover on
the other side in the direction of
arrow and remove it.
Removing the fog light – Guide your hand into the opening,
in which the cover was located,
and press the spring bolt
⇒
fig. 247
.
– Take out the fog light. – Turn the connector with the light bulb up to the stop towards the left
and remove.
– Replace the lamp, insert the connector with the new lamp and turn to
the right up to the stop.
– For the installation, first of all insert the fog light with the interlock to
the side far away from the marking of the vehicle.
– Press into place the headlight onto the side facing the marking. – In order to reinstall the cover, first of all insert one part of the cover
starting on the side facing the mark
ing. Then press the cover closed on
the side facing the fog light. The cover must engage firmly.
Cover of fog lights Octavia RS, Octavia Scout
Fig. 247 Removing the front fog light
AA
AB
AAA1
A2
Fig. 248 Front bumper: Octavia RSFig. 249 Front bumper: Octavia Scout
se0.1.book Page 266 Frida
y, April 10, 2009 3:19 PM
Page 268 of 304

Fuses and light bulbs
267
Using the system
Safety
Driving Tips
General Maintenance
Breakdown assistance
Technical Data
Removing the cover - Octavia RS – Switch the ignition and all lights off. – Guide one finger into the opening
⇒
page 266, fig. 248
and remove
the cover.
Removing the cover - Octavia Scout – Switch the ignition and all lights off. – Guide the wire clamp from the vehi
cle tool kit into
the opening above
the fog light
⇒
page 266, fig. 249
and remove the cover.
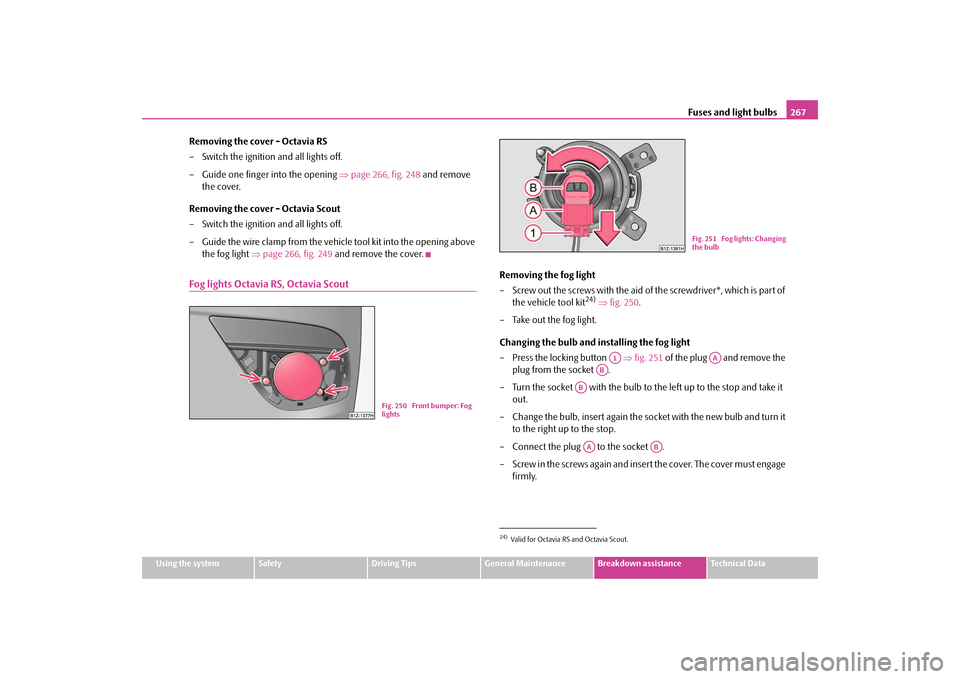
Fog lights Octavia RS, Octavia Scout
Removing the fog light – Screw out the screws with the aid of the screwdriver*, which is part of
the vehicle tool kit
24) ⇒
fig. 250
.
– Take out the fog light. Changing the bulb and installing the fog light – Press the locking button
⇒
fig. 251
of the plug and remove the
plug from the socket .
– Turn the socket with the bulb to the left up to the stop and take it
out.
– Change the bulb, insert again the socket with the new bulb and turn it
to the right up to the stop.
– Connect the plug to the socket . – Screw in the screws again and insert
the cover. The cover must engage
firmly.
Fig. 250 Front bumper: Fog lights
24)Valid for Octavia RS and Octavia Scout.
Fig. 251 Fog lights: Changing the bulb
A1
AA
AB
ABAA
AB
se0.1.book Page 267 Frida
y, April 10, 2009 3:19 PM
Page 269 of 304

Fuses and light bulbs
268
Light unit (Octavia)Changing light bulbs in the lamp holder – Switch the ignition and all lights off. – Unlock the locking button and open the cover of the lamp holder
⇒
fig. 252
.
– Press the catches in the direction of arrow and take out the lamp
holder
⇒
fig. 253
.
– Press the defective light bulb into the socket, turn to the left and
remove.
– Press a new light bulb into the socket and turn the light bulb to the
right as far as the stop.
– Insert the lamp holder in such a wa
y that the catches lock in place in
the housing.
– Close and lock the cover of the lamp holder. Change the light bulb for the parking light – Switch the ignition and all lights off. – Unlock the locking button and open the cover of the lamp holder
⇒
fig. 252
.
– Take the defective light bulb (arrow or
⇒
fig. 253
) out of the
housing and replace it with a new one.
– Close and lock the cover of the lamp holder.Rear light unit (Combi)
Fig. 252 Luggage compart- ment: Cover for the lamp holderFig. 253 Removing the lamp holder
A1
A2Fig. 254 Luggage compart-ment: Side compartment
se0.1.book Page 268 Frida
y, April 10, 2009 3:19 PM
Page 270 of 304

Fuses and light bulbs
269
Using the system
Safety
Driving Tips
General Maintenance
Breakdown assistance
Technical Data
Changing light bulbs in the lamp holder – Switch the ignition and all lights off. – Remove the side compartment cover by turning the locks in the direc-
tion of arrow
⇒
page 268, fig. 254
.
– Take out the cover of the lamp holder on the luggage compartment
side.
– Take out the light bulbs of the tail light (arrow and )
⇒
fig. 255
.
– Press the catches in the directio
n of arrow and take out the lamp
holder.
– Press the defective light bulb into
the socket, turn to the left and
remove.
– Press a new light bulb into the socket and turn the light bulb to the
right as far as the stop.
Change the light bulb for the parking light – Switch the ignition and all lights off. – Remove the side compartment cover by turning the locks in the direc-
tion of arrow
⇒
page 268, fig. 254
.
– Take out the cover of the lamp holder on the luggage compartment
side.
– Take the defective light bulb (arrow or
⇒
page 268, fig. 253
) out
of the housing and replace it with a new one.
– Remove the lamp holder cover on the luggage compartment side and
close the side compartment.
Fig. 255 Removing the lamp holderA1
A2
A1
A2
se0.1.book Page 269 Frida
y, April 10, 2009 3:19 PM
Page 271 of 304
Fuses and light bulbs
270
se0.1.book Page 270 Frida
y, April 10, 2009 3:19 PM
Page 272 of 304

Technical Data
271
Using the system
Safety
Driving Tips
General Maintenance
Breakdown assistance
Technical Data
Technical DataTechnical DataGeneral informationThe details given in the official vehicle
registration document
s always take prece-
dence over the details in th
e Owner's Manual. Please refe
r to the official vehicle
registration documents or consult an auth
orised Škoda Service Partner concerning
the engine with which yo
ur vehicle is equipped.
Used abbreviations
PerformancesThe listed performance values were de
termined without pe
rformance-reducing
equipment, e.g. air conditioning system.WeightThe loading capacity is reduced in line with the range of the special equipment. The unloaden weight contains a fu
el tank topped up to 90%. A driver with a weight of
75 kg is also included in the value.
Abbreviation
Importance
kW
Kilowatt, measuring unit
for the engine output
rpm
Engine revolutions per minute
Nm
Newton meter, measuring unit for the engine torque
g/km
discharged quantity of carbon dioxide in grams per driven kilometer
RON
Research octane number, me
asuring unit for the knock-
ing resistance of petrol
TSI
Petrol engine with a turbocharger and a direct fuel injec- tion system
TDI PD
Diesel engine with turbocharger and injection system unit injector
TDI CR
Diesel engine with turbocharger and injection system Common Rail
M5 / M6
5-speed/6-speed manual gearbox
AG6
6-speed automatic gearbox
DQ6/DQ7
6 speed-/7 speed automatic gearbox DSG
DPF
Diesel particle filter
Abbreviation
Importance
se0.1.book Page 271 Frida
y, April 10, 2009 3:19 PM