Page 17 of 38
 Amundsen Navigation System Manual Range selector key RADIO
15
– You can select the station stored on one of the station keys to
in the main menu
RADIO
by briefly pressing the desired station key.
Calling up available stat")
Range selector key RADIO
15
– You can select the station stored on one of the station keys to
in the main menu
RADIO
by briefly pressing the desired station key.
Calling up available stati
ons from the memory list
– Press the button and then the button and the func-
tion key .
– Select the desired radio station using the menu control button .RDS function– If you wish to switch the display of additional information to a radio
station on or off, press the button
, the function is displayed in the
top right corner of the screen by the letter “i”.
RDS (“
Radio
Data
System”) serves to transmit program identification and additional
services therefore also enabling automatic tracking of stations. In the event of sufficiently satisfactory reception, the suitable RDS radio stations will display the station name instead of the station frequency. If a radio station sends additional information via the RDS function while a station is being stored, it can occur that the name
of the radio station is later displayed
incorrectly in the memory list. In this case, the stored station name can be restored by selecting the desired radio station, wait until the correct station name is displayed as radio text then press the menu control button and a pop-up window is displayed on the screen.Traffic information function TPSwitching traffic information TP
(Traffic Program) on or off
– Press the function key in the
RADIO
mode.
– Briefly press on in the opening pop-up window to switch the
traffic information on or off.
The display “
TP” in combination with a station name (e. g. in the station or memory
list), indicates a traffic information station. Irrespective of which radio station is heard,
an additional receiver part in the unit
ensures that a traffic information station can always be received as long as the traffic information function is switched on. The functionality of the function for the traffic information “
TP” is displayed at the
top right in the screen. If no traffic information station can be re
ceived because, for
example, radio recep-
tion is interrupted in general, “
No TP
” will be displayed instead of “
TP”. Remember
that car parks, tunnels, high buildings or
mountains can interrupt the radio signal
up to the total loss of reception. Incoming traffic announcement If you wish to interrupt the transmission of the traffic announcement, press on the function key in the pop-up window
Traffic announcement
. The traffic infor-
mation function remains available and a following traffic announcement is replayed if a random source is switch
ed on. Pressing the function key will
switch off the traffic information function permanently.
1
24
RADIO
Freq. Band
FM/List
A10
�º
A10
Station name stored
Extras
TP
Cancel
TP off
s36c.b.book Page 15 Thursday, April 9, 2009 2:50 PM
Page 18 of 38
 Amundsen Navigation System Manual Range selector key TRAFFIC
16
Range selector key TRAFFICDisplaying TMC traffic reportsTMC traffic reports are used during
route guidance, depending on the
set-up for the automatic optimization of t")
Range selector key TRAFFIC
16
Range selector key TRAFFICDisplaying TMC traffic reportsTMC traffic reports are used during
route guidance, depending on the
set-up for the automatic optimization of the route, to report possible traffic problems. – Press the range selector key to display the current traffic
reports in a list.
– Press on the display of a traffic report
to show it in a detailed display.
– You can browse through all the traffic information received in the
detailed display, in sequence by using the function keys.
Traffic problems are illustrated in the de
tailed display and in the map by a corre-
sponding symbol. The direction, in which the traffic problem is found in the map, is displayed in colour. A traffic problem which is located on the route (in direction of travel) is marked in red, a traffic problem in the opposite direction is marked in grey.
Note
•
The unit has a continuous background of
TMC traffic reports providing a TMC
station at the current location can be rece
ived. The station you are listening to does
not have to be a TMC station.•
TMC traffic reports can only be evaluate
d and stored by the unit if the nagi-
vation data (SD card or CD) is
available for the driven area.
•
The quality of the dynamic route guidan
ce depends on the transmitted traffic
announcements. The radio stations broadcasting this information are responsible for the content.•
TMC traffic reports are necessar
y for the dynamic navigation.
•
There may not be any advantage in avoiding the traffic jam if, as a result of the
TMC traffic reports, the diversion is also heavily congested.
TRAFFIC
s36c.b.book Page 16 Thursday, April 9, 2009 2:50 PM
Page 19 of 38
 Amundsen Navigation System Manual Range selector key MEDIA
17
Range selector key MEDIAGeneral information for CD operationAudio-CDs (CD-A) and MP3-CDs can be
played in the internal drive.
CD not legible If you insert a CD which cann")
Range selector key MEDIA
17
Range selector key MEDIAGeneral information for CD operationAudio-CDs (CD-A) and MP3-CDs can be
played in the internal drive.
CD not legible If you insert a CD which cannot be read by
the unit, a pop-up window is displayed
with a note. Press on the function key , the CD is driven to the initial position. If the CD is not taken out within 10 seconds, it is drawn in again for safety reasons.
WARNING
•
The CD player is a 1st class laser produc
t. There is a definite risk of injury
from invisible laser beams if it is opened.•
The CD player contains no parts that have to be serviced or repaired.
Please contact your speciali
st garage if a mechanical
defect occurs or the CD
player has to be repaired.
Caution
•
Inserting a second CD while a CD is being ejected can destroy the CD drive in
the unit. Please note that the CD ejecti
on lasts a few seconds after pressing the
Eject button
. During this time the lock in fr
ont of the CD case is open. It is
essential that you wait until the CD has been
fully ejected before you try to insert a
new CD.•
If the CD drive becomes me
chanically defective or
a CD has been inserted
incorrectly or not fully, “
Fa u l t : ° C D
” will be displayed on the screen. Please check the
CD and place it again correctly and fully into the drive. If “
Fa u l t : ° C D
” is indicated
again, please contact your Škoda Service Partner.•
If the inside temperature of the unit is
too high, no CDs will be accepted. The
unit switches into the last active operating mode.
Note
•
If the function key is inactive, no
new Audio CD has been inserted or an
inserted Audio CD is not readable.•
It is possible that CDs protected by copyright and self-made CD-R and CD-RW
are not returned at all or on
ly in certain circumstances.
•
Please observe the following information for the MP3 operation
⇒page 20.
•
Please comply with the national legal copyright requirements in your country.
Main menu MEDIAMain menu MEDIA - Overview
OK
�š
CD
BAT-20H1065
Fig. 9 Main menu MEDIA: CD
mode
s36c.b.book Page 17 Thursday, April 9, 2009 2:50 PM
Page 20 of 38
 Amundsen Navigation System Manual Range selector key MEDIA
18
Calling up the main menu MEDI
A and changing the media source
– Press the range selector key to switch to the main menu
MEDIA
. The last used audio source will co")
Range selector key MEDIA
18
Calling up the main menu MEDI
A and changing the media source
– Press the range selector key to switch to the main menu
MEDIA
. The last used audio source will continue to play.
Buttons on the unit for controlling the current audio sources The arrow keys on unit or will always affect the currently heard audio source, irrespective of the current menu used. - briefly press to go to the beginning of
the current track, press repeatedly to
return to the beginning of the previous track. - brief pressing changes over to the beginning of the next track.When in the menu of the currently played audio source it is also possible to change titles using the setting up button. - by briefly pressing, you can select the display for the additional information of the audio sources. Selectable audio sources in the menu AUDIO
CD - changes over to an inserted CD. CD 1-6
* - changes over to a connected external CD changer.
SD card
- changes over to an inserted memory card.
, or * - changes over to a connected external audio source.
Operating an externally connected audio
source is possible, wi
th certain restric-
tions, via the radio navigation unit and depends largely on the type of the connec- tion. Additional function keys in the AUDIO menu
- opens a pop-up window wher
e the random play function
Mix
, the auto-
matic play
Scan
or the replay of the track or the folder can be started.
- opens the list of the tracks for the current audio source in order to select
another track.Inserting or ejecting a CDInserting the CD – Push a CD with the written side facing
up as far as po ssible into the CD
case until it is automatically drawn in
. The play function will start auto-
matically.
Taking out the CD – Press the button to move the CD
in the internal CD drive into the
Eject position.
If a CD is not taken out in the initial position, it will be reinserted after approximately 10 seconds for safety reasons.Inserting or removing a memory cardInserting a memory card – Push the memory card into the me
mory card case with the trimmed
edge to the front top, until it is locked in position. The play function will start automatically.
Taking out a memory card – Press the button and then the function key .
BAT-20H1066
Fig. 10 Selectable sources in
the menu MEDIA
MEDIA
�ƒ
�„
�ƒ�„�º�F�F�F
�HAUX
MDI
BT audio
ExtrasSelect
�šSETUP
System
s36c.b.book Page 18 Thursday, April 9, 2009 2:50 PM
Page 21 of 38
 Amundsen Navigation System Manual Range selector key MEDIA
19
– You can select the function key using the menu
control button .
– Press against the spring resistance of the inserted memory card, the
memory card “skips�")
Range selector key MEDIA
19
– You can select the function key using the menu
control button .
– Press against the spring resistance of the inserted memory card, the
memory card “skips” back into the Eject position.
– After removing the SD card,
confirm with on the screen.
Memory card empty or data not readable If a memory card is inserted, on which no audio data has been stored, it will
not
be
switched over into the memory card mode after the loading procedure. Requirements of the memory card•
Memory cards measuring 32 mm x 24 mm x 2.1 mm or 1.4 mm can be inserted
into the memory card case.•
SD (Secure Digital Memory Cards) and MMC (Multimedia Cards) memory cards
with a capacity up to 4 GB.•
SDHC (Secure Digital High-Capacity Memory Cards) memory cards with a
capacity up to 32 GB.•
Due to the differing demands on quality of the card manufacturer, it is possible
that some of the data on the memory ca
rds cannot be played or their play is
restricted.Audio menu Selecting title or audio sourceChanging the audio source – Press the range selector key to switch to the main menu
MEDIA
.
– Press one of the top function keys to select the corresponding audio
source. The play function of the selected audio source will continue from the last played point.
Opening the selection menu of the available audio sources –When in the
Audio
menu, press the function key to display the
title list of the currently played audio source. The currently played track is shown as highlighted.
– If one of the buttons of the audio source data is pressed, the contents
of the folder or the data carrier is displayed.
Changing track or selecting track manuallyPress the range selector key to switch to the main menu
MEDIA
.
Select track – Briefly press the arrow key on the unit or while in the
MEDIA
menu.
Fast forward/reverse – Hold the arrow key on the unit or pressed. – If you have reached the desired title sequence, release the button. Audio CD – Press on the function key , in order to display the title list of
the currently played audio CD.
– Select the desired track from the title list using the menu control
button .
MP3 Data: Select track – Press on the function key , in order to display the title list with
the currently played title and, if ne
cessary, to display the sub-folder
contained in this folder.
– Press on the display of a data folder to open it.
Remove SD card
A10
OK
MEDIA
Select
MEDIA
�ƒ
�„
�ƒ
�„
Selection
A10
Selection
s36c.b.book Page 19 Thursday, April 9, 2009 2:50 PM
Page 22 of 38
 Amundsen Navigation System Manual Range selector key MEDIA
20
– Press on the function key to open the appropriate higher priority
folder.
– By pressing repetitively, you can reach the root folder of the
played medium whi")
Range selector key MEDIA
20
– Press on the function key to open the appropriate higher priority
folder.
– By pressing repetitively, you can reach the root folder of the
played medium while moving from folder to folder. Then the function key is inactive.
Repeat track – Press the function key in the
Media
menu and then the func-
tion key (repeats the current track) or (constantly repeats all the tracks in the folder).
Random play function – Press on the function key in
MEDIA
.
– Press on the function key in the pop-up window. All titles of the
current audio source will now be played in random order.
– If you press the function key in the pop-up window, the
tracks of the current folder are played in random order.
– Use the function key to terminate the function of the current
title. The normal play function continues with the current title.
Automatic play (Scan function)– Press on the function key in
MEDIA
.
– Press on in the pop-up window. All the titles of the current audio
source are played for approximately 10 seconds.
– Press to terminate the play function of the current title. The
normal play function continues with the current title.
Alternatively, start and end the automatic
play by briefly pressing the menu control
button .MP3 and WMA dataGeneral information for MP3 operationRequirements for the MP3 data and data carrier•
CD-ROM, CD-R, CD-RW with a capacity of 650 MB and 700 MB.
•
The CDs must correspond to the ISO 9660
Level 1 or Level 2 standard as well as
the Joliet data system (single and multi-session).•
Data names must be no longer than 256 characters.
•
The list structure is restricted
to a depth of 8 list levels.
•
An MP3 CD must not have more than 50°folders and 500°data.
•
A memory card must not have more than 5°000°folders and 15°000°data. Thus,
one folder must not have more than 6°000 data.•
The name of the artist, the album and the title of the reproduced MP3 data can
be shown as ID3 tag, providing this information is available. The list and data name will be displayed if
there is no ID3 tag.
•
Playlists are not supported.
•
WMA data (
Windows
Media
Audio) can also be played
even if the copyright is
additionally protected
by the DRM procedure (
Digital
Rights
Management). Such
WMA data is not supported by the unit. Bit rate (data flow per time unit)•
The system supports MP3 data with bit rates of 32 to 320 KB/s as well as MP3
data with variable bit rates.•
The indicated playing time data with variable bit rates is not reliable.
Up
Up
Up
Extras
Repeat track
Repeat folder
MIX
ExtrasMix all
Mix folder
�b MixExtras
Scan
�bScan
A10
s36c.b.book Page 20 Thursday, April 9, 2009 2:50 PM
Page 23 of 38
Range selector key MEDIA
21
Note
For the correct display of the specific characters in Czech in ID3 day (name of the artist, the album and the track), the text
must correspond to
the standard ID3°V2
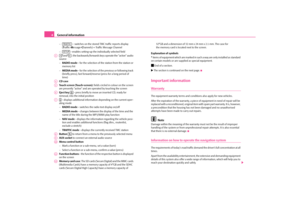
and the UTF coding.Playing sequence of MP3 data, WMA data and folders
The unit plays the MP3 data stored on
a data carrier in a certain sequence
⇒fig. 11
.
The illustration shows an example of a
typical MP3 CD cont
aining the titles
(Tracks
�?), folder (Folder
�>) and sub-folder. When settin
g up, you can stipulate if
MP3 data from all folders and sub-folders can be played.External sources*External sources - Overview
Fig. 11 Possible structure of a MP3 CD.
Fig. 12 Socket MDIFig. 13 Menu of the audio source via the multimedia socket MDI
s36c.b.book Page 21 Thursday, April 9, 2009 2:50 PM
Page 24 of 38
 Amundsen Navigation System Manual Range selector key MEDIA
22
Input AUX – Activate the AUX socket in the menu
Setup Media
by pressing the
function key .
– The input for an external audio source is located on the unit. –")
Range selector key MEDIA
22
Input AUX – Activate the AUX socket in the menu
Setup Media
by pressing the
function key .
– The input for an external audio source is located on the unit. – External audio sources, which are connected to the AUX socket,
cannot
be operated via the radio.
Input MDI - Multimedia socket – The input MDI is located under the armrest of the front seats or in the
storage compartment on the front passenger side.
– Audio data in MP3, WMA, OGG Vorbis and AAC format from the
external data stickers, connected to the multimedia socket, can be played via the radio.
– External audio sources, which are connected to the MDI socket,
can
be operated via the radio.
You can select another audio source on the ra
dio at any time. As long as the external
audio source is not switched off, it re
mains always active in the background.
Please refer to the Owner's manual of th
e respective manufacturer for the opera-
tion of the external audio source. Use the standard jack
plug 3.5 mm for the AUX socket. If the external audio source
does not have this jack pl
ug, you must use an adapter.
iPod If an iPod is connected to the MDI socket
, a menu is opened in which you can select
the folders of the iPods (playlists, artists, albums, songs etc.). Adjust the play function volume of the external audio source The play function volume of the extern
al audio source can be changed via the
volume control on the radio. Depending on the connected audio source, the output volume on the external audio source can be changed.
You can also change the input sensitivity of the external audio source, in order for the play function volume of the external
audio source to adapt to other audio
sources or to avoid distortions
of the play function volume.
Adapter A special adapter is required to connect audio sources via the input MDI. You can purchase an adapter for connecting the USB devices, the devices with Mini USB output or an iPod, from the Škoda original accessories. Conditions for proper connection•
Only USB devices with the specification 2.0 can be connected.
•
The version of the file allocation tabl
e FAT (File Allocati
on Table) of the
connected device must be FAT16 (< 2 GB) or FAT32 (> 2 GB).•
In order to replay from a unit with a hard
disk (HDD) which includes a large data
volume, it can lead to a time delay when reading in the overview of the music data.•
In order to replay from a unit, which incl
udes a complicated folder structure, it
can lead to a time delay when readin
g in the overview of the music data.
•
The folder structure in the connected unit must not exceed a depth of 8 levels.
One folder must not contain more than 1°000° data.•
A USB extension cable or USB distributo
r (HUB) must not be used to connect
the unit.
WARNING
•
On no account place an external au
dio source on the dash panel. You
could make sudden manoeuvres in th
e passenger compartment and injure
the occupants.•
On no account place an external audio source close to the airbags. You
could be thrown back in the passen
ger compartment by the airbags being
deployed and injure the occupants.•
You must not hold the external audio source in the hand or on the knees
while driving. You could make su
dden manoeuvres in the passenger
compartment and injure the occupants.•
Always guide the connection cable of
the external audio source in such a
way that is does not restrict you when driving.
AUX
s36c.b.book Page 22 Thursday, April 9, 2009 2:50 PM


 Amundsen Navigation System Manual Range selector key MEDIA
21
Note
For the correct display of the specific characters in Czech in ID3 day (name of the artist, the album and the track), the text
must correspond to
the standard ID3")