2009 Seat Ibiza ST lock
[x] Cancel search: lockPage 86 of 250
Unlocking and locking85
Safety First
Operating instructions
Practical tips
Technical Data
Panorama tilting roof*Opening and closing the panorama/tilting roof
The panorama/tilting roof is opened and closed by using the
switch when the ignition is switched on.Closing the panorama/tilting sunroof
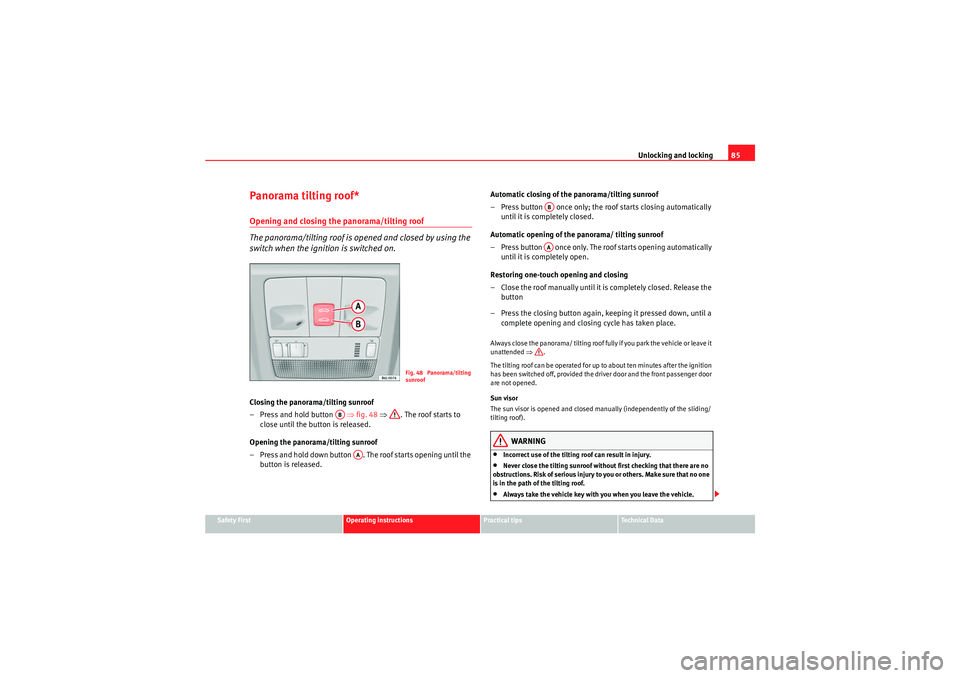
– Press and hold button ⇒fig. 48 ⇒ . The roof starts to
close until the button is released.
Opening the panorama/tilting sunroof
– Press and hold down button . The roof starts opening until the button is released. Automatic closing of the panorama/tilting sunroof
– Press button once only; the roof starts closing automatically
until it is completely closed.
Automatic opening of the panorama/ tilting sunroof
– Press button once only. The roof starts opening automatically until it is completely open.
Restoring one-touch opening and closing
– Close the roof manually until it is completely closed. Release the button
– Press the closing button again, keeping it pressed down, until a
complete opening and closing cycle has taken place.
Always close the panorama/ tilting roof fully if you park the vehicle or leave it
unattended ⇒.
The tilting roof can be operated for up to about ten minutes after the ignition
has been switched off, provided the driver door and the front passenger door
are not opened.
Sun visor
The sun visor is opened and closed manually (independently of the sliding/
tilting roof).
WARNING
•Incorrect use of the tilting roof can result in injury.•Never close the tilting sunroof without first checking that there are no
obstructions. Risk of serious injury to you or others. Make sure that no one
is in the path of the tilting roof.•Always take the vehicle key with you when you leave the vehicle.
Fig. 48 Panorama/tilting
sunroof
AB
AA
ABAA
Ibiza ST_EN.book Seite 85 Dienstag, 12. Januar 2010 4:03 16
Page 87 of 250
Unlocking and locking
86•Never leave children or disabled persons in the vehicle, particularly if
they have access to the keys. Unsupervised use of a key could mean that
the engine is started or that electrical equipment is used (e.g. electric
tilting sunroof) with a risk of accident. The doors can be locked using the
remote control key. This could make the aid difficult in an emergency situ-
ation.•The tilting sunroof continues to function until one of the front doors is
opened and the key removed from the ignition.•Ensure that no object and/or end is between the glass and the roof
when the one-touch opening/closing function is reset.
Convenience closing* Using the door lock
– Hold the key in the door lock of the driver door in the locking position until the tilting sunroof is closed.
– Release the key to interrupt this function.
Using the remote control
– Push the lock button on the remote control for about 3 seconds. The tilting roof closes.
– Press the unlock button to interrupt the function.
Roll-back function of the panorama/ tilting roof*The panorama/ tilting roof has a roll-back function which prevents larger
objects getting trapped when the roof is closed. The roll-back function does
not prevent fingers getting pinched against the roof opening. The tilting
sunroof stops and opens again immediately if it is obstructed when closing.Operation in case of breakdown
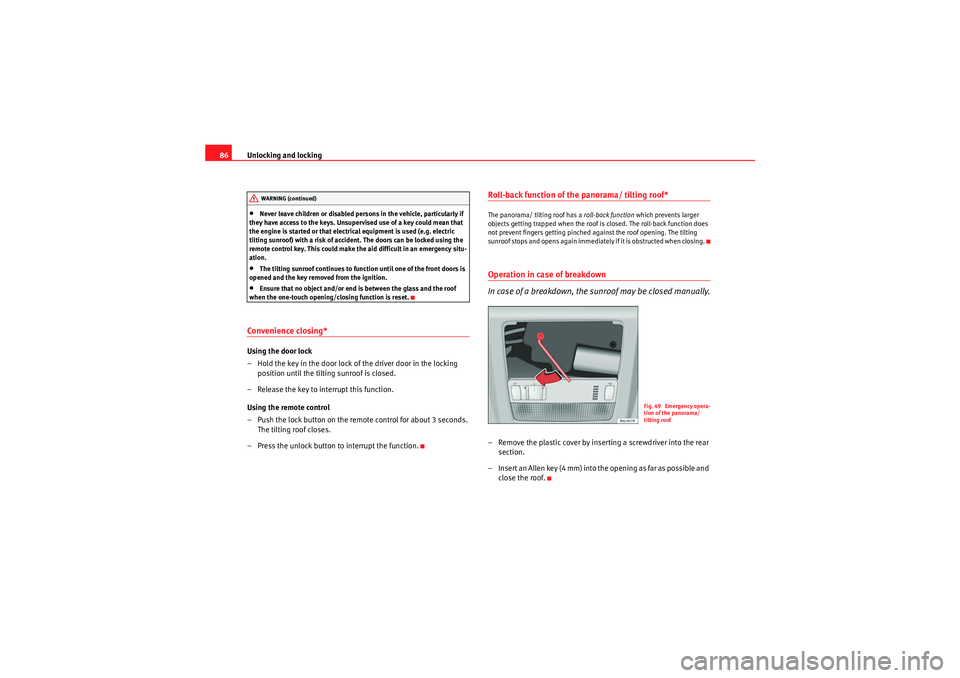
In case of a breakdown, the sunroof may be closed manually.– Remove the plastic cover by inserting a screwdriver into the rear section.
– Insert an Allen key (4 mm) into the opening as far as possible and close the roof.
WARNING (continued)
Fig. 49 Emergency opera-
tion of the panorama/
tilting roof
Ibiza ST_EN.book Seite 86 Dienstag, 12. Januar 2010 4:03 16
Page 88 of 250
Lights and visibility87
Safety First
Operating instructions
Practical tips
Technical Data
Lights and visibilityLightsSwitching lights on and off
Switching on the side lights
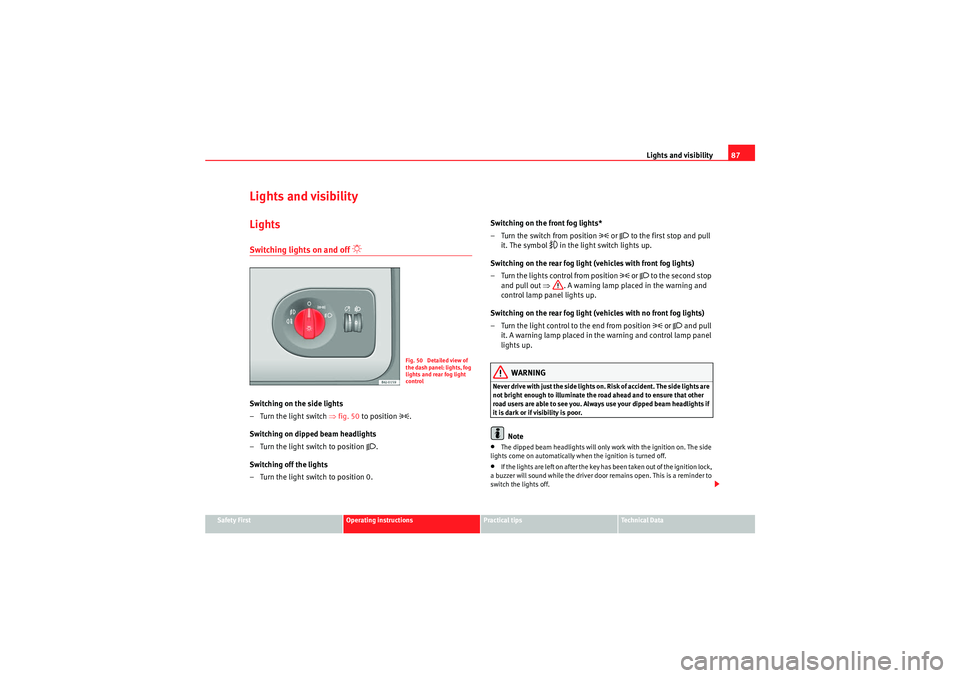
– Turn the light switch ⇒fig. 50 to position
.
Switching on dipped beam headlights
– Turn the light switch to position
.
Switching off the lights
– Turn the light switch to position 0. Switching on the front fog lights*
– Turn the switch from position
or to the first stop and pull
it. The symbol
in the light switch lights up.
Switching on the rear fog light (vehicles with front fog lights)
– Turn the lights control from position
or to the second stop
and pull out ⇒. A warning lamp placed in the warning and
control lamp panel lights up.
Switching on the rear fog light (vehicles with no front fog lights)
– Turn the light control to the end from position or and pull
it. A warning lamp placed in the warning and control lamp panel
lights up.
WARNING
Never drive with just the side lights on. Risk of accident. The side lights are
not bright enough to illuminate the road ahead and to ensure that other
road users are able to see you. Always use your dipped beam headlights if
it is dark or if visibility is poor.
Note
•The dipped beam headlights will only work with the ignition on. The side
lights come on automatically when the ignition is turned off.•If the lights are left on after the key has been taken out of the ignition lock,
a buzzer will sound while the driver door remains open. This is a reminder to
switch the lights off.
Fig. 50 Detailed view of
the dash panel: lights, fog
lights and rear fog light
control
Ibiza ST_EN.book Seite 87 Dienstag, 12. Januar 2010 4:03 16
Page 93 of 250

Lights and visibility
92Turn signal and main beam headlight lever
The turn signal and main beam lever also operates the
parking lights and the headlight flasher.The turn signal and main beam headlight lever has the following
functions:
Switching on the turn signals
– Move the lever all the way up ⇒fig. 55 to indicate right , and
all the way down to indicate left .
Signalling a lane change
– Push the lever up or down to the point where you incur resistance and then release it. The turn signal will flash several
times. The corresponding warning lamp will also flash. Switching main beam on and off
– Turn the light switch to position
.
–Press the lever forward ⇒fig. 55 to switch on the main
beams.
– Pull the lever back towards you to switch the main beam head- lights off again.
Headlight flashers
– Pull the lever towards the steering wheel to operate the flasher.
Switching on parking lights
– Switch the ignition off and remove the key from the lock.
– Move the lever up or down to turn the right or left-hand parking lights on, respectively.
WARNING
The main beam can dazzle other drivers. Risk of accident! Never use the
main beam headlights or the headlight flasher if they could dazzle other
drivers.
Note
• The turn signals only work when the ignition is switched on. The corre-
sponding warning lamp
or flashes in the instrument panel. The warning
lamp
flashes when the turn signals are operated, provided a trailer is
correctly attached and connected to the vehicle. If a turn signal bulb is defec-
tive, the warning lamp flashes at double sp eed. If the trailer turn signal bulbs
are damaged, warning lamp
does not light up. Change the bulb.
Fig. 55 Turn signal and
main beam headlight
lever
A1
A2A1
A2
A4
A3
Ibiza ST_EN.book Seite 92 Dienstag, 12. Januar 2010 4:03 16
Page 94 of 250
Lights and visibility93
Safety First
Operating instructions
Practical tips
Technical Data
•The main beam headlights can only be switched on if the dipped beam
headlights are already on. The warning lamp
then comes on in the instru-
ment panel.
•The headlight flasher comes on for as long as you pull the lever – even if
no other lights are switched on. The warning lamp
then comes on in the
instrument panel.
•When the parking lights are switched on, the headlight and the tail light
on the corresponding side of the vehicle light up. The parking lights will only
work if the key is removed from the ignition. If the lights are switched on, a
buzzer gives an warning buzzer while the driver door is open.•If the turn signal lever is left on after the key has been taken out of the
ignition lock, an acoustic signal sounds when the driver door is opened. This
is a reminder to switch off the turn signal, unless of course you wish to leave
the parking light on.
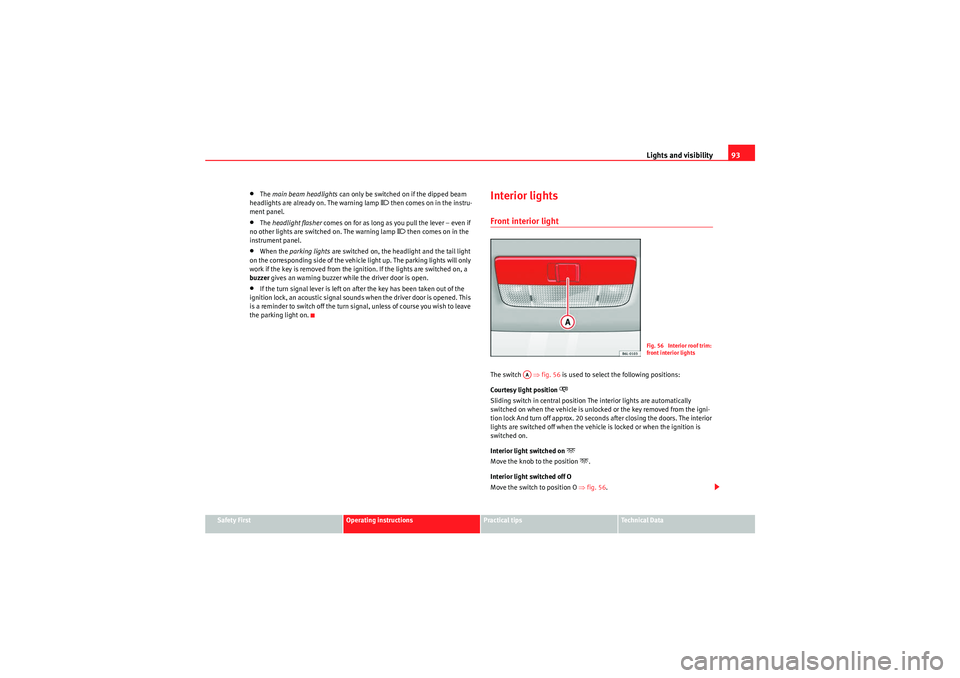
Interior lightsFront interior light The switch ⇒fig. 56 is used to select the following positions:
Courtesy light position
Sliding switch in central position The interior lights are automatically
switched on when the vehicle is unlocked or the key removed from the igni-
tion lock And turn off approx. 20 seconds after closing the doors. The interior
lights are switched off when the vehicle is locked or when the ignition is
switched on.
Interior light switched on
Move the knob to the position
.
Interior light switched off O
Move the switch to position O ⇒fig. 56 .
Fig. 56 Interior roof trim:
front interior lights
AA
Ibiza ST_EN.book Seite 93 Dienstag, 12. Januar 2010 4:03 16
Page 107 of 250
Seats and storage compartments
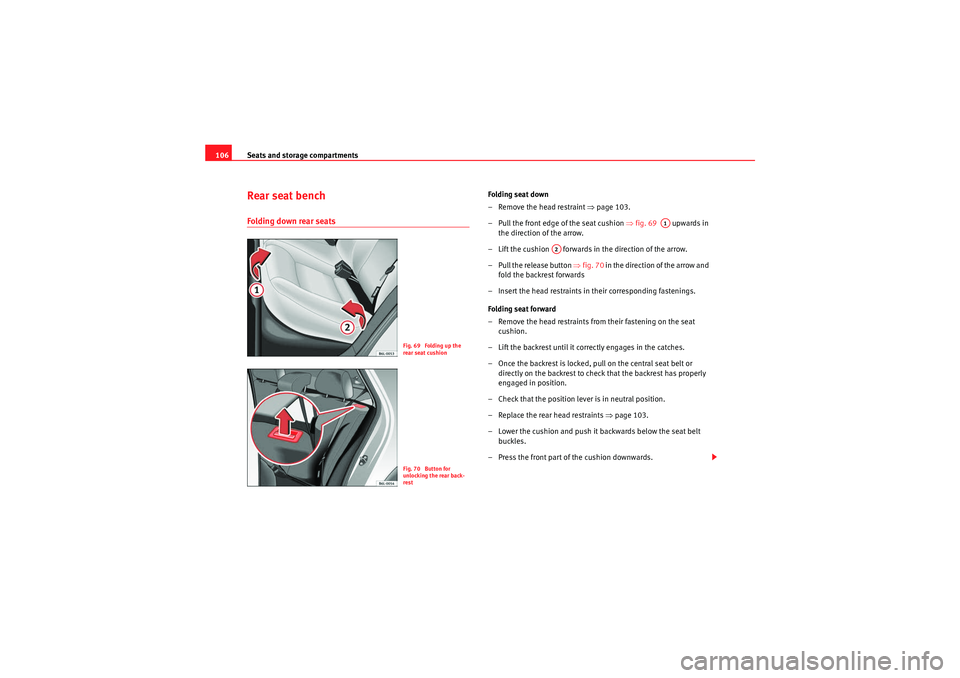
106Rear seat benchFolding down rear seats
Folding seat down
– Remove the head restraint ⇒page 103.
– Pull the front edge of the seat cushion ⇒ fig. 69 upwards in
the direction of the arrow.
– Lift the cushion forwards in the direction of the arrow.
– Pull the release button ⇒fig. 70 in the direction of the arrow and
fold the backrest forwards
– Insert the head restraints in their corresponding fastenings.
Folding seat forward
– Remove the head restraints from their fastening on the seat cushion.
– Lift the backrest until it correctly engages in the catches.
– Once the backrest is locked, pull on the central seat belt or directly on the backrest to check that the backrest has properly
engaged in position.
– Check that the position lever is in neutral position.
–Replace the rear head restraints ⇒page 103.
– Lower the cushion and push it backwards below the seat belt buckles.
– Press the front part of the cushion downwards.
Fig. 69 Folding up the
rear seat cushionFig. 70 Button for
unlocking the rear back-
rest
A1
A2
Ibiza ST_EN.book Seite 106 Dienstag, 12. Januar 2010 4:03 16
Page 122 of 250

Air conditioning121
Safety First
Operating instructions
Practical tips
Technical Data
•In air recirculation mode, no cold air from the outside enters the vehicle
interior. The windows can quickly fog over if the heating is switched off.
Therefore, never leave the air recirculation mode switched on for a long
time (risk of accident).Note
•Please consider the general notes ⇒ page 129.Vehicle ventilation or heatingVentilating the passenger compartment
– Turn the temperature selector ⇒fig. 94 anti-clockwise.
– Turn blower switch to any of the head settings 1 -4. – Set the airflow to the desired
direction using air distribution
control .
– Open the relevant air outlets.
Interior heating
– Turn the temperature selector ⇒fig. 94 clockwise to select
the desired temperature.
– Turn blower switch to any of the head settings 1 -4.
– Set the airflow to the desired direction using air distribution
control .
– Open the relevant air outlets.
Defrosting the windscreen
– Turn the temperature selector ⇒fig. 94 clockwise to reach
the maximum temperature.
– Turn the blower switch to setting 4.
– Turn air distribution control to
.
–Close outlet .
– Open and turn outlet towards side windows
Keeping the windscreen and the side windows demisted
– Turn the temperature selector ⇒fig. 94 to the heating zone.
– Turn blower switch to any of the head settings 2 -3.
– Turn air distribution control to .
WARNING (continued)
Fig. 94 Heating controls
on the dash panel
AA
AB
AC
AA
AB
AC
AA
AB
A3
A4
AA
AB
Ibiza ST_EN.book Seite 121 Dienstag, 12. Januar 2010 4:03 16
Page 131 of 250

Driving
130DrivingAddressAdjusting the steering wheel position
The height and reach of the steering wheel can be freely
adjusted to suit the driver.– Adjust the driver seat to the correct position.
– Push the lever under the steering column ⇒fig. 99 down ⇒.
– Adjust the steering wheel until the correct position is set ⇒fig. 99 .
– Then push the lever up again firmly ⇒.
WARNING
•Incorrect use of the steering column adjustment function and an incor-
rect seating position can result in serious injury.•To avoid accidents, the steering column should be adjusted only when
the vehicle is stationary.•Adjust the driver seat or steering wheel so that there is a distance of at
least 25 cm between the steering wheel and your chest ⇒fig. 99 . If you fail
to observe the minimum distance, the airbag will not protect you. Risk of
fatal injury.•If your physical constitution does not allow you to maintain the
minimum distance of 25 cm, contact an Authorised Service Centre. The
Authorised Service Centre will help you to decide if special specific modifi-
cations are necessary.•If you adjust the steering wheel so that it points towards your face, the
driver airbag will not protect you properly in the event of an accident. Make
sure that the steering wheel points towards your chest.•When driving, always hold the steering wheel with both hands on the
outside of the ring at the 9 o'clock and 3 o'clock positions. Never hold the
steering wheel at the 12 o'clock position, or in any other manner (e.g. in
the centre of the steering wheel, or on the inside of the rim). In such cases,
if the airbag is triggered, you may sustain injuries to the arms, hands and
head.
Fig. 99 Steering column
height adjustment
Ibiza ST_EN.book Seite 130 Dienstag, 12. Januar 2010 4:03 16