2009 Seat Ibiza ST instrument panel
[x] Cancel search: instrument panelPage 57 of 250
Cockpit
56Warning lampsOverview of the warning lamps
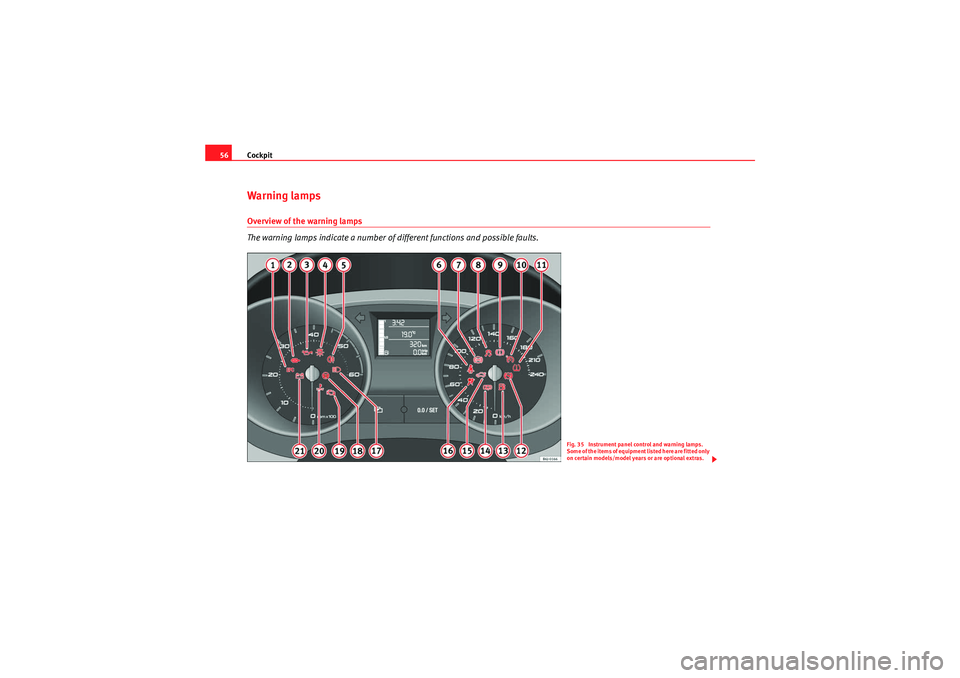
The warning lamps indicate a number of different functions and possible faults.
Fig. 35 Instrument panel control and warning lamps.
Some of the items of equipment listed here are fitted only
on certain models/model years or are optional extras.
Ibiza ST_EN.book Seite 56 Dienstag, 12. Januar 2010 4:03 16
Page 66 of 250

Cockpit65
Safety First
Operating instructions
Practical tips
Technical Data
The instrument panel displays the following message
6):
SAFE . The vehicle
cannot be started in this case
The engine can, however, be started if the appropriate coded SEAT genuine
key is used.
Note
The vehicle cannot operate properly if you do not have a genuine SEAT key.6)Depending on the version of the model.
Ibiza ST_EN.book Seite 65 Dienstag, 12. Januar 2010 4:03 16
Page 81 of 250
Unlocking and locking
80Rear lidUnlocking and locking
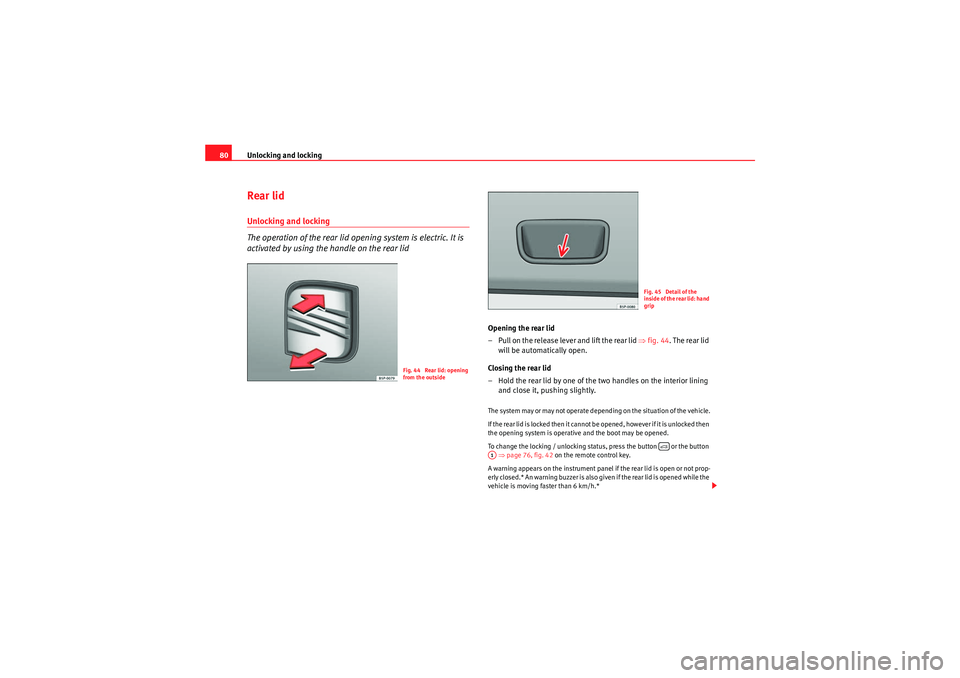
The operation of the rear lid opening system is electric. It is
activated by using the handle on the rear lid
Opening the rear lid
– Pull on the release lever and lift the rear lid ⇒fig. 44 . The rear lid
will be automatically open.
Closing the rear lid
– Hold the rear lid by one of the two handles on the interior lining and close it, pushing slightly.The system may or may not operate depending on the situation of the vehicle.
I f t h e r e a r l i d is l o cke d t h e n i t ca n n o t b e o p e n e d , h o w e v e r i f i t is u nl o cke d t h e n
the opening system is operative and the boot may be opened.
To change the locking / unlocking status, press the button or the button
⇒ page 76, fig. 42 on the remote control key.
A warning appears on the instrument panel if the rear lid is open or not prop-
e r l y c l o s e d . * A n wa r n i n g b u z ze r is a l s o g i v e n i f t h e r e a r l i d i s o p e n e d w h i l e t h e
vehicle is moving faster than 6 km/h.*
Fig. 44 Rear lid: opening
from the outside
Fig. 45 Detail of the
inside of the rear lid: hand
grip
A1
Ibiza ST_EN.book Seite 80 Dienstag, 12. Januar 2010 4:03 16
Page 89 of 250
Lights and visibility
88•The rear fog light is so bright that it can dazzle drivers behind you. You
should use the rear fog light only when visibility is very poor.•The use of the lighting described here is subject to the relevant statutory
requirements.Instrument and switch lighting / Headlight range controlInstrument and switch lighting
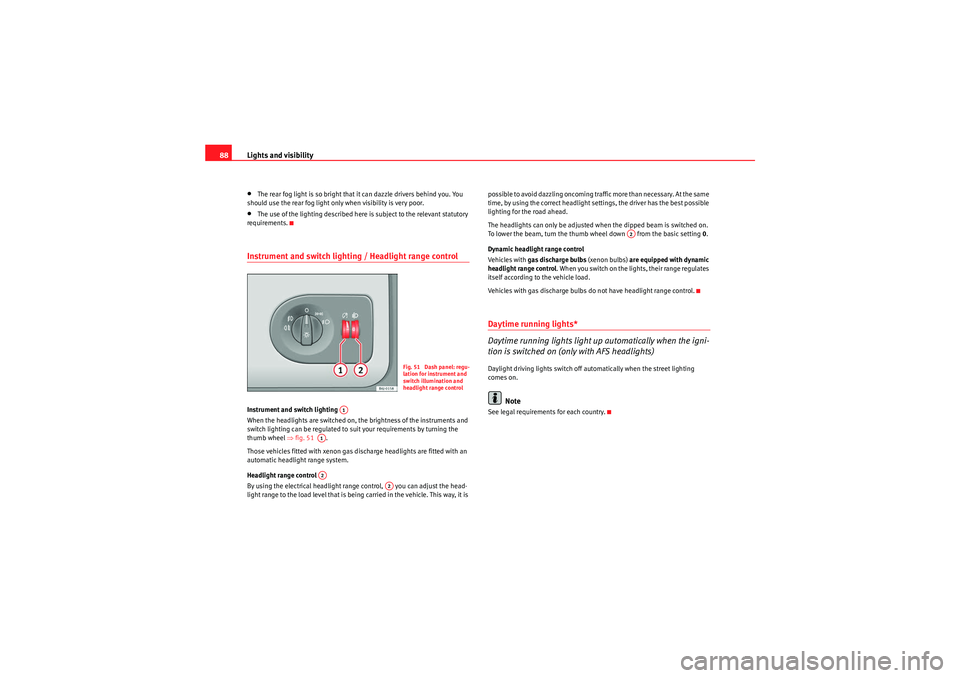
When the headlights are switched on, the brightness of the instruments and
switch lighting can be regulated to suit your requirements by turning the
thumb wheel ⇒fig. 51 .
Those vehicles fitted with xenon gas discharge headlights are fitted with an
automatic headlight range system.
Headlight range control
By using the electrical headlight range control, you can adjust the head-
light range to the load level that is being carried in the vehicle. This way, it is possible to avoid dazzling oncoming traffic more than necessary. At the same
time, by using the correct headlight settings, the driver has the best possible
lighting for the road ahead.
The headlights can only be adjusted when the dipped beam is switched on.
To lower the beam, turn the thumb wheel down from the basic setting
0.
Dynamic headlight range control
Ve hi cle s wi th gas discharge bulbs (xenon bulbs) are equipped with dynamic
headlight range control . When you switch on the lights, their range regulates
itself according to the vehicle load.
Vehicles with gas discharge bulbs do not have headlight range control.
Daytime running lights*
Daytime running lights light up automatically when the igni-
tion is switched on (only with AFS headlights)Daylight driving lights switch off automatically when the street lighting
comes on.
Note
See legal requirements for each country.
Fig. 51 Dash panel: regu-
lation for instrument and
switch illumination and
headlight range control
A1
A1A2
A2
A2
Ibiza ST_EN.book Seite 88 Dienstag, 12. Januar 2010 4:03 16
Page 93 of 250

Lights and visibility
92Turn signal and main beam headlight lever
The turn signal and main beam lever also operates the
parking lights and the headlight flasher.The turn signal and main beam headlight lever has the following
functions:
Switching on the turn signals
– Move the lever all the way up ⇒fig. 55 to indicate right , and
all the way down to indicate left .
Signalling a lane change
– Push the lever up or down to the point where you incur resistance and then release it. The turn signal will flash several
times. The corresponding warning lamp will also flash. Switching main beam on and off
– Turn the light switch to position
.
–Press the lever forward ⇒fig. 55 to switch on the main
beams.
– Pull the lever back towards you to switch the main beam head- lights off again.
Headlight flashers
– Pull the lever towards the steering wheel to operate the flasher.
Switching on parking lights
– Switch the ignition off and remove the key from the lock.
– Move the lever up or down to turn the right or left-hand parking lights on, respectively.
WARNING
The main beam can dazzle other drivers. Risk of accident! Never use the
main beam headlights or the headlight flasher if they could dazzle other
drivers.
Note
• The turn signals only work when the ignition is switched on. The corre-
sponding warning lamp
or flashes in the instrument panel. The warning
lamp
flashes when the turn signals are operated, provided a trailer is
correctly attached and connected to the vehicle. If a turn signal bulb is defec-
tive, the warning lamp flashes at double sp eed. If the trailer turn signal bulbs
are damaged, warning lamp
does not light up. Change the bulb.
Fig. 55 Turn signal and
main beam headlight
lever
A1
A2A1
A2
A4
A3
Ibiza ST_EN.book Seite 92 Dienstag, 12. Januar 2010 4:03 16
Page 94 of 250
Lights and visibility93
Safety First
Operating instructions
Practical tips
Technical Data
•The main beam headlights can only be switched on if the dipped beam
headlights are already on. The warning lamp
then comes on in the instru-
ment panel.
•The headlight flasher comes on for as long as you pull the lever – even if
no other lights are switched on. The warning lamp
then comes on in the
instrument panel.
•When the parking lights are switched on, the headlight and the tail light
on the corresponding side of the vehicle light up. The parking lights will only
work if the key is removed from the ignition. If the lights are switched on, a
buzzer gives an warning buzzer while the driver door is open.•If the turn signal lever is left on after the key has been taken out of the
ignition lock, an acoustic signal sounds when the driver door is opened. This
is a reminder to switch off the turn signal, unless of course you wish to leave
the parking light on.
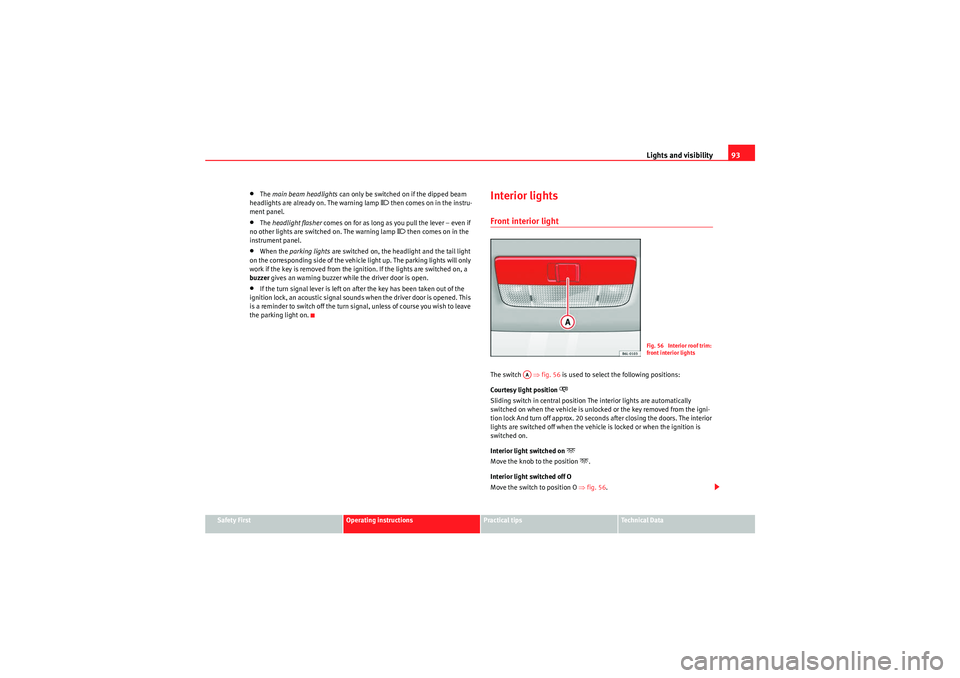
Interior lightsFront interior light The switch ⇒fig. 56 is used to select the following positions:
Courtesy light position
Sliding switch in central position The interior lights are automatically
switched on when the vehicle is unlocked or the key removed from the igni-
tion lock And turn off approx. 20 seconds after closing the doors. The interior
lights are switched off when the vehicle is locked or when the ignition is
switched on.
Interior light switched on
Move the knob to the position
.
Interior light switched off O
Move the switch to position O ⇒fig. 56 .
Fig. 56 Interior roof trim:
front interior lights
AA
Ibiza ST_EN.book Seite 93 Dienstag, 12. Januar 2010 4:03 16
Page 102 of 250
Seats and storage compartments101
Safety First
Operating instructions
Practical tips
Technical Data
Seats and storage compartmentsThe importance of correct seat adjustmentProper seat adjustment optimises the level of protection
offered by seat belts and airbags.Your vehicle has five seats, two in the front and three in the rear. Each seat is
equipped with a three-point seat belt.
The driver seat and the front passenger seat can be adjusted in many ways to
suit the physical requirements of the vehicle occupants. The correct seat
position is very important for:•a fast and easy operation of all controls on the instrument panel,•a relaxed posture which does not cause drowsiness,•a safe driving ⇒ page 7,•ensuring that the seat belts and airbag system provide maximum protec-
tion ⇒page 17.WARNING
•If the driver and passengers assume improper sitting positions, they
may sustain critical injuries.•More people than available seats must never be transported in your
vehicle.•Every passenger in the vehicle must properly fasten and wear the seat
belt belonging to his or her seat. Chil dren must be protected with an appro-
priate child restraint system ⇒page 38, “Child safety”.•The front seats and all head restraints must always be adjusted to body
size and the seat belt must always be properly adjusted to provide you and
your passengers with optimum protection.
•Always keep your feet on the footwell when the vehicle is moving; never
rest them on the dash panel, out of the window or on the seat. This is also
applied to passengers. An incorrect sitting position exposes you to an
increased risk of injury in case of a sudden braking or an accident. If the
airbag is triggered, you could sustain severe injuries due to an incorrect
sitting position.•It is important for the driver and front passenger to keep a distance of
at least 25 cm from the steering wheel or dash panel. Failure to respect the
minimum distance means that the airbag will not protect you. Risk of fatal
injury. The distance between the driver and the steering wheel or between
the front passenger and the dash panel should always be as great as
possible.•Adjust the driver or front passenger seat only when the vehicle is
stationary. Otherwise, your seat could move unexpectedly while the
vehicle is moving. This could increase the risk of an accident and therefore,
injury. In addition, while adjusting your seat, you will assume an incorrect
sitting position. Risk of fatal accidents.•Special guidelines apply to installing a child seat on the front
passenger seat. When installing a child seat, please observe the warnings
described in ⇒page 38, “Child safety”.WARNING (continued)
Ibiza ST_EN.book Seite 101 Dienstag, 12. Januar 2010 4:03 16
Page 138 of 250
Driving137
Safety First
Operating instructions
Practical tips
Technical Data
If you select the sport programme,
S, you will drive in a sporty mode, i.e. a
programme in which shifts into high gears are postponed in order to use the
full power of the engine.
Selector lever lock functions
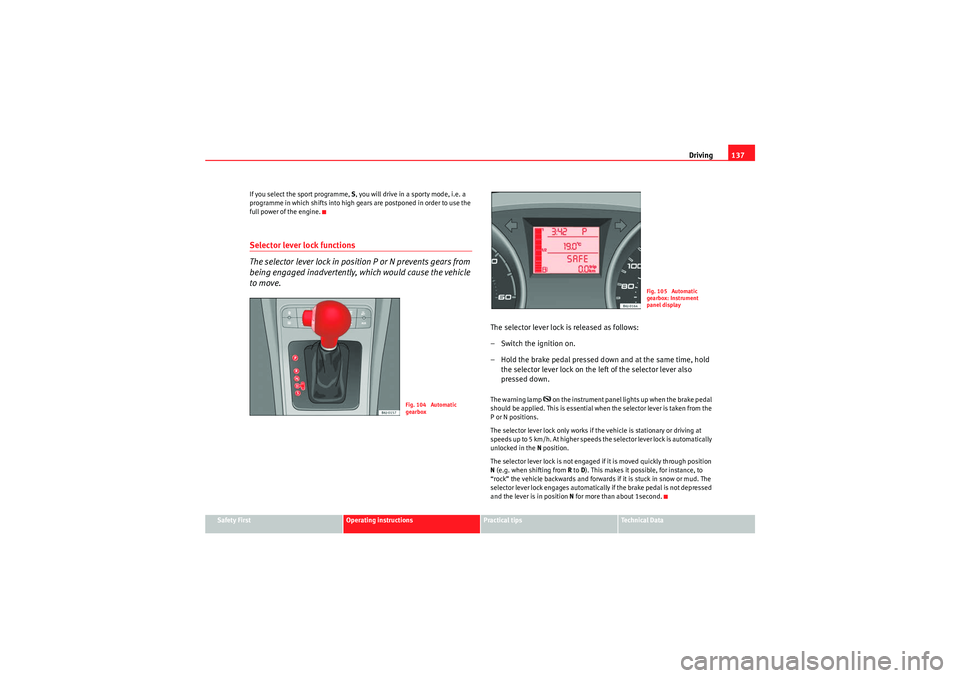
The selector lever lock in positi on P or N prevents gears from
being engaged inadvertently, which would cause the vehicle
to move.
The selector lever lock is released as follows:
– Switch the ignition on.
– Hold the brake pedal pressed down and at the same time, hold
the selector lever lock on the left of the selector lever also
pressed down.The warning lamp
on t he inst ru m e nt pa ne l lig hts up whe n t he bra ke p e dal
should be applied. This is essential when the selector lever is taken from the
P or N positions.
The selector lever lock only works if the vehicle is stationary or driving at
s p e e d s u p t o 5 k m / h . A t h i g h e r s p e e d s t h e s e le c to r le v e r l o ck is a u t o m a t i ca ll y
unlocked in the N position.
The selector lever lock is not engaged if it is moved quickly through position
N (e.g. when shifting from R to D). This makes it possible, for instance, to
“rock” the vehicle backwards and forwards if it is stuck in snow or mud. The
selector lever lock engages automatically if the brake pedal is not depressed
and the lever is in position N for more than about 1second.
Fig. 104 Automatic
gearbox
Fig. 105 Automatic
gearbox: Instrument
panel display
Ibiza ST_EN.book Seite 137 Dienstag, 12. Januar 2010 4:03 16