2009 Seat Ibiza 5D engine
[x] Cancel search: enginePage 202 of 257

If and when
200Snow chains
For technical reasons, snow chains must not be used on the compact tempo-
rary spare wheel.
If you should have a puncture on one of the front wheels when using snow
chains, fit the compact temporary spare in place of one of the rear wheels.
You can then attach the snow chains to the wheel taken from the rear and use
this wheel to replace the punctured front wheel.
WARNING
•The tyre pressures must be checked and corrected as soon as possible.•Do not drive faster than 80 km/h. Higher speeds can cause an accident.•Avoid heavy acceleration, hard braking and fast cornering. Risk of acci-
dent.•Never use two or more compact spare tyres at the same time, risk of
accident.•No other type of tyre (normal summer or winter tyre) may be fitted on
the compact temporary spare wheel rim.
Tyre repair kit*
The tyre repair kit (for vehicles not including a spare wheel) is
stored under the floor panel in the luggage compartment.Your vehicle is equipped with the Tyre Mobility System “Tyre repair kit”.
The tyre repair kit consists of a container with sealing compound to repair the
puncture and a compressor to generate the required tyre pressure. The kit will
reliably seal punctures up to a size of about 4 mm caused by the penetration
of a foreign body into the tyre.
Note
•Seek professional assistance if the repair of a tyre puncture is not
possible with the sealing compound.Wheel changePreparation work
What you must do before changing a wheel.– If you have a flat tyre or puncture, park the vehicle as far away from the flow of traffic as possible. Choose a location that is as
level as possible.
– All passengers should leave the vehicle. They should wait in a safe area (for instance behind the roadside crash barrier).
– Switch the engine off. Switch the hazard warning lights on and place the warning triangles in position.
–Apply the handbrake firmly.
– Engage the first gear, or put the selector lever to position P for
those vehicles with an automatic gearbox.
– If you are towing a trailer, unhitch it from your vehicle.
–Take the vehicle tools and the spare wheel out of the luggage
compartment.
Ibiza_EN.book Seite 200 Montag, 14. September 2009 6:19 18
Page 210 of 257

If and when
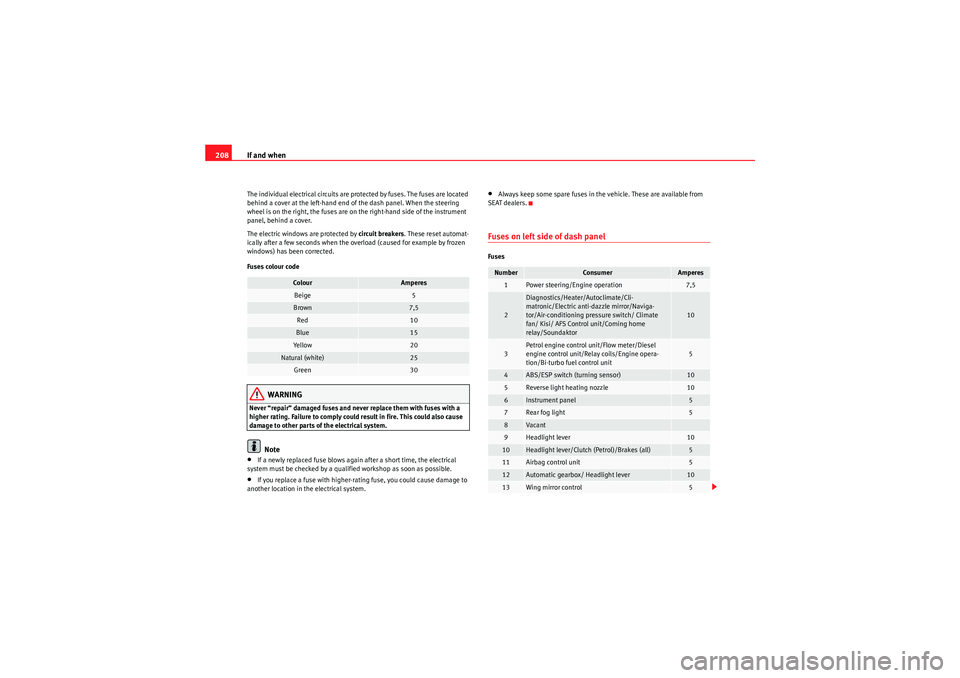
208The individual electrical circuits are protected by fuses. The fuses are located
behind a cover at the left-hand end of the dash panel. When the steering
wheel is on the right, the fuses are on the right-hand side of the instrument
panel, behind a cover.
The electric windows are protected by circuit breakers . These reset automat-
ically after a few seconds when the overload (caused for example by frozen
windows) has been corrected.
Fuses colour code
WARNING
Never “repair” damaged fuses and never replace them with fuses with a
higher rating. Failure to comply could result in fire. This could also cause
damage to other parts of the electrical system.
Note
•If a newly replaced fuse blows again after a short time, the electrical
system must be checked by a qualified workshop as soon as possible.•If you replace a fuse with higher-rating fuse, you could cause damage to
another location in the electrical system.
•Always keep some spare fuses in the vehicle. These are available from
SEAT dealers.Fuses on left side of dash panelFuses
Colour
Amperes
Beige
5
Brown
7,5
Red
10
Blue
15
Ye ll ow
20
Natural (white)
25
Green
30
Number
Consumer
Amperes
1
Power steering/Engine operation
7,5
2
Diagnostics/Heater/Autoclimate/Cli-
matronic/Electric anti-dazzle mirror/Naviga-
tor/Air-conditioning pressure switch/ Climate
fan/ Kisi/ AFS Control unit/Coming home
relay/Soundaktor
10
3
Petrol engine control unit/Flow meter/Diesel
engine control unit/Relay coils/Engine opera-
tion/Bi-turbo fuel control unit
5
4
ABS/ESP switch (turning sensor)
10
5
Reverse light heating nozzle
10
6
Instrument panel
5
7
Rear fog light
5
8
Vaca n t
9
Headlight lever
10
10
Headlight lever/Clutch (Petrol)/Brakes (all)
5
11
Airbag control unit
5
12
Automatic gearbox/ Headlight lever
10
13
Wing mirror control
5
Ibiza_EN.book Seite 208 Montag, 14. September 2009 6:19 18
Page 211 of 257

If and when209
Safety First
Controls and equipment
Practical tips
Technical Data
14
Left-hand AFS headlamps
15
15
Right-hand AFS headlamps
15
16
Va can t
17
Registration plate light /Dimmer /Side light indi-
cator light
5
18
Dimmer
5
19
Electronic control unit
5
20
Indicators
15
21
Lights control, instrument panel
5
22
Electronic control unit, heated mirrors
5
23
Engine injection module/ Rain sensor/ Gear
lever/ Starter relay
7,5
24
Glovebox light, boot light, interior light
10
25
Parking aid
5
26
Towing hook
27
12 Volt Input/Cigarette lighter
15
28
Lambda probe
10
29
Engine power supply
20
30
Petrol engine operation
10
31
Petrol engine operation/Glow plugs/Relay
coil/Bi-turbo electric fan
10
32
Engine control unit
15
33
Clutch switch power supply/preheating relay
5
34
Fuel control unit / Bi-turbo engine supply
15
Number
Consumer
Amperes
35
Heated seats control unit
25
36
Main beam headlight, right
10
37
LHS full beam lamp/Coming Home
10
38
Electric fan motor
30
39
Va can t
40
Va can t
41
Va can t
42
Horn
20
43
Panoramic roof
30
44
Windscreen wipers
20
45
Rear window heater
20
46
Radio/telephone VDA/Bluetooth/Steering col-
umn controls
20
47
Climatronic/autoclimate
5
48
Locking unit
25
49
Front electric window
30
50
Rear electric windows
30
51
Automatic gearbox control unit
30
52
Alarm/Volume sensor
15
53
Electro-kinetic pump relay/bi-turbo fuel control
unit
15
54
Reverse light for automatic gearbox, fog light
15
55
Transformer on
15
Number
Consumer
Amperes
Ibiza_EN.book Seite 209 Montag, 14. September 2009 6:19 18
Page 212 of 257

If and when
210Fuses below steering wheel in relay holderPTC fuses
AUX 1 Fuses
AUX 3 Fuses
Fuses in engine compartment above batteryNon-metal fuses
Some of the electrical items listed in the table are only fitted on certain
models or are optional extras.
Please note that the above list contains all data at the time of going to press,
so it is subject to modifications.
56
Rear windscreen wiper
10
57
Dipped headlight (right side)
15
58
Dipped headlight (left side)
15
Number
Consumer
Amperes
1
Supplementary electrical heating using air
40
2
Supplementary electrical heating using air
40
3
Supplementary electrical heating using air
40
Number
Consumer
Amperes
1
Dipped headlight (left side)
15
2
Dipped headlight (right side)
15
3
Headlight washer pump
20
Number
Consumer
Amperes
1
Trailer control unit
15
2
Trailer control unit
20
3
Trailer control unit
20
Number
Consumer
Amperes
Number
Consumer
Amperes
1
ABS unit
25
2
Electroblower clima heater/fan
30
3
Climate fan
5
4
ABS unit
10
5
Electronic control unit
5
6
Injection module
30
Fig. 132 Fuses in engine
compartment
Ibiza_EN.book Seite 210 Montag, 14. September 2009 6:19 18
Page 221 of 257

If and when219
Safety First
Controls and equipment
Practical tips
Technical Data
– First fit the glass with the fastening tabs over the frame of the
switch. Next press the front part until the two long tabs click on
the support.Additional brake lights*Given the difficulty involved in the replacement of this light it should be done
by the Technical Service.Boot light*
– Extract the tulip shaped fitting by pressing on the inside edge of this -arrow- using the flat side of a screwdriver ⇒fig. 149 .
– Press the lamp sideways and remove from its housing ⇒fig. 150 .Jump-startingJump leads
The jump lead must have a su fficient wire cross section.If the engine fails to start because of a discharged battery, the battery can be
connected to the battery of another vehicle to start the engine.
Fig. 149 Luggage
compartment light
Fig. 150 Luggage
compartment light
Ibiza_EN.book Seite 219 Montag, 14. September 2009 6:19 18
Page 222 of 257

If and when
220Jump leads
Jump leads must comply with the standard DIN 72553 (see manufacturer's
documentation). The wire cross section must be at least 25 mm
2 for petrol
engines and at least 35 mm
2 for diesel engines.
Note
•The vehicles must not touch each other, otherwise electricity could flow as
soon as the positive terminals are connected.•The discharged battery must be properly connected to the vehicle elec-
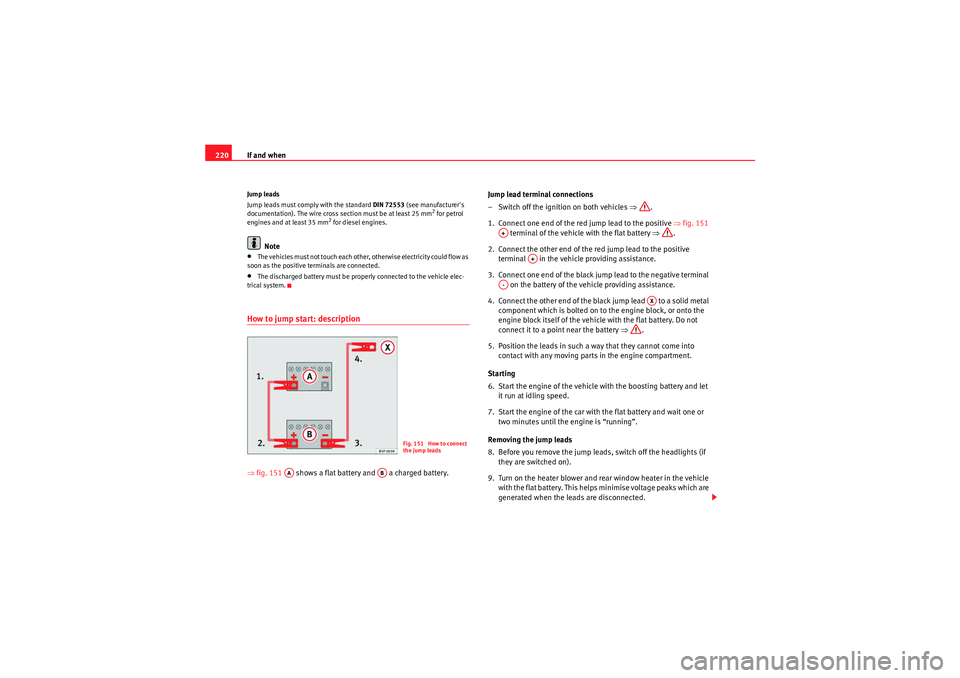
trical system.How to jump start: description⇒ fig. 151 shows a flat battery and a charged battery. Jump lead terminal connections
– Switch off the ignition on both vehicles ⇒
.
1. Connect one end of the red jump lead to the positive ⇒fig. 151
terminal of the vehicle with the flat battery ⇒.
2. Connect the other end of the red jump lead to the positive terminal in the vehicle providing assistance.
3. Connect one end of the black jump lead to the negative terminal on the battery of the vehicle providing assistance.
4. Connect the other end of the black jump lead to a solid metal component which is bolted on to the engine block, or onto the
engine block itself of the vehicle with the flat battery. Do not
connect it to a point near the battery ⇒.
5. Position the leads in such a way that they cannot come into contact with any moving parts in the engine compartment.
Starting
6. Start the engine of the vehicle with the boosting battery and let it run at idling speed.
7. Start the engine of the car with the flat battery and wait one or two minutes until the engine is “running”.
Removing the jump leads
8. Before you remove the jump lead s, switch off the headlights (if
they are switched on).
9. Turn on the heater blower and rear window heater in the vehicle with the flat battery. This helps minimise voltage peaks which are
generated when the leads are disconnected.
Fig. 151 How to connect
the jump leads
AA
AB
A+
A+
A-
AX
Ibiza_EN.book Seite 220 Montag, 14. September 2009 6:19 18
Page 223 of 257

If and when221
Safety First
Controls and equipment
Practical tips
Technical Data
10. When the engine is running, disconnect the leads in reverse
order to the details given above.Connect the battery clamps so they have good metal-to-metal contact with
the battery terminals.
If the engine fails to start, switch off the starter after about 10 seconds and
try again after about half a minute.
WARNING
•Please note the safety warnings referring to working in the engine
compartment ⇒page 178, “Working in the engine compartment”.•The battery providing assistance must have the same voltage as the flat
battery (12V) and approximately the same capacity (see imprint on
battery). Failure to comply could result in an explosion.•Never use jump leads when one of the batteries is frozen. Danger of
explosion! Even after the battery has thawed, battery acid could leak and
cause chemical burns. If a battery freezes, it should be replaced.•Keep sparks, flames and lighted cigarettes away from batteries, danger
of explosion. Failure to comply could result in an explosion.•Observe the instructions provided by the manufacturer of the jump
leads.•Do not connect the negative cable from the other vehicle directly to the
negative terminal of the flat battery. The gas emitted from the battery could
be ignited by sparks. Danger of explosion.•Do not attach the negative cable from the other vehicle to parts of the
fuel system or to the brake line.•The non-insulated parts of the battery clamps must not be allowed to
touch. The jump lead attached to the positive battery terminal must not
touch metal parts of the vehicle, this can cause a short circuit.•Position the leads in such a way that they cannot come into contact
with any moving parts in the engine compartment.
•Do not bend over the batteries. This could result in chemical burns.Note
The vehicles must not touch each other, otherwise electricity could flow as
soon as the positive terminals are connected.
WARNING (continued)
Ibiza_EN.book Seite 221 Montag, 14. September 2009 6:19 18
Page 224 of 257

If and when
222Towing and tow-startingTo w - s t a r t i n g *
The use of jump leads is preferable to tow-starting.We recommend that you do not tow-start your vehicle. Jump-starting
is preferable ⇒ page 219.
However, if your vehicle has to be tow-started:
– Engage the 2
nd or the 3
rd gear.
– Keep the clutch pressed down.
– Switch the ignition on.
– Once both vehicles are moving, release the clutch.
– As soon as the engine starts, press the clutch and move the gear lever into neutral. This helps to prevent driving into the towing
vehicle.
WARNING
The risk of accidents is high when tow-starting. The vehicle being towed
can easily collide with the towing vehicle.
Caution
When tow-starting, fuel could enter the catalytic converter and damage it.
CommentsPlease observe the following points if you use a tow-rope:
Notes for the driver of the towing vehicle
– Drive slowly at first until the tow-rope is taut. Then accelerate gradually.
– Begin and change gears cautiously. If you are driving an auto- matic vehicle, accelerate gently.
– Remember that the brake servo and power steering are not working in the vehicle you are towing. Brake earlier than you
would normally, but with a more gentle pressure on the brake.
Notes for the driver of the towed vehicle
– Ensure that the tow-rope remains taut at all times when towing.Tow-rope or tow-bar
It is easier and safer to tow a vehicle with a tow-bar. You should only use a
tow-rope if you do not have a tow-bar.
A tow-rope should be slightly elastic to reduce the loading on both vehicles.
It is advisable to use a tow-rope made of synthetic fibre or similarly elastic
material.
Attach the tow-rope or the tow-bar only to the towing eyes provided or a
towing bracket.
Driving style
Towing requires some experience, especially when using a tow-rope. Both
drivers should be familiar with the technique required for towing. Inexperi-
enced drivers should not attempt to tow-start or tow away another vehicle.
Ibiza_EN.book Seite 222 Montag, 14. September 2009 6:19 18