Page 9 of 60
.
aRefit clips (4) .
III - FINAL OPERATION.
aRefit the interior light and sunro")
71A-6
BODY INTERNAL TRIM
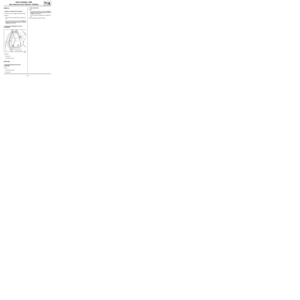
Headlining: Removal - Refitting
71A
aRefit the headlining (this operation requires two peo-
ple).
aRefit clips (4) .
III - FINAL OPERATION.
aRefit the interior light and sunroof wiring harnesses
(depending on equipment level).
aConnect the interior light and sunroof connectors (3)
(depending on equipment level).
aRefit:
-the interior lights (see Interior light: Removal -
Refitting) (MR 411, 81B, Interior lights),
-the sun visors (see Sun visor: Removal - Refit-
ting) (MR 412, 57A, Interior equipment),
-the windscreen pillar trims (see 71A, Body inter-
nal trim, Windscreen pillar trim: Removal - Re-
fitting, page 71A-9) ,
-the rear quarter panel trims (see 71A, Body inter-
nal trim, Quarter panel trim: Removal - Refit-
ting, page 71A-12) .
-the B-pillar upper trims (see 71A, Body internal
trim, B-pillar upper trim: Removal - Refitting,
page 71A-10) ,
-the rear panel trims (see 71A, Body internal trim,
Rear panel lining: Removal - Refitting, page
71A-14) ,
-the rear parcel shelf side trim panels (see 71A,
Body internal trim, Rear parcel shelf side trim:
Removal - Refitting, page 71A-15) ,
-the rear bench seatback (depending on equipment
level) (see 76A, Rear seat frames and mecha-
nisms, Rear bench seatback: Removal - Refit-
ting, page 76A-5) (MR 412, 76A, Rear seat frame
and runners),aRefit:
-the sunroof switch plate (see Sunroof switch: Re-
moval - Refitting) (MR 411, 87D, Electric window
winders - Sunroof),
-the sunroof finishing seal (2) .
aFit the sun visor headlining cross member mounting
trim piece (1) .
aRefit the front side door and tailgate seals.
aConnect the battery (see Battery: Removal - Refit-
ting) (MR 411, 80A, Battery).
aUnlock the airbag computer using Diagnostic tool
(see Fault finding - Replacement of components)
(MR 413, 88C, Airbags and pretensioners). OPENING ROOF
OPENING ROOF
Page 10 of 60

71A-7
BODY INTERNAL TRIM
Front door sill lining: Removal - Refitting
71A
REMOVAL
I - REMOVAL PREPARATION OPERATION
aUnclip the bonnet release catch.
aPartially remove the front side door seal.
aRemove:
-the front seat belt lower mounting (see Front seat
belt: Removal - Refitting) (MR 412, 59A, Safety
equipment),
-the rear parcel shelf side trim (see 71A, Body in-
ternal trim, Rear parcel shelf side trim: Removal
- Refitting, page 71A-15) ,
-the rear panel trim (see 71A, Body internal trim,
Rear panel lining: Removal - Refitting, page
71A-14) .II - OPERATION FOR REMOVAL OF PART
CONCERNED
aUnclip the front door sill lining.
REFITTING
I - REFITTING OPERATION FOR PART
CONCERNED
aClip on the front door sill lining.
II - FINAL OPERATION.
aRefit:
-the rear panel trim (see 71A, Body internal trim,
Rear panel lining: Removal - Refitting, page
71A-14) ,
-the rear parcel shelf side trim (see 71A, Body in-
ternal trim, Rear parcel shelf side trim: Removal
- Refitting, page 71A-15) ,
-the front seat belt lower mounting (see Front seat
belt: Removal - Refitting) (MR 412, 59A, Safety
equipment),
-the front side door seal.
aFit the bonnet release catch.
121144
121143
Note:
The front seat does not need to be removed to
remove the front door sill lining.
Page 11 of 60
71A-8
BODY INTERNAL TRIM
Rear wheel arch trim: Removal - Refitting
71A
REMOVAL
I - REMOVAL PREPARATION OPERATION
aPartially remove the luggage compartment carpet.
aRemove:
-the rear parcel shelf (depending on equipment le-
vel),
-the rear parcel shelf side trim (see 71A, Body in-
ternal trim, Rear parcel shelf side trim: Removal
- Refitting, page 71A-15) .
II - OPERATION FOR REMOVAL OF PART
CONCERNED
aRemove:
-the clips (1) ,
-the wheel arch lining.
REFITTING
I - REFITTING OPERATION FOR PART
CONCERNED
aRefit:
-the wheel arch lining,
-the clips (1) .II - FINAL OPERATION.
aRefit:
-the rear parcel shelf side trim (see 71A, Body in-
ternal trim, Rear parcel shelf side trim: Removal
- Refitting, page 71A-15) ,
-the rear parcel shelf (depending on equipment le-
vel).
aRefit the luggage compartment carpet.
121221
Page 12 of 60
71A-9
BODY INTERNAL TRIM
Windscreen pillar trim: Removal - Refitting
71A
REMOVAL
I - REMOVAL PREPARATION OPERATION
aPartially remove the front side door seal.
II - OPERATION FOR REMOVAL OF PART
CONCERNED
aUnclip the windscreen pillar trim in the direction and
order shown.
REFITTING
I - REFITTING OPERATION FOR PART
CONCERNED
aRefit the windscreen pillar trim.
II - FINAL OPERATION.
aRefit the front side door seal.
121716
Page 13 of 60
71A-10
BODY INTERNAL TRIM
B-pillar upper trim: Removal - Refitting
71A
REMOVAL
I - REMOVAL PREPARATION OPERATION
aPartially remove the door seal.
aRemove:
-the seat belt return reel (1) (see Front seat belt:
Removal - Refitting) (MR 412, 59A, Safety equip-
ment),
-the rear panel trim (see 71A, Body internal trim,
Rear panel lining: Removal - Refitting, page
71A-14) .II - OPERATION FOR REMOVAL OF PART
CONCERNED
aUnclip:
-the covers (2) ,
-the B-pillar upper trim at (2) .
aRemove the B-pillar upper trim.
121071
121076
121077
Page 14 of 60
71A-11
BODY INTERNAL TRIM
B-pillar upper trim: Removal - Refitting
71A
REFITTING
I - REFITTING OPERATION FOR PART
CONCERNED
aRefit the B-pillar upper trim.
aFit the B-pillar upper trim at (2) .
II - FINAL OPERATION.
aRefit:
-the rear panel trim (see 71A, Body internal trim,
Rear panel lining: Removal - Refitting, page
71A-14) ,
-the seat belt return reel (1) (see Front seat belt:
Removal - Refitting) (MR 412, 59A, Safety equip-
ment),
-the door seal.
Page 15 of 60
71A-12
BODY INTERNAL TRIM
Quarter panel trim: Removal - Refitting
71A
REMOVAL
I - REMOVAL PREPARATION OPERATION
aPull the rear seats down or remove the rear bench
seatback (depending on equipment level) (see 76A,
Rear seat frames and mechanisms, Rear bench
seatback: Removal - Refitting, page 76A-5) .
aRemove:
-the rear parcel shelf side trim (see 71A, Body in-
ternal trim, Rear parcel shelf side trim: Removal
- Refitting, page 71A-15) ,
-the rear panel trim (see 71A, Body internal trim,
Rear panel lining: Removal - Refitting, page
71A-14) .
aRemove the rear seat belt return reel (see Rear seat
belt: Removal - Refitting) (MR 412, 59A, Safety
equipment).aPartially remove the luggage compartment seal. (1)
II - OPERATION FOR REMOVAL OF PART
CONCERNED
aRemove the bolt (2) .
aUnclip the rear quarter panel trim.
aRemove the rear quarter panel trim.
121065
121068
121067
Page 16 of 60
71A-13
BODY INTERNAL TRIM
Quarter panel trim: Removal - Refitting
71A
REFITTING
I - REFITTING OPERATION FOR PART
CONCERNED
aRefit the rear quarter panel lining.
aClip the rear quarter panel trim.
aRefit the bolt (2) .
II - FINAL OPERATION.
aRefit:
-the luggage compartment seal, (1)
-the rear seat belt return reel (see Rear seat belt:
Removal - Refitting) (MR 412, 59A, Safety equip-
ment),
-the rear panel trim (see 71A, Body internal trim,
Rear panel lining: Removal - Refitting, page
71A-14) ,
-the rear parcel shelf side trim (see 71A, Body in-
ternal trim, Rear parcel shelf side trim: Removal
- Refitting, page 71A-15) .
aPull the rear seats down or refit the rear bench seat-
back (depending on equipment level) (see 76A,
Rear seat frames and mechanisms, Rear bench
seatback: Removal - Refitting, page 76A-5) .


 (see Front se")
 .
II -")

