2009 PORSCHE PANAMERA page 42
[x] Cancel search: page 42Page 123 of 343

Instrument Panel and Multi-Function Display
121
Oil level
Display and measurement of the engine oil
level
Caution!
Risk of engine damage.
f Regularly check the oil level each time before
refuelling.
f Do not allow the oil level to fall below the minimum mark.
Prerequisites for the oil-level gauge:
– Ignition is switched on or
Engine is running while the vehicle is stationary
or in motion.
– After opening the hood, the oil level can only be measured after driving for at least 6 miles
(10 km).
Activate the “Oil level” function on the
multi-function display
f Please see the chapter “OVERVIEW OF
WARNING MESSAGES” on page 152. Measured oil level
The oil level reading is
shown on the segment
display in the oil level menu.
If the segments are filled in up to the top line,
the oil level has reached the maximum mark.
f Under no circumstances add engine oil.
If the bottom segment is filled in, the oil level has
reached the minimum mark.
The message “Check Minimum reached” appears
on the multi-function display.
f Add engine oil immediately. If the bottom segment is red, the oil level has
dropped below the minimum mark.
The message “Oil level below minimum” appears
on the multi-function display.
f
Add engine oil immediately.
Top-up quantity
The difference between the minimum and
maximum marks on the segment display is
approx. 1 litre.
One segment of the display corresponds to
a top-up quantity of approx. 0.26 US quarts
(0.25 liters).
f Never add more engine oil than required to
reach the maximum mark.
1.Select
> “Vehicle ”
> “Oil level” and confirm.
Page 125 of 343

Instrument Panel and Multi-Function Display
123
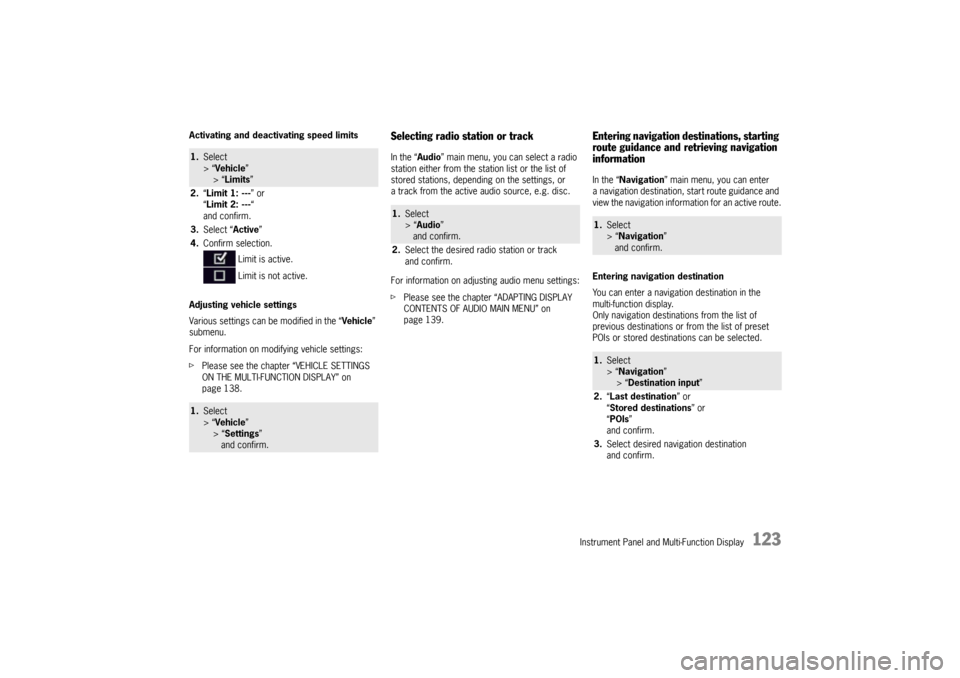
Activating and deactivating speed limits
Adjusting vehicle settings
Various settings can be modified in the “Vehicle”
submenu.
For information on modifying vehicle settings:
f Please see the chapter “VEHICLE SETTINGS
ON THE MULTI-FUNCTION DISPLAY” on
page 138.
Selecting radio station or trackIn the “ Audio” main menu, you can select a radio
station either from the st ation list or the list of
stored stations, depending on the settings, or
a track from the active audio source, e.g. disc.
For information on adjusting audio menu settings:
f Please see the chapter “ADAPTING DISPLAY
CONTENTS OF AUDIO MAIN MENU” on
page 139.
Entering navigation destinations, starting
route guidance and retrieving navigation
informationIn the “ Navigation” main menu, you can enter
a navigation destination, start route guidance and
view the navigation information for an active route.
Entering navigation destination
You can enter a navigatio n destination in the
multi-function display.
Only navigation destinations from the list of
previous destinations or from the list of preset
POIs or stored destinations can be selected.
1. Select
> “Vehicle ”
> “ Limits ”
2. “Limit 1: --- ” or
“ Limit 2: --- “
and confirm.
3. Select “ Active”
4. Confirm selection.
Limit is active.
Limit is not active.1.Select
> “Vehicle ”
> “ Settings ”
and confirm.
1. Select
> “Audio”
and confirm.
2. Select the desired radio station or track
and confirm.
1.Select
> “Navigation”
and confirm.1. Select
> “Navigation”
> “ Destination input ”
2. “Last destination ” or
“ Stored destinations” or
“ POIs ”
and confirm.
3. Select desired navigation destination
and confirm.
Page 129 of 343

Instrument Panel and Multi-Function Display
127
Tire Pressure Monitoring (TPM)Each tire should be checked monthly when cold
and inflated to the inflation pressure
recommended by Porsche on the tire inflation
pressure label.
For information on the tire inflation pressure label:
fPlease see the chapter “TIRES AND WHEELS”
on page 280.
As an added safety feature, your vehicle has been
equipped with a tire pressure monitoring system
(TPM) that illuminates a low tire pressure telltale
(warning light) when one or more of your tires is
significantly under-inflated.
Accordingly, when the low tire pressure telltale
illuminates, you should stop and check your tires
as soon as possible, an d inflate them to the
proper pressure. Driving on a significantly under-
inflated tire causes the tire to overheat and can
lead to tire failure. Under-inflation also reduces
fuel efficiency and tire tread life, and may affect
the vehicle’s handling and stopping ability.
However, the tire pressure must still be set
manually on the wheel.
f Please see the chapter “TIRE PRESSURE FOR
COLD TIRES (68 °F/20 °C)” on page 326.
Danger!
Risk of serious personal injury or death.
Driving the vehicle with low tire pressure
increases the risk of a tire failure and
resulting loss of control. Furthermore, low
tire pressure increases rate of wear of the
affected tires.
Please note that the Tire Pressure Monitoring
is not a substitute for proper tire
maintenance, and it is the driver's
responsibility to maintain correct tire
pressure, even if under-inflation has not
reached the level to trigger illumination of
Tire Pressure Monitoring low tire pressure
telltale. Low tire pressure reduces the road
safety of the vehicle and destroys the tire and
wheel.
Tire Pressure Monitoring gives a warning
about tire damage caused by a natural loss
in pressure as well as about a gradual loss of
pressure caused by foreign objects.
Tire Pressure Monitoring cannot warn you
about tire damage that occurs suddenly (e.g.
flat tire due to abrupt external effects).
f When a red tire pressure warning appears,
stop immediately in a suitable place and check
the tires for damage. If necessary, remedy the
damage with a tire sealant.
f Do not by any means continue to drive with
defective tires. f
Sealing the tire with tire sealant is only an
emergency repair so you can drive to the
nearest specialist workshop.
The permitted top speed is 50 mph
(80 km/h) .
f Do not drive with tires in which the tire
pressure drops again very quickly. In case of
doubt, have tires checked by a specialist
workshop.
f Defective tires must be replaced immediately
at an authorized Porsche dealer.
Tires must never be repaired under any
circumstances.
f If Tire Pressure Monitoring is defective
(e.g. defective wheel transmitter), contact an
authorized Porsche dealer immediately and
have the damage repaired.
The tire pressure will not be monitored at all
or will be monitored only partially when Tire
Pressure Monitoring is defective.
For information on warning messages on the multi-
function display:
f Please see the chapter “OVERVIEW OF
WARNING MESSAGES” on page 152.
f Incomplete entries or selection of the wrong
tires on the multi-function display affect the
accuracy of warnings and messages.
The settings in the tire pressure menu must be
updated following a wheel change or changes
in vehicle loading.
Page 133 of 343

Instrument Panel and Multi-Function Display
131
Selecting “Comfort pressure” in the
Tire pressure menu
Available setting options:
–“Comfort ”
–“ Standard ” For speeds up to 100 mph (160 km/h), the tire
pressures can be reduced to increase driving
comfort.
The Tire Pressure Monitoring system must be set
to the applicable tire pressure (comfort pressure
or standard pressure).
If you selected “
Comfort press.”, the TPM
system automatically uses lower pressure values
when monitoring tire pressures.
The comfort tire pressures are included in the
technical data or under “Fill info” in the Tire
pressure menu, you can compare the pressure
differences (e.g. 4.4 psi (+0.3 bar)) with the
“Comfort pressures”.
For tires that have not ye t been learned, the new
required tire pressures are displayed instead of
the actual tire pressures.
For information on learning the tires:
f Please see the chapter “SYSTEM LEARNING”
on page 134.
Caution!
Tires are inflated to comfort pressure at the
factory, which is not suitable for driving at
very high speeds. Comfort pressure speed warning
If the maximum speed of the preset comfort
pressure is exceeded, a warning message
appears on the multi-function display.
Warning!
Risk of accident when exceeding the
maximum speed.
Driving at excessive speeds when the comfort
pressure is active will destroy the tires.
f Never exceed the speed specified on the
warning message.
f Always set the standard tire pressure when driving at higher speeds.
1.Select
> “Tire pressure”
2. “Comfort press. ”
and confirm.
3. Select required pressure
and confirm.
Page 134 of 343

132
Instrument Panel and Multi-Function Display
Selecting settings in the Tire pressure menu
(type and size of fitted tire)
Warning!
Risk of accident due to excessive speed. This
could lead to serious personal injury or
death.
f Always observe the permissible maximum
speed of the respective tire.
f Exceeding maximum tire speed could result in
a tire burst, causing loss of control of the
vehicle. This could lead to serious personal
injury or death.
Moreover, Porsche recommends obeying all
traffic laws at all times to maintain the safety of yourself and all vehicle occupants. Warning!
Incomplete entries or selection of the wrong
tires on the multi-function display affect
correct indication of warnings and
messages.
f The settings must be updated in the “Tire
pressure ” menu after changing a wheel, filling
with tire sealant or adding air (after previous
warning “ Tire pressure!”).
f Please see the chapter “RED WARNING – TIRE PRESSURE!” on page 133. The new tire type and tire
size must be selected
even if the settings for the new set of wheels are
the same as for the old wheels.
Available setting options:
–“ 18 inch ”
–“ 19 inch ”
–“ 20 inch ”
Tire selection has only been successfully
completed when the following message appears
on the multi-function display (example).
“Summer tires 19-inch was set. No monitoring,
system is learning”.
f Please see the chapter “SYSTEM LEARNING”
on page 134. Notes
The message “Action cancelled” appears if the
setting process is interrupted. All entries made up
to this point are lost, and the original settings
remain in effect.
Before fitting tires with dimensions that are not
already stored in the mult
i-function display, the
missing information should be added to the
multi-function display.
f Please contact a qualified specialist workshop.
We recommend that you have an authorized
Porsche dealer to do this work as they have
trained workshop personnel and the necessary
parts and tools.
f Use only tires approved by Porsche.
The available items in the tire pressure menu
depend on the model type. For this reason it is
possible that some of the selection options shown
here are not available on your multi-function
display.
1. Select
> “Tire pressure ”
2. “Adjust ”
and confirm.
3. Select “ Summer tires ” or
“ Winter tires ” or
“ All-season ”
and confirm.
4. Select the tire size
and confirm.
Page 137 of 343

Instrument Panel and Multi-Function Display
135
No monitoringIn the event of faults, Tire Pressure Monitoring
cannot monitor the tire pressure.
The warning light on the instrument panel lights up
and a corresponding message appears on the
multi-function display.
Monitoring is not active:
– if Tire Pressure Monitoring is faulty,
– if wheel transmitters for Tire Pressure Monitoring are missing,
– during the learning phase after the tire settings have been updated,
– after a wheel change without updating the tire settings,
– if more than four wheel transmitters are recognized,
– if there is external interference by other radio sources, e.g. wireless headphones,
– if tire temperatures are too high.
f Please see the chapter “OVERVIEW OF
WARNING MESSAGES” on page 152.
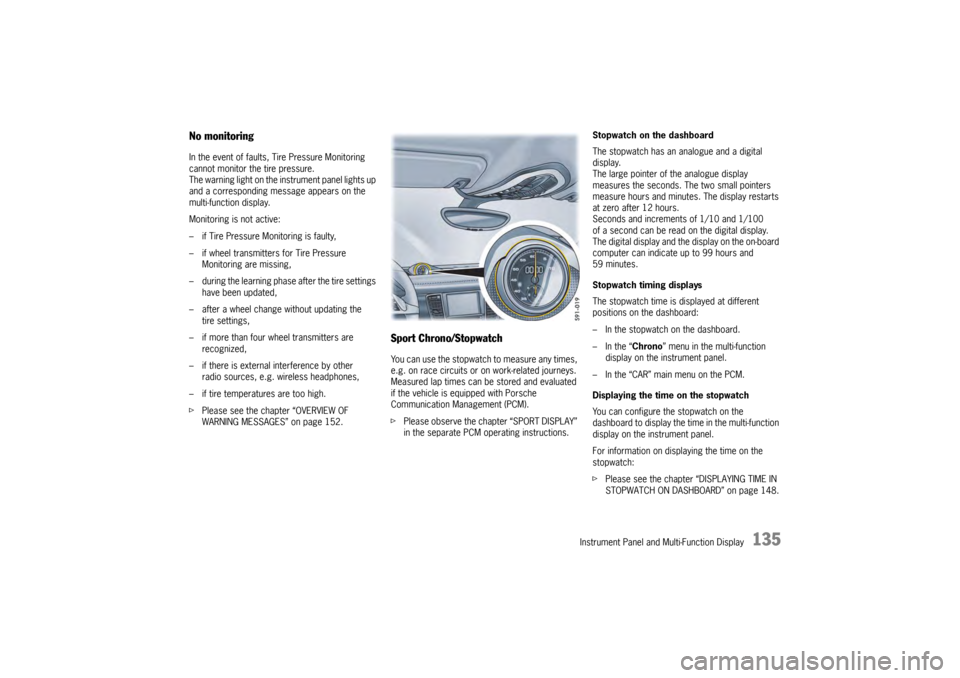
Sport Chrono/StopwatchYou can use the stopwatch to measure any times,
e.g. on race circuits or on work-related journeys.
Measured lap times can be stored and evaluated
if the vehicle is equipped with Porsche
Communication Management (PCM).
fPlease observe the chapter “SPORT DISPLAY”
in the separate PCM operating instructions. Stopwatch on the dashboard
The stopwatch has an analogue and a digital
display.
The large pointer of the analogue display
measures the seconds. The two small pointers
measure hours and minutes. The display restarts
at zero after 12 hours.
Seconds and increments of 1/10 and 1/100
of a second can be read on the digital display.
The digital display and the
display on the on-board
computer can indicate up to 99 hours and
59 minutes.
Stopwatch timing displays
The stopwatch time is displayed at different
positions on the dashboard:
– In the stopwatch on the dashboard.
– In the “ Chrono” menu in the multi-function
display on the instrument panel.
– In the “CAR” main menu on the PCM.
Displaying the time on the stopwatch
You can configure the stopwatch on the
dashboard to display the ti me in the multi-function
display on the instrument panel.
For information on displaying the time on the
stopwatch:
f Please see the chapter “DISPLAYING TIME IN
STOPWATCH ON DASHBOARD” on page 148.
Page 138 of 343

136
Instrument Panel and Multi-Function Display
Sport Chrono on multi-function display
All stopwatch displays are started and stopped in
the “Chrono” menu on the multi-function display.
For instructions on using the multi-function
display:
f
Please see the chapter “OPERATING THE
MULTI-FUNCTION DISPLAY IN THE
INSTRUMENT PANEL” on page 115.
Notes on operation
If you exit the “Chrono ” menu while the stopwatch
is running, measurement will continue.
The stopwatch stops after the ignition is switched
off. If the ignition is switched on again within
approximately 4 minutes, the stopwatch will
continue to run.
The only way to reset th e stopwatch to zero is
by selecting “ Reset” in the “ Chrono” menu.
For information on re setting the stopwatch:
f Please see the chapter “RESETTING THE
STOPWATCH TIME” on page 137.
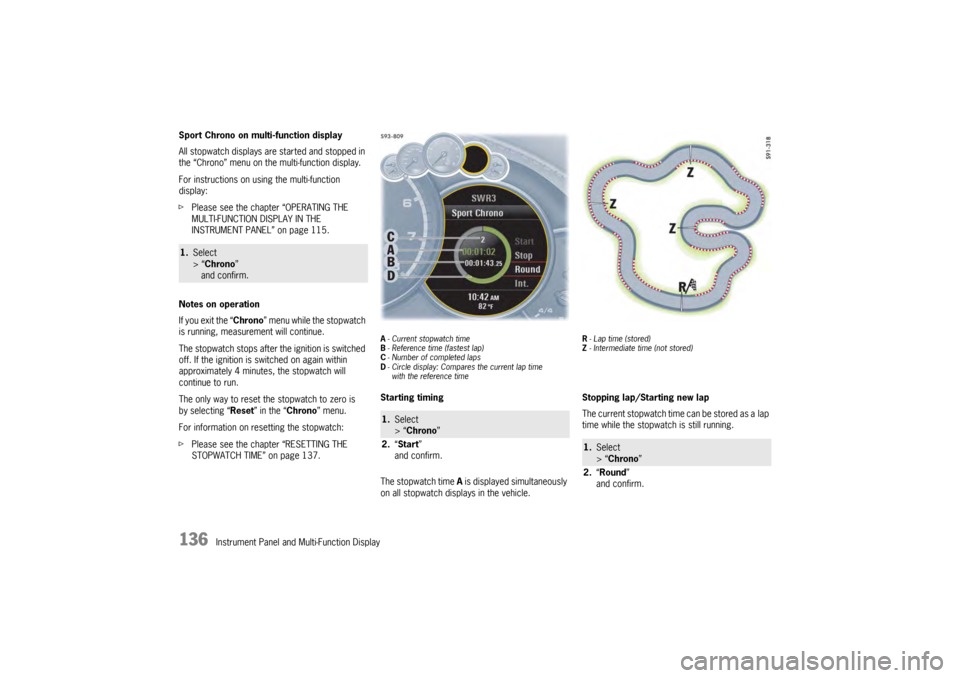
A- Current stopwatch time
B - Reference time (fastest lap)
C - Number of completed laps
D - Circle display: Compares the current lap time
with the reference timeStarting timing
The stopwatch time A is displayed simultaneously
on all stopwatch displays in the vehicle.
R - Lap time (stored)
Z - Intermediate time (not stored)Stopping lap/Starting new lap
The current stopwatch time can be stored as a lap
time while the stopwatch is still running.
1. Select
> “Chrono”
and confirm.
1. Select
> “Chrono”
2. “Start”
and confirm.
1. Select
> “Chrono ”
2. “Round ”
and confirm.
Page 140 of 343

138
Instrument Panel and Multi-Function Display
Vehicle Settings on the Multi-
Function DisplayDifferent settings can be adjusted in the
multi-function display on the instrument panel
depending on the vehicle equipment.
On vehicles with comfort memory, the settings are
stored on the car key or the person buttons in the
driver’s door.
For information on the comfort memory:
fPlease see the chapter “COMFORT MEMORY”
on page 40.
Selecting settings menu
Setting optionsThe following vehicle functions can be adapted
individually:
–“ Display ”
Adapt the appearance of the multi-function
display, see page 139.
–“ Light/Visibility ”
Adjust the vehicle lighting, wipers and
reversing options, see page 142.
–“ Locking ”
Adjust the locking settings, see page 145.
–“ Air conditioning ”
Adapt the air conditioning, see page 146.
–“ Date/time ”
Set the date and time, see page 147.
–“ Units ”
Set the units of measurement on the
instruments and display, see page 149.
–“ Language”
Set the language of the multi-function display
and the instrument panel, see page 150. –“
Volume ”
Adjust the volume of the warning and
information tones, see page 150.
–“ Steering wheel operation”
Change the MFS button assignment on the
multi-function steering wheel, see page 151.
–“ Reset ”
Reset to factory settings, see page 139.
Selecting setting options or activating
vehicle functionsA symbol positioned in front of a setting option
indicates whether the option is selected or
a vehicle function is activated.
Selecting one of several options
Option is selected.
Option is not selected.
Activating and deactivating functions Function is activated.
Function is deactivated.
1.Select
> “Vehicle ”
> “ Settings ”
and confirm.