2009 PORSCHE PANAMERA stop start
[x] Cancel search: stop startPage 126 of 343

124
Instrument Panel and Multi-Function Display
Starting route guidance
If route guidance is inactive and you have entered
a new navigation destination you can then start
route guidance.
Stopping route guidance
You can stop route guidance while in progress.
Displaying and modifying the
navigation mapIn the “
Map” main menu, you can view and modify
the map display on the navigation system.
Modifying map display
Available display options:
–“ Auto zoom ”
The scale of the map is set automatically from
the current position of the vehicle to the next
navigation maneuver point.
–“ 3D map ”
Three-dimensional map display.
–“ North up ”
The map always faces north. Enlarging and reducing map display
The zoom factor of the map display can be
adapted individually.
Displaying current location or destination
You can view the navigation destination or
current vehicle position on an enlarged section
of the map.
1.
Select
> “Navigation”
2. “Start route guidance ”
and confirm.1. Select
> “Navigation”
2. “Stop route guidance ”
and confirm.
1. Select
> “Map ” 1.Select
> “Map ”
and confirm.
2. Select display option
and confirm.
3. Confirm selection.
Function is active.
Function is not active.
1.Select
> “Map ”
> “Manual zoom ”
and confirm.
2. Select the desired zoom setting
and confirm.1.Select
> “Map ”
2. “Show destination ” or
“ Show position ”
and confirm.
Page 137 of 343
Instrument Panel and Multi-Function Display
135
No monitoringIn the event of faults, Tire Pressure Monitoring
cannot monitor the tire pressure.
The warning light on the instrument panel lights up
and a corresponding message appears on the
multi-function display.
Monitoring is not active:
– if Tire Pressure Monitoring is faulty,
– if wheel transmitters for Tire Pressure Monitoring are missing,
– during the learning phase after the tire settings have been updated,
– after a wheel change without updating the tire settings,
– if more than four wheel transmitters are recognized,
– if there is external interference by other radio sources, e.g. wireless headphones,
– if tire temperatures are too high.
f Please see the chapter “OVERVIEW OF
WARNING MESSAGES” on page 152.
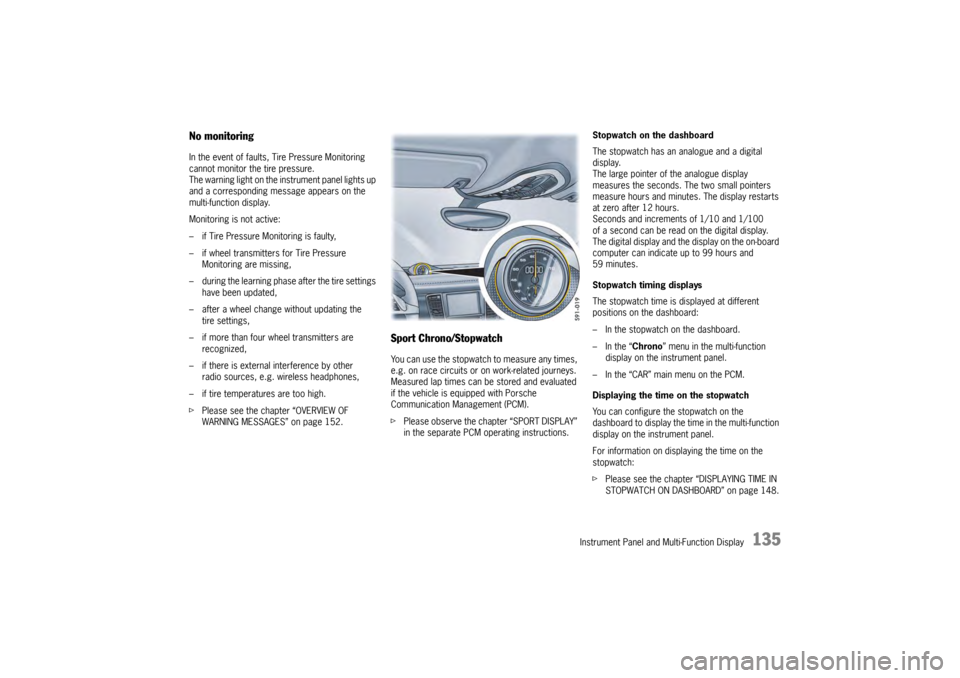
Sport Chrono/StopwatchYou can use the stopwatch to measure any times,
e.g. on race circuits or on work-related journeys.
Measured lap times can be stored and evaluated
if the vehicle is equipped with Porsche
Communication Management (PCM).
fPlease observe the chapter “SPORT DISPLAY”
in the separate PCM operating instructions. Stopwatch on the dashboard
The stopwatch has an analogue and a digital
display.
The large pointer of the analogue display
measures the seconds. The two small pointers
measure hours and minutes. The display restarts
at zero after 12 hours.
Seconds and increments of 1/10 and 1/100
of a second can be read on the digital display.
The digital display and the
display on the on-board
computer can indicate up to 99 hours and
59 minutes.
Stopwatch timing displays
The stopwatch time is displayed at different
positions on the dashboard:
– In the stopwatch on the dashboard.
– In the “ Chrono” menu in the multi-function
display on the instrument panel.
– In the “CAR” main menu on the PCM.
Displaying the time on the stopwatch
You can configure the stopwatch on the
dashboard to display the ti me in the multi-function
display on the instrument panel.
For information on displaying the time on the
stopwatch:
f Please see the chapter “DISPLAYING TIME IN
STOPWATCH ON DASHBOARD” on page 148.
Page 138 of 343
136
Instrument Panel and Multi-Function Display
Sport Chrono on multi-function display
All stopwatch displays are started and stopped in
the “Chrono” menu on the multi-function display.
For instructions on using the multi-function
display:
f
Please see the chapter “OPERATING THE
MULTI-FUNCTION DISPLAY IN THE
INSTRUMENT PANEL” on page 115.
Notes on operation
If you exit the “Chrono ” menu while the stopwatch
is running, measurement will continue.
The stopwatch stops after the ignition is switched
off. If the ignition is switched on again within
approximately 4 minutes, the stopwatch will
continue to run.
The only way to reset th e stopwatch to zero is
by selecting “ Reset” in the “ Chrono” menu.
For information on re setting the stopwatch:
f Please see the chapter “RESETTING THE
STOPWATCH TIME” on page 137.
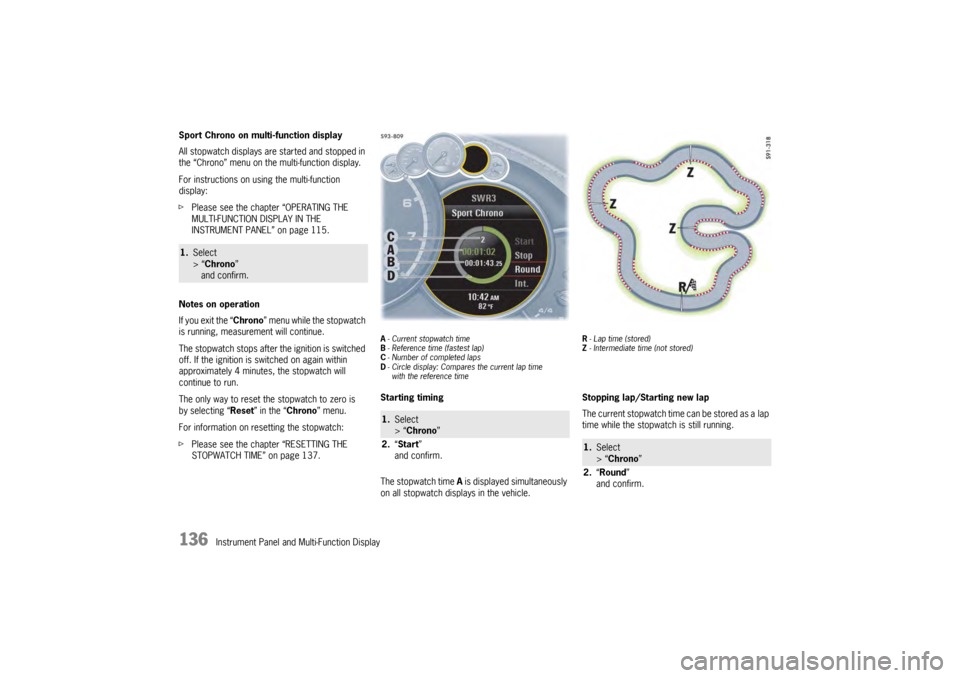
A- Current stopwatch time
B - Reference time (fastest lap)
C - Number of completed laps
D - Circle display: Compares the current lap time
with the reference timeStarting timing
The stopwatch time A is displayed simultaneously
on all stopwatch displays in the vehicle.
R - Lap time (stored)
Z - Intermediate time (not stored)Stopping lap/Starting new lap
The current stopwatch time can be stored as a lap
time while the stopwatch is still running.
1. Select
> “Chrono”
and confirm.
1. Select
> “Chrono”
2. “Start”
and confirm.
1. Select
> “Chrono ”
2. “Round ”
and confirm.
Page 153 of 343

Instrument Panel and Multi-Function Display
151
Adjusting volume of warning tones
The volume of the warning tones can be adjusted
individually.
Available setting options:
–“Loud ”
–“ Medium”
–“ Low ”
Changing button assignment on multi-
function steering wheelThe assignment of the MFS button on the multi-
function display can be changed individually.
Functions from the multi-function display or PCM
can be assigned to the MFS button.
Available PCM functions:
–“Source change ”
Change audio source.
–“ Voice control ”
Activate voice control.
–“ Dri. instr. (Rep) “
Repeat voice instruction from the navigation
system.
–“ Station/track < ”
Previous radio station/title.
–“ Station/track > ”
Next radio station/track. –“
Map ”
Display navigation map in PCM.
–“ Menu change ”
Change main menu area.
Available instrument cluster functions:
–“ Start/Stop Chr. ”
Start/stop timing.
–“ Vehicle menu ”
Display vehicle menu.
–“ Tr i p m e n u ”
Display trip menu.
–“ TPM menu ”
Display TPM menu.
–“ Chrono menu”
Display chrono menu.
–“ ACC menu ”
Display ACC menu.
–“ Audio menu ”
Display audio menu.
–“ Phone menu ”
Display telephone menu.
–“ Navi menu ”
Display navigation menu.
–“ Map menu ”
Display navigation map on the multi-function
display.
1. Select
> “Vehicle ”
> “ Settings ”
> “Volume ”
2. “Warn. tones ”.
3. Select desired setting
and confirm.
1.Select
> “Vehicle ”
> “Settings ”
> “ Steering wheel op. ”
2. “Multif. key ”
and confirm.
3. Select “PCM function” or
“ Inst. clus. fun. ”
and confirm.
4. Select desired function assignment
and confirm.
Page 156 of 343
154
Instrument Panel and Multi-Function Display
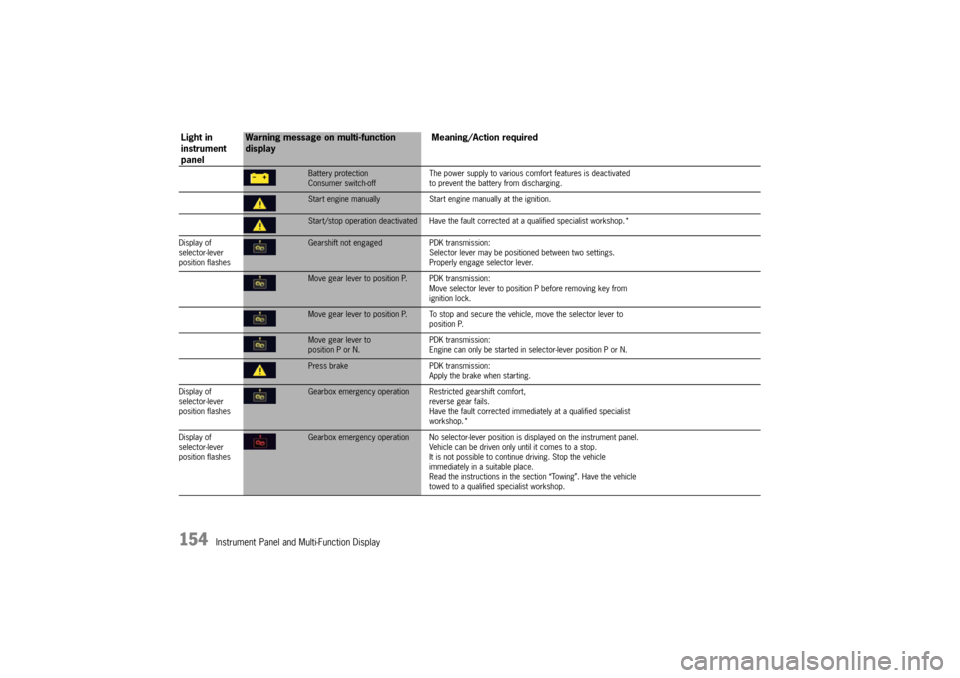
Battery protection
Consumer switch-offThe power supply to various comf
ort features is deactivated
to prevent the battery from discharging.Start engine manually Start engine manually at the ignition.Start/stop operation deactivated Have the faul t corrected at a qualified specialist workshop.*
Display of
selector-lever
position flashesGearshift not engaged PDK transmission:
Selector lever may be positi oned between two settings.
Properly engage selector lever.Move gear lever to position P. PDK transmission:
Move selector lever to position P before removing key from
ignition lock.Move gear lever to position P. To stop and se cure the vehicle, move the selector lever to
position P.Move gear lever to
position P or N. PDK transmission:
Engine can only be started in selector-lever position P or N.Press brake
PDK transmission:
Apply the brake when starting.
Display of
selector-lever
position flashesGearbox emergency operation R estricted gearshift comfort,
reverse gear fails.
Have the fault corrected immediately at a qualified specialist
workshop.*
Display of
selector-lever
position flashesGearbox emergency operation No selector-lever po sition is displayed on the instrument panel.
Vehicle can be driven only until it comes to a stop.
It is not possible to contin ue driving. Stop the vehicle
immediately in a suitable place.
Read the instructions in the se ction “Towing”. Have the vehicle
towed to a qualified specialist workshop.
Light in
instrument
panel
Warning message on multi-function
display Meaning/Action required
Page 157 of 343
Instrument Panel and Multi-Function Display
155
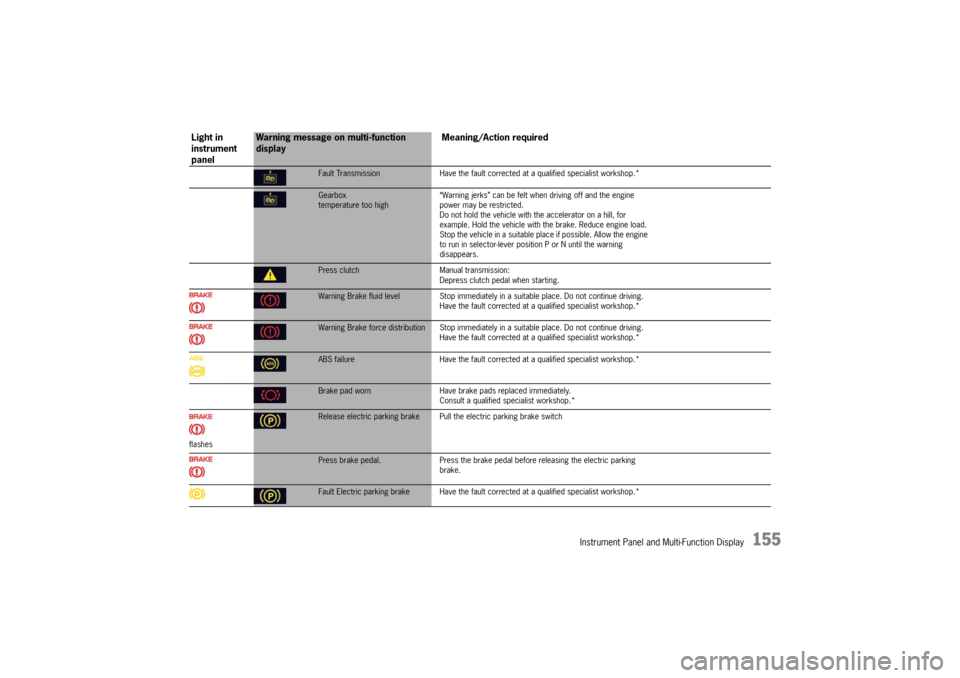
Fault TransmissionHave the fault corrected at a qualified specialist workshop.*Gearbox
temperature too high “Warning jerks” can be felt when driving off and the engine
power may be restricted.
Do not hold the vehicle with the accelerator on a hill, for
example. Hold the vehicle with
the brake. Reduce engine load.
Stop the vehicle in a suitable plac e if possible. Allow the engine
to run in selector-lever posi tion P or N until the warning
disappears.Press clutch Manual transmission:
Depress clutch pedal when starting.Warning Brake fluid level Stop immediately in a suitable place. Do not continue driving.
Have the fault corrected at a q ualified specialist workshop.*Warning Brake force distribution Stop immediately in a suitable place. Do not continue driving.
Have the fault corrected at a q ualified specialist workshop.*ABS failure Have the fault corrected at a qualified specialist workshop.*Brake pad worn Have brake pads replaced immediately.
Consult a qualified specialist workshop.*
flashesRelease electric parking brake Pull the electric parking brake switchPress brake pedal.Press the brake pedal before releasing the electric parking
brake.Fault Electric parking brake Have the fault co rrected at a qualified specialist workshop.*
Light in
instrument
panel
Warning message on multi-function
display Meaning/Action required
Page 165 of 343
Driving and Driving Safety
163
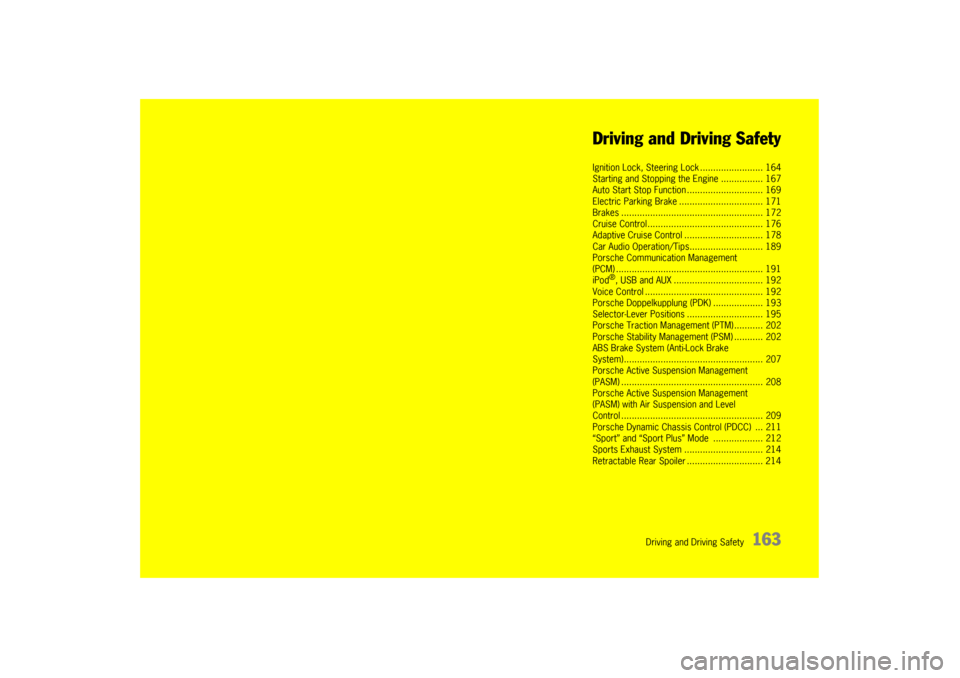
Driving and Driving Safety
Ignition Lock, Steering
Lock ........................ 164
Starting and Stopping the Engine ................ 167
Auto Start Stop Func tion ............................. 169
Electric Parking Brak e ................................ 171
Brakes ........................ .............................. 172
Cruise Control......... ................................... 176
Adaptive Cruise Contr ol .............................. 178
Car Audio Operation/Ti ps............................ 189
Porsche Communication Management
(PCM) .......................... .............................. 191
iPod
®, USB and AUX ........ .......................... 192
Voice Control ............... .............................. 192
Porsche Doppelkupplung (PDK) ................... 193
Selector-Lever Positi ons ............................. 195
Porsche Traction Management (PTM) ........... 202
Porsche Stability Management (PSM) ........... 202
ABS Brake System (Anti-Lock Brake
System)....................... .............................. 207
Porsche Active Suspension Management
(PASM) ............................................ .......... 208
Porsche Active Suspension Management
(PASM) with Air Suspension and Level
Control ............................................ .......... 209
Porsche Dynamic Chassis Control (PDCC) ... 211
“Sport” and “Sport Plus ” Mode ................... 212
Sports Exhaust Syst em .............................. 214
Retractable Rear Spoiler ............................. 214
Page 167 of 343

Driving and Driving Safety
165
To remove the ignition key:
fStop the vehicle.
f Move PDK selector lever to position P.
f Switch ignition off.
f Remove the ignition key.Ignition lock position 1 – Ignition onfTurn ignition key to position 1.
All electrical equipment can be switched on. The
warning lights on the inst rument panel light up for
alamp check.
f Please see the chapter “INSTRUMENT PANEL
USA MODELS” on page 107.
If an electrical consumer is not switched on for
10 minutes after switching on the ignition, the
ignition must be switched off then on again.
Ignition lock position 2 – Start enginef Turn ignition key to ignition lock position 2.
The car key is reset automa tically from position 2
to position 1 when you start the engine.Ignition lock position 3 – Activate
steering column lock on vehicles with
Porsche Entry & Drivef Please see the chapter “Manually locking the
steering column on vehicles with Porsche
Entry & Drive” on page 165.Steering column lockVehicles without Porsche Entry & Drive
The steering column is locked automatically
when the ignition key is removed from the ignition
lock and unlocked automatically when the
ignition key is inserted into the ignition lock.
Vehicles with Porsche Entry & Drive
The steering column is locked automatically
when the driver’s door is opened when the ignition
is switched off. Manually locking the steering column on
vehicles with Porsche Entry & Drive
f
Once the ignition is switched off, turn the
control unit to ignition lock position 3 again
and hold it there for 2seconds.
The steering column is locked when you hear
a clicking noise.
The steering column can be unlocked
automatically by turning the control unit to
ignition lock position 1.
Emergency operation with Porsche
Entry & DriveInterference in radio tr ansmission between the
vehicle and ignition lock or a discharged ignition
lock battery can disable the Porsche Entry & Drive
comfort function.
If this happens, the control unit can be removed
from the ignition lock and the vehicle can be
started using the standard ignition key.
Removing the control unit from the
ignition lock
1. Turn the control unit to ignition lock position 3
and hold it there for about 10 seconds.
Once you hear the clicking sound, you can remove
the control unit in ignition lock position 0.