2009 PORSCHE PANAMERA fuse
[x] Cancel search: fusePage 65 of 343

Seats, Mirrors and Steering Wheel
63
Multi-Function Steering Wheel
Warning!
There is a risk of accident if you set or
operate the multi-funct ion display, radio,
navigation system, telephone or other
equipment while driving.
Operating these devices while driving could
distract you from traffic and cause you to
lose control of the vehicle.
f Operate the equipment while driving only if the
traffic situation allows you to do so safely.
f Carry out any complicated operating or setting procedures only when the vehicle is stationary.
Depending on the equipment in your vehicle, you
can use the function keys of the multi-function
steering wheel to operate the following Porsche
communication systems:
– Telephone
–PCM
– Multi-function display in the instrument panel
Readiness for operation of the
multi-function steering wheel– With ignition switched on
f Please observe the operating instructions
supplied for the Porsche communication
systems before operating the function keys.
Note on operation
The Porsche communication systems cannot be
switched on and off using the multi-function
steering wheel.
Function buttons on the multi-function
steering wheelThe rotary buttons at the top left and right of the
steering wheel can also be pressed.
Turn volume control
Upwards – increase volume
Downwards – decrease volume
Press volume control
Switch volume/mute on and off.
Turn rotary knob
Select/highlight the main menu or menu
item on the multi-function display by
turning the rotary knob upward or
downward.
Press rotary knob
Go to submenu or activate selected
function.
Press MFS button
Call up the stored function.
The button can be assigned the desired
function in the multi-fu nction display on the
instrument panel.
Press Back button
Return to the menu.
Press Handset Pickup button
Accept a telephone call.
Press Handset Hangup button
End or refuse a telephone call.
Page 83 of 343

Air Conditioning
81
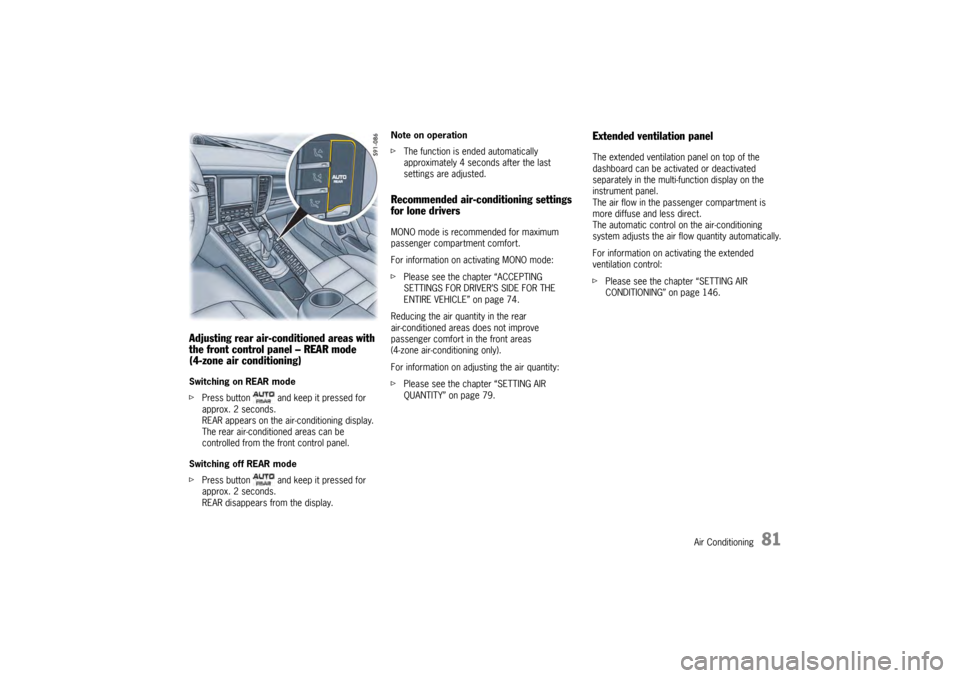
Adjusting rear air-conditioned areas with
the front control panel – REAR mode
(4-zone air conditioning)Switching on REAR mode
fPress button and keep it pressed for
approx. 2 seconds.
REAR appears on the air-conditioning display.
The rear air-conditioned areas can be
controlled from the front control panel.
Switching off REAR mode
f Press button and keep it pressed for
approx. 2 seconds.
REAR disappears from the display. Note on operation
f
The function is ended automatically
approximately 4 seconds after the last
settings are adjusted.
Recommended air-conditioning settings
for lone driversMONO mode is recommended for maximum
passenger compartment comfort.
For information on activating MONO mode:
fPlease see the chapter “ACCEPTING
SETTINGS FOR DRIVER’S SIDE FOR THE
ENTIRE VEHICLE” on page 74.
Reducing the air quantity in the rear
air-conditioned areas does not improve
passenger comfort in the front areas
(4-zone air-conditioning only).
For information on adju sting the air quantity:
f Please see the chapter “SETTING AIR
QUANTITY” on page 79.
Extended ventilation panelThe extended ventilation panel on top of the
dashboard can be activated or deactivated
separately in the multi- function display on the
instrument panel.
The air flow in the passenger compartment is
more diffuse and less direct.
The automatic control on the air-conditioning
system adjusts the air flow quantity automatically.
For information on activating the extended
ventilation control:
f Please see the chapter “SETTING AIR
CONDITIONING” on page 146.
Page 91 of 343

Windows and Slide/Tilt Roof
89
Operational readiness of the slide/tilt roof– With ignition switched on.
– A maximum of 10 minutes after the ignition is switched off, but only until driver’s or
passenger door is first opened.
Note on operation
The slide/tilt roof has a force limiter. If obstructed
during the closing process, the slide/tilt roof
opens again immediately.
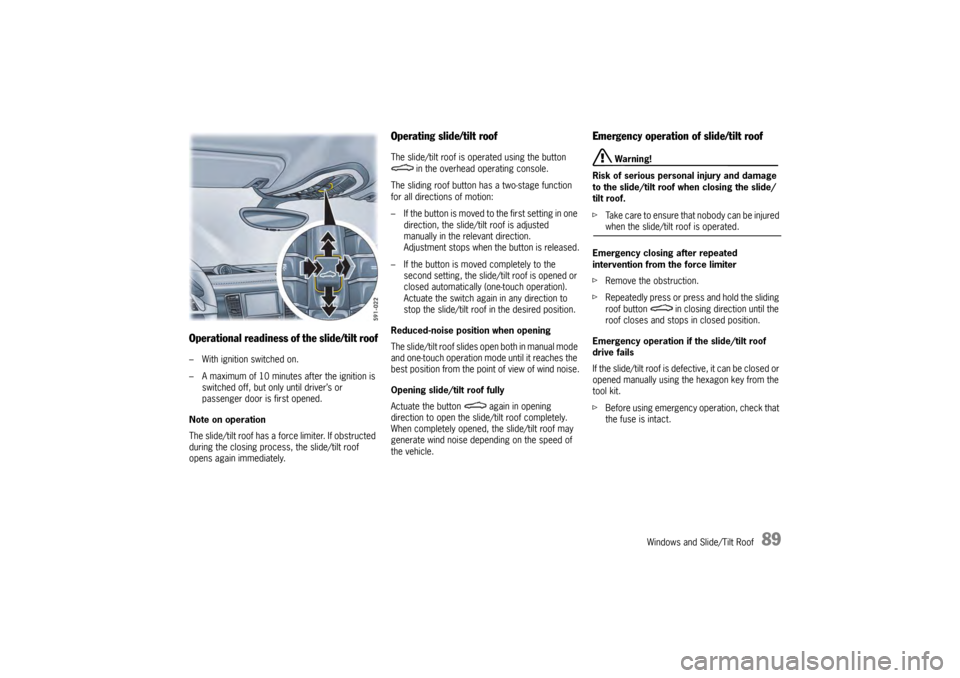
Operating slide/tilt roofThe slide/tilt roof is operated using the button in the overhead operating console.
The sliding roof button has a two-stage function
for all directions of motion:
– If the button is moved to the first setting in one
direction, the slide/tilt roof is adjusted
manually in the relevant direction.
Adjustment stops when the button is released.
– If the button is moved completely to the second setting, the slide/tilt roof is opened or
closed automatically (one-touch operation).
Actuate the switch again in any direction to
stop the slide/tilt roof in the desired position.
Reduced-noise position when opening
The slide/tilt roof slides open both in manual mode
and one-touch operation mode until it reaches the
best position from the poi nt of view of wind noise.
Opening slide/tilt roof fully
Actuate the button again in opening
direction to open the slide/tilt roof completely.
When completely opened, the slide/tilt roof may
generate wind noise depending on the speed of
the vehicle.
Emergency operation of slide/tilt roof
Warning!
Risk of serious personal injury and damage
to the slide/tilt roof when closing the slide/
tilt roof.
f Take care to ensure that nobody can be injured when the slide/tilt roof is operated.
Emergency closing after repeated
intervention from the force limiter
f Remove the obstruction.
f Repeatedly press or press and hold the sliding
roof button in clos ing direction until the
roof closes and stops in closed position.
Emergency operation if the slide/tilt roof
drive fails
If the slide/tilt roof is defective, it can be closed or
opened manually using th e hexagon key from the
tool kit.
f Before using emergency operation, check that
the fuse is intact.
Page 92 of 343

90
Windows and Slide/Tilt Roof
1. Press lightly on the front tip of the cover over
the left passenger compartment monitoring
sensor.
The opposite end of the cover lifts up.
2. Unclip cover.
f Take the hexagon key out of the tool kit in
the luggage compartment.
For information on the tool kit:
f Please see the chapter “TOOL KIT” on
page 279. 3. Insert the hexagon
key all the way into
the opening.
4. Hold the key in this position and turn.
5. Remove the key. Stow the key in the tool kit.
6. Clip in cover.
f Have the fault corrected.
Please contact a qualified specialist workshop.
We recommend that you have an authorized
Porsche dealer to do this work as they have
trained workshop personnel and the necessary
parts and tools.
Storing end position of the slide/tilt roofThe end position of the slide/ tilt roof are lost if the
vehicle battery is disconnected/reconnected or
flat, the vehicle is started using jump leads, the
electrical fuse for the slide/tilt roof is replaced or
after emergency operation.
Warning!
Risk of injury when closing the slide/tilt roof.
When the end position is stored, the force
limiter is not available and the slide/tilt roof
will close with full force.
f Take care to ensure that nobody can be injured when the slide/tilt roof closes.
The vehicle must be stat ionary to store the end
position of the slide/tilt roof.
1. Switch on ignition.
2. Press the button forwards in closing direction and hold in position.
The process for storing the end position
begins after approximately 10 seconds.
Press and hold the button until the roof has
stopped moving completely.
The process takes a maximum of 20 seconds.
Start the storing process again if the button is
released prematurely.
Page 168 of 343

166
Driving and Driving Safety
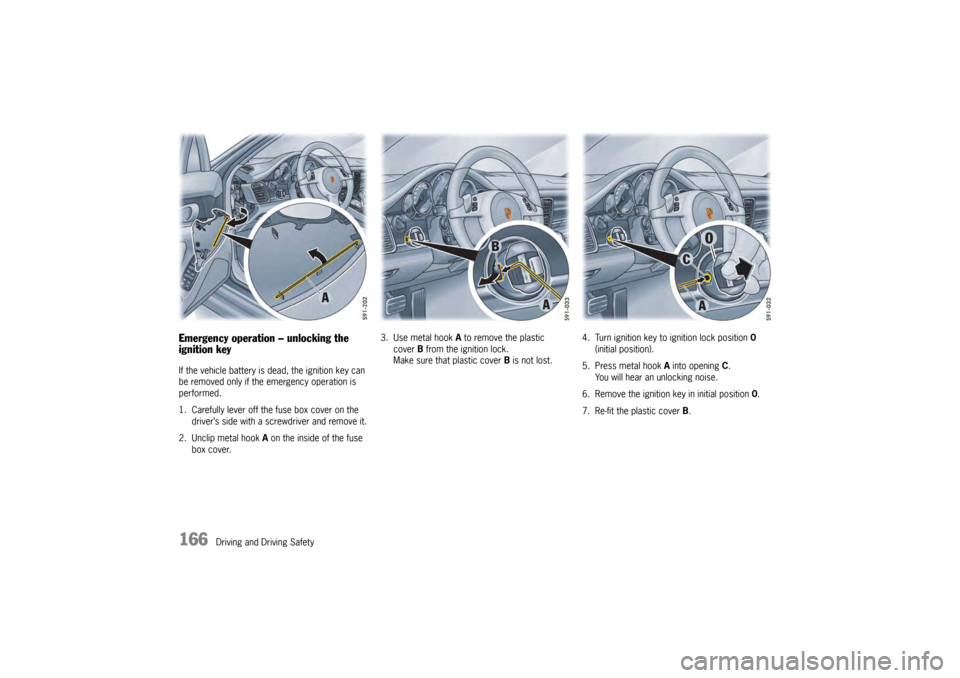
Emergency operation – unlocking the
ignition keyIf the vehicle battery is dead, the ignition key can
be removed only if the emergency operation is
performed.
1. Carefully lever off the fuse box cover on the driver’s side with a screwdriver and remove it.
2. Unclip metal hook A on the inside of the fuse
box cover. 3. Use metal hook A
to remove the plastic
cover B from the ignition lock.
Make sure that plastic cover B is not lost. 4. Turn ignition key to ignition lock position
0
(initial position).
5. Press metal hook A into opening C.
You will hear an unlocking noise.
6. Remove the ignition key in initial position 0.
7. Re-fit the plastic cover B .
Page 259 of 343

Maintenance and Car Care
257
Checking Coolant Level and
Adding CoolantThe coolant provides year-round protection
from corrosion and freezing down to –31 °F
(–35 °C) (–40 °F (–40 °C) in Nordic countries).
Observe the following points:
fUse only antifreeze authorised by Porsche.
f Check the coolant level regularly.Coolant levelWhen the engine is cold and the vehicle is level,
the red display must be under the arrow between
the minus and plus markings.
f Add coolant if necessary.
The maximum fill level is reached when the red
display is under the plus marking.
f Please see the chapter “OVERVIEW OF
WARNING MESSAGES” on page 152.
f Please see the chapter “EXERCISE EXTREME
CAUTION WHEN WORKING ON YOUR VEHICLE”
on page 252. Checking when engine is cold
1. Open cap on the reservoir carefully and
allow any overpressure to escape.
Then unscrew cap completely.
2. Read off the engine coolant level.
3. Top up with coolant if necessary. Do not top up over the plus marking.
Only add a mixture of antifreeze and water
in equal parts.
Antifreeze in coolant:
50 % provides antifreeze protection
down to –31 °F (–35 °C).
4. Screw the cap on the reservoir closed until it locks securely. Checking the coolant level when a warning
message appears on the multi-function
display in the instrument panel
Warning!
Danger of serious personal injury or death
from scalding. Coolant is hazardous to your
health, and may be fatal if swallowed.
f Do not open the cap of the expansion tank
while the engine is hot.
f Allow the engine to cool down before opening
the cap and protect your hands, arms and face
from any possible escape of hot coolant.
f Keep coolant out of children's reach.
f Also, keep coolant away from your pets. They
can be attracted to it should there be a spill, or
to used coolant left in an open container. Coolant can be deadly to pets if consumed.
Page 276 of 343

274
Maintenance and Car Care
Cleaning headlights, lights, interior and
exterior plastic components, adhesive
foils, radar sensor for adaptive cruise
control and rearview cameraObserve the following points:
fUse only clean water and a little dishwashing
liquid or interior window cleaner to clean
headlights, lights, plastic components
and surfaces.
Use a soft sponge or a soft, lint-free cloth.
Note
An interior window cleane r can also be used to
clean plastic surfaces (always read the cleaning
instructions on the container!).
We recommend Porsche interior window cleaner.
f Gently wipe the surface without applying
too much pressure.
f Do not clean when dry.
f Never use other chemical cleaners
or solvents.
f Rinse cleaned surfaces with clear water.
Alloy wheelsMetal particles (e.g. brass or copper in brake
dust) must not remain too long on alloy wheels.
Contact corrosion can cause pitting.
Note
Cleaners with an oxide-removing effect or
wrong pH value, as are commonly used for
other metals, as well as mechanical tools and
products, will damage the oxide layer and are
therefore unsuitable.
fUse only cleaners for alloy wheels
(pH value 9.5). Products with the wrong
pH value can destroy the protective layer
on the wheels.
We recommend Porsche cleaner for light
alloy rims.
f If possible, wash the wheels every two weeks
with a sponge or washing brush. If the wheels
are exposed to road salt, grit or industrial dust,
weekly cleaning is necessary.
f Every three months, after cleaning, treat the
wheels with car wax or an acid-free grease
(e.g. Vaseline).
Rub the grease in well with a soft cloth.
f Please see the chapter “CLEANING IN CAR
WASHES” on page 271.
Danger!
Danger of accident resulting in serious
personal injury or death if cleaning agents
(e.g. wheel cleaning agents) come into
contact with the brake discs. The resulting
film on the brake discs can impair braking
performance.
f Make sure that no clea ning agent comes into
contact with the brake discs.
f If cleaning agent has come into contact with
the brake discs, clean the brake discs
thoroughly with a strong jet of water.
f Paying attention to any road users behind you, dry the brake discs by applying the brakes.
Stainless steel tailpipesStainless steel tailpipes can discolor due to
soiling, strong heat and combustion residues.
The original shine can be achieved again using
commercially available metal lustre paste or metal
polish.
Page 278 of 343

276
Maintenance and Car Care
Cleaning air bag covers
Danger!
Risk of serious or fatal injury from impaired
operation of the air bag system caused by
incorrect cleaning.
f While it is appropriate to use normal surface
cleaning methods on the interior of your
vehicle, do not undertake deep cleaning of air
bag-related components, such as the
padded covers on the steering wheel,
the underside of the instrument panel,
front seats, roof pillars, roof liners and the
rear interior trim panels, and around the
seat backrest.
f Have your authorized Porsche dealer to clean these components.
Cleaning fabric liningsfFabric linings on pillars, roofliner and sun
blinds, etc. must be cleaned only using
suitable cleaning agents or a suitable dry
foam and a soft brush.
Alcantara careDo not use leather care products to
clean Alcantara.
For regular care, it is sufficient to clean the
cover with a soft brush.
Strong abrasion or rubbing when cleaning will
produce a lasting change to the surface.
Cleaning when lightly soiled
f Wet a soft cloth with water or a neutral
soap solution and wipe off the dirt.
Cleaning when heavily soiled
f Wet a soft cloth with lukewarm water or diluted
white spirit and dab the dirt from the outside
in.Cleaning the seat beltsfUse mild detergent to clean soiled belts.
f When drying, avoid direct sunlight.
f Only use suitable cleaning agents.
f Do not tint or bleach the belts.
The belt fabric could be weakened,
thus affecting safety.
Storing your PorscheIf you wish to keep your Porsche off the road for
a lengthy period, we recommend that you contact
your authorized Porsche dealer.
They will be glad to advise you about the
necessary measures, e.g. corrosion prevention,
care, maintenance and storage.
Further important information on laying up your
Porsche can be found in other sections.
fPlease see the chapter “BATTERY” on
page 303.
For information on locking the vehicle when
the battery is disconnected:
f Please see the chapter “NOT ALL VEHICLE
DOORS ARE LOCKED” on page 36.