2009 PORSCHE PANAMERA page 42
[x] Cancel search: page 42Page 307 of 343

Minor Repairs
305
Replacing the batteryThe service life of the battery is subject to normal
wear; it depends greatly on care, climatic
conditions, and driving conditions (distances,
loads).
f Only use an original Porsche battery, with the
correct part number, as a replacement. Only
this battery meets the spec ific requirements of
the vehicle.
f Please observe the disposal instructions for
batteries.
Putting vehicle into operationAfter the battery is connected or after a fully
discharged battery is charged, the PSM warning
light lights up on the instrument panel and
a message appears on the multi-function display
in the instrument panel to indicate a fault.
This fault can be corrected with a few
simple steps:
1. Start the engine. To do this, turn the igni tion key or the control
unit (on vehicles with Porsche Entry & Drive)
to ignition lock position 2, twice .
2. With the vehicle stationary, perform a few steering movements to the left and right and
then drive a short distance in a straight line
until the PSM warning light goes out and the
message is erased from the multi-function
display in the instrument panel.
3. If the warnings do not disappear, then:
Drive carefully to the nearest authorized
Porsche dealer to have the fault corrected.
4. After the warnings go out: Stop the vehicle in a suitable place.
5. Store the end position for the power windows. For information on storin
g the end positions for
the power windows:
f Please see the chapter “STORING END
POSITION OF THE DOOR WINDOWS AFTER
CONNECTING THE VEHICLE BATTERY” on
page 88.
6. Teach tires on vehicles with Tire Pressure Monitoring.
For information on teaching the Tire Pressure
Monitoring system:
f Please see the chapter “TIRE PRESSURE
MONITORING (TPM)” on page 127.
7. Store end position on vehicles with a slide/ tilt roof.
For information on storing the end position for the
slide/tilt roof:
f Please see the chapter “STORING END
POSITION OF THE SLIDE/TILT ROOF” on
page 90.
Page 309 of 343

Minor Repairs
307
4. Leave the engine of the donor vehicle running at a higher engine speed.
5. Start the engine. An attempted start using jump leads should
not last more than 15 seconds. Then wait for
at least one minute.
6. Disconnect the negative lead from the ground
point for jump-lead starting ( –) first, then from
the negative terminal of the donor battery.
7. Disconnect the positive lead from the positive terminal of the donor ba ttery first, then from
the positive terminal for jump-lead starting ( +).
8. Close the cap on the posi tive terminal for jump-
lead starting ( +).Charging the batteryAutomotive batteries loose their efficiency when
not in use. The charge available in your battery can
be measured with a battery hydrometer. We
recommend that the battery voltage be tested by
your Porsche dealer who has the appropriate
equipment.
If the car is not driven for prolonged periods, the
battery must be charged at least every 6 weeks.
A discharged battery allo ws rapid formation of
sulfates, leading to premature deterioration of the
plates.
Danger!
Hydrogen gas genera ted by the battery
could cause an explosion, resulting in
serious personal injury or death.
f Charge battery in a well ventilated area.
f Never charge a frozen battery. It may explode
because of gas trapped in the ice. Allow a
frozen battery to thaw out first.
f If you get electrolyte, which is an acid, in your
eyes or on your skin, immediately rinse with
cold water for several minutes and call a doctor.
Your authorized Porsche dealer will be pleased to
advise you about a suitable charger.
f Always observe the instructions provided by
the charger manufacturer.
1. Connect the charger to the jump-lead starting terminals.
Only plug into the mains and switch the
charger on when it is connected up correctly.
2. Switch on the charger.
3. After charging the battery, first switch off the charger and then disconnect it.
f Please see the chapter “PUTTING VEHICLE
INTO OPERATION” on page 305.
Changing the Remote Control
BatteryNote
f Please observe the regulations for disposing
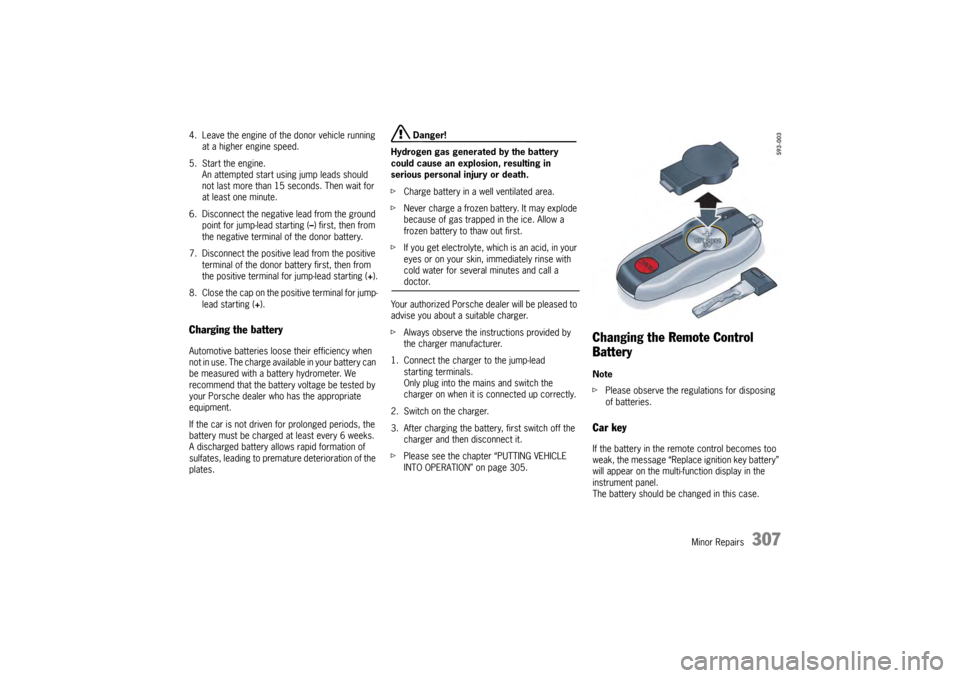
of batteries.Car keyIf the battery in the remote control becomes too
weak, the message “Replace ignition key battery”
will appear on the multi-function display in the
instrument panel.
The battery should be changed in this case.
Page 312 of 343

310
Minor Repairs
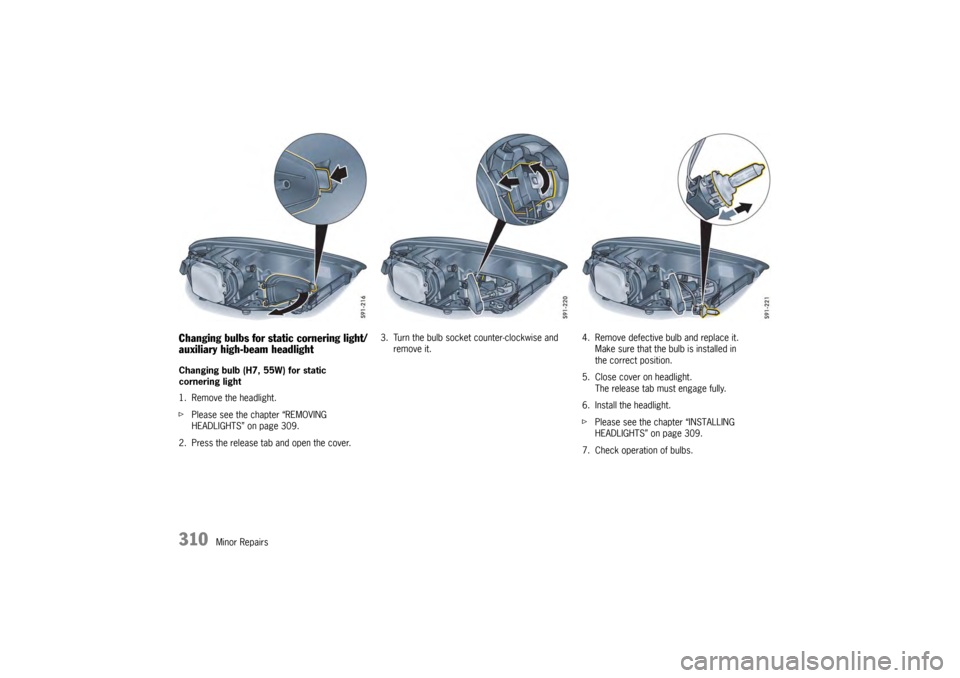
Changing bulbs for static cornering light/
auxiliary high-beam headlight Changing bulb (H7, 55W) for static
cornering light
1. Remove the headlight.
fPlease see the chapter “REMOVING
HEADLIGHTS” on page 309.
2. Press the release tab and open the cover. 3. Turn the bulb socket counter-clockwise and
remove it. 4. Remove defective bulb and replace it.
Make sure that the bulb is installed in
the correct position.
5. Close cover on headlight. The release tab must engage fully.
6. Install the headlight.
f Please see the chapter “INSTALLING
HEADLIGHTS” on page 309.
7. Check operation of bulbs.
Page 313 of 343

Minor Repairs
311
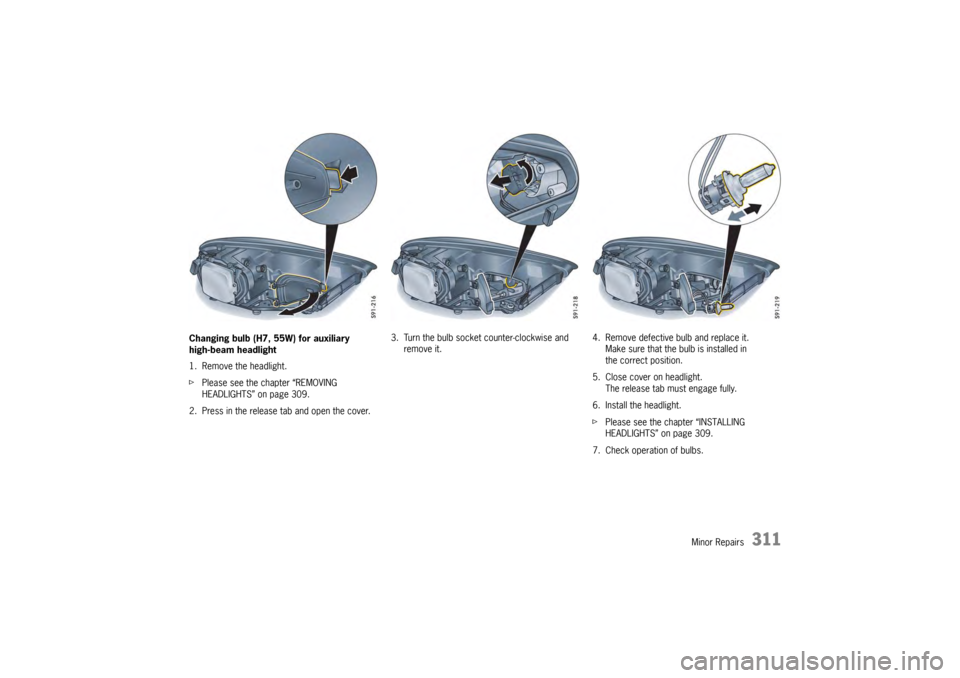
Changing bulb (H7, 55W) for auxiliary
high-beam headlight
1. Remove the headlight.
fPlease see the chapter “REMOVING
HEADLIGHTS” on page 309.
2. Press in the release tab and open the cover. 3. Turn the bulb socket counter-clockwise and
remove it. 4. Remove defective bulb and replace it.
Make sure that the bulb is installed in
the correct position.
5. Close cover on headlight. The release tab must engage fully.
6. Install the headlight.
f Please see the chapter “INSTALLING
HEADLIGHTS” on page 309.
7. Check operation of bulbs.
Page 316 of 343

314
Minor Repairs
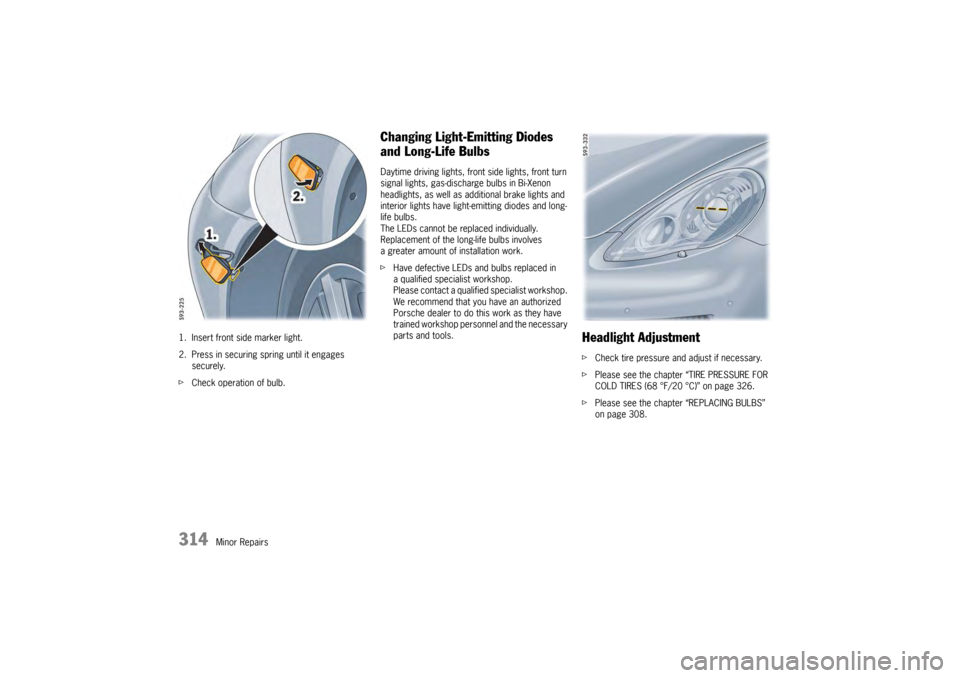
1. Insert front side marker light.
2. Press in securing spring until it engages
securely.
f Check operation of bulb.
Changing Light-Emitting Diodes
and Long-Life BulbsDaytime driving lights, front side lights, front turn
signal lights, gas-discharge bulbs in Bi-Xenon
headlights, as well as additional brake lights and
interior lights have light-emitting diodes and long-
life bulbs.
The LEDs cannot be replaced individually.
Replacement of the long-life bulbs involves
a greater amount of installation work.
fHave defective LEDs and bulbs replaced in
a qualified specialist workshop.
Please contact a qualified specialist workshop.
We recommend that you have an authorized
Porsche dealer to do this work as they have
trained workshop personnel and the necessary
parts and tools.
Headlight AdjustmentfCheck tire pressure and adjust if necessary.
f Please see the chapter “TIRE PRESSURE FOR
COLD TIRES (68 °F/20 °C)” on page 326.
f Please see the chapter “REPLACING BULBS”
on page 308.
Page 319 of 343

Minor Repairs
317
If the vehicle's transmission or shifter is already
damaged, serious damage will result if the vehicle
is not towed with all four wheels off the ground.
Porsche cannot be held responsible for damage
incurred in cases where a vehicle has been transported on one or both of its axles.
fThe vehicle must not be towed if the PDK
transmission is in em ergency operation mode
(yellow or red “Gearbox emergency operation”
warning message). The vehicle must be
transported with a car transporter or on
a trailer.
f If a selector lever emergency release was
performed, the vehicle must not be towed.
The vehicle must be transported with a car
transporter or on a trailer.
f Move PDK selector lever to position N.
To properly engage selector-lever position N
on the display and at the selector lever, the
engine must be started once before towing
the vehicle.
The vehicle can be towed as soon as the
selector lever is in position N and selector-
lever position N appears on the display.
f The vehicle must always roll on all four wheels
when towed.
The ignition must be switched on so that the
brake lights and turn signal lights operate and
the steering lock cannot engage.
f Do not exceed a maximum speed of 30 mph
(50 km/h). Maximum towing distance 30 miles (50 km).
If towing distances ar
e greater, the vehicle
must be transported with a car transporter
or on a trailer.
Panamera STowing a vehicle with PDK transmission on
one axle
f The vehicle must not be towed if the PDK
transmission is in emergency operation mode
(yellow or red “Gearbox emergency operation”
warning message). The vehicle must be
transported with a car transporter or on
a trailer.
f If a selector lever emergency release was
performed, the vehicle must not be towed.
The vehicle must be transported with a car
transporter or on a trailer.
f Move PDK selector lever to position N.
To properly engage selector-lever position N
on the display and at the selector lever, the
engine must be started once before towing
the vehicle.
The vehicle can be towed as soon as the
selector lever is in position N and selector-
lever position N appears on the display.
f Switch ignition off.
The ignition key must remain in the ignition
lock so that the steering wheel lock does
not engage.
The control unit must be removed from the ignition lock and the ke
y inserted in vehicles
with Porsche Entry & Drive.
f Please see the chapter “REMOVING THE
CONTROL UNIT FROM THE IGNITION LOCK” on
page 165.
f Make sure that the vehicle is
adequately illuminated.
f Do not exceed a maximum speed of 30 mph
(50 km/h).
Maximum towing distance 30 miles (50 km).
If towing distances are greater, the vehicle
must be transported with a car transporter or
on a trailer.
Panamera 4S, Panamera TurboTowing a vehicle with PDK and all-wheel drive
Caution!
We urge that wherever possible, a car
transporter or trailer be used to transport a
Panamera vehicle that cannot move under
its own power. This is the safest way to
transport a down vehicle.
For those instances where a car transporter or
trailer is not available, the vehicle may be towed
on all four axles only, provided the following
conditions are strictly met. Failure to meet these
conditions will result in serious and expensive
damage to the PDK transmission.
Page 320 of 343

318
Minor Repairs
If the vehicle's transmission or shifter is already
damaged, serious damage will result if the vehicle
is not towed with all four wheels off the ground.
Porsche cannot be held responsible for damage
incurred in cases where a vehicle has been
transported on one or both of its axles.
f
The vehicle must not be towed if the PDK
transmission is in emergency operation mode
(yellow or red “Gearbox emergency operation”
warning message). The vehicle must be
transported with a car transporter or on
atrailer.
f If a selector lever emergency release was
performed, the vehicle must not be towed.
The vehicle must be transported with a car
transporter or on a trailer.
f The vehicle must have all four wheels on the
ground when being towed or it must be
transported on a car transporter.
The vehicle must not be raised at one axle,
irrespective of whether it is the front or
rear axle.
f Move PDK selector lever to position N.
To properly engage selector-lever position N
on the display and at the selector lever, the
engine must be started once before towing
the vehicle.
The vehicle can be towed as soon as the
selector lever is in position N and selector-
lever position N appears on the display. f
Switch off the ignition or leave the engine
running. The ignition key must remain in the
ignition lock so that the steering wheel lock
does not engage.
The control unit must be removed from the
ignition lock and the key inserted in vehicles
with Porsche Entry & Drive.
f Please see the chapter “REMOVING THE
CONTROL UNIT FROM THE IGNITION LOCK” on
page 165.
f Make sure that the vehicle is
adequately illuminated.
f Do not exceed a maximum speed of 30 mph
(50 km/h).
Maximum towing distance 30 miles (50 km).
If towing distances are greater, the vehicle
must be transported with a car transporter or
on a trailer.
Pulling out a vehicle stuck in snow,
sand, etc.fAlways pull out the stuck vehicle with the
greatest care.
f Do not pull out the vehi cle abruptly or at
an angle.
f If possible, pull the vehicle out backwards in
its own tracks.
Page 322 of 343

320
Minor Repairs
Pulling vehicle onto flat bed1. Position wooden ramps at the base of the flat bed to reduce the angle of the pull.
2. Reel in the hoist cable and check the underside of the vehicle for any interference.
Tying down vehicle on flat bed1. Carefully feed towing straps through the opening in the rear wheels.
Make sure metal parts of straps do not
damage rim.
Make sure the strap is flat over the rim bead.
Make sure brake backing plate is not
damaged.
2. Secure straps to rear of flat bed.
3. Reel in hoist cable only far enough to tension
tie-down straps. 4. Carefully feed towing straps through the
opening in the front wheels.
Make sure metal parts of straps do not
damage rim.
Make sure the strap is flat over the rim bead.
Make sure brake backing plate is not
damaged.
5. Secure straps to front of flat bed.
6. Release tension on ho ist cable, but do not
disconnect.
Use hoist cable as safety cable.
Transporting the vehicle on car trains,
ferries and car transportersf Tie the vehicle down only at its wheels.
f Deactivate interior surveillance and the
inclination sensor.
f Please see the chapter “ALARM SYSTEM AND
PASSENGER COMPARTMENT MONITORING”
on page 247.