Page 239 of 356

9. Push the new bulb into the
socket and turn it clockwise
to lock it into place.
10. Push the bulb socket straight in
and turn it clockwise to lock it
into place.
11. Make sure the seals are applied
to the taillamp assembly and
screws.
12. Raise the spare tire cover.
13. Turn the trunk lining securing
pins clockwise to lock into place.14. Return the plastic trunk trim
to its original location.
15. Reinstall the plastic
retaining pins.
License Plate Lamp
To replace one of these bulbs:
1. Open the trunk. SeeTrunk on
page 2-10.
2. Turn the bulb socket
counterclockwise and pull it
straight out.3. Pull the bulb straight out of the
bulb socket.
4. Push the new bulb straight into
the bulb socket until it clicks.
5. Push the bulb socket straight in
and turn it clockwise to lock it
into place.
Replacement Bulbs
Exterior LampBulb
Number
High-Beam Headlamp H9
Low-Beam Headlamp H11
Stoplamp/Taillamp P21/5W
Rear Turn
Signal LampPY21W
Back-up Lamp P21W
For replacement bulbs not listed
here, contact your dealer/retailer.
Vehicle Service and Care 9-35
Page 273 of 356

Do a safety check before
proceeding. SeeIf a Tire
Goes Flat on page 9-66.
Inspect the damaged tire.
The sealant cannot seal sidewall
damage, large punctures, or a
tire that has unseated from
the wheel. SeeRoadside Assistance
Program on page 12-6.
Do not remove any objects that
have penetrated the tire.
1. Place the tire sealant and
compressor kit on the ground and
unwrap the sealant/air hose (E)
from the side of the compressor.
2. Remove the air compressor
accessory plug (B) from the unit.
Do not plug the plug in yet.3. Turn the tire valve stem cap
counterclockwise to remove.
4. Attach the sealant/air hose (E)
onto the tire valve stem.
Turn it clockwise until tight.
5. Make sure the sealant and
compressor kit on/off switch (A)
is in the O (off) position.
Plug the air compressor
accessory plug (B) into an
accessory power outlet in the
vehicle. SeeAccessory Power
Outlet(s) on page 4-9for
more information.
Do not slam door or close
window on the compressor
accessory plug cord.
{CAUTION
Idling the engine in a closed-in
place or with the climate control
system off can cause deadly
carbon monoxide (CO). See
Engine Exhaust on page 8-14.6. Start the vehicle. The vehicle
must be running while using
the air compressor.
{CAUTION
Overin�ation could cause the tire
to rupture, and you or others
could be injured. Be sure to read
the in�ator instructions, and in�ate
the tire to its recommended
pressure. Do not exceed 36 psi
(248 kPa).
7. Push the On/Off switch (A) to the
I (on) position.
The kit will begin to inject sealant
into the tire. Sealant could leak
from the puncture hole until
the vehicle is driven and the hole
has sealed.
Vehicle Service and Care 9-69
Page 274 of 356

8. Check the air pressure gage (G).
If there is not a pressure reading
while the compressor is running,
check for leaks at the connection
between the tire valve stem and
the sealant/air hose (E).
9. In�ate the tire to the
recommended in�ation pressure,
found on the Tire and Loading
Information label. See
Inflation - Tire Pressure on
page 9-49.
The pressure gage (G) will
initially read high while the
compressor injects the sealant
into the tire. Once the sealant
injection is complete, the
pressure will quickly drop. It will
start to rise again as the tire
in�ates with air.10. Turn the compressor off by
pushing the On/Off button (A)
to the I (off) position.
The pressure gage (G) reads
slightly high while the
compressor is on. Turn the
compressor off to get an
accurate reading. The
compressor may be turned on
and off until the correct pressure
is reached.
Notice:If the recommended
pressure cannot be reached after
approximately 15 minutes, the
vehicle should not be driven. The
tire is too severely damaged and
the tire sealant and compressor kit
cannot in�ate the tire. Remove the
air compressor accessory plug
from the accessory power outlet
and unscrew the sealant/air hose
from the tire valve or tire pressure
monitoring sensor valve. See
Roadside Assistance Program on
page 12-6.The tire is not sealed and will
continue to leak air until
the vehicle is driven and the
sealant is distributed in the tire.
Steps 11 through 19 must be
done right after Step 10.
Be careful while handling the
tire sealant and compressor kit
as they could be hot after
usage.
11. Unplug the air compressor
accessory plug (B) from the
accessory power outlet in
the vehicle.
12. Turn the sealant/air hose (E)
counterclockwise to remove.
13. Replace the tire valve
stem cap.
14. Stow the sealant/air hose (E)
and air compressor accessory
plug (B) in their original
locations.
9-70 Vehicle Service and Care
Page 276 of 356

19. Wipe off any sealant from the
wheel, tire or vehicle.
20. Dispose of the used sealant
canister at a local dealer/retailer
or in accordance with local
state codes and practices.
After using the sealant canister,
replace it with a new canister
available from your
dealer/retailer.
This is a temporary repair. Take
the vehicle to your
dealer/retailer to have the tire
repaired or replaced as soon as
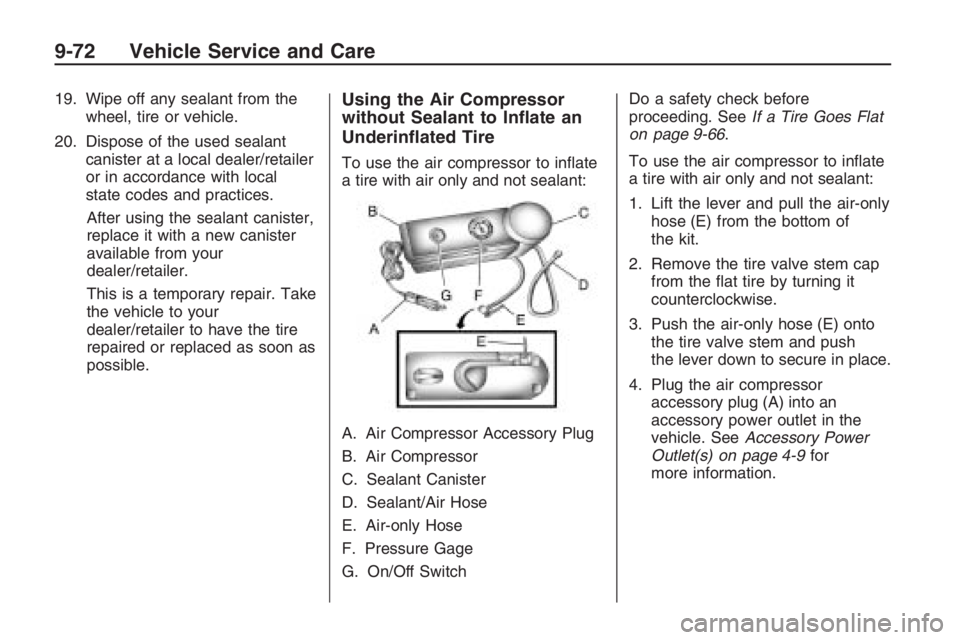
possible.Using the Air Compressor
without Sealant to In�ate an
Underin�ated Tire
To use the air compressor to in�ate
a tire with air only and not sealant:
A. Air Compressor Accessory Plug
B. Air Compressor
C. Sealant Canister
D. Sealant/Air Hose
E. Air-only Hose
F. Pressure Gage
G. On/Off SwitchDo a safety check before
proceeding. SeeIf a Tire Goes Flat
on page 9-66.
To use the air compressor to in�ate
a tire with air only and not sealant:
1. Lift the lever and pull the air-only
hose (E) from the bottom of
the kit.
2. Remove the tire valve stem cap
from the �at tire by turning it
counterclockwise.
3. Push the air-only hose (E) onto
the tire valve stem and push
the lever down to secure in place.
4. Plug the air compressor
accessory plug (A) into an
accessory power outlet in the
vehicle. SeeAccessory Power
Outlet(s) on page 4-9for
more information.
9-72 Vehicle Service and Care
Page 278 of 356

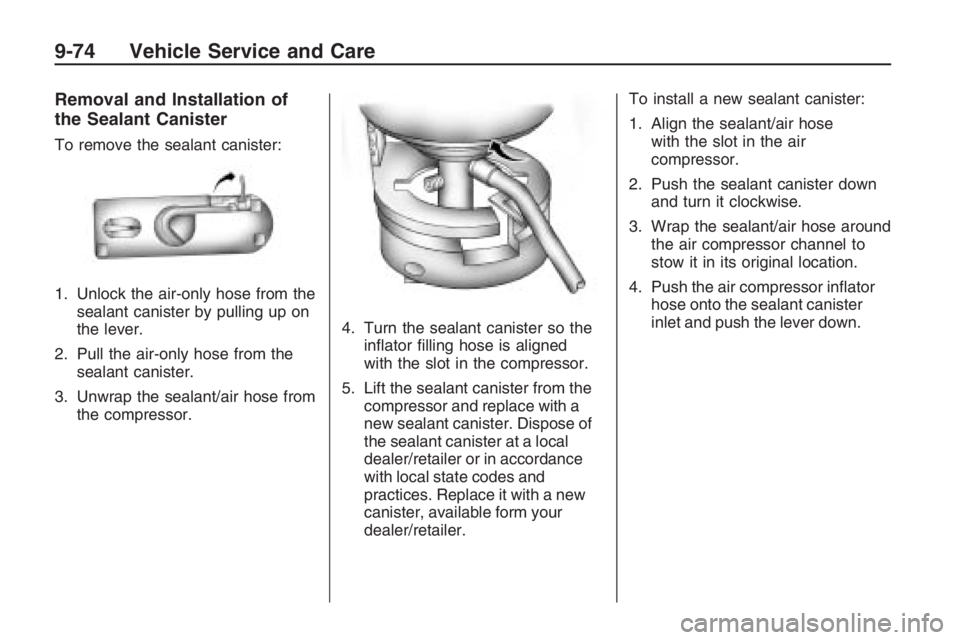
Removal and Installation of
the Sealant Canister
To remove the sealant canister:
1. Unlock the air-only hose from the
sealant canister by pulling up on
the lever.
2. Pull the air-only hose from the
sealant canister.
3. Unwrap the sealant/air hose from
the compressor.4. Turn the sealant canister so the
in�ator �lling hose is aligned
with the slot in the compressor.
5. Lift the sealant canister from the
compressor and replace with a
new sealant canister. Dispose of
the sealant canister at a local
dealer/retailer or in accordance
with local state codes and
practices. Replace it with a new
canister, available form your
dealer/retailer.To install a new sealant canister:
1. Align the sealant/air hose
with the slot in the air
compressor.
2. Push the sealant canister down
and turn it clockwise.
3. Wrap the sealant/air hose around
the air compressor channel to
stow it in its original location.
4. Push the air compressor in�ator
hose onto the sealant canister
inlet and push the lever down.
9-74 Vehicle Service and Care
Page 280 of 356
Removing the Spare Tire
and Tools
Spare Tire
The equipment you will need is
located in the rear storage area.
1. Open the trunk. SeeTrunk
on page 2-10.
2. Pull the handle of the spare
wheel cover strap straight up and
secure to the trunk lid.3. Turn the retainer nut
counterclockwise and remove the
spare tire.
4. Place the spare tire next to the
tire being changed.
5. The jack and tools are stored
below the spare tire.
9-76 Vehicle Service and Care
Page 281 of 356
Tools
A. Jack Handle
B. Nut Cap Tool
C. Wheel Wrench
D. Jack
1. Turn the second retainer nut
counterclockwise and remove
the panel.
2. Remove the tools from the tool
container.
3. Place the tools next to the tire
being changed.
Removing the Flat Tire
and Installing the
Spare Tire
1. If your vehicle has wheel bolt
caps, remove the caps. Store
the caps with the wheel cover.
2. Use the fully extended
wheel wrench to loosen all the
wheel nuts one-half turn
counterclockwise. Do not
remove them yet.
Vehicle Service and Care 9-77
Page 283 of 356
The jack handle must be
unfolded at a right angle
before it is used.
6. Raise the vehicle by turning the
jack handle clockwise 180°.7. Pull the jack handle
towards you.
8. Repeat Steps 7 and 8 until the
vehicle is far enough off the
ground so there is enough room
for the compact spare tire to
�t under the vehicle.9. Remove all of the wheel nuts
and place them in a dry, clean
place to avoid getting dirt in
the threads.
Vehicle Service and Care 9-79