2009 OPEL ZAFIRA spare wheel
[x] Cancel search: spare wheelPage 90 of 228

90
Instruments and controls
It illuminates for a few seconds when
the ignition is switched on.
Flashing during driving
The system has kicked in. Engine
output may be reduced and the
vehicle may be braked automatically
to a small degree 3 142.
Illuminates while driving
The system is switched off or a fault
is present. Continued driving is
possible. Driving stability, however,
may deteriorate depending on road
surface conditions.
Have the cause of the fault remedied
by a workshop.
ESP® Plus
3 142.
Engine coolant
temperature
W illuminates red.
Illuminates when the engine is
running
Stop, switch off engine. Caution
Coolant temperature too high.
Check coolant level immediately
3 157.
If there is sufficient coolant, consult
a workshop.
Preheating and diesel
particle filter
!
illuminates or flashes yellow.
Illuminated
Preheating activated. Only activates
when outside temperature is low.
Flashes
( in
vehicles fitted with a diesel particle
filter).
Control indicator ! flashes if the filter
requires cleaning and previous
driving conditions did not permit
automatic cleaning. Continue driving
and if possible do not allow engine
speed to drop below 2000 rpm. The control indicator
! goes off as
soon
as the self-cleaning operation is
complete.
Diesel particle filter 3 129.
Deflation detection system
and tyre pressure
monitoring system
w illuminates or flashes red or yellow.
Control indicator lights red
Tyre pressure loss. Stop immediately
and check tyre pressure. A maximum
speed of 80 km/h is permitted for run-
flat tyres 3 174.
Control indicator lights yellow
Fault in system or tyre without
pressure sensor mounted (e. g. spare
wheel). Consult a workshop.
Flashes
Flashes three times to indicate
system initialisation.
Deflation detection system 3 177,
tyre pressure monitoring system
3 176.
Page 92 of 228

92
Instruments and controls
When operating with natural gas, the
system automatically switches over to
petrol operation 3 84.
Open&Start system
0 illuminates or flashes yellow.
Flashes
The electronic key is no more within
the reception range of the vehicle
interior. The engine cannot be
started. Hold the Start/Stop button
depressed a bit longer to switch off
the ignition.
or
Failure of the electronic key.
Operation is yet only possible via
emergency operation.
Illuminated
Fault in system. Try to operate with
the spare key, the remote control or
through emergency operation. Hold
the Start/Stop button depressed a bit
longer to switch off the ignition. Seek
the assistance of a workshop.
or The steering wheel lock is still
engaged. Move the steering wheel
slightly and press the
Start/Stop
button.
Open&Start System 3 29.
Apply footbrake
j illuminates yellow.
The
engine with manual transmission
automated can only be started if the
foot brake is depressed. If the foot
brake is not depressed, the control
indicator illuminates 3 137.
Exterior light
8 illuminates green.
Illuminated when the exterior lights
are on 3 108.
High beam
C illuminates blue.
Illuminated when high beam is on and
during headlamp flash 3 109. Adaptive forward lighting
B
illuminates or flashes yellow.
Illuminated
Fault in system.
If the swivelling device for curve
lighting fails, the corresponding
dipped
beam lamp is deactivated and
the fog lamp is switched on.
Seek the assistance of a workshop.
Flashes
System switched to symmetrical
dipped beam.
Control indicator B flashes for
approximately 4 seconds after the
ignition is switched on as a reminder
that the system has been switched
3 109.
Adaptive Forward Lighting (AFL)
3 110.
Fog light
> illuminates green.
Illuminated when the fog lamps are on
3 111.
Page 102 of 228

102
Instruments and controls
Reduce speed and check tyre
pressure at the next opportunity. Tyre
pressure monitoring system 3 176.
Check tyre pressure 3 175, 3 220.If there is a considerable loss of
pressure, a corresponding message
appears indicating the tyre.
Steer out of flow of traffic as quickly
as possible without endangering
other vehicles. Stop and check the
tyres. Mount the spare wheel
3 182.
If run-flat tyres are fitted, maximum
speed is 80 km/h. Information
3 174. Tyre pressure monitoring
system 3 176. Washer fluid level
Low washer fluid level. Top up
washer fluid
3 158. Trip computer
Trip computer in Board-
Info-Display
Access the data by pressing the
BC
button on the infotainment system or
the
left adjuster wheel on the steering
wheel.
Some information appears in the
display in an abbreviated form.
Once an audio function has been
selected, the lower row of the trip
computer function is displayed
furthermore.
Page 175 of 228

Vehicle care
175
Depending on tyre manufacturer, run-
flat tyres can be identified from
a marking on the tyre wall. E.g. ROF
= RunonFlat for Goodyear or SSR
= Self Supporting Runflat Tyre for
Continental.
Use of run-flat tyres is only permitted
in combination with factory approved
alloy wheels.
Do not use a tyre repair kit.
The ECO tyre pressure must not be
used.
Run-flat tyres must not be combined
with standard tyres.
If converting to standard tyres, note
that the vehicle is not equipped with
a spare wheel or tyre repair kit.
Driving with a damaged tyre
A
loss in tyre pressure is indicated by
the tyre pressure monitoring system
or the deflation detection system.
If a tyre has no pressure, continued
driving is possible
■ at a speed of max. 80 km/h
■ up to a distance of 80 km 9
Warning The vehicle will be more difficult to
steer and handle. Braking
distance will be longer.
Adapt driving style and speed to
the changed conditions.
Tyre designations
E.g. 195/65 R 15 91 H
195
=Tyre width, mm
65 =Cross-section ratio (tyre
height to tyre width), %
R = Belt type: Radial
RF =Type: RunFlat
15 =Wheel diameter, inches
91 =Load index e.g. 91 is
equivalent to 618 kg
H = Speed code letter
Speed code letter:
Q = up to 160 km/h
S = up to 180 km/h
T = up to 190 km/h
H = up to 210 km/h
V = up to 240 km/h
W = up to 270 km/h Tyre pressure
Check the pressure of cold tyres at
least every 14 days and before any
long journey. Do not forget the spare
wheel. This also applies to vehicles
with tyre pressure monitoring.
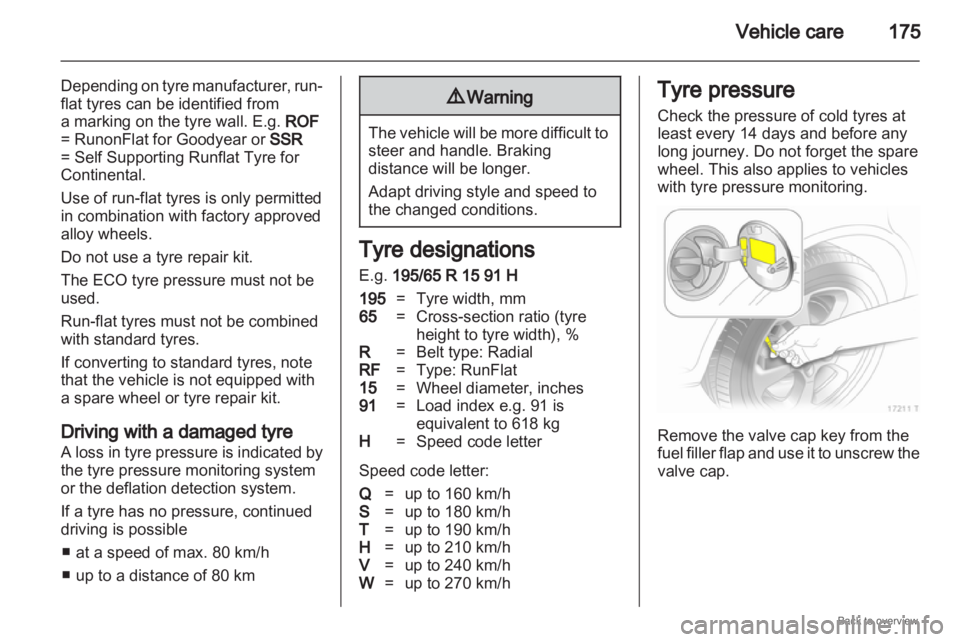
Remove the valve cap key from the
fuel
filler flap and use it to unscrew the
valve cap.
Page 176 of 228

176
Vehicle careOn vehicles with tyre pressure
monitoring
system, screw the adapter
to the valve.
Tyre pressure 3 220 and on the label
on the inside of the fuel filler flap.
The tyre pressure data refer to cold
tyres. It applies to summer and winter
tyres.
Always inflate the spare wheel to the
pressure specified for full load.
The ECO tyre pressure serves to
achieve the smallest amount of fuel
consumption possible. It must not be
used with run-flat tyres. Incorrect tyre pressures will impair
safety, vehicle handling, comfort and
fuel economy and will increase tyre
wear.
9
Warning If the pressure is too low, this can
result in considerable tyre warm-
up
and internal damage, leading to
tread separation and even to tyre
blow-out at high speeds. Tyre pressure monitoring
system
The tyre pressure monitoring system
continually checks the pressure of all
four wheels when vehicle speed
exceeds a certain limit.
All wheels must be equipped with
pressure sensors and the tyres must
have the prescribed pressure.
Otherwise, the tyre pressure will be
monitored by the deflation detection
system 3 177.
The current tyre pressures can be
shown in the Info-Display
3 107. Vehicle messages, tyre pressure
3 101.
Control indicator
w 3 90.
If a complete set of wheels without
sensors is mounted (e.g. four winter
tyres), no error message will be
displayed. The tyre pressure
monitoring system is not operational.
Retrofitting of sensors is possible.
The use of commercially available
liquid tyre repair kits can impair the
function of the system. Factory
approved systems can be used.
External high-power radio equipment
could disrupt the tyre pressure
monitoring system.
Page 179 of 228

Vehicle care
179
The use of tyre chains is not permitted
on the temporary spare wheel.
Tyre repair kit
Minor damage to the tyre tread or
sidewall
can be repaired with the tyre
repair kit.
Do not remove foreign bodies from
the tyres.
Tyre damage exceeding 4 mm or that
is near the rim cannot be repaired with
the tyre repair kit. 9
Warning Do not drive faster than 80 km/h.
Do not use for a lengthy period.
Steering and handling may be
affected.
If you have a flat tyre:
Apply
the hand brake and engage first
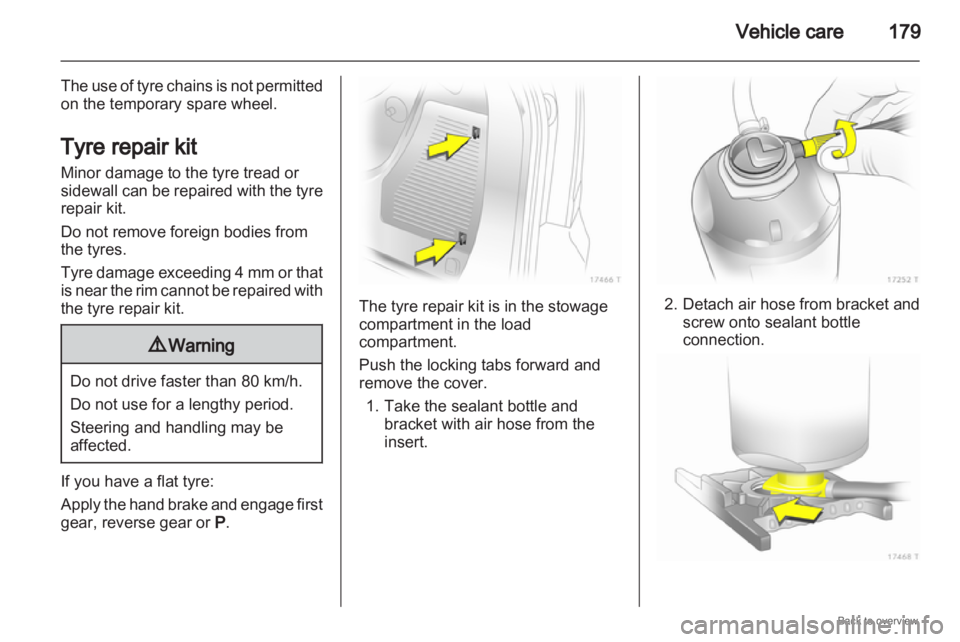
gear, reverse gear or P. The tyre repair kit is in the stowage
compartment in the load
compartment.
Push the locking tabs forward and
remove the cover.
1.
Take the sealant bottle andbracket with air hose from the
insert. 2. Detach air hose from bracket and
screw onto sealant bottle
connection.
Page 182 of 228

182
Vehicle care
Wheel changing
Some vehicles are equipped with
a tyre repair kit instead of a spare
wheel 3 179.
Make the following preparations and
observe the following information: ■ Park
the vehicle on a level, firm and
non-skid surface. The front wheels
must be in the straight-ahead
position.
■ Apply the hand brake and engage first gear, reverse gear or P.
■ Remove the spare wheel 3 183.
■ Never change more than one wheel at once.
■ Use the jack only to change wheels.
■ If the ground on which the vehicle is standing is soft, a solid board
(max. 1 cm thick) should be placed
under the jack.
■ No people or animals may be in the vehicle when it is jacked up.
■ Never crawl under a jacked-up vehicle.
■ Do not start the vehicle when it is raised on the jack. ■ Before screwing in the wheel bolts,
clean them and lightly coat the
taper of each wheel bolt with
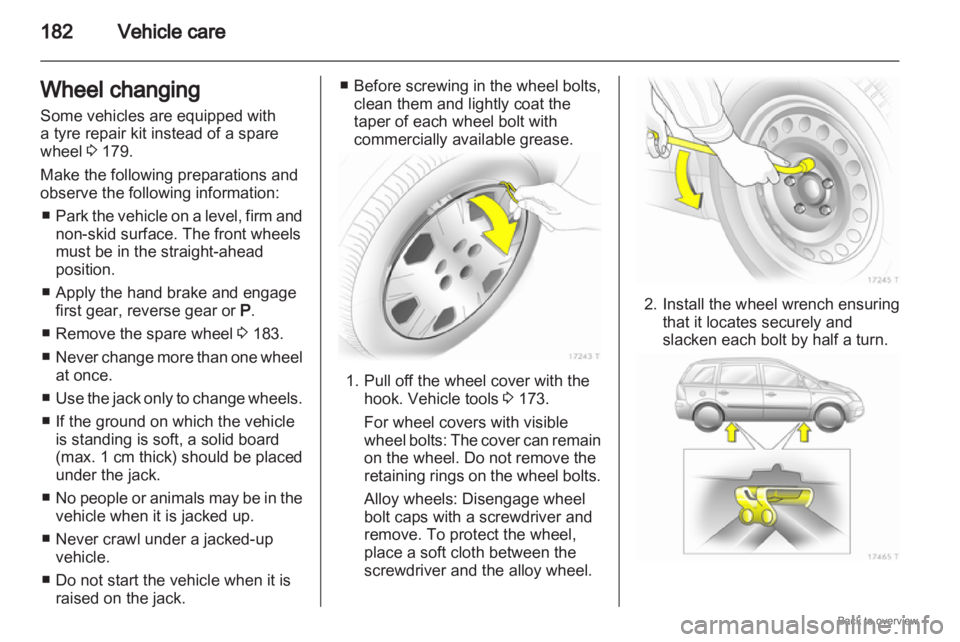
commercially available grease. 1. Pull off the wheel cover with the
hook. Vehicle tools 3 173.
For wheel covers with visible
wheel
bolts: The cover can remain
on the wheel. Do not remove the
retaining rings on the wheel bolts.
Alloy wheels: Disengage wheel
bolt caps with a screwdriver and
remove. To protect the wheel,
place a soft cloth between the
screwdriver and the alloy wheel. 2. Install the wheel wrench ensuring
that it locates securely and
slacken each bolt by half a turn.
Page 183 of 228

Vehicle care
183
3. Ensure the jack is positioned correctly with the vehicle jacking
points. 4. Set the jack to the necessary
height before positioning it directly
below the jacking point in
a manner that prevents it from
slipping. Attach jack handle and with the
jack correctly aligned rotate
handle until wheel is clear of the
ground.
5.
Unscrew the wheel bolts.
6. Change the wheel.
7. Screw in the wheel bolts.
8. Lower vehicle.
9. Install the wheel wrench ensuring that it locates securely and tighten
each bolt in a crosswise
sequence. Tightening torque is
110 Nm.
10. Align the valve hole in the wheel cover with the tyre valve before
installing. Install wheel bolt caps.
11.
Stow the replaced wheel 3 179
and the vehicle tools 3 173.
12. Check the tyre pressure of the installed tyre and also the wheel
bolt torque as soon as possible.
Have the defective tyre renewed or
repaired.
Spare wheel
The spare wheel can be classified as
a temporary spare wheel depending
on the size compared to the other
mounted wheels and country
regulations.
The spare wheel has a steel rim.
Use of a spare wheel that is smaller
than the other wheels or together with
winter tyres could affect driveability.
Have the defective tyre replaced as
soon as possible.