2009 OPEL AGILA bulb
[x] Cancel search: bulbPage 63 of 153

5-13Instruments and controls
If it illuminates when the engine is
running; there may be a fault in the
engine electronics: interrupt your
journey and seek the assistance of a
workshop.
If regeneration of the diesel particle
filter is not successful or possible (3
5-13 “8 Diesel particle filter 3“), the
control indicator may illuminate and
the vehicle goes into limp home
mode: interrupt your journey and
seek the assistance of a workshop
immediately.
Further information 3 9-7.
Y Low fuel
If it illuminates during driving; fuel
level is low: fill up fuel tank as soon
as possible.
Never let the tank run dry!
Erratic fuel supply can cause catalytic
converter to overheat 3 9-8.
Diesel engines: The engine stops and
control indicator Z illuminates if the
fuel level is too low (3 5-11 “Z
Exhaust emissions”). If the tank has
been run dry, bleed the fuel system 3
10-7.Refuelling 3 9-12, fuel tank capacity
3 12-5.
8 Diesel particle filter 3
Will illuminate briefly in yellow when
the ignition is switched on.
If it illuminates during driving, the
diesel particle filter requires cleaning.
As soon as the road and traffic
situation permits it, increase speed to
more than 75 km/h (50 mph) for
approx. 30 minutes. The control
indicator extinguishes as soon as
cleaning is complete.
If regeneration of the diesel particle
filter is not successful or possible (3
5-12 “A Service vehicle soon 3“),
control indicator A may illuminate
and the vehicle goes into limp home
mode: interrupt your journey and
seek the assistance of a workshop
immediately.
Further information 3 9-7.
O Turn signal lamps
The appropriate control indicator will
flash in green when the turn signal is
on. Rapid flash; failure of a turn signal
bulb or the corresponding fuse.
Both control indicators flash when the
hazard warning lamps are active.
Turn signal lamps 3 6-2, bulb
replacement 3 10-7, fuses 3 10-11.
Warning chimes
While driving:
�„when operating the turn signals.
�„if driver’s seat belt is not engaged
and vehicle speed exceeds approx.
15 km/h (9 mph).
When the vehicle is parked and
driver’s door is opened:
�„with exterior lamps switched on
(and ignition key removed).
�„when the key is in the ignition
switch.
Seat belt warning chime 33-7.
Driving hints 3 9-1.
Page 101 of 153

10-1Vehicle care
Vehicle care General information
Accessories and vehicle
modifications
We recommend the use of ‘Opel
genuine parts and accessories’
expressly released for your vehicle
type. Do not make any changes to the
vehicle’s electrical systems.
End-of-life vehicle recovery
Information on end-of-life vehicle
recovery centres and the recycling of
end-of-life vehicles is available at
www.opel.com.
Vehicle checks
Bonnet .................................. 10-2
Engine oil .............................. 10-3
Engine coolant ...................... 10-4
Windscreen/rear window
washer fluid ........................ 10-5
Windscreen/rear window
wipers ................................. 10-5
Brakes ................................... 10-6
Battery .................................. 10-6
Diesel fuel system, bleeding . 10-7
Bulb replacement .................. 10-7
Fuses .................................... 10-11
Wheels .................................. 10-15
Tyre repair kit 3 ..................... 10-18
Wheel changing .................... 10-22
Jump starting 3 ..................... 10-26
Towing .................................. 10-28
Interior care........................... 10-29
Exterior care ......................... 10-30
9 Warning
Only carry out engine
compartment checks when the
ignition is switched off.
The cooling fan can start to
operate unexpectedly, even when
the ignition is switched off.
9 Danger
Electronic ignition systems
generate very high voltages. Do
not touch the ignition system; high
voltage can be fatal.
Page 107 of 153

10-7Vehicle care
Diesel fuel system, bleeding
It is possible to restart the engine if
the tank has been run dry.
With vehicle stationary, turn key to
ignition switch position ON for more
than 5 seconds, then turn to START.
If engine does not start, wait
approx.15 seconds before repeating
starting procedure.
If the engine will still not start, seek
the assistance of a workshop.
Bulb replacement
Before replacing a bulb, switch off
ignition and relevant switch.
Only hold new bulbs at base! Do not
touch the bulb glass with bare hands.
Replacement bulb must be in
accordance with data on base of
defective bulb. Do not exceed
wattage given on bulb base.
Headlamps
Battery removal
Diesel engines: for headlamp bulb
replacement on the battery side, it is
necessary to first disconnect and
remove the battery then remove the
coolant expansion tank and fuse box.
1. Switch off ignition and exterior
lamps.
2. Open bonnet and disconnect
battery by detaching negative (-)
terminal followed by positive (+)
terminal.3. Unscrew the retaining bolt using a
suitable tool and remove battery,
coolant expansion tank and fuse
box.
When reinstalling the battery,
reconnect the positive (+) terminal
first and then the negative (-)
terminal.
Page 108 of 153

10-8 Vehicle care
High beam and dipped beam
1. Remove headlamp protective
cover.
2. Detach plug connector from bulb.
3. Push retaining spring wire clip
forward and unhook it.
4. Remove bulb from reflector
housing and pull bulb straight out of
socket.
5. Insert new bulb by pushing in and
install in reflector housing.
6. Engage spring wire clip, and
reattach plug connector to bulb.7. Replace headlamp protective
cover.
Parking lamps
1. Remove headlamp protective
cover.
2. Remove parking lamp socket from
reflector housing.
3. Remove bulb (2) from socket by
pulling straight out.
4. Insert new bulb by pushing in.
5. Install parking lamp socket in
reflector housing.
6. Replace headlamp protective
cover.
Front turn signal lamps
1. Rotate bulb holder anti-clockwise
and remove from reflector housing.
2. Push bulb (1) into socket slightly,
rotate anti-clockwise and remove.
3. Insert new bulb and install bulb
holder in reflector housing by
rotating clockwise.
Front fog lamps 3
Access the rear of the fog lamp from
behind the front bumper.
1. Rotate bulb holder anti-clockwise
and remove from reflector housing.
Page 109 of 153

10-9Vehicle care
2. Remove bulb from socket by
pulling straight out.
3. Insert new bulb by pushing in.
4. Insert bulb holder in reflector
housing, rotate clockwise and
engage in position.
If the bulb is inaccessible, seek the
assistance of a workshop.
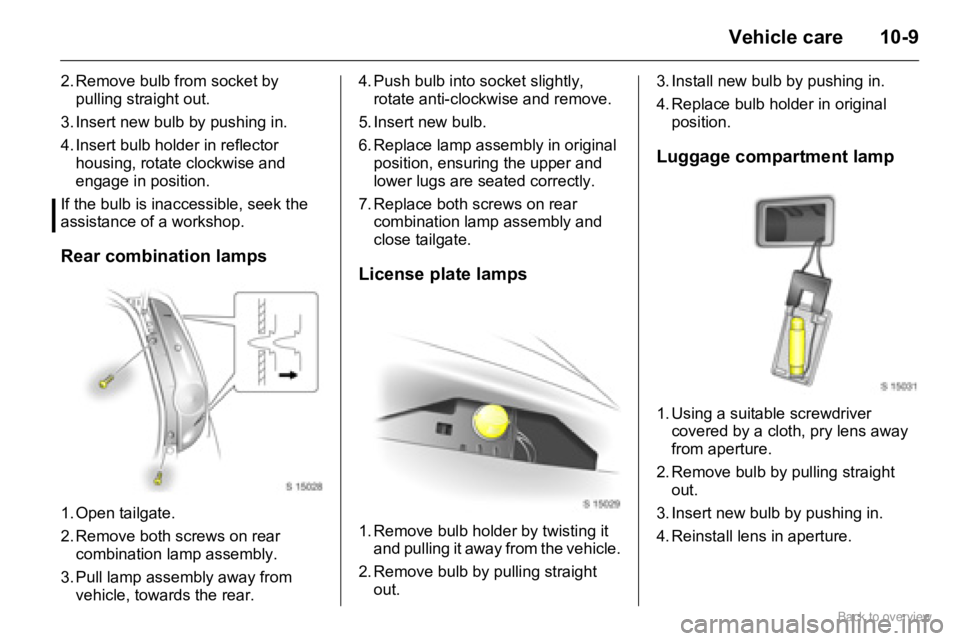
Rear combination lamps
1. Open tailgate.
2. Remove both screws on rear
combination lamp assembly.
3. Pull lamp assembly away from
vehicle, towards the rear.4. Push bulb into socket slightly,
rotate anti-clockwise and remove.
5. Insert new bulb.
6. Replace lamp assembly in original
position, ensuring the upper and
lower lugs are seated correctly.
7. Replace both screws on rear
combination lamp assembly and
close tailgate.
License plate lamps
1. Remove bulb holder by twisting it
and pulling it away from the vehicle.
2. Remove bulb by pulling straight
out.3. Install new bulb by pushing in.
4. Replace bulb holder in original
position.
Luggage compartment lamp
1. Using a suitable screwdriver
covered by a cloth, pry lens away
from aperture.
2. Remove bulb by pulling straight
out.
3. Insert new bulb by pushing in.
4. Reinstall lens in aperture.
Page 110 of 153

10-10 Vehicle care
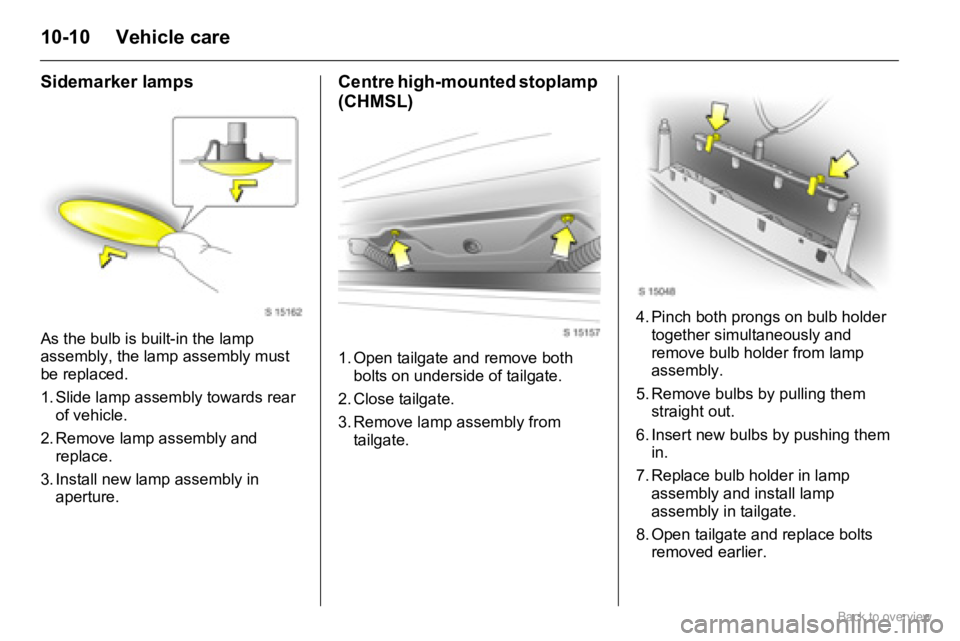
Sidemarker lamps
As the bulb is built-in the lamp
assembly, the lamp assembly must
be replaced.
1. Slide lamp assembly towards rear
of vehicle.
2. Remove lamp assembly and
replace.
3. Install new lamp assembly in
aperture.
Centre high-mounted stoplamp
(CHMSL)
1. Open tailgate and remove both
bolts on underside of tailgate.
2. Close tailgate.
3. Remove lamp assembly from
tailgate.4. Pinch both prongs on bulb holder
together simultaneously and
remove bulb holder from lamp
assembly.
5. Remove bulbs by pulling them
straight out.
6. Insert new bulbs by pushing them
in.
7. Replace bulb holder in lamp
assembly and install lamp
assembly in tailgate.
8. Open tailgate and replace bolts
removed earlier.
Page 111 of 153

10-11Vehicle care
Interior lamps
1. Using a suitable screwdriver
covered by a cloth, pry lens away
from roof lining.
2. Remove bulb by pulling straight
out.
3. Insert new bulb, ensuring contact
springs hold the bulb securely.
4. Reinstall lens in roof lining by
pushing it back into original
position.
Instrument illumination
Have bulbs replaced by a workshop.
Electrical system
Fuses
Only install fuses of the specified
rating. Each fuse has its rating written
on it, in addition the fuses are colour
coded.
There are two fuse boxes in the
vehicle: the instrument panel fuse
box is located on the left-hand side of
the vehicle below the instrument
panel and the engine compartment
fuse box is located next to the battery.
It is advisable to carry a full set of
fuses.
Spare fuses can be kept in the engine
compartment fuse box.
When replacing a fuse, turn off the
respective switch and the ignition.
Page 148 of 153

13-1 Index
IndexA
ABS ........................................... 9-9
Accessories
............... 3-9, 4-5, 10-6
Accessory socket
....................... 5-4
Air conditioning system ....... 8-1, 8-3
Air intake
.................................... 8-6
Air recirculation
.......................... 8-3
Air vents ..................................... 8-4
Airbags
.................................... 3-13
Alternator, see Charging system
5-9
Antenna .......................... 7-6, 10-30
Antifreeze
....................... 10-4, 11-6
Antifreeze protection
....... 10-4, 10-5
Anti-knock quality of fuel .......... 9-12
Octane number
.................... 12-3
Anti-theft locking system
............ 2-6
Anti-theft protection ................... 9-2
Ashtrays
..................................... 5-5
Automatic transmission
............. 9-3
Automatic mode ..................... 9-4
Engine braking assistance
..... 9-4
Fault
....................................... 9-5
Interruption of power supply ... 9-5
Kickdown
................................ 9-4
Rocking the vehicle
................ 9-5
Selector lever ......................... 9-4
Transmission display
.............. 9-3
Automatic wiping
....................... 5-3B
Battery
..................................... 10-6
Interruption of power supply
... 9-5
Before starting-off
...................... 9-2
Belt force limiters ....................... 3-6
Belt tensioners
........................... 3-6
Belts
................................ 3-5, 10-29
Bleeding, diesel fuel system .... 10-7
Bonnet
..................................... 10-2
Boot, see Luggage compartment
3-3
Brake assist ............................. 9-10
Brake fluid
................................ 11-7
Brake system
............................. 9-9
Brakes ....................................... 9-9
ABS
........................................ 9-9
Brake assist
.......................... 9-10
Brake fluid ............................ 10-6
Brake lamps
......................... 10-9
Foot brake
.............................. 9-9
Parking brake ......................... 9-9
Bulb replacement
..................... 10-7
C
Capacities
................................ 12-5
Care
....................................... 10-29
Catalytic converter
..................... 9-8
Central locking system ....... 2-3, 2-4
Centre high-mounted
stoplamp (CHMSL)
Bulb replacement
............... 10-10