Page 161 of 336

1. PRESET A·B·C button
2.
CD eject button
3. FM·AM button
4. CD insert slot
5. CD button
6. MENU button7. TUNE button
8. RPT button
9. PWR button/VOL control knob
10. RDM button
11. Station select (1 - 6) buttons
12. SEEK button
FM/AM RADIO WITH COMPACT
DISC (CD) PLAYER (if so equipped)
For all operation precautions, see9Audio opera-
tion precautions9earlier in this section.
Audio main operation
Power button and VOL control knob
Turn the ignition switch to the ACC or ON posi-
tion, then press the PWR (power) button. If you
listen to the radio with the engine not running,
turn the ignition switch to the ACC position. The
mode (radio or CD) that was playing immediately
before the system was turned off resumes play-
ing.
When no CD is loaded, the radio comes on.
Pressing the PWR button again turns the system
off.
Turn the VOL control knob to the right to increase
volume or to the left to decrease volume.
MENU button (BASS, TREBLE, FADE, BAL-
ANCE and CLOCK):
Press the MENU button to change the mode as
follows:
BAS!TRE!FAD!BAL!CLOCK!Audio
!BAS
WHA1167
Heater, air conditioner, audio and phone systems4-23
ZREVIEW COPYÐ2009 Xterra(xtr)
Owners ManualÐUSA_English(nna)
05/21/08Ðdebbie
X
Page 162 of 336

To adjust Bass, Treble, Fade and Balance, press
the MENU button until the desired mode appears
in the display. Press the SEEK button to adjust
Bass and Treble to the desired level. You can also
use the SEEK button to adjust Fade and Balance
modes. Fade adjusts the sound level between the
front and rear speakers and Balance adjusts the
sound between the right and left speakers.
Once you have adjusted the sound quality to the
desired level, press the MENU button repeatedly
until the radio or CD display reappears. Other-
wise, the radio or CD display will automatically
reappear after about 10 seconds.
NOTE:
If the clock is enabled, pressing the MENU
button will change the mode as follows:
BAS!TRE!FAD!BAL!CLOCK!
Hour adjustment!Minute adjustment!
Audio!BAS
For more information on setting the clock, see
“Clock set” later in this section.
Clock operation
Press the MENU button until CLOCK is dis-
played; use the SEEK button to turn the clock
display on (CLK ON) or off (CLK OFF) .Clock set
If the clock is not displayed with the ignition
switch in the ACC or ON position, you need to
select the CLK ON mode. Press the MENU but-
ton repeatedly until CLOCK is displayed. Use the
SEEK button to enable CLK ON mode.
1. Press the MENU button repeatedly until
CLOCK mode appears; press the SEEK
button until CLK ON appears.
2. Press the MENU button again; the hours will
start flashing.
3. Press the SEEK button
orto
adjust the hour.
4. Press the MENU button again; the display
will switch to the minute adjustment mode.
5. The minutes will start flashing. Press SEEK
button
orto adjust the minutes.
6. Press the MENU button again to exit the
clock set mode.
The display will return to the regular clock display
after 10 seconds, or press the MENU button
again to return to the regular clock display.Resetting the time
Hold the MENU button down and then press the
TUNE/SEEK button; the time will reset as fol-
lows:
cIf the displayed minutes before the reset are
in the range of :00 - :29, the hour displayed
before the reset will stay the same and the
minutes will be reset to :00.
cIf the displayed minutes before the reset are
in the range of :30 - :59, the hour displayed
before the reset will advance by one hour
and the minutes will be reset to :00.
For example, if the MENU button and the TUNE/
SEEK button are pressed while the time dis-
played is between 8:00 and 8:29, the display will
be reset to 8:00. If the buttons were pressed
while the time was between 8:30 and 8:59, the
display will be reset to 9:00. At the same time the
display will return to the audio.
FM/AM radio operation
FM·AM button:
Press the FM·AM button to change from AMÃ!
FM reception.
The FM stereo indicator, ST, illuminates during
FM stereo reception. When the stereo broadcast
signal is weak, the radio automatically changes
from stereo to monaural reception.
4-24Heater, air conditioner, audio and phone systems
ZREVIEW COPYÐ2009 Xterra(xtr)
Owners ManualÐUSA_English(nna)
05/21/08Ðdebbie
X
Page 163 of 336

TUNE buttons:
Manual tuning
Press the TUNE
orbutton for less
than 0.5 seconds for manual tuning.
To move quickly through the channels, press and
hold either TUNE
orbutton down
for more than 1.5 seconds.
SEEK buttons:
SEEK tuning
Press the SEEK
orbutton to seek
through the frequencies. Seek tuning begins
from low to high frequencies, or high to low
frequencies, depending on which button is
pressed, and stops at the next broadcasting sta-
tion. Once the highest broadcasting station is
reached, the radio continues in the seek mode at
the lowest broadcasting station.
Station memory operations:
18 stations can be set for the FM and AM radio to
the A, B and C preset button in any combination
of AM or FM stations.
1. Press the PRESET A·B·C button to change
between storage banks. The radio displaysthe icon A, B or C to indicate which set of
presets are active.
2. Tune to the desired station using manual
TUNE or SEEK tuning. Press and hold any of
the desired station memory buttons (1 – 6)
until a beep sound is heard. (The radio mutes
when the select button is pressed.)
3. The channel indicator will then come on and
the sound will resume. Programming is now
complete.
4. Other buttons can be set in the same man-
ner.
If the battery cable is disconnected, or if the fuse
opens, the radio memory will be canceled. In that
case, reset the desired stations.
Compact disc (CD) player operation
Turn the ignition switch to the ACC or ON posi-
tion, and carefully insert the compact disc into the
slot with the label side up. The compact disc is
automatically pulled into the slot and starts to
play.
If the radio is already operating, it automatically
turns off and the compact disc begins to play.CD button:
When the CD button is pressed with a compact
disc loaded and the radio playing, the radio turns
off and the last used compact disc starts to play.
TUNE (rewind and fast
forward) buttons:
When the TUNE
orbutton is
pressed while the compact disc is playing, the
compact disc plays at an increased speed while
rewinding or fast forwarding. When the button is
released, the compact disc returns to normal play
speed.
SEEK buttons:
When
is pressed while the compact disc
is playing, the next track following the present
one starts to play from the beginning.
Press
several times to skip several tracks.
Each time the button is pressed, the CD ad-
vances 1 additional track. The track number ap-
pears in the display window. (When the last track
on the compact disc is skipped, the first track is
played.)
When
is pressed, the track being played
returns to the beginning. Press
several
times to skip back several tracks. Each time the
button is pressed, the CD moves back one track.
Heater, air conditioner, audio and phone systems4-25
ZREVIEW COPYÐ2009 Xterra(xtr)
Owners ManualÐUSA_English(nna)
05/21/08Ðdebbie
X
Page 164 of 336

SEEK (Scan CDs) button:
Press and hold the SEEK
button for more
than 1.5 seconds to scan through the first 10
seconds of a track on the compact disc. The
SCAN icon is flashed during scan mode.
The scan mode is canceled once it scans through
all the tracks on the disc, or if the SEEK
orbutton is pressed during the scan
mode.
RPT button:
When the RPT button is pressed while the com-
pact disc is being played, the play pattern can be
changed as follows:
1Ã!Normal
1: The track that is currently playing will be re-
peated.
RDM button:
When the RDM button is pressed while the com-
pact disc is being played, the play pattern can be
changed as follows:
RDMÃ!Normal
RDM: Tracks from the disc that is currently play-
ing will be played randomly.
CD EJECT button:
When the
button is pressed with a com-
pact disc loaded, the compact disc will be
ejected.
When the
button is pressed while the
compact disc is being played, the compact disc
will eject and the system will turn off.
CD IN indicator:
CD IN indicator appears on the display when the
CD is loaded with the system on.
4-26Heater, air conditioner, audio and phone systems
ZREVIEW COPYÐ2009 Xterra(xtr)
Owners ManualÐUSA_English(nna)
05/21/08Ðdebbie
X
Page 165 of 336

1. PRESET A·B·C button
2. Display screen
3. CD button
4.
CD eject button
5. CD insert slot
6. MENU button7. AUDIO button
8. Station select (1 - 6) buttons
9. SEEK/TRACK (FF/REV) button
10. PWR/VOL control knob
11. BAND button
FM/AM RADIO WITH COMPACT
DISC (CD) PLAYER (if so equipped)
For all operation precautions, see9Audio opera-
tion precautions9earlier in this section.
PWR/VOL control knob
Turn the ignition key to the ACC or ON position,
then press the PWR/VOL control knob. If you
listen to the radio with the engine not running,
turn the key to the ACC position. The mode (radio
or CD) that was playing immediately before the
system was turned off resumes playing.
When no CD is loaded, the radio comes on.
Pressing the PWR/VOL control knob again turns
the system off.
Turn the PWR/VOL control knob to the right to
increase volume or to the left to decrease volume.
AUDIO button (Bass, Treble, Fade, Bal-
ance):
Press the AUDIO button to change the mode as
follows:
BASS!TREB!FAD!BAL!Audio!
BASS
To adjust Bass, Treble, Fade and Balance, press
the AUDIO button until the desired mode ap-
pears in the display. Press the SEEK/TRACK
button to adjust Bass and Treble to the desired
WHA0586
Heater, air conditioner, audio and phone systems4-27
ZREVIEW COPYÐ2009 Xterra(xtr)
Owners ManualÐUSA_English(nna)
05/21/08Ðdebbie
X
Page 166 of 336

level. You can also use the SEEK/TRACK button
to adjust Fade and Balance modes. Fade adjusts
the sound level between the front and rear speak-
ers and Balance adjusts the sound between the
right and left speakers.
Once you have adjusted the sound quality to the
desired level, press the AUDIO button repeatedly
until the radio or CD display reappears. Other-
wise, the radio or CD display will automatically
reappear after about 7 seconds.
Clock set
1. Press and hold the MENU button until it
beeps (for more than 2 seconds) to enter the
clock set mode.
2. The hours will start flashing. Press the
SEEK/TRACK button
orto ad-
just the hours.
3. Press the MENU button until the radio beeps
to switch to the minute adjustment.
4. The minutes will start flashing. Press the
SEEK/TRACK button
orto ad-
just the minutes.
5. Press the MENU button again to exit the
clock set mode.The display will return to the regular clock display
after 7 seconds, or press the MENU button again
to return to the regular clock display.
FM/AM radio operation
FM/AM band select:
Pressing the BAND button will change the band
as follows:
AMÃ!FM
When the BAND button is pressed while the
ignition switch is in the ACC or ON position, the
radio will come on at the station last played.
If a compact disc is playing when the BAND
button is pressed, the compact disc will auto-
matically be turned off and the last radio station
played will come on.
The FM stereo indicator, ST, illuminates during
FM stereo reception. When the stereo broadcast
signal is weak, the radio automatically changes
from stereo to monaural reception.
MENU button:
Press the MENU button while the radio is playing
to change the tuning mode as follows:
SEEK tuning mode!TUNE mode!SCAN
tuning modeTUNE and SCAN are shown in the display win-
dow for each mode. No icon is displayed for
SEEK tuning.
SEEK tuning
While in SEEK tuning mode, press the SEEK/
TRACK button
orfor less than 1.5
seconds. SEEK tuning begins from low to high
frequencies or high to low frequencies, depend-
ing on which button is pressed, and stops at the
next broadcasting station. Press the
but-
ton, once the highest broadcasting station is
reached, the radio continues in the SEEK mode
at the lowest broadcasting station. Press
the
button, once the lowest broadcasting
station is reached, the radio continues in the
SEEK mode at the highest broadcasting station.
Manual tuning
While in TUNE mode, press the SEEK/TRACK
button
orfor manual tuning. Press
and hold the SEEK/TRACK button
orto move quickly through the channels.
4-28Heater, air conditioner, audio and phone systems
ZREVIEW COPYÐ2009 Xterra(xtr)
Owners ManualÐUSA_English(nna)
05/21/08Ðdebbie
X
Page 167 of 336

SCAN tuning
While in SCAN tuning mode, press and hold the
SEEK/TRACK button
orfor more
than 1.5 seconds.
Scan tuning begins from low to high frequencies
or high to low frequencies, depending on which
SEEK/TRACK button
oris pressed.
scan tuning stops at each broadcasting station
for 5 seconds. When scanning, SCAN illumi-
nates in the display and the radio station blinks.
When temporarily stopped on a station, SCAN
blinks and the radio station display is solid.
Pressing the SEEK/TRACK button
oragain during this 5 second period stops
scan tuning and the radio remains tuned to that
radio station.
Station memory operations:
18 stations can be set for the FM and AM radio to
the A, B and C preset button in any combination
of AM or FM stations.
1. Press the PRESET A·B·C button to change
between storage banks. The radio displays
the icon A, B or C to indicate which set of
presets are active.
2. Tune to the desired station using manual
TUNE or SEEK tuning. Press and hold any ofthe desired station memory buttons (1 – 6)
until a beep sound is heard. (The radio mutes
when the select button is pressed.)
3. The channel indicator will then come on and
the sound will resume. Programming is now
complete.
4. Other buttons can be set in the same man-
ner.
If the battery cable is disconnected, or if the fuse
opens, the radio memory will be canceled. In that
case, reset the desired stations.
Compact disc (CD) player operation
Turn the ignition switch to the ACC or ON posi-
tion, and carefully insert the compact disc into the
slot with the label side up. The compact disc is
automatically pulled into the slot and starts to
play.
If the radio is already operating, it automatically
turns off and the compact disc begins to play.
CD button:
When the CD button is pressed with a compact
disc loaded and the radio playing, the radio turns
off and the compact disc starts to play.
SEEK/TRACK button:
When the SEEK/TRACK button
is
pressed while the compact disc is playing, the
next track following the present one starts to play
from the beginning. Press SEEK/TRACK
button
several times to skip several tracks.
Each time the button is pressed, the CD ad-
vances 1 additional track. The track number ap-
pears in the display window. (When the last track
on the compact disc is skipped, the first track is
played.)
When SEEK/TRACK button
is pressed,
the track being played returns to the beginning.
Press SEEK/TRACK button
several times
to skip back several tracks. Each time the button
is pressed the CD moves back 1 track.
SEEK/TRACK (FF/REV)
button:
Press and hold the SEEK/TRACK button
orwhile a compact disc is playing, the
compact disc plays at an increased speed while
fast forwarding or rewinding. When the button is
released, the compact disc returns to normal play
speed.
Heater, air conditioner, audio and phone systems4-29
ZREVIEW COPYÐ2009 Xterra(xtr)
Owners ManualÐUSA_English(nna)
05/21/08Ðdebbie
X
Page 168 of 336

MENU button:
When the MENU button is pressed while the
compact disc is playing, the play pattern changes
as follows:
RPTÃ!MIXÃ!Normal
RPT: The track that is currently playing will be
repeated.
MIX: The order of the tracks on the disc will be
mixed during play, not following the sequence on
the compact disc. The same track may be re-
peated twice. Press the
button while in the
MIX mode and tracks will be chosen at random.
When a new compact disc is inserted, the play
pattern automatically changes to normal.
CD EJECT:
When the
button is pressed with a com-
pact disc loaded, the compact disc will be
ejected.
When the
button is pressed while the
compact disc is playing, the compact disc will
eject and the system will turn off.
CD IN indicator:
This
indicator appears on the display when
a CD is loaded with the audio system on.
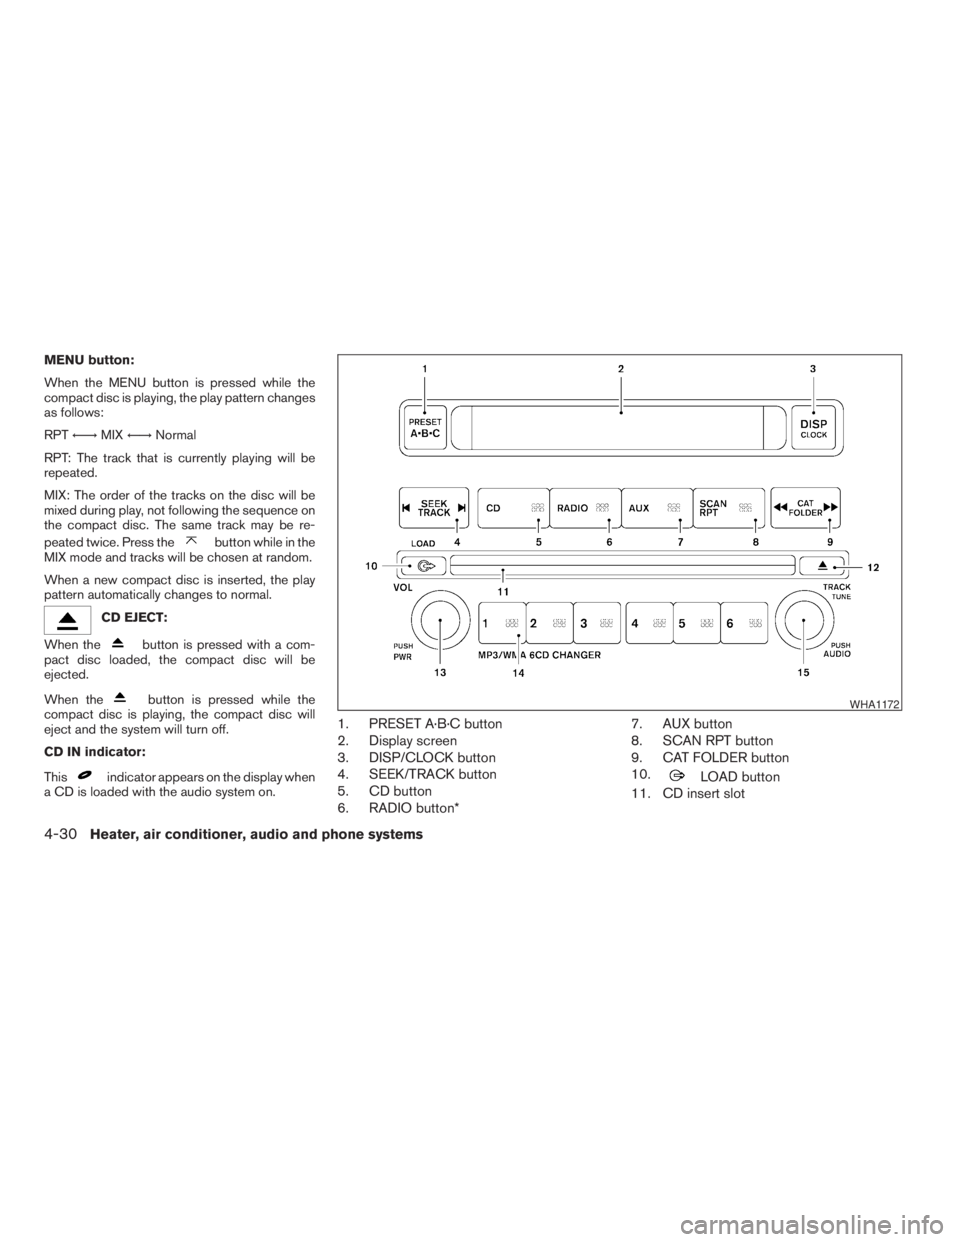
1. PRESET A·B·C button
2. Display screen
3. DISP/CLOCK button
4. SEEK/TRACK button
5. CD button
6. RADIO button*7. AUX button
8. SCAN RPT button
9. CAT FOLDER button
10.
LOAD button
11. CD insert slot
WHA1172
4-30Heater, air conditioner, audio and phone systems
ZREVIEW COPYÐ2009 Xterra(xtr)
Owners ManualÐUSA_English(nna)
05/21/08Ðdebbie
X