2009 NISSAN TIIDA width
[x] Cancel search: widthPage 3056 of 4331
EM
NP
O
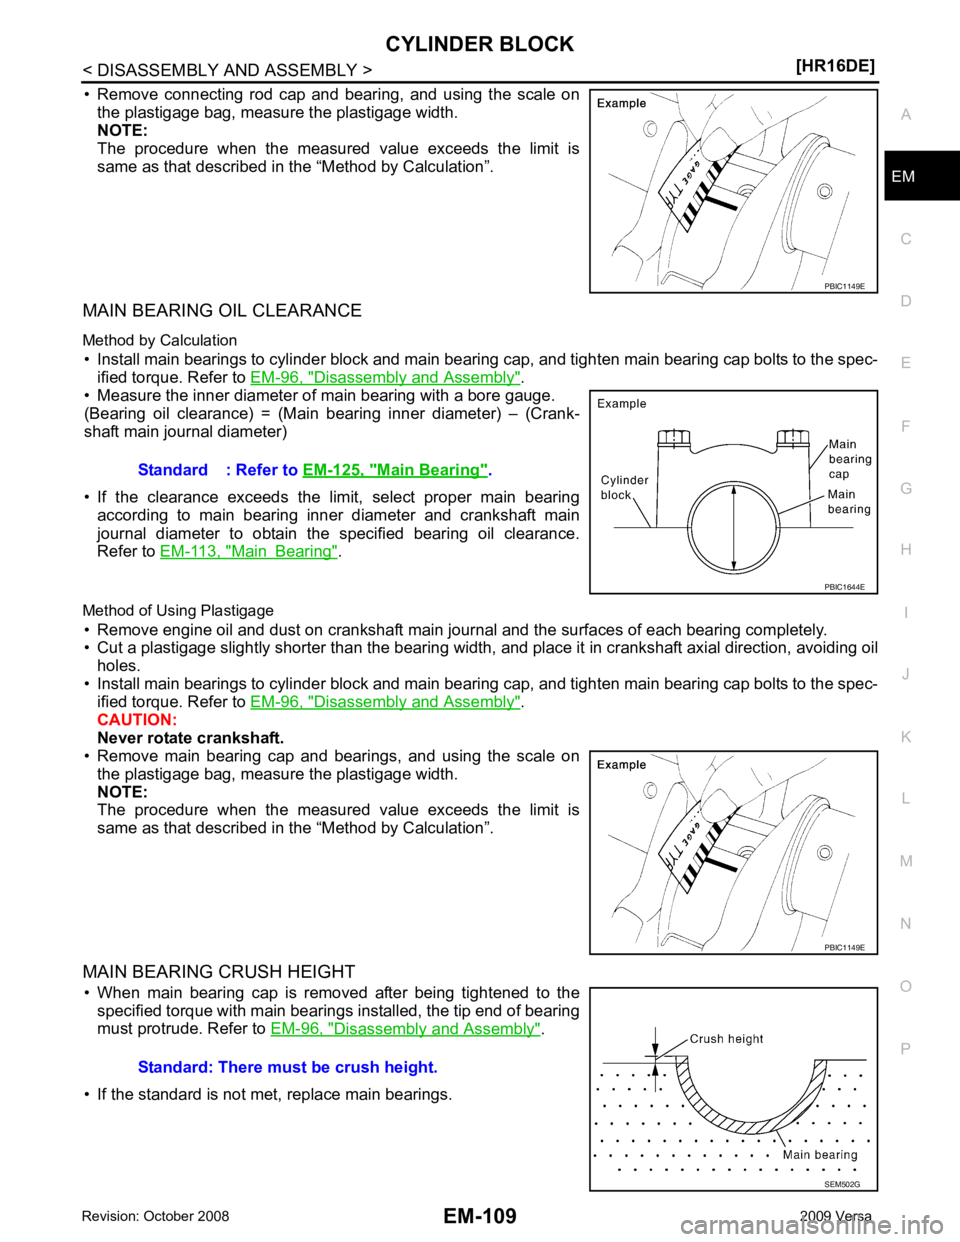
• Remove connecting rod cap and bearing, and using the scale on
the plastigage bag, measure the plastigage width.
NOTE:
The procedure when the measured value exceeds the limit is
same as that described in the “Method by Calculation”.
MAIN BEARING OIL CLEARANCE
Method by Calculation • Install main bearings to cylinder block and main bearing cap, and tighten main bearing cap bolts to the spec- ified torque. Refer to EM-96, " Disassembly and Assembly " .
• Measure the inner diameter of main bearing with a bore gauge.
(Bearing oil clearance) = (Main bearing inner diameter) – (Crank-
shaft main journal diameter)
• If the clearance exceeds the limit, select proper main bearing according to main bearing inner diameter and crankshaft main
journal diameter to obtain the specified bearing oil clearance.
Refer to EM-113, " Main Bearing " .
Method of Using Plastigage • Remove engine oil and dust on crankshaft main journal and the surfaces of each bearing completely.
• Cut a plastigage slightly shorter than the bearing width, and place it in crankshaft axial direction, avoiding oil
holes.
• Install main bearings to cylinder block and main bearing cap, and tighten main bearing cap bolts to the spec- ified torque. Refer to EM-96, " Disassembly and Assembly " .
CAUTION:
Never rotate crankshaft.
• Remove main bearing cap and bearings, and using the scale on
the plastigage bag, measure the plastigage width.
NOTE:
The procedure when the measured value exceeds the limit is
same as that described in the “Method by Calculation”.
MAIN BEARING CRUSH HEIGHT • When main bearing cap is removed after being tightened to the specified torque with main bearings installed, the tip end of bearing
must protrude. Refer to EM-96, " Disassembly and Assembly " .
• If the standard is not met, replace main bearings. Main Bearing " .
Page 3068 of 4331
EM
NP
O
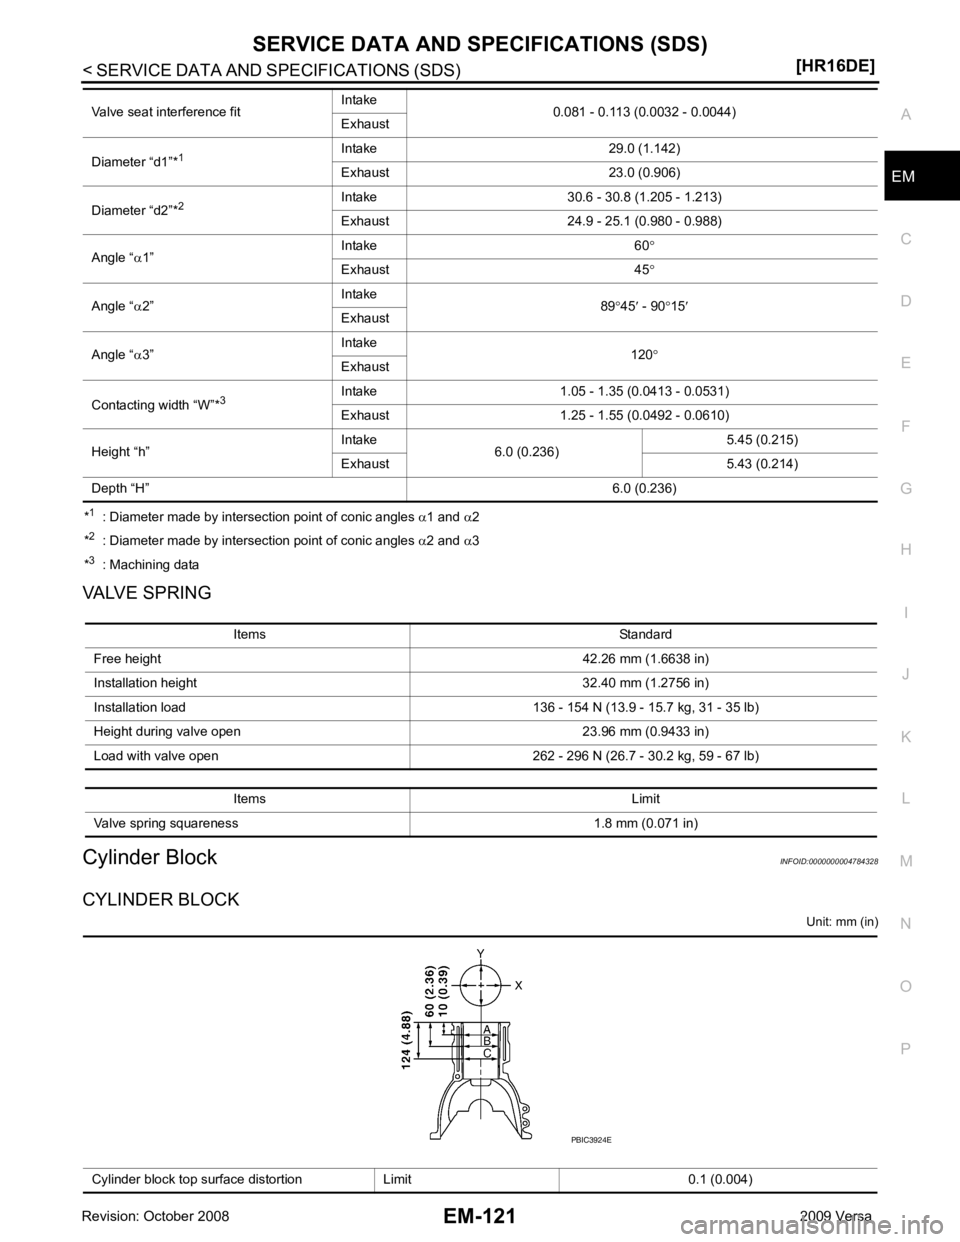
*
1
: Diameter made by intersection point of conic angles α1 and α2
* 2
: Diameter made by intersection point of conic angles α2 and α3
* 3
: Machining data
VALVE SPRING
Cylinder Block INFOID:0000000004784328
CYLINDER BLOCK Unit: mm (in)
Valve seat interference fit
Intake
0.081 - 0.113 (0.0032 - 0.0044)
Exhaust
Diameter “d1”* 1 Intake 29.0 (1.142)
Exhaust 23.0 (0.906)
Diameter “d2”* 2 Intake 30.6 - 30.8 (1.205 - 1.213)
Exhaust 24.9 - 25.1 (0.980 - 0.988)
Angle “ α1” Intake 60
°
Exhaust 45 °
Angle “ α2” Intake
89°45 ′ - 90 °15 ′
Exhaust
Angle “ α3” Intake
120°
Exhaust
Contacting width “W”* 3Intake 1.05 - 1.35 (0.0413 - 0.0531)
Exhaust 1.25 - 1.55 (0.0492 - 0.0610)
Height “h” Intake
6.0 (0.236) 5.45 (0.215)
Exhaust 5.43 (0.214)
Depth “H” 6.0 (0.236)Items Standard
Free height 42.26 mm (1.6638 in)
Installation height 32.40 mm (1.2756 in)
Installation load 136 - 154 N (13.9 - 15.7 kg, 31 - 35 lb)
Height during valve open 23.96 mm (0.9433 in)
Load with valve open 262 - 296 N (26.7 - 30.2 kg, 59 - 67 lb)
Items Limit
Valve spring squareness 1.8 mm (0.071 in) Cylinder block top surface distortion Limit 0.1 (0.004)
Page 3170 of 4331
EM
NP
O
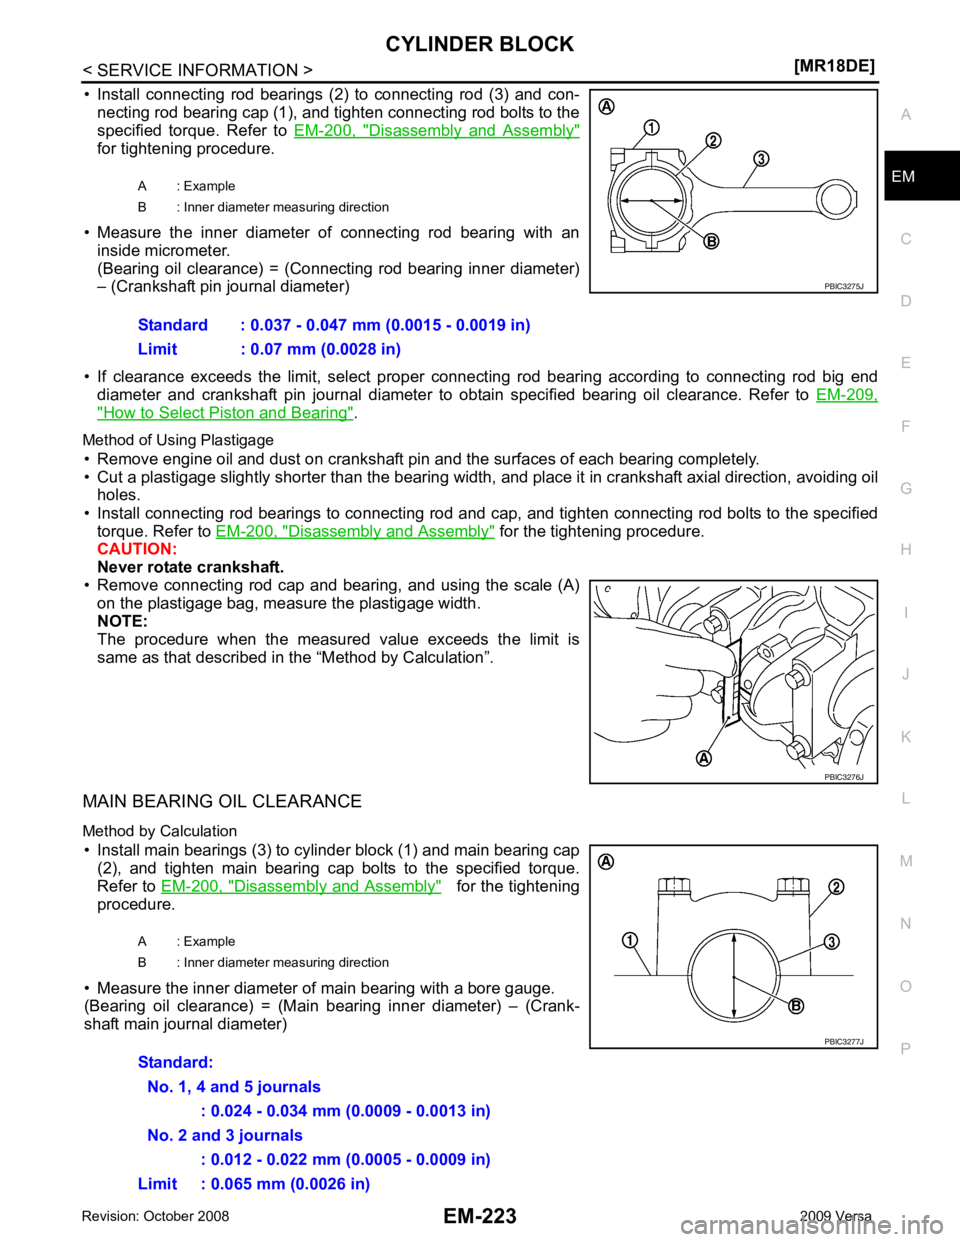
• Install connecting rod bearings (2) to connecting rod (3) and con-
necting rod bearing cap (1), and tighten connecting rod bolts to the
specified torque. Refer to EM-200, " Disassembly and Assembly "
for tightening procedure.
• Measure the inner diameter of connecting rod bearing with an inside micrometer.
(Bearing oil clearance) = (Connecting rod bearing inner diameter)
– (Crankshaft pin journal diameter)
• If clearance exceeds the limit, select proper c onnecting rod bearing according to connecting rod big end
diameter and crankshaft pin journal diameter to obtain specified bearing oil clearance. Refer to EM-209," How to Select Piston and Bearing " .
Method of Using Plastigage • Remove engine oil and dust on crankshaft pin and the surfaces of each bearing completely.
• Cut a plastigage slightly shorter than the bearing width, and place it in crankshaft axial direction, avoiding oil
holes.
• Install connecting rod bearings to connecting rod and c ap, and tighten connecting rod bolts to the specified
torque. Refer to EM-200, " Disassembly and Assembly " for the tightening procedure.
CAUTION:
Never rotate crankshaft.
• Remove connecting rod cap and bearing, and using the scale (A) on the plastigage bag, measure the plastigage width.
NOTE:
The procedure when the measured value exceeds the limit is
same as that described in the “Method by Calculation”.
MAIN BEARING OIL CLEARANCE
Method by Calculation • Install main bearings (3) to cylinder block (1) and main bearing cap (2), and tighten main bearing cap bolts to the specified torque.
Refer to EM-200, " Disassembly and Assembly " for the tightening
procedure.
• Measure the inner diameter of main bearing with a bore gauge.
(Bearing oil clearance) = (Main bearing inner diameter) – (Crank-
shaft main journal diameter) A : Example
B : Inner diameter measuring direction
Standard : 0.037 - 0.047 mm (0.0015 - 0.0019 in)
Limit : 0.07 mm (0.0028 in)
Page 3171 of 4331
How to Select
Piston and Bearing " .
Method of Using Plastigage
• Remove engine oil and dust on crankshaft main journal and the surfaces of each bearing completely.
• Cut a plastigage slightly shorter than the bearing width, and place it in crankshaft axial direction, avoiding oil
holes.
• Install main bearings to cylinder block and main bearing cap, and tighten main bearing cap bolts to the spec- ified torque. Refer to EM-200, " Disassembly and Assembly " for the tightening procedure.
CAUTION:
Never rotate crankshaft.
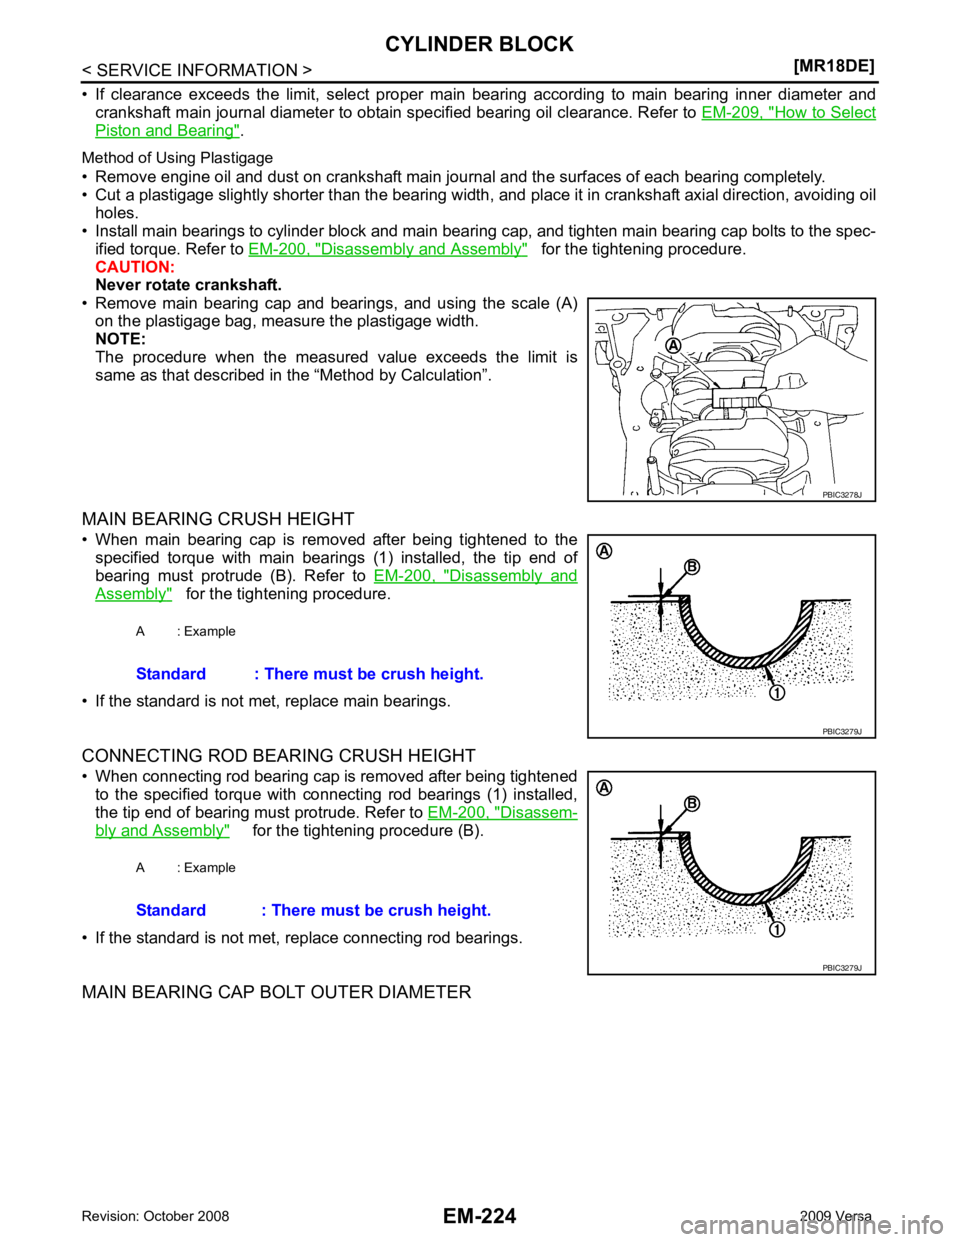
• Remove main bearing cap and bearings, and using the scale (A) on the plastigage bag, measure the plastigage width.
NOTE:
The procedure when the measured value exceeds the limit is
same as that described in the “Method by Calculation”.
MAIN BEARING CRUSH HEIGHT
• When main bearing cap is removed after being tightened to the specified torque with main bearings (1) installed, the tip end of
bearing must protrude (B). Refer to EM-200, " Disassembly and
Assembly " for the tightening procedure.
• If the standard is not met, replace main bearings.
CONNECTING ROD BEARING CRUSH HEIGHT
• When connecting rod bearing cap is removed after being tightened to the specified torque with connecting rod bearings (1) installed,
the tip end of bearing must protrude. Refer to EM-200, " Disassem-
bly and Assembly " for the tightening procedure (B).
• If the standard is not met, replace connecting rod bearings.
MAIN BEARING CAP BOLT OUTER DIAMETER
Page 3178 of 4331
![NISSAN TIIDA 2009 Service Repair Manual SERVICE DATA AND SPECIFICATIONS (SDS)
EM-231
< SERVICE INFORMATION >
[MR18DE] C
D E
F
G H
I
J
K L
M A EM
NP
O
Valve Seat
Unit: mm (in)
*: Diameter made by intersection point of conic angles ( α1) an NISSAN TIIDA 2009 Service Repair Manual SERVICE DATA AND SPECIFICATIONS (SDS)
EM-231
< SERVICE INFORMATION >
[MR18DE] C
D E
F
G H
I
J
K L
M A EM
NP
O
Valve Seat
Unit: mm (in)
*: Diameter made by intersection point of conic angles ( α1) an](/manual-img/5/57398/w960_57398-3177.png)
SERVICE DATA AND SPECIFICATIONS (SDS)
EM-231
< SERVICE INFORMATION >
[MR18DE] C
D E
F
G H
I
J
K L
M A EM
NP
O
Valve Seat
Unit: mm (in)
*: Diameter made by intersection point of conic angles ( α1) and ( α2)
* 2
: Diameter made by intersection point of conic angles ( α2) and α3)
* 3
: Machining data
CAMSHAFT AND CAMSHAFT BEARING Unit: mm (in)
Items Standard Oversize [0.5 (0.02)] (Service)
Cylinder head seat recess diameter (D) Intake 34.700 - 34.727 (1.3661 - 1.3672) 35.200 - 35.227 (1.3858 - 1.3869)
Exhaust 28.700 - 28.727 (1.1299 - 1.1310) 29.200 - 29.227 (1.1496 - 1.1507)
Valve seat outer diameter (d) Intake 34.808 - 34.824 (1.3704 - 1.3710) 35.308 - 35.324 (1.3901 - 1.3907)
Exhaust 28.808 - 28.824 (1.1342 - 1.1348) 29.308 - 29.324 (1.1539 - 1.1545)
Valve seat interference fit 0.081 - 0.124 (0.0032 - 0.0049)
Diameter (d1)* 1 Intake 31.8 (1.252)
Exhaust 25.3 (0.996)
Diameter (d2)* 2 Intake 33.1 - 33.6 (1.303 - 1.323)
Exhaust 26.9 - 27.4 (1.059 - 1.079)
Angle ( α1) Intake 60
°
Exhaust 45 °
Angle ( α2) 88°45 ′ - 90 °15 ′
Angle ( α3) 120°
Contacting width (W)* 3Intake 1.0 - 1.4 (0.039 - 0.055)
Exhaust 1.2 - 1.6 (0.047 - 0.063)
Height (h) Intake 5.9 - 6.0 (0.232 - 0.236) 5.03 - 5.13 (0.1980 - 0.2020)
Exhaust 5.9 - 6.0 (0.232 - 0.236) 4.95 - 5.05 (0.1949 - 0.1988)
Depth (H) Intake 6.04 (0.2378)
Exhaust 6.05 (0.2382) PBIC2745E
Items Standard Limit
Camshaft journal oil clearance No. 1 0.045 - 0.086 (0.0018 - 0.0034)
0.15 (0.0059)
No. 2, 3, 4, 5 0.030 - 0.071 (0.0012 - 0.0028)
Camshaft bracket inner diameter No. 1 28.000 - 28.021 (1.1024 - 1.1032) —
No. 2, 3, 4, 5 25.000 - 25.021 (0.9843 - 0.9851) —
Camshaft journal diameter No. 1 27.935 - 27.955 (1.0998 - 1.1006) —
No. 2, 3, 4, 5 24.950 - 24.970 (0.9823 - 0.9381) —
Camshaft end play 0.075 - 0.153 (0.0030 - 0.0060) 0.24 (0.0094)
Page 3350 of 4331
GW
N
O P
• Removal and installation of the door glass.
• Removal and installation of the door glass run.
Initialization After installing each component to the vehicle, follow the steps below.
1. Disconnect the battery negative c able or disconnect power window switch's harness connector tempo-
rarily, then reconnect after at least 1 minute.
2. Turn ignition switch ON.
3. Open the window to its full width by operating the power window switch. (Exclude this procedure if the
window is already fully opened).
4. Move the power window switch in the up direction (auto close position) and hold. Keep holding the switch
even when window is completely closed, and then release after 4 seconds have passed.
5. Inspection of the ant i-pinch system function.
NOTE:
Initialization may be cancelled with continuous opening and closing operation. In this case, initialize the
system.
INSPECT THE FUNCTION OF THE ANTI-PINCH SYSTEM 1. Fully open the door glass.
2. Place a wooden piece (wooden hammer handle, etc.) near the fully closed position.
3. Carry out fully closing operation with auto up switch.
• Check that the glass reverses without pinching the w ooden piece, is lowered approx.150 mm (5.91 in) or for
2 seconds and then stops.
• The glass should not be raised with power window main switch while it is reversing or lowering.
CAUTION:
• Use care to avoid being pinched du ring the inspection. Do not use a hand, etc. in place of the
wooden piece durin g the inspection.
• Check that auto up function is normal before inspection, following the system initialization.
FITTING INSPECTION • Make sure the glass is securely fit into the glass run groove.
• Lower the glass slightly [approx. 10 to 20 mm (0.39 to 0.79 in)] and make sure the clearance to the sash is parallel. If the clearance between the glass and sash is not parallel, loosen the regulator bolts, guide rail
bolts, and the glass and guide rail bolts to correct the glass position.
• Make sure the system is normal with raising and lowering the glass.