2009 NISSAN QASHQAI tow
[x] Cancel search: towPage 8 of 297

Downloaded from www.Manualslib.com manuals search engine j1Towing eye (P. 6-15)
j2Bonnet (P. 3-14)
j3Headlights, front side lights, turn signal lights
(Switch P. 2-24, Location and bulb replace-
ment P. 8-25)
j4Windscreen (Wiper and washer switch P. 2-21, Wiper replacement P. 8-22, Washer
fluid P. 8-16)
j5
Side turn signal light (P. 2-24, Location and
bulb replacement P. 8-27)
j6C-View® (Glass roof)* (P. 2-36)
j7Power windows (P. 2-34)
j8Roof rail* (P. 2-32)
j9Tyres (Tyres and wheels P. 8-31, P. 9-7, Flat
tyre P. 6-2)
j10Front view camera* (Around view monitor,
P. 4-4)
j11Back door (Door locks P. 3-12, Remote key-
less entry system P. 3-3)
j12Rear view camera* (Rear-view monitor, P. 4-2,
around view monitor, P. 4-4)
j13Rear window (Defogger switch P. 2-23, Wiper
and washer switch P. 2-21, Wiper replace-
ment P. 8-23, Washer fluid P. 8-16)
j14Rear combination light (Switch P. 2-24, Loca-
tion and bulb replacement P. 8-25)
j15Fuel filler lid (P. 3-15)
j16Doors (Keys P. 3-2, Door locks P. 3-9,
Remote keyless entry system P. 3-3)
j17Outside rear-view mirrors (P. 3-17)
Side view camera* (Around view monitor,
P. 4-4)
* where fitted
NPA1091
EXTERIOR FRONT AND REAR
Illustrated table of contents0-3
Page 23 of 297
Downloaded from www.Manualslib.com manuals search engine 4. Fold the seatback forward.
To return the 2nd row centre seat to its seating posi-
tion, pull the strap to push the seatback up until it
latches into position. Pull the strap again to set the
angle of the seatback as desired. Pull the head re-
straint into the correct position for the occupant us-
ing the seat.
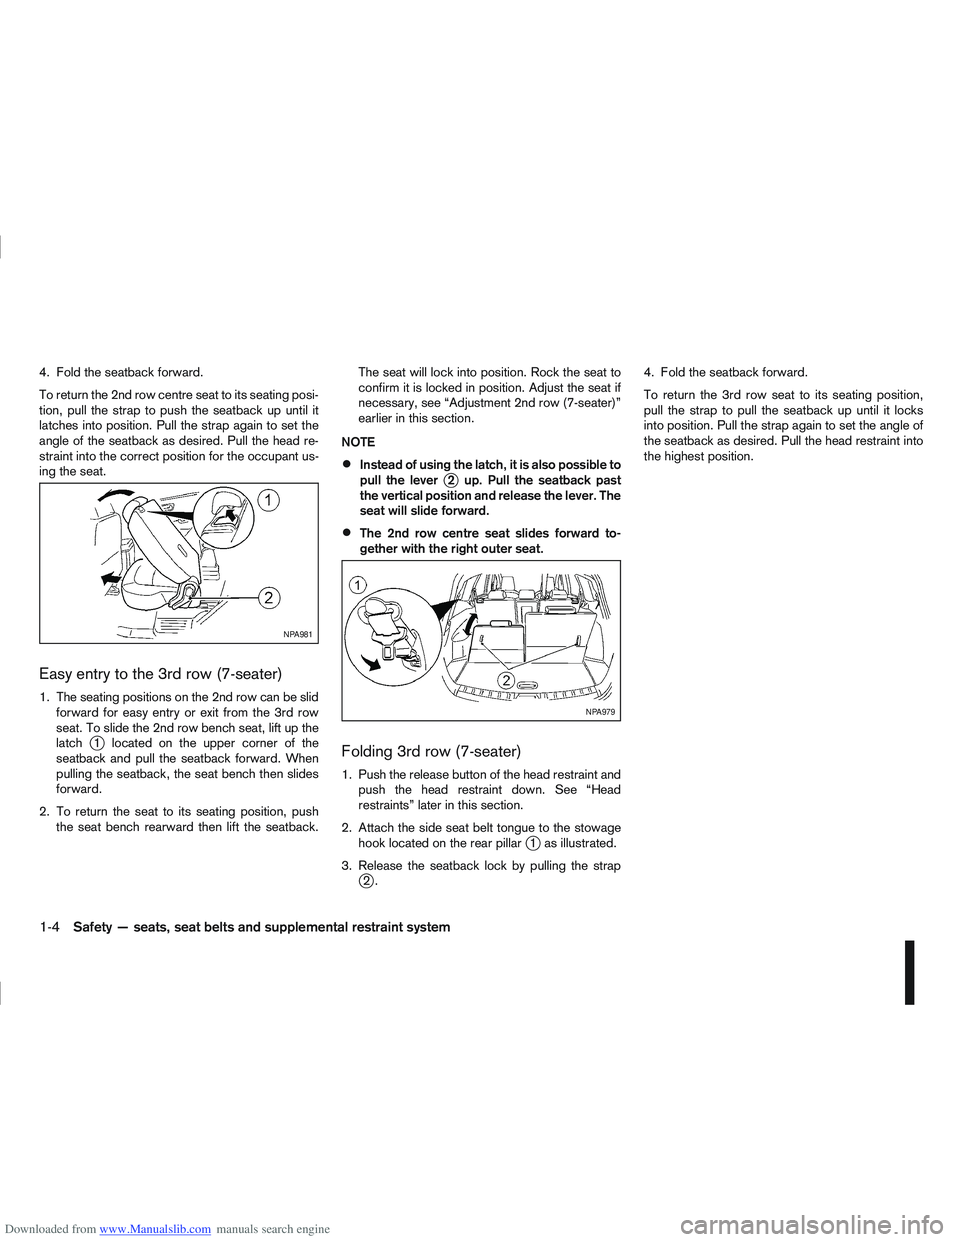
Easy entry to the 3rd row (7-seater)
1. The seating positions on the 2nd row can be slidforward for easy entry or exit from the 3rd row
seat. To slide the 2nd row bench seat, lift up the
latch
j1 located on the upper corner of the
seatback and pull the seatback forward. When
pulling the seatback, the seat bench then slides
forward.
2. To return the seat to its seating position, push the seat bench rearward then lift the seatback. The seat will lock into position. Rock the seat to
confirm it is locked in position. Adjust the seat if
necessary, see “Adjustment 2nd row (7-seater)”
earlier in this section.
NOTE
Instead of using the latch, it is also possible to
pull the leverj2 up. Pull the seatback past
the vertical position and release the lever. The
seat will slide forward.
The 2nd row centre seat slides forward to-
gether with the right outer seat.
Folding 3rd row (7-seater)
1. Push the release button of the head restraint and push the head restraint down. See “Head
restraints” later in this section.
2. Attach the side seat belt tongue to the stowage hook located on the rear pillar
j1 as illustrated.
3. Release the seatback lock by pulling the strap
j2. 4. Fold the seatback forward.
To return the 3rd row seat to its seating position,
pull the strap to pull the seatback up until it locks
into position. Pull the strap again to set the angle of
the seatback as desired. Pull the head restraint into
the highest position.
NPA981
NPA979
1-4Safety — seats, seat belts and supplemental restraint system
Page 28 of 297

Downloaded from www.Manualslib.com manuals search engine INJURED PERSONS
NISSAN recommends that injured persons use seat
belts, depending on the injury. Check with your doc-
tor for specific recommendations.
THREE-POINT TYPE SEAT BELTS
Every person who drives or rides in this vehicle
should wear a seat belt at all times.
Fastening the seat belts
1. Adjust the seat.
WARNING
The seatback should not be reclined any more
than needed for comfort. Seat belts are most
effective when the passenger sits well back
and upright in the seat. If the seat is reclined,
the risk of sliding under the lap belt and being
injured is increased.
2. Slowly pull the seat belt out of the retractor and insert the tongue into the buckle until it clicks. CAUTION
The seat belt retractor is designed to lock dur-
ing a sudden impact. A slow pulling motion
will permit the belt to move and allow you
some freedom of movement in the seat.
2nd row centre seat (5-seater)
a. Unclip the seat belt buckles from the ceiling stowage point.
b. Slowly pull the seat belt out of the ceiling retrac- tor and insert the end tongue into the buckle with
the black button
j1 until it clicks.
c. Pull the tongue and insert it into the buckle
j2
until it clicks. 2nd row centre seat (7-seater)
a. Unclip the seat belt buckles from the (magnetic)
ceiling stowage point
j1.
b. Slowly pull the seat belt out of the ceiling retrac- tor and pass the buckles through the comfort
loop
j2.
c. Insert the end tongue into the buckle with the black button
j3 until it clicks.
d. Pull the second tongue and insert it into the buckle with the red button
j4 until it clicks.
SSS0292Z
NPA827Z
2nd row centre seat (5-seater)
NPA966
2nd row rear centre (7-seater)
Safety — seats, seat belts and supplemental restraint system1-9
Page 29 of 297
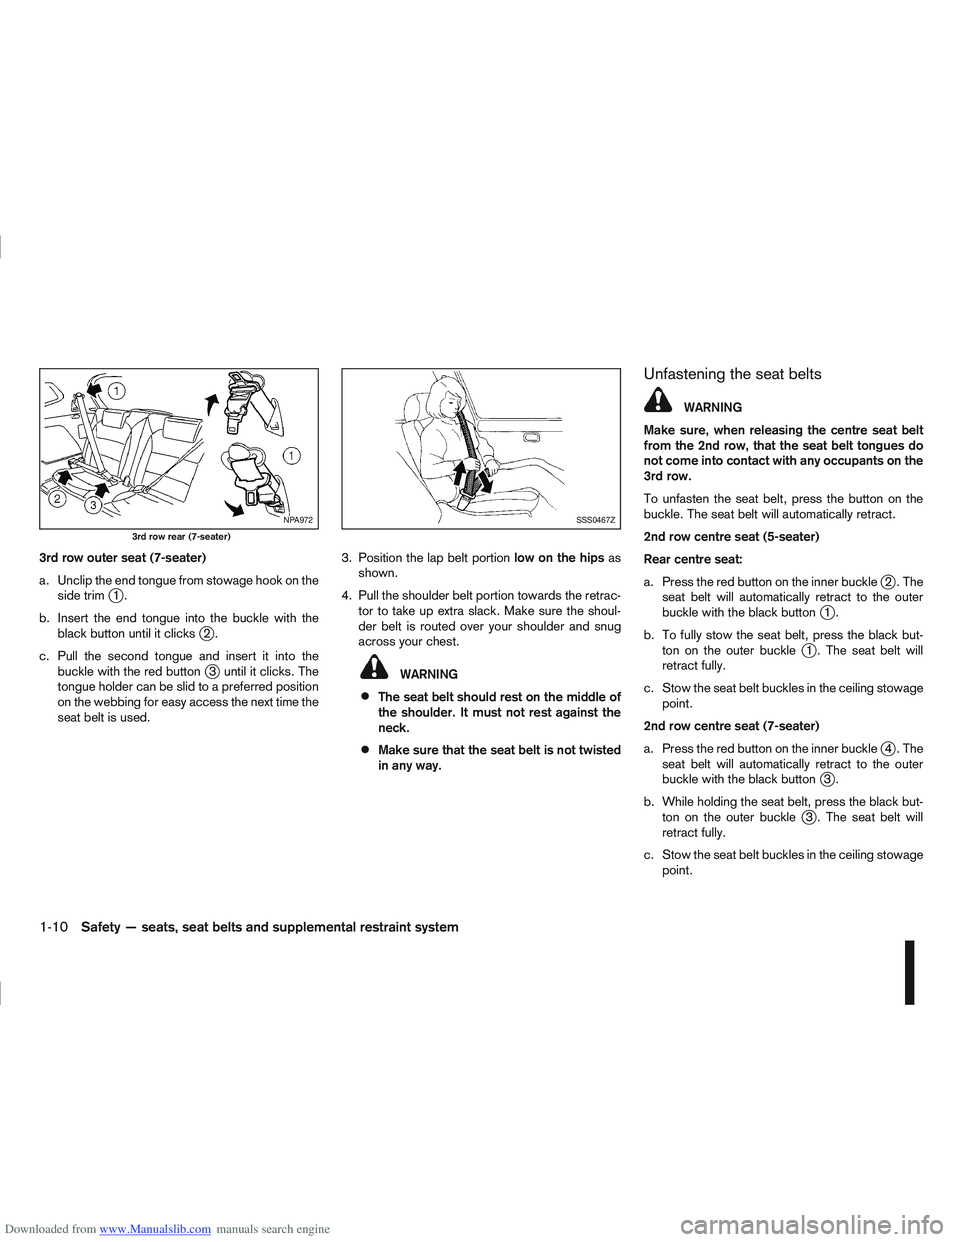
Downloaded from www.Manualslib.com manuals search engine 3rd row outer seat (7-seater)
a. Unclip the end tongue from stowage hook on theside trim
j1.
b. Insert the end tongue into the buckle with the black button until it clicks
j2.
c. Pull the second tongue and insert it into the buckle with the red button
j3 until it clicks. The
tongue holder can be slid to a preferred position
on the webbing for easy access the next time the
seat belt is used. 3. Position the lap belt portion
low on the hipsas
shown.
4. Pull the shoulder belt portion towards the retrac- tor to take up extra slack. Make sure the shoul-
der belt is routed over your shoulder and snug
across your chest.WARNING
The seat belt should rest on the middle of
the shoulder. It must not rest against the
neck.
Make sure that the seat belt is not twisted
in any way.
Unfastening the seat belts
WARNING
Make sure, when releasing the centre seat belt
from the 2nd row, that the seat belt tongues do
not come into contact with any occupants on the
3rd row.
To unfasten the seat belt, press the button on the
buckle. The seat belt will automatically retract.
2nd row centre seat (5-seater)
Rear centre seat:
a. Press the red button on the inner buckle
j2.The
seat belt will automatically retract to the outer
buckle with the black button
j1.
b. To fully stow the seat belt, press the black but- ton on the outer buckle
j1 . The seat belt will
retract fully.
c. Stow the seat belt buckles in the ceiling stowage point.
2nd row centre seat (7-seater)
a. Press the red button on the inner buckle
j4.The
seat belt will automatically retract to the outer
buckle with the black button
j3.
b. While holding the seat belt, press the black but- ton on the outer buckle
j3 . The seat belt will
retract fully.
c. Stow the seat belt buckles in the ceiling stowage point.
NPA972
3rd row rear (7-seater)
SSS0467Z
1-10Safety — seats, seat belts and supplemental restraint system
Page 30 of 297

Downloaded from www.Manualslib.com manuals search engine 3rd row outer seat (7-seater)
a. Press the red button on the inner buckle
j3.The
seat belt will automatically retract to the outer
buckle with the black button
j2.
– If desired, the 3rd row seatback can be folded flat for further information see “Folding 3rd
row (7-seater)” earlier in this section.
b. Press the black button to release the end tongue. When the seat belt has retracted fully, place the
end tongue onto stowage hook
j1 . Move the
tongue holder downwards if required.
Shoulder belt height adjustment (front
seats only)
The shoulder belt anchor height should be adjusted
to the position best for you (see “Precautions on
seat belt usage” earlier in this section).
To adjust, depress the adjustment button as illus-
trated and move the shoulder belt anchor to the
appropriate position, so that the belt passes over the centre of the shoulder. Release the adjustment
button to lock the shoulder belt anchor into position.
WARNING
After adjustment, release the adjustment but-
ton and check by moving the shoulder belt
assembly up and down to make sure the
shoulder belt anchor is securely fixed in posi-
tion.
The seat belt should be away from your face
and neck, but not falling off your shoulder.
Checking the seat belt operation
Your seat belt retractors are designed to lock the
belt movement in two separate situations:
When the belt is pulled quickly from the retrac-
tor.
When the vehicle slows down rapidly.
To increase your confidence in the belts, check the
operation as follows:
Take place in the seat for which you wish to check
the belt operation. Grasp the shoulder belt and pull
quickly forward. The retractor should lock and re-
strict further belt movement.
If the retractor does not lock during these checks or
if you have any questions about the seat belt opera-
tion, see a NISSAN dealer or qualified workshop.
SEAT BELT MAINTENANCE
To clean the seat belt webbing, apply a mild
soap solution or any solution recommended for
cleaning upholstery or carpets. Then brush it,
wipe with a cloth and allow it to dry in the shade.
Do not allow the seat belts to retract until they
are completely dry.
If dirt builds up in the shoulder belt guide of
the seat belt anchors, the seat belts may retract
slowly. Wipe the shoulder belt guide with a clean,
dry cloth.
Periodically check to see whether the seat
belt and the metal components such as buck-
les, tongues, retractors, flexible wires and an-
chors work properly. If loose parts, deteriora-
tion, cuts or other damage to the webbing is
found, the entire belt assembly should be re-
placed.
NPA816Z
Safety — seats, seat belts and supplemental restraint system1-11
Page 53 of 297
Downloaded from www.Manualslib.com manuals search engine If the light comes on while the engine is running, it
may indicate that the anti-lock portion of the braking
system is not functioning properly. Have the system
checked by a NISSAN dealer or qualified workshop.
Brake warning light
This light functions for both the handbrake and the
footbrake systems.
Handbrake indicator:
The light comes on when the handbrake is applied.
Low brake fluid warning:
The light warns of a low brake fluid level. If the light
comes on while the engine is running with the hand-
brake not applied, stop the vehicle and perform the
following procedure:
1. Check the brake fluid level. Add brake fluid asnecessary. See “Brake and clutch fluid” in the
“8. Maintenance and do-it-yourself” section.
WARNING
If the level is below the MIN (minimum) mark
on the brake fluid reservoir, do not drive until
the brake system has been checked at a
NISSAN dealer or qualified workshop.
2. If the brake fluid level is correct: Have the warning system checked by a NISSAN
dealer or qualified workshop.
WARNING
Driving your vehicle could be dangerous. Have
it towed to the nearest NISSAN dealer or quali-
fied workshop.
Depressing the brake pedal with the engine
stopped could increase your stopping dis-
tance and require greater pedal travel dis-
tance and effort.
Charge warning light
If the light comes on while the engine is running, it
may indicate that the charging system is not func-
tioning properly. Turn the engine off and check the
alternator belt. If the belt is loose, broken, missing
or if the light remains on, see a NISSAN dealer or
qualified workshop immediately.
CAUTION
Do not continue driving if the alternator belt is
loose, broken or missing.
Diesel Particulate Filter (DPF)
warning light (where fitted)
WARNING
Be careful not to burn yourself with exhaust
gases.
Do not park the vehicle over flammable mate-
rials such as dry grass, waste paper or rags,
as they may burn easily.
If the vehicle continues to be driven at a low
speed with the DPF warning light illuminated,
the fail-safe will limit engine revolutions and/
or torque. In this case, the engine oil must be
replaced and the process of burning accumu-
lated particulate matter must be carried out
by a NISSAN dealer or qualified workshop.
Service regeneration is a maintenance item
and is not covered by the NISSAN warranty.
Use engine oil for DPF equipped models. For
details, see “Capacities and recommended
fuel/lubricants” in the “9. Technical
information” section.
CAUTION
The DPF becomes extremely hot after burning
particulate matter.
M9R engine only:
When the ignition switch is turned to the ON posi-
tion, the Diesel Particulate Filter (DPF) warning light
illuminates for a few seconds and then goes out.
This indicates that the system is operational.
All diesel engines:
NISSAN GREEN PROGRAM
Some diesel engine models are fitted with a Diesel
Particulate Filter (DPF), which is a device that re-
moves carbon (soot) from the exhaust gas. To oper-
ate effectively, the DPF system must routinely con-
duct a cleaning operation, called regeneration, that
2-4Instruments and controls
Page 55 of 297
Downloaded from www.Manualslib.com manuals search engine Malfunction warning light (red)
(where fitted)
When the ignition switch is turned to the ON posi-
tion, the malfunction warning light illuminates. This
means the system is operational.
See “Malfunction Indicator light” later in this section
for details of the orange Malfunction Indicator light.
If the red malfunction warning light comes on steady
while the engine is running, it may indicate an en-
gine control system malfunction.
Have your vehicle inspected by a NISSAN dealer or
qualified workshop. You do not need to have your
vehicle towed to the dealer.
CAUTION
Continued vehicle operation without having the
engine control system checked and repaired as
necessary could lead to poor driveability,
reduced fuel economy and possible damage to
the engine control system, which may affect your
warranty coverage.
Incorrect setting of the engine control system may
lead to non-compliance of local and national emis-
sion laws and regulations.
Master warning light
The master warning light is displayed when any
warning message is displayed. See “Vehicle infor-
mation display” later in this section.
NATS security warning light
(where fitted)
This light blinks whenever the ignition switch is in
the LOCK, “OFF” or Acc position. This function
indicates that your vehicle is equipped with the
NISSAN Anti-Theft System (NATS)*.
If NATS is malfunctioning, this light will remain on
while the ignition switch is in the ON position.
For additional information, see “Security system”
later in this section.
* Immobilizer
Seat belt (driver and front
passenger) warning light
The seat belt warning light alerts the driver if their
seat belt or that of the front passenger is not se-
curely fastened. The light will come on when the
ignition switch is turned to the ON position. It will go
out when both the driver and front passenger (if
occupied) seat belts have been securely fastened.
A seat belt reminder chime is also fitted, see “Seat
belt reminder chime” later in this section.
Supplemental Restraint System
(SRS) air bag warning light
When the ignition switch is in the ON or START
position, the Supplemental Restraint System (SRS)
air bag warning light will illuminate. The SRS air bag
warning light will turn off after approximately 7 sec-
onds if the system is operational.
The air bag systems and pre-tensioner seat beltsneed servicing and the vehicle must be taken to the
nearest NISSAN dealer or qualified workshop if the
SRS air bag warning light:
Remains on after approximately 7 seconds
Flashes intermittently
Does not come on at all
Unless checked and repaired, the SRS air bag sys-
tem and pre-tensioner seat belts may not function
properly.
For additional details see “Air bag warning light” in
the “1. Safety — seats, seat belts and supplemental
restraint system” section.
4WD warning light (4WD
models)
The 4WD warning light comes on when the ignition
switch is turned to the ON position. It turns off soon
after the engine is started.
If the 4WD system malfunctions or the revolution or
radius of the front and the rear wheels differs, the
warning light will either remain illuminated or blink.
See “Four-wheel Drive (4WD) (where fitted)” in the
“5. Starting and driving” section.
CAUTION
If the warning light comes on or blinks while
driving, 4WD mode will change to 2WD mode.
Reduce the vehicle speed and have your ve-
hicle checked by a NISSAN dealer or qualified
workshop as soon as possible.
2-6Instruments and controls
Page 57 of 297
Downloaded from www.Manualslib.com manuals search engine When the ESP OFF indicator light and SLIP indica-
tor light come on with the ESP system turned on, it
alerts the driver to the fact that the system’s fail-safe
mode is operating. This means that the system may
not be functioning properly. Have the system
checked by your NISSAN dealer or qualified work-
shop.
If an abnormality occurs in the system, the ESP sys-
tem function will be cancelled, but the vehicle is still
driveable. For additional information, see “Electronic
Stability Programme (ESP) system (where fitted)” in
the “5. Starting and driving” section.
4WD mode indicator light
(AUTO) (4WD models)
This light comes on briefly when the ignition is turned
to the ON position. If the engine is running, this light
will illuminate when the 4WD AUTO mode is se-
lected.
See “Four-wheel Drive (4WD) (where fitted)” in the
“5. Starting and driving” section.
4WD mode indicator light
(LOCK) (4WD models)
This light comes on briefly when the ignition is turned
to the ON position.
If the engine is running, this light and the 4WD mode
indicator light (AUTO) will be lit when the 4WD
LOCK mode is selected.
See “Four-wheel Drive (4WD) (where fitted)” in the
“5. Starting and driving” section.
Glow plug indicator light (Diesel
engines)
This light comes on when the ignition switch is in the
ON position and goes out when the glow plugs have
been pre-heated. When the engine is cold, the glow
plug warm-up time will be longer.
Low fuel indicator light
When the fuel level is getting low, the low fuel warn-
ing light will switch on to alert the driver. Refuel as
soon as it is convenient. There should be a small
reserve of fuel in the tank when the fuel gauge
reaches the empty level. See also “Vehicle informa-
tion display” later in this section.
Malfunction Indicator light
When the ignition switch is turned to the ON posi-
tion, the orange Malfunction Indicator light illumi-
nates. This means that the system is operational.
If the orange Malfunction Indicator light comes on
steady or blinks (where fitted) while the engine is
running, it may indicate an engine control system
malfunction.
See “Malfunction warning light (red) (where fitted)”
earlier in this section for details of the red malfunc-
tion warning light (where fitted).On steady (orange):
An engine malfunction has been detected. Have the
vehicle inspected by a NISSAN dealer or qualified
workshop. You do not need to have your vehicle
towed to the dealer.
Blinking (orange) (where fitted):
An engine misfire has been detected which may
damage the engine control system.
To reduce or avoid engine control system dam-
age:
Do not drive at speeds above 70 km/h (43
MPH).
Avoid hard acceleration or deceleration.
Avoid steep uphill grades.
If possible, reduce the load being carried or
towed.
The Malfunction Indicator light may stop blinking
and come on steady.
Have the vehicle inspected by a NISSAN dealer or
qualified workshop. You do not need to have your
vehicle towed to the dealer.
CAUTION
Continued vehicle operation without having the
engine control system checked and repaired as
necessary could lead to poor driveability,
reduced fuel economy and possible damage to
the engine control system, which may affect your
warranty coverage.
2-8Instruments and controls