2009 NISSAN QASHQAI tow
[x] Cancel search: towPage 199 of 297

Downloaded from www.Manualslib.com manuals search engine steep slope consider the incline (the towing
weights quoted are for a 12% slope).
Follow the trailer manufacturer’s instructions.
Have your vehicle serviced more often than at
the intervals specified in the separately provided
Warranty Information and Maintenance booklet.
Trailer towing requires more fuel than under nor-
mal circumstances because of a considerable
increase in traction power required and resis-
tance.
When towing a trailer, observe the following re-
stricted towing speed:
Speed: below 100 km/h (62 MPH)
CAUTION
While towing a trailer, check the engine coolant
temperature gauge regularly to prevent engine
overheating.
TYRE PRESSURE
When towing a trailer, inflate the vehicle tyres to the
maximum recommended COLD tyre pressure, as
indicated on the tyre placard (for full loading). Make
sure the trailer tyre pressures are correct.
CAUTION
Do not tow a trailer when the vehicle is installed
with a temporary-use spare tyre.
SAFETY CHAINS
Always use a suitable chain between the vehicle
and trailer. The chain should be attached to the hitch
and not to the vehicle bumper or axle. Be sure to
leave enough slack in the chain to permit turning
corners. The chain should not drag on the ground:
passing the chain across the trailer hitch may be the
best practice depending on your trailer.
TRAILER BRAKES
Ensure that trailer brakes are installed as required
by local regulations. Also check that all other trailer
equipment conforms to local regulations.
TRAILER DETECTION (where fitted)
When towing a trailer and the turn signal switch is
used, the electrical system of the vehicle will detect
an additional electrical load of the trailer lighting. As
a result, the trailer direction indicator light comes
on.
INSTALLATION OF COUPLING
DEVICE
NISSAN recommends that the coupling device for
trailer towing be installed under the following condi-
tions:
Maximum permissible vertical load on the cou-
pling device: 736 N (75 kg, 165 lb)
The coupling device, mounting points and instal-
lation parts on your vehicle: as shown as an ex-
ample in the illustration. Follow all of the coupling device manufacturer’s in-
structions for installation and use.
5-36Starting and driving
Page 208 of 297
Downloaded from www.Manualslib.com manuals search engine 6In case of emergency
In case of emergency
Spare tyre................................................................ 6-2
Temporary-use spare tyre ................................... 6-2
Flat tyre ................................................................... 6-2 Stopping the vehicle ........................................... 6-2
Changing flat tyre (Models with spare wheel,
where fitted) ....................................................... 6-3
Repairing flat tyre (Models with emergency
tyre puncture repair kit, where fitted) ................... 6-7
Jump-starting ........................................................... 6-10
Push-starting ........................................................... 6-12 Engine overheat ....................................................... 6-12
Tow truck towing ..................................................... 6-13
Towing precautions ............................................ 6-13
Recommended towing for two-wheel drive
(2WD) models .................................................... 6-14
Recommended towing for four-wheel drive
(4WD) models .................................................... 6-14
Towing eye ......................................................... 6-15
Freeing the vehicle from sand, snow or mud ....... 6-15
Page 209 of 297

Downloaded from www.Manualslib.com manuals search engine TEMPORARY-USE SPARE TYRE
The temporary-use spare tyre is designed for emer-
gency use only. This spare tyre should be used
ONLY for very short periods and NEVER be used
for long drives or extended periods.
Observe the following precautions if the temporary-
use spare tyre must be used, otherwise your vehicle
could be damaged or involved in an accident.
WARNING
Any continuous road use of this tyre could result
in tyre failure, loss of vehicle control, and pos-
sible personal injury.
CAUTION
The temporary-use spare tyre should be used
only in emergencies. It should be replaced by
the standard tyre at the first opportunity.
Drive carefully and do not drive your vehicle
faster than 80 km/h (50 MPH).
Avoid driving over obstacles. Also, do not take
the vehicle through an automatic car wash.
Avoid driving sharp turns and abrupt braking.
Do not exceed the vehicle’s maximum load
rating or the load-carrying capacity molded
on the sidewall of the temporary-use spare
tyre.
Do not use a snow chain on this tyre because
it will not fit properly. This could cause dam-
age to the vehicle and result in loss of the
chain.
Do not use the temporary-use spare tyre on
any other vehicle because this tyre has been
designed specifically for your vehicle.
The vehicle must not be driven with more than
one temporary-use spare tyre at the same
time.
Do not tow a trailer.
As with all tyres, the temporary-use spare tyre
must be checked regularly to ensure pres-
sure is maintained.
For pressure details, see the tyre placard lo-
cated on the driver’s side centre pillar. In case of a flat tyre, follow the instructions as de-
scribed below:
STOPPING THE VEHICLE
WARNING
Make sure that the handbrake is securely ap-
plied.
For Manual Transmission (MT) models: Make
sure the gear lever is in the R (Reverse) posi-
tion.
For Automatic Transmission (AT) or Continu-
ously Variable Transmission (CVT) models:
Make sure that the selector lever is in the P
(Park) position.
Never change tyres when the vehicle is on a
slope, ice or a slippery area. This is hazard-
ous.
Never change tyres if oncoming traffic is close
to your vehicle. Wait for professional road as-
sistance.
1. Safely move the vehicle off the road, away from traffic.
2. Switch on the hazard warning flashers.
3. Park on a level surface.
4. Apply the handbrake.
5. Shift the gear lever (MT models) into the R (Re- verse) position [AT or CVT models, move the
selector lever to the P (Park) position].
NCE069Z
Temporary-use spare tyre label
SPARE TYRE FLAT TYRE
6-2In case of emergency
Page 213 of 297
Downloaded from www.Manualslib.com manuals search engine CAUTION
The wheel is heavy. Be sure that your feet are
clear of the wheel and use gloves as necessary
to avoid injury.
Installing the wheel
WARNING
The temporary use spare tyre is designed for
emergency use. See “Spare tyre” earlier in
this section.
Never use wheel nuts other than those pro-
vided with your vehicle. Incorrect wheel nuts
or improperly tightened wheel nuts may cause
the wheel to become loose or come off. This
could cause an accident.
Never use oil or grease on the wheel studs or
nuts. This may cause the wheel nuts to be-
come loose.
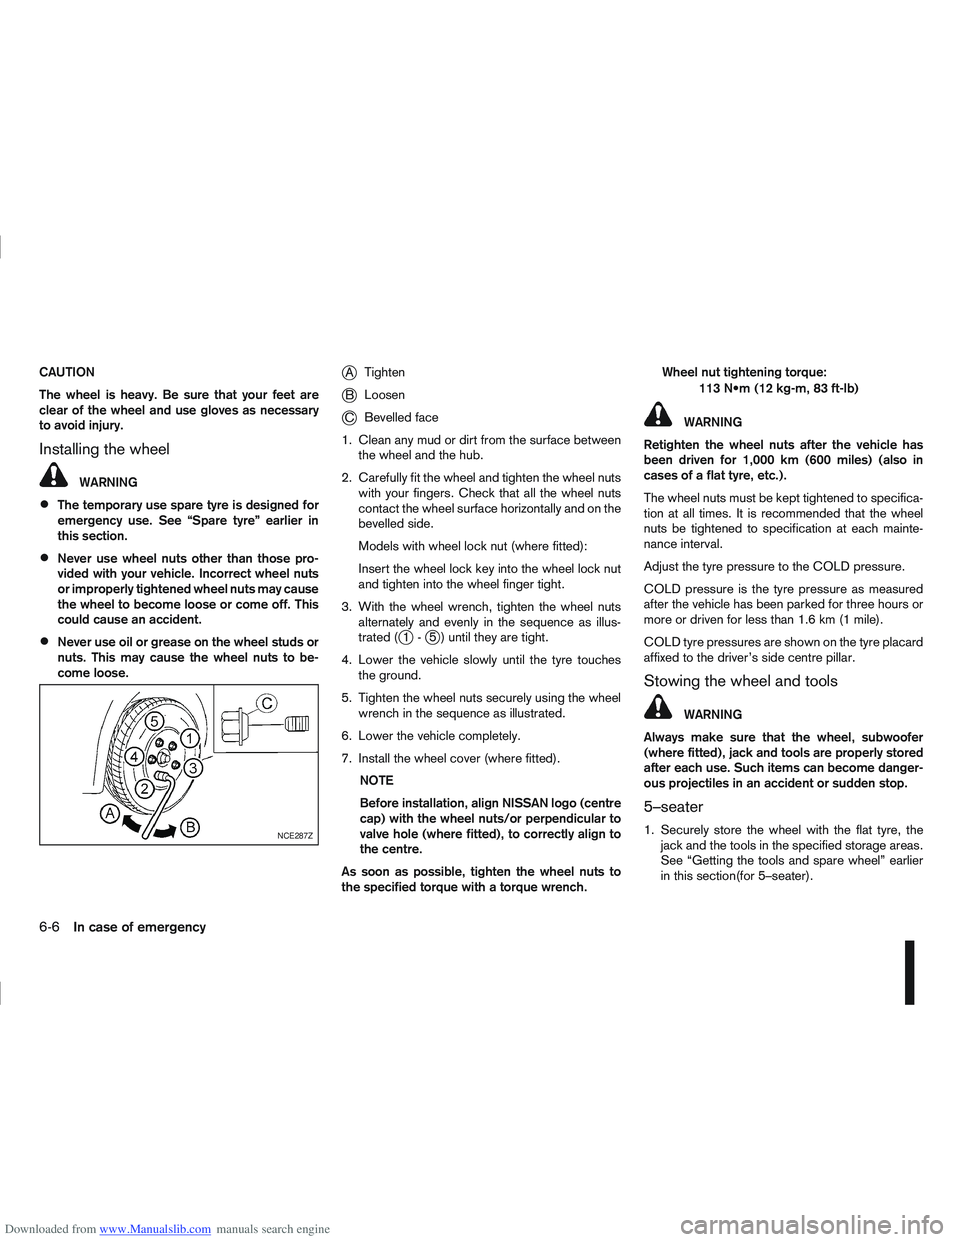
jATighten
jB Loosen
jC Bevelled face
1. Clean any mud or dirt from the surface between the wheel and the hub.
2. Carefully fit the wheel and tighten the wheel nuts with your fingers. Check that all the wheel nuts
contact the wheel surface horizontally and on the
bevelled side.
Models with wheel lock nut (where fitted):
Insert the wheel lock key into the wheel lock nut
and tighten into the wheel finger tight.
3. With the wheel wrench, tighten the wheel nuts alternately and evenly in the sequence as illus-
trated (
j1-j5 ) until they are tight.
4. Lower the vehicle slowly until the tyre touches the ground.
5. Tighten the wheel nuts securely using the wheel wrench in the sequence as illustrated.
6. Lower the vehicle completely.
7. Install the wheel cover (where fitted). NOTE
Before installation, align NISSAN logo (centre
cap) with the wheel nuts/or perpendicular to
valve hole (where fitted), to correctly align to
the centre.
As soon as possible, tighten the wheel nuts to
the specified torque with a torque wrench. Wheel nut tightening torque:
113 (12 kg-m, 83 ft-lb)
WARNING
Retighten the wheel nuts after the vehicle has
been driven for 1,000 km (600 miles) (also in
cases of a flat tyre, etc.).
The wheel nuts must be kept tightened to specifica-
tion at all times. It is recommended that the wheel
nuts be tightened to specification at each mainte-
nance interval.
Adjust the tyre pressure to the COLD pressure.
COLD pressure is the tyre pressure as measured
after the vehicle has been parked for three hours or
more or driven for less than 1.6 km (1 mile).
COLD tyre pressures are shown on the tyre placard
affixed to the driver’s side centre pillar.
Stowing the wheel and tools
WARNING
Always make sure that the wheel, subwoofer
(where fitted), jack and tools are properly stored
after each use. Such items can become danger-
ous projectiles in an accident or sudden stop.
5–seater
1. Securely store the wheel with the flat tyre, the jack and the tools in the specified storage areas.
See “Getting the tools and spare wheel” earlier
in this section(for 5–seater).NCE287Z
6-6In case of emergency
Page 219 of 297
Downloaded from www.Manualslib.com manuals search engine CAUTION
Three-way catalyst equipped models should
not be started by pushing the vehicle as the
three-way catalyst may be damaged.
Automatic transmission (AT) or continuously
variable transmission (CVT) models cannot be
started by pushing the vehicle. This may cause
transmission damage.
Never try to start the vehicle by towing it; when
the engine starts, the forward surge could
cause the vehicle to collide with the tow ve-
hicle.
WARNING
Never continue driving if the engine of your
vehicle overheats. Doing so could cause a ve-
hicle fire.
Never open the bonnet if steam is coming
out.
Never remove engine coolant reservoir cap
when the engine is hot. If the engine coolant
reservoir cap is removed while the engine is
hot, pressurised hot water will spurt out and
possibly cause burning, scalding or serious
injury.
If steam or coolant is coming out of the en-
gine, stand clear of the vehicle to prevent get-
ting injured.
The engine cooling fan will start whenever the
coolant temperature exceeds preset degrees.
Be careful not to allow your hands, hair, jewel-
lery or clothing to come into contact with, or
get caught in, the cooling fan or drive belts.
If the engine of your vehicle is overheating (indi-
cated by the engine coolant temperature gauge) or
if you feel a lack of engine power, detect unusual
noise, etc., proceed as follows:
1. Move and park the vehicle safely off the road and away from traffic.
2. Turn on the hazard warning flasher lights.
3. Apply the handbrake. 4. Shift the gear lever (MT models) into the N (Neu-
tral) position [AT or CVT models, move the se-
lector lever to the P (Park) position].
DO NOT STOP THE ENGINE.
5. Open all windows.
6. Switch off the air conditioner system (where fit- ted).
7. Set the heater or air conditioner temperature control to maximum “HOT” and fan speed con-
trol to maximum speed.
8. Exit the vehicle.
9. Visually inspect and listen for steam or coolant escaping from the radiator before opening the
bonnet. Wait until no steam or coolant can be
seen before proceeding.
10. Open the bonnet. For details, see “Bonnet release” in the “3. Pre-driving checks and
adjustments” section.
11. Visually check if the cooling fan is running.
12. Visually check the radiator and radiator hoses for leakage.
WARNING
If coolant is leaking, the cooling fan belt is
missing or loose or the cooling fan is not run-
ning, stop the engine.
13. After the engine cools down, check the coolant level in the engine coolant reservoir with the
engine running.
PUSH-STARTING ENGINE OVERHEAT
6-12In case of emergency
Page 220 of 297
Downloaded from www.Manualslib.com manuals search engine 14. If the level is low, remove the engine coolantreservoir cap and add coolant slowly into the
reservoir. After refilling the reservoir to the MAX
level, install the reservoir cap.
WARNING
Before removing the engine coolant reservoir
cap and to avoid the danger of being scalded,
cover the reservoir cap with a rag and loosen
the reservoir cap to the first notch to allow the
steam to escape.
15. Close the bonnet.
Have your vehicle inspected or repaired by a
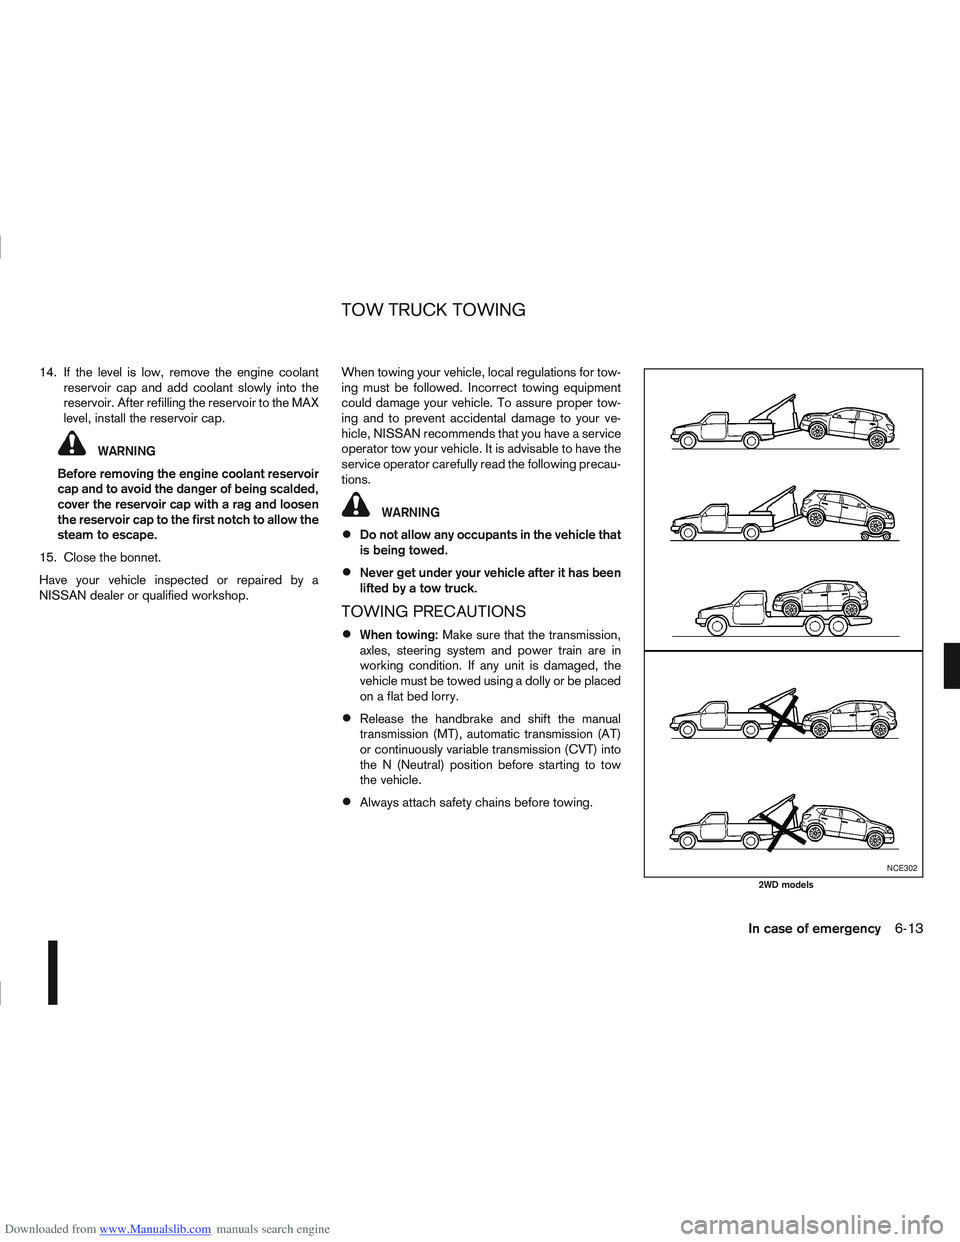
NISSAN dealer or qualified workshop. When towing your vehicle, local regulations for tow-
ing must be followed. Incorrect towing equipment
could damage your vehicle. To assure proper tow-
ing and to prevent accidental damage to your ve-
hicle, NISSAN recommends that you have a service
operator tow your vehicle. It is advisable to have the
service operator carefully read the following precau-
tions.
WARNING
Do not allow any occupants in the vehicle that
is being towed.
Never get under your vehicle after it has been
lifted by a tow truck.
TOWING PRECAUTIONS
When towing:
Make sure that the transmission,
axles, steering system and power train are in
working condition. If any unit is damaged, the
vehicle must be towed using a dolly or be placed
on a flat bed lorry.
Release the handbrake and shift the manual
transmission (MT), automatic transmission (AT)
or continuously variable transmission (CVT) into
the N (Neutral) position before starting to tow
the vehicle.
Always attach safety chains before towing.
NCE302
2WD models
TOW TRUCK TOWING
In case of emergency6-13
Page 221 of 297
Downloaded from www.Manualslib.com manuals search engine RECOMMENDED TOWING FOR
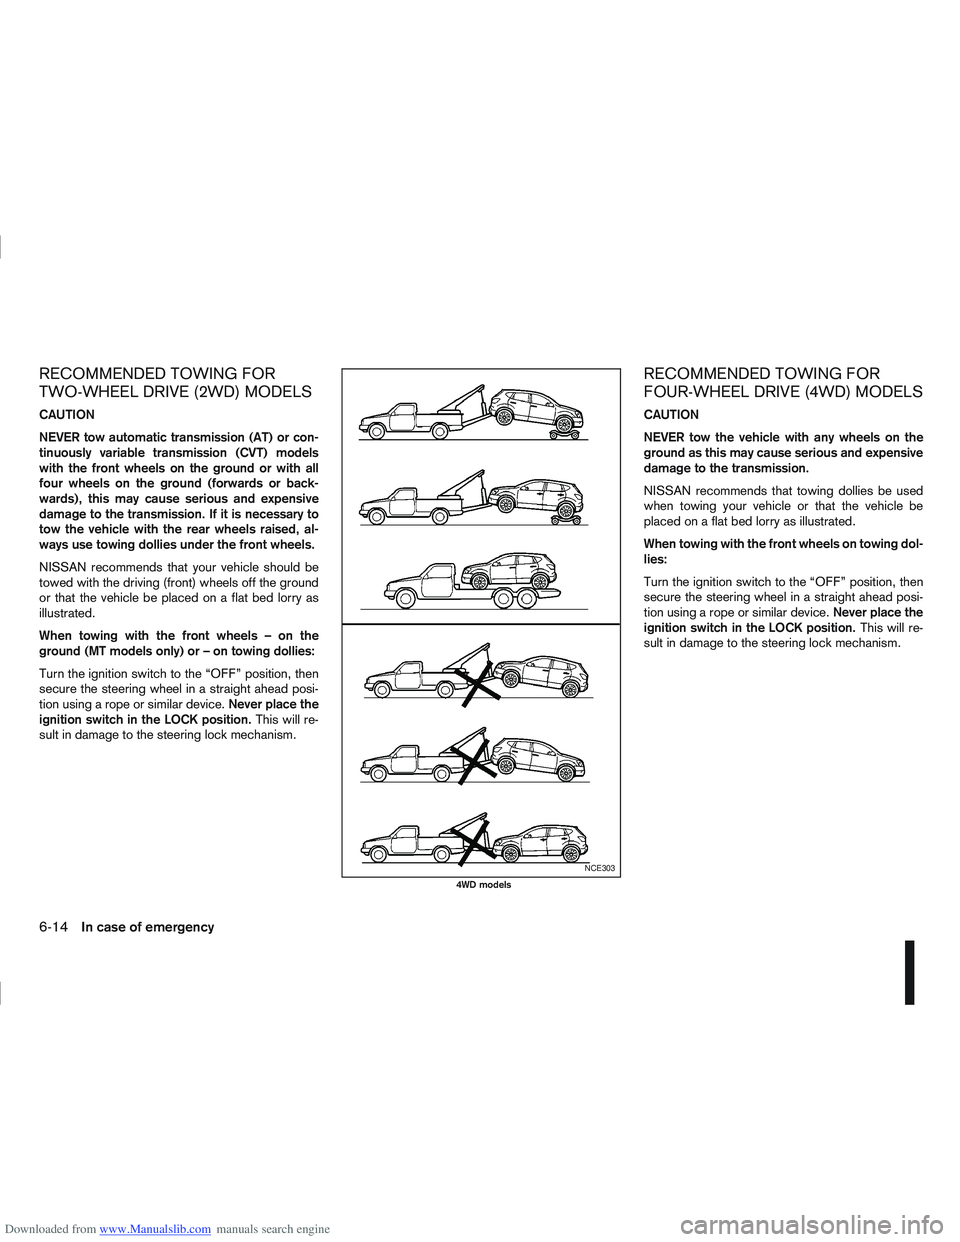
TWO-WHEEL DRIVE (2WD) MODELS
CAUTION
NEVER tow automatic transmission (AT) or con-
tinuously variable transmission (CVT) models
with the front wheels on the ground or with all
four wheels on the ground (forwards or back-
wards), this may cause serious and expensive
damage to the transmission. If it is necessary to
tow the vehicle with the rear wheels raised, al-
ways use towing dollies under the front wheels.
NISSAN recommends that your vehicle should be
towed with the driving (front) wheels off the ground
or that the vehicle be placed on a flat bed lorry as
illustrated.
When towing with the front wheels – on the
ground (MT models only) or – on towing dollies:
Turn the ignition switch to the “OFF” position, then
secure the steering wheel in a straight ahead posi-
tion using a rope or similar device.Never place the
ignition switch in the LOCK position. This will re-
sult in damage to the steering lock mechanism.
RECOMMENDED TOWING FOR
FOUR-WHEEL DRIVE (4WD) MODELS
CAUTION
NEVER tow the vehicle with any wheels on the
ground as this may cause serious and expensive
damage to the transmission.
NISSAN recommends that towing dollies be used
when towing your vehicle or that the vehicle be
placed on a flat bed lorry as illustrated.
When towing with the front wheels on towing dol-
lies:
Turn the ignition switch to the “OFF” position, then
secure the steering wheel in a straight ahead posi-
tion using a rope or similar device. Never place the
ignition switch in the LOCK position. This will re-
sult in damage to the steering lock mechanism.
NCE303
4WD models
6-14In case of emergency
Page 222 of 297
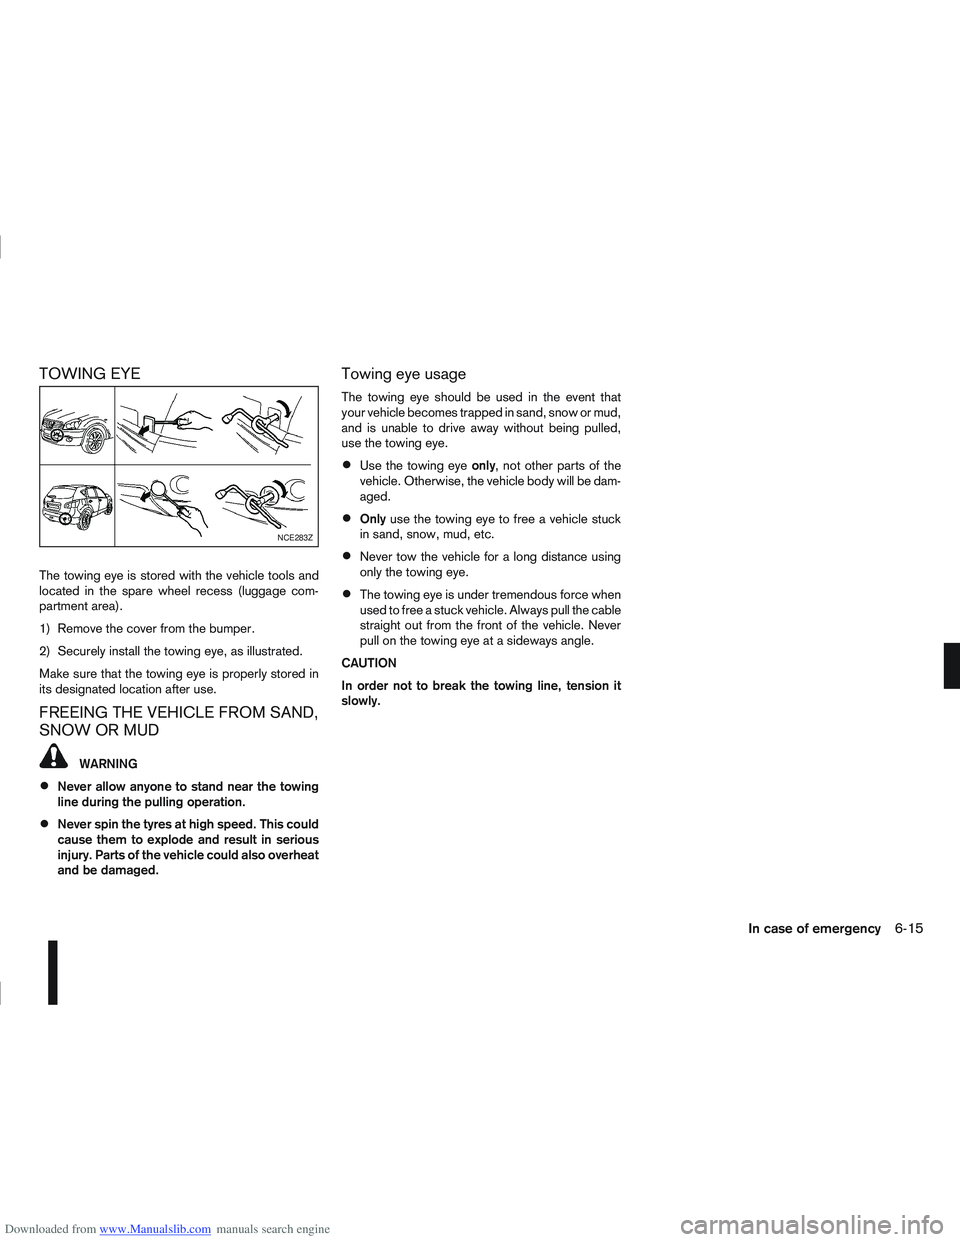
Downloaded from www.Manualslib.com manuals search engine TOWING EYE
The towing eye is stored with the vehicle tools and
located in the spare wheel recess (luggage com-
partment area).
1) Remove the cover from the bumper.
2) Securely install the towing eye, as illustrated.
Make sure that the towing eye is properly stored in
its designated location after use.
FREEING THE VEHICLE FROM SAND,
SNOW OR MUD
WARNING
Never allow anyone to stand near the towing
line during the pulling operation.
Never spin the tyres at high speed. This could
cause them to explode and result in serious
injury. Parts of the vehicle could also overheat
and be damaged.
Towing eye usage
The towing eye should be used in the event that
your vehicle becomes trapped in sand, snow or mud,
and is unable to drive away without being pulled,
use the towing eye.
Use the towing eyeonly, not other parts of the
vehicle. Otherwise, the vehicle body will be dam-
aged.
Only use the towing eye to free a vehicle stuck
in sand, snow, mud, etc.
Never tow the vehicle for a long distance using
only the towing eye.
The towing eye is under tremendous force when
used to free a stuck vehicle. Always pull the cable
straight out from the front of the vehicle. Never
pull on the towing eye at a sideways angle.
CAUTION
In order not to break the towing line, tension it
slowly.
NCE283Z
In case of emergency6-15