2009 NISSAN QASHQAI tow
[x] Cancel search: towPage 58 of 297
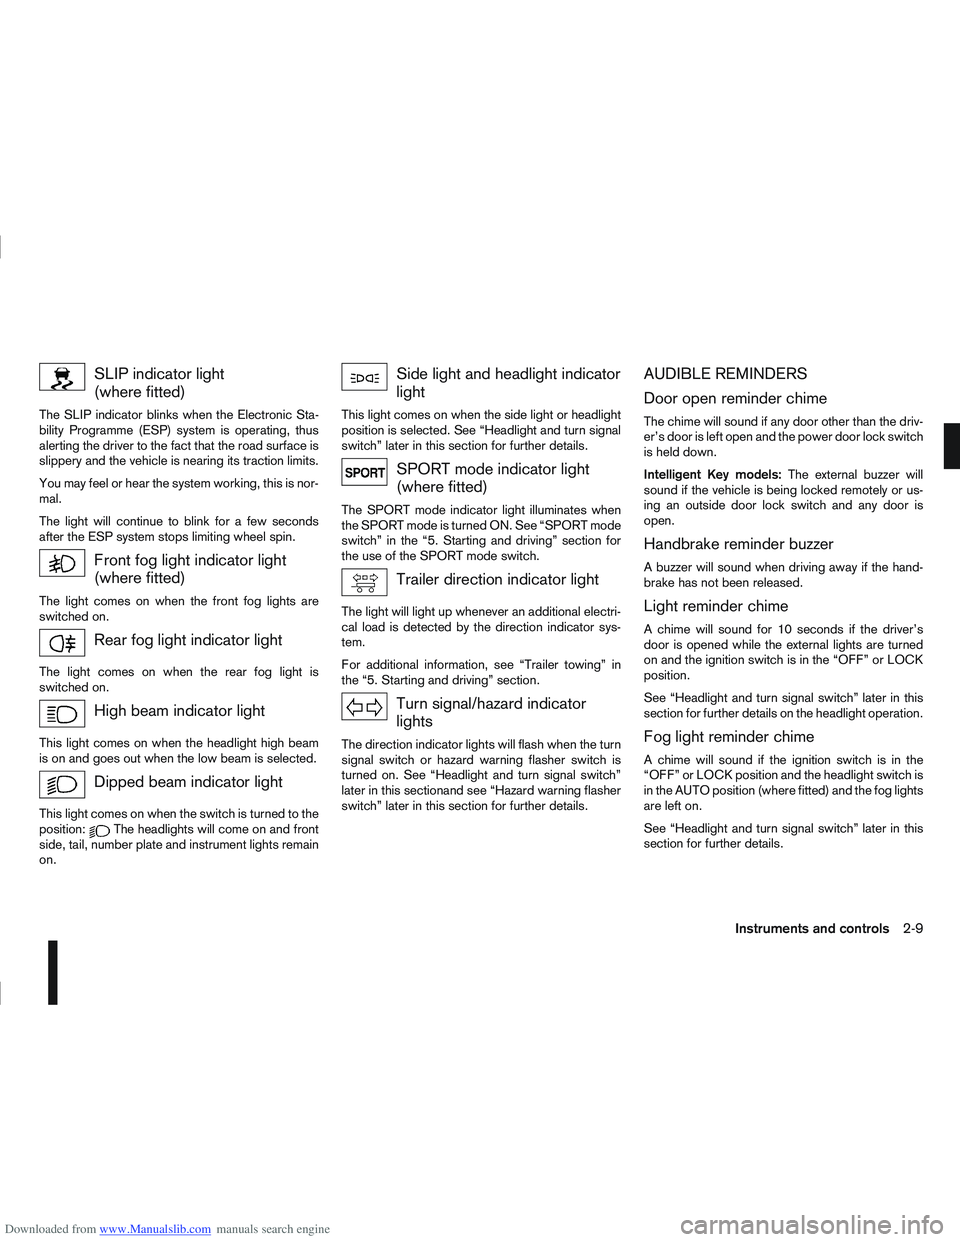
Downloaded from www.Manualslib.com manuals search engine SLIP indicator light
(where fitted)
The SLIP indicator blinks when the Electronic Sta-
bility Programme (ESP) system is operating, thus
alerting the driver to the fact that the road surface is
slippery and the vehicle is nearing its traction limits.
You may feel or hear the system working, this is nor-
mal.
The light will continue to blink for a few seconds
after the ESP system stops limiting wheel spin.
Front fog light indicator light
(where fitted)
The light comes on when the front fog lights are
switched on.
Rear fog light indicator light
The light comes on when the rear fog light is
switched on.
High beam indicator light
This light comes on when the headlight high beam
is on and goes out when the low beam is selected.
Dipped beam indicator light
This light comes on when the switch is turned to the
position:The headlights will come on and front
side, tail, number plate and instrument lights remain
on.
Side light and headlight indicator
light
This light comes on when the side light or headlight
position is selected. See “Headlight and turn signal
switch” later in this section for further details.
SPORT mode indicator light
(where fitted)
The SPORT mode indicator light illuminates when
the SPORT mode is turned ON. See “SPORT mode
switch” in the “5. Starting and driving” section for
the use of the SPORT mode switch.
Trailer direction indicator light
The light will light up whenever an additional electri-
cal load is detected by the direction indicator sys-
tem.
For additional information, see “Trailer towing” in
the “5. Starting and driving” section.
Turn signal/hazard indicator
lights
The direction indicator lights will flash when the turn
signal switch or hazard warning flasher switch is
turned on. See “Headlight and turn signal switch”
later in this sectionand see “Hazard warning flasher
switch” later in this section for further details.
AUDIBLE REMINDERS
Door open reminder chime
The chime will sound if any door other than the driv-
er’s door is left open and the power door lock switch
is held down.
Intelligent Key models: The external buzzer will
sound if the vehicle is being locked remotely or us-
ing an outside door lock switch and any door is
open.
Handbrake reminder buzzer
A buzzer will sound when driving away if the hand-
brake has not been released.
Light reminder chime
A chime will sound for 10 seconds if the driver’s
door is opened while the external lights are turned
on and the ignition switch is in the “OFF” or LOCK
position.
See “Headlight and turn signal switch” later in this
section for further details on the headlight operation.
Fog light reminder chime
A chime will sound if the ignition switch is in the
“OFF” or LOCK position and the headlight switch is
in the AUTO position (where fitted) and the fog lights
are left on.
See “Headlight and turn signal switch” later in this
section for further details.
Instruments and controls2-9
Page 71 of 297

Downloaded from www.Manualslib.com manuals search engine WINDSCREEN
The windscreen wiper and washer can be operated
when the ignition switch is in the ON position.
Wiper operation
Move the lever up or down to operate the wiper at
the following speeds:
Lever positionUp
j4 — for a single sweep opera-
tion of the wiper. Lever position
j1:
Intermittent ()or AUTO.
AUTO (where fitted) operates the rain-sensing auto
wiper system. (See “Rain sensor (where fitted)” later
in this section.).
— The intermittent operation speed can be adjusted
by rotating the ring forward
jA (slower) or back-
wardjB (faster).
— The wiper operation speed will vary (where fit-
ted) in accordance with the vehicle speed. For ex-
ample, when the vehicle speed is high, the intermit-
tent operation speed will be faster.
Lever position Low (
)j2 – for continuous low
speed operation
Lever position High (
)j3 – for continuous high
speed operation
Washer operation
Pull the lever toward youj5 to operate the washer.
For every fifth operation of the wiper and washer,
the headlight washing system (where fitted) will be
activated to clean the headlights. The headlight
washing system is only activated while the headlight
switchisinthe
position. See “Headlight
cleaner (where fitted)” later in this section.
Wiper drip wipe system (where fitted):
The wiper will also operate once about 3 seconds
after the washer and wiper are operated. This op-
eration is to wipe washer fluid that has dripped on
the windscreen.
Rain sensor (where fitted)
The rain sensor is activated when the AUTO posi-
tionj1 of the wiper switch is selected.
The wiper will start to operate automatically at a suit-
able speed when rain is detected on the windscreen.
The sensitivity of the rain sensing system can be
adjusted by rotating the ring of the wiper switch for-
ward
jA – less sensitive, or backwardjB – more
sensitive.
NOTE
The rain sensor is only intended for use during
rain or precipitation. During other weather condi-
tions no harm will come to the rain sensor sys-
tem if left active (wiper switch set to AUTO), al-
though occasional unexpected activation of the
wipers may occur.
NIC1471
Intermittent (without rain sensor)
NIC1469
AUTO (with rain sensor)
2-22Instruments and controls
Page 72 of 297
Downloaded from www.Manualslib.com manuals search engine REAR WINDOW
WARNING
In freezing temperatures the washer solution
may freeze on the rear window and obscure your
vision. Warm the rear window with the rear win-
dow defogger before you wash the rear window.
CAUTION
Do not operate the washer continuously for
more than 15 seconds.
Do not operate the washer if the reservoir
tank is empty or frozen.
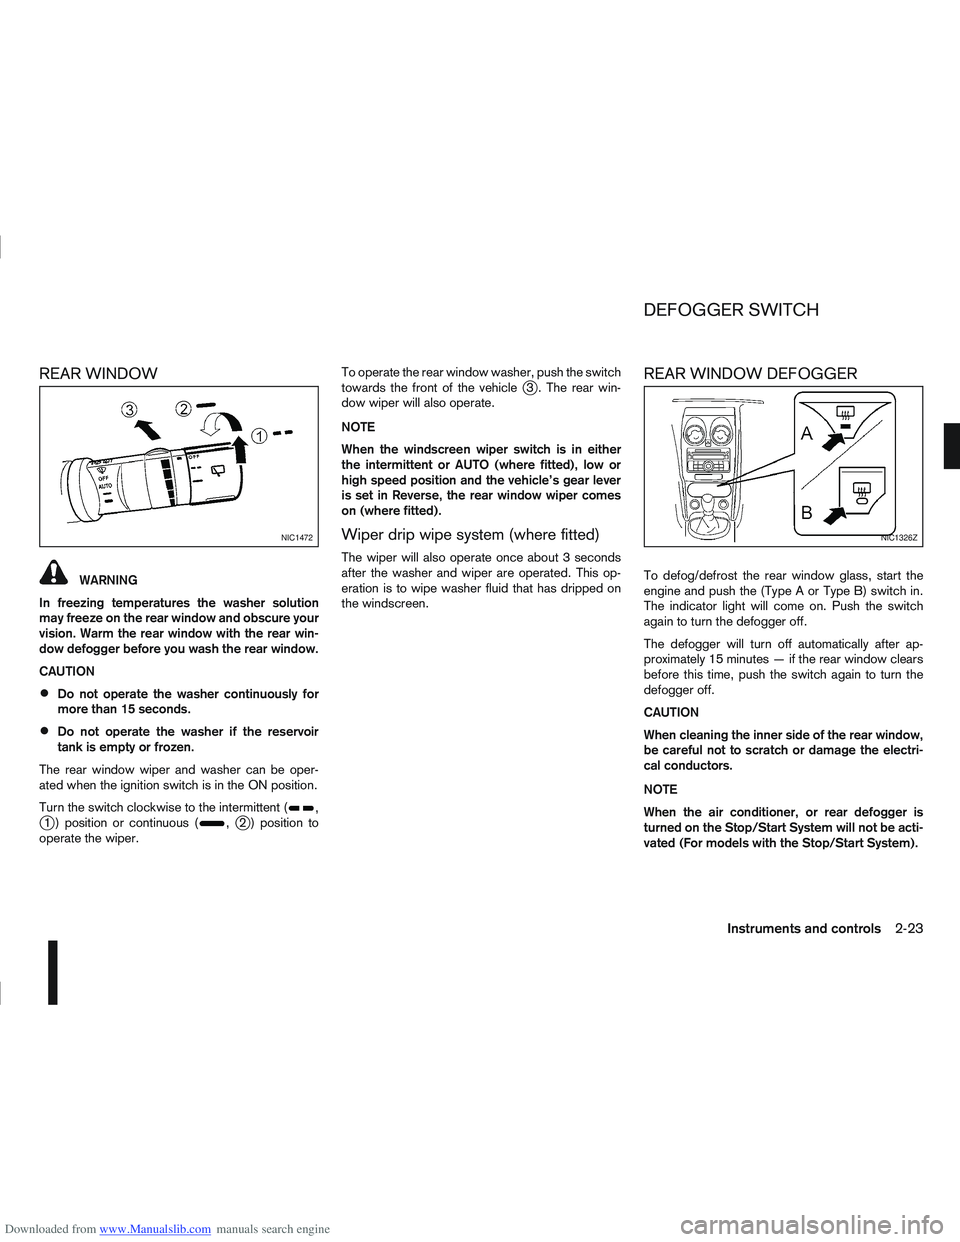
The rear window wiper and washer can be oper-
ated when the ignition switch is in the ON position.
Turn the switch clockwise to the intermittent (
,j1 ) position or continuous (,j2 ) position to
operate the wiper. To operate the rear window washer, push the switch
towards the front of the vehicle
j3 . The rear win-
dow wiper will also operate.
NOTE
When the windscreen wiper switch is in either
the intermittent or AUTO (where fitted), low or
high speed position and the vehicle’s gear lever
is set in Reverse, the rear window wiper comes
on (where fitted).
Wiper drip wipe system (where fitted)
The wiper will also operate once about 3 seconds
after the washer and wiper are operated. This op-
eration is to wipe washer fluid that has dripped on
the windscreen.
REAR WINDOW DEFOGGER
To defog/defrost the rear window glass, start the
engine and push the (Type A or Type B) switch in.
The indicator light will come on. Push the switch
again to turn the defogger off.
The defogger will turn off automatically after ap-
proximately 15 minutes — if the rear window clears
before this time, push the switch again to turn the
defogger off.
CAUTION
When cleaning the inner side of the rear window,
be careful not to scratch or damage the electri-
cal conductors.
NOTE
When the air conditioner, or rear defogger is
turned on the Stop/Start System will not be acti-
vated (For models with the Stop/Start System).
NIC1472NIC1326Z
DEFOGGER SWITCH
Instruments and controls2-23
Page 74 of 297
Downloaded from www.Manualslib.com manuals search engine Daytime light system (where fitted)
Even if the headlight switch is off, the headlight low
beam, front side, rear combination and number plate
lights will come on after starting the engine. How-
ever, you cannot change low beam to high beam
when the light switch is off.
When the light switch is turned to the
position,
the headlight low beam will turn off.
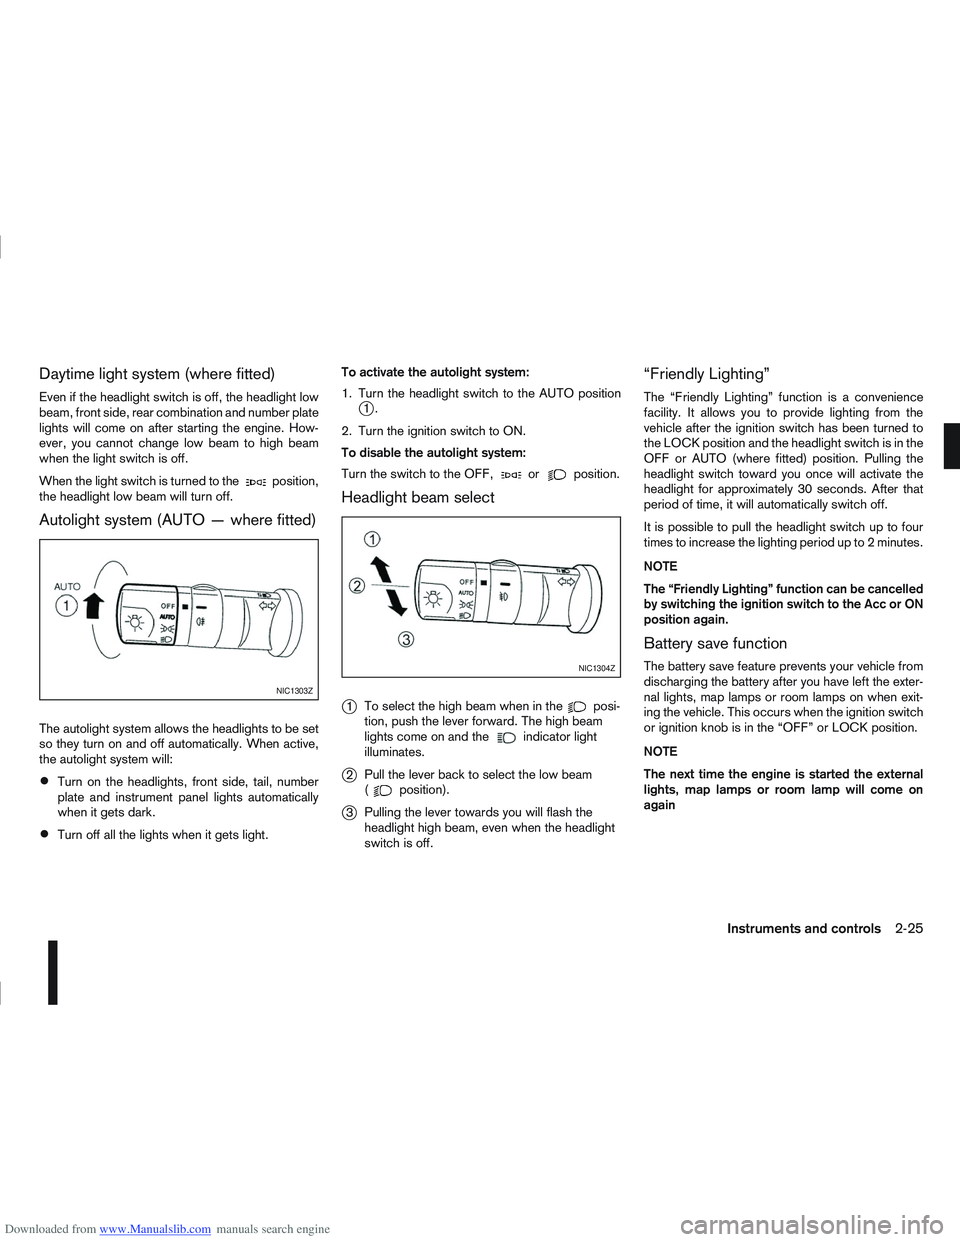
Autolight system (AUTO — where fitted)
The autolight system allows the headlights to be set
so they turn on and off automatically. When active,
the autolight system will:
Turn on the headlights, front side, tail, number
plate and instrument panel lights automatically
when it gets dark.
Turn off all the lights when it gets light. To activate the autolight system:
1. Turn the headlight switch to the AUTO position
j1.
2. Turn the ignition switch to ON.
To disable the autolight system:
Turn the switch to the OFF,
orposition.
Headlight beam select
j
1 To select the high beam when in theposi-
tion, push the lever forward. The high beam
lights come on and the
indicator light
illuminates.
j2 Pull the lever back to select the low beam
(position).
j3Pulling the lever towards you will flash the
headlight high beam, even when the headlight
switch is off.
“Friendly Lighting”
The “Friendly Lighting” function is a convenience
facility. It allows you to provide lighting from the
vehicle after the ignition switch has been turned to
the LOCK position and the headlight switch is in the
OFF or AUTO (where fitted) position. Pulling the
headlight switch toward you once will activate the
headlight for approximately 30 seconds. After that
period of time, it will automatically switch off.
It is possible to pull the headlight switch up to four
times to increase the lighting period up to 2 minutes.
NOTE
The “Friendly Lighting” function can be cancelled
by switching the ignition switch to the Acc or ON
position again.
Battery save function
The battery save feature prevents your vehicle from
discharging the battery after you have left the exter-
nal lights, map lamps or room lamps on when exit-
ing the vehicle. This occurs when the ignition switch
or ignition knob is in the “OFF” or LOCK position.
NOTE
The next time the engine is started the external
lights, map lamps or room lamp will come on
again
NIC1303Z
NIC1304Z
Instruments and controls2-25
Page 77 of 297
Downloaded from www.Manualslib.com manuals search engine NISSAN recommends consulting local regulations
on the use of lights.To clean the headlights, pull the windscreen washer
switch towards you while the headlight switch is in
the
position and the ignition switch is in the ON
position.
NOTE
The headlight cleaner will automatically operate
every fifth operation of the wiper and washer
switch.
See “Wiper and washer switch” earlier in this sec-
tion
CAUTION
Do not operate the cleaner continuously for
more than 15 seconds.
Do not operate the cleaner if the washer fluid
reservoir is empty or frozen.
See “Window washer fluid/headlight cleaner fluid
(where fitted)” in the “8. Maintenance and
do-it-yourself” section for details on refilling the res-
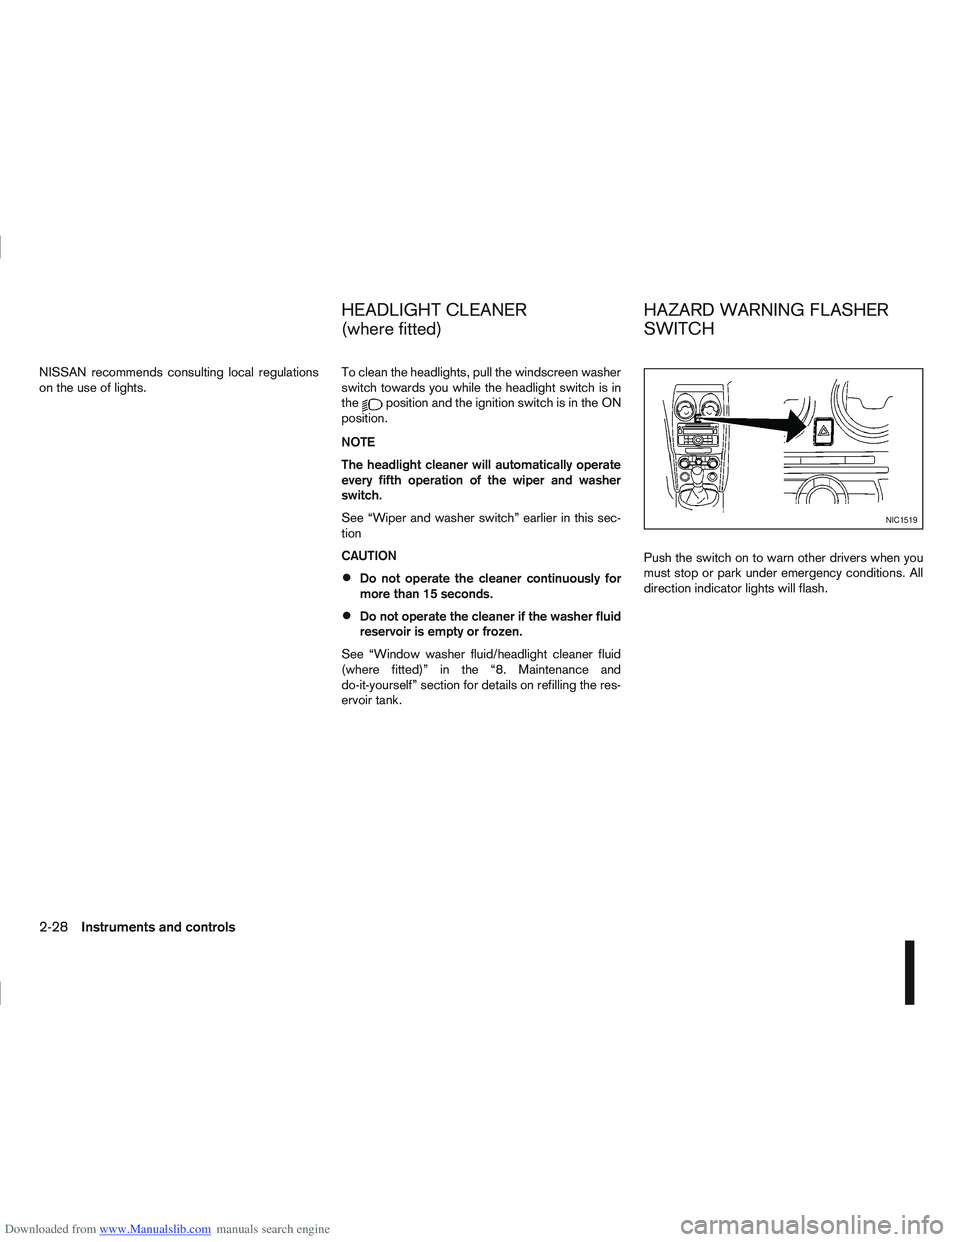
ervoir tank. Push the switch on to warn other drivers when you
must stop or park under emergency conditions. All
direction indicator lights will flash.
NIC1519
HEADLIGHT CLEANER
(where fitted)
HAZARD WARNING FLASHER
SWITCH
2-28Instruments and controls
Page 96 of 297
Downloaded from www.Manualslib.com manuals search engine SUPER LOCK SYSTEM (RHD models)
WARNING
Super Lock system equipped models:
Failure to follow the precautions below may lead
to hazardous situations. Make sure the Super
Lock system activation is always conducted
safely.
When the vehicle is occupied, never lock the
doors with the integrated keyfob. Doing so
will trap the occupants, since the Super Lock
system prevents the doors from being opened
from the inside of the vehicle.
Only operate the integrated keyfob “LOCK”
button when there is a clear view of the ve-
hicle. This is to prevent anybody from being
trapped inside the vehicle through the Super
Lock system activation.
Pressing the “LOCK” button
on the integrated
keyfob or locking the doors using one of the outside
door lock switches (Intelligent Key models) will acti-
vate the Super Lock system.
When the Super Lock system is active, none of the
doors can be opened from inside the vehicle. This
provides additional security in case of theft or break-
in.
The Super Lock system will be released when all
the doors are unlocked using the integrated keyfob
or an outside door lock switch (Intelligent Key mod-
els).
Emergency situations
If the Super Lock system is activated while you are
inside the vehicle, for example by a traffic accident
or other unexpected circumstances, follow the in-
structions below.
To release the Super Lock system:
– Insert the key into the ignition switch and turn it to the ON position.
All doors can now be unlocked and opened from
inside the vehicle.
– Remove the key from the ignition switch and un- lock the doors using the integrated keyfob “UN-
LOCK” button
.
All doors can now be opened from inside the
vehicle.
To unlock and open the driver’s door from
inside the vehicle while the Super Lock system
is active:
1. Open or break the driver’s door window.
2. Insert the key into the outside door key cylinder and turn it towards the rear of the vehicle.
3. The driver’s door will unlock and can now be opened from inside the vehicle.
Locking without activating the Super
Lock system
WARNING
Do not leave the key inside the vehicle when leav-
ing the vehicle.
Locking the doors using the door key cylinder or
power door lock switch will not activate the Super
Lock system. See “Power door lock switch” later in
this section for further information.
LOCKING/UNLOCKING WITH THE
KEY (vehicle dead battery)
WARNING
When leaving the vehicle, do not leave the key
inside the vehicle.
Never leave children unattended in a vehicle
and always be sure you have your keys with
you when leaving. If an emergency occurs it
may be more difficult to help them otherwise.
NPA828Z
DOOR LOCKS
Pre-driving checks and adjustments3-9
Page 97 of 297
Downloaded from www.Manualslib.com manuals search engine The driver’s door can be locked/unlocked from out-
side using the key/emergency key if the vehicle’s
battery is dead.
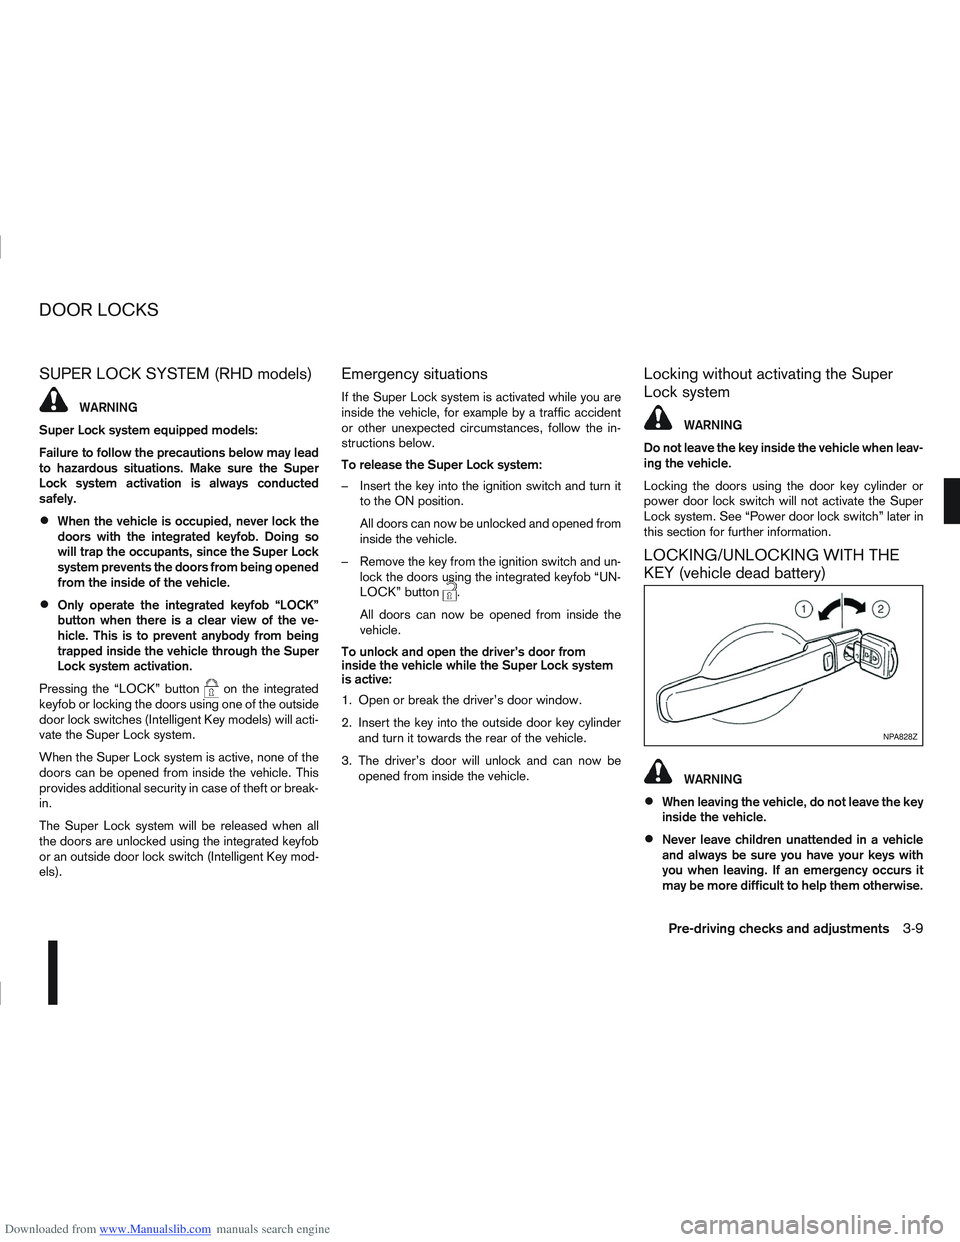
To lock the door, insert the key into the driver’s door
key cylinder and turn it towards the front of the ve-
hicle
j1.
To unlock the door, turn the key towards the rear of
the vehicle
j2.
See “Ignition knob (where fitted)” in the “5. Starting
and driving” section for instructions on accessing
the Intelligent Key system Emergency key.
CAUTION
The alarm system will be triggered when the door
is opened using the key (NISSAN alarm equipped
models). To stop the alarm, turn the ignition key
to the ON position or press the unlock
button
on the integrated keyfob.
Initialising the system after vehicle
battery loading or replacement
After recharging or replacing the battery, you should
release (initialise) the system by:
Inserting the key into the ignition switch and then
turning it to the ON position.
Unlocking the vehicle using the integrated key-
fob.
INSIDE DOOR HANDLE
To unlock and open the door, pull the inside door
handle as illustrated.
With Super Lock (where fitted)
The door cannot be opened when the Super Lock
system is activated.
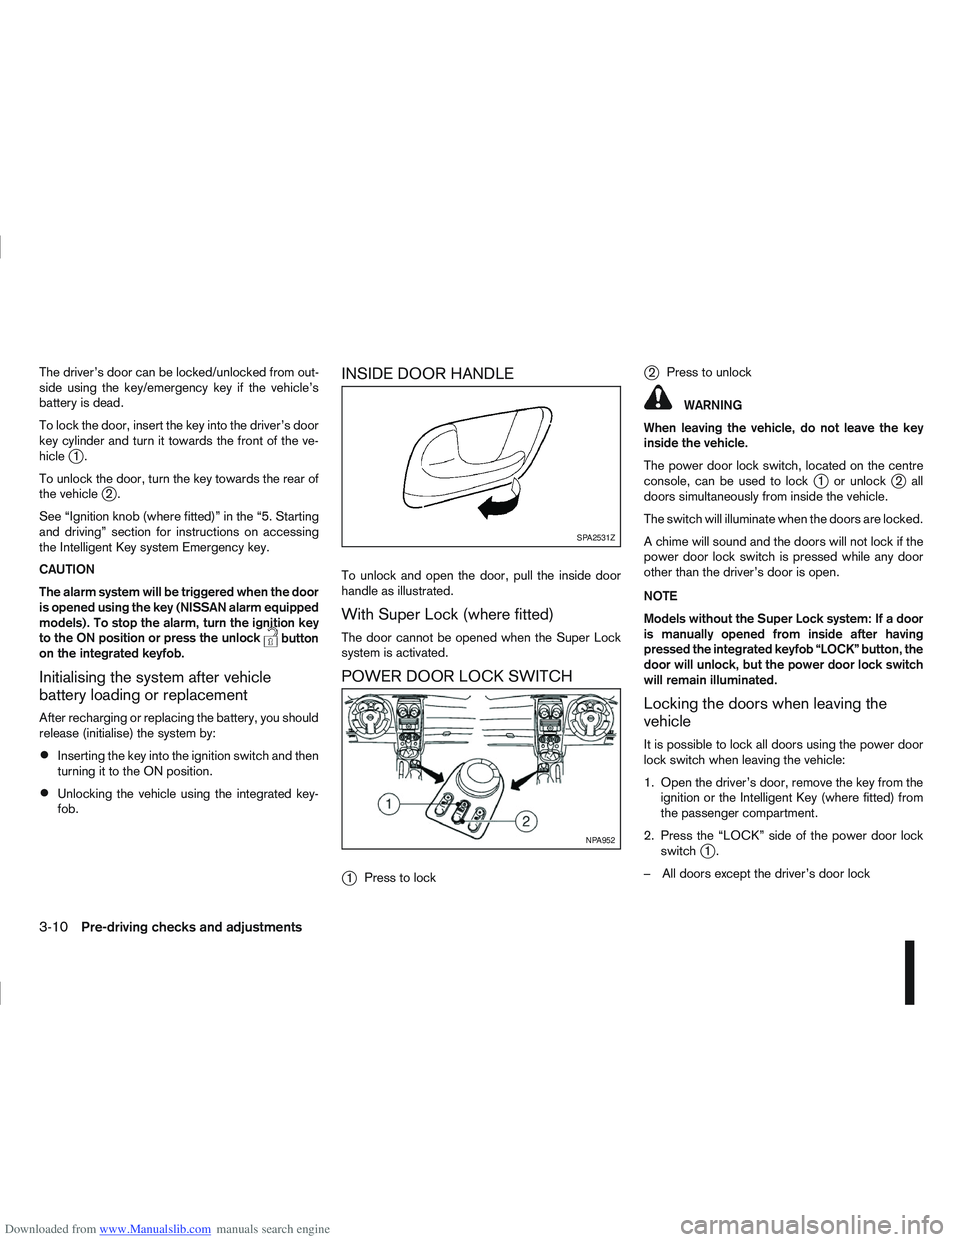
POWER DOOR LOCK SWITCH
j
1 Press to lock
j2Press to unlock
WARNING
When leaving the vehicle, do not leave the key
inside the vehicle.
The power door lock switch, located on the centre
console, can be used to lock
j1 or unlockj2all
doors simultaneously from inside the vehicle.
The switch will illuminate when the doors are locked.
A chime will sound and the doors will not lock if the
power door lock switch is pressed while any door
other than the driver’s door is open.
NOTE
Models without the Super Lock system: If a door
is manually opened from inside after having
pressed the integrated keyfob “LOCK” button, the
door will unlock, but the power door lock switch
will remain illuminated.
Locking the doors when leaving the
vehicle
It is possible to lock all doors using the power door
lock switch when leaving the vehicle:
1. Open the driver’s door, remove the key from the ignition or the Intelligent Key (where fitted) from
the passenger compartment.
2. Press the “LOCK” side of the power door lock switch
j1.
– All doors except the driver’s door lock
SPA2531Z
NPA952
3-10Pre-driving checks and adjustments
Page 118 of 297
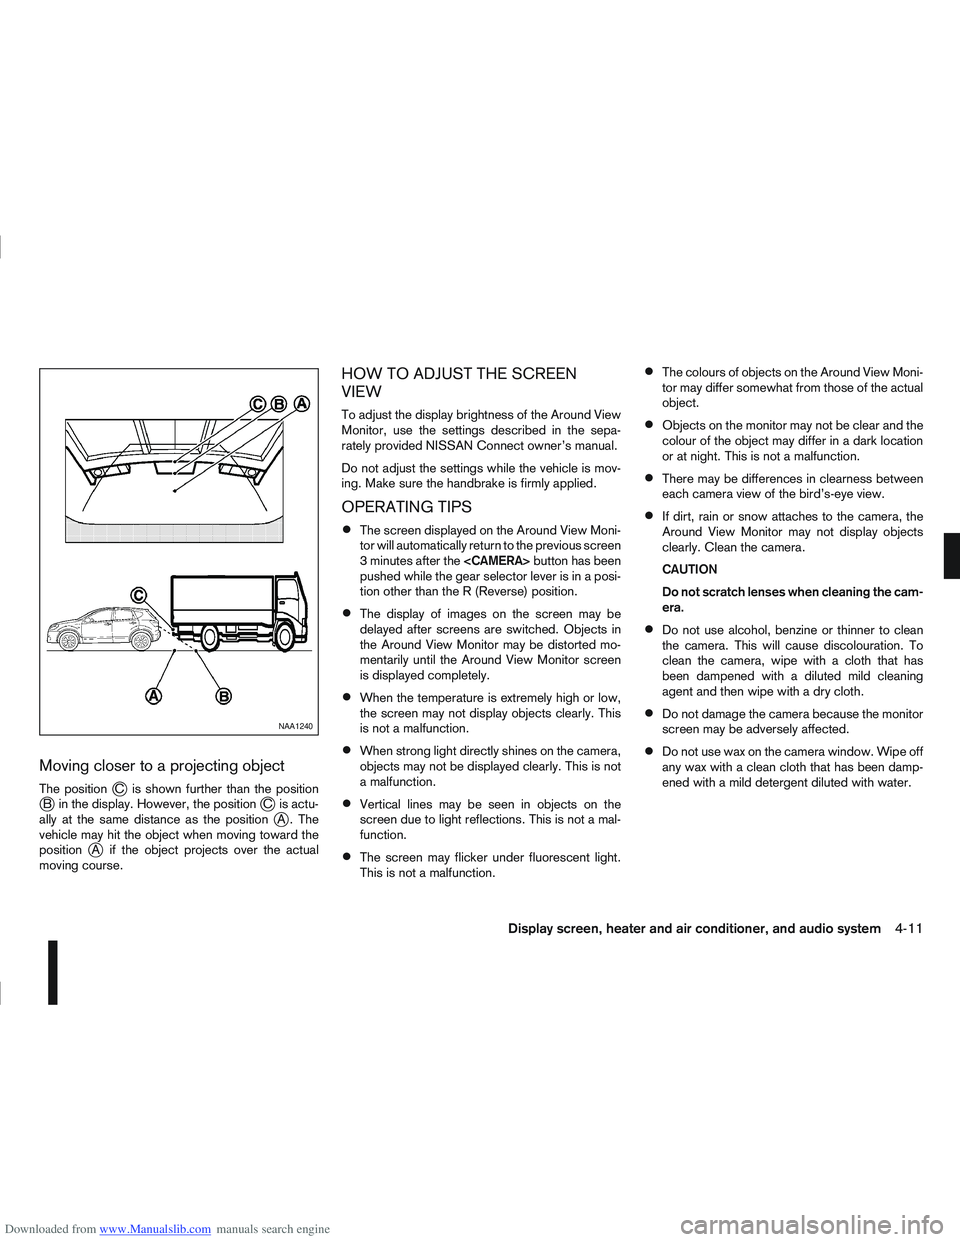
Downloaded from www.Manualslib.com manuals search engine Moving closer to a projecting object
The positionjC is shown further than the positionjB in the display. However, the positionjC is actu-
ally at the same distance as the positionjA . The
vehicle may hit the object when moving toward the
position
jA if the object projects over the actual
moving course.
HOW TO ADJUST THE SCREEN
VIEW
To adjust the display brightness of the Around View
Monitor, use the settings described in the sepa-
rately provided NISSAN Connect owner’s manual.
Do not adjust the settings while the vehicle is mov-
ing. Make sure the handbrake is firmly applied.
OPERATING TIPS
The screen displayed on the Around View Moni-
tor will automatically return to the previous screen
3 minutes after the
pushed while the gear selector lever is in a posi-
tion other than the R (Reverse) position.
The display of images on the screen may be
delayed after screens are switched. Objects in
the Around View Monitor may be distorted mo-
mentarily until the Around View Monitor screen
is displayed completely.
When the temperature is extremely high or low,
the screen may not display objects clearly. This
is not a malfunction.
When strong light directly shines on the camera,
objects may not be displayed clearly. This is not
a malfunction.
Vertical lines may be seen in objects on the
screen due to light reflections. This is not a mal-
function.
The screen may flicker under fluorescent light.
This is not a malfunction.
The colours of objects on the Around View Moni-
tor may differ somewhat from those of the actual
object.
Objects on the monitor may not be clear and the
colour of the object may differ in a dark location
or at night. This is not a malfunction.
There may be differences in clearness between
each camera view of the bird’s-eye view.
If dirt, rain or snow attaches to the camera, the
Around View Monitor may not display objects
clearly. Clean the camera.
CAUTION
Do not scratch lenses when cleaning the cam-
era.
Do not use alcohol, benzine or thinner to clean
the camera. This will cause discolouration. To
clean the camera, wipe with a cloth that has
been dampened with a diluted mild cleaning
agent and then wipe with a dry cloth.
Do not damage the camera because the monitor
screen may be adversely affected.
Do not use wax on the camera window. Wipe off
any wax with a clean cloth that has been damp-
ened with a mild detergent diluted with water.
NAA1240
Display screen, heater and air conditioner, and audio system4-11