2009 NISSAN QASHQAI Instruments
[x] Cancel search: InstrumentsPage 87 of 297
Downloaded from www.Manualslib.com manuals search engine Room light timer (where fitted)
The room light will stay on for approximately 30 sec-
onds when:
The ignition is switched off.
The doors are unlocked.
Any door is opened and then closed.
The timer is cancelled, and the interior light will turn
off when:
The doors are locked.
The ignition switch is turned to the ON position.
MAP LIGHTS (where fitted)
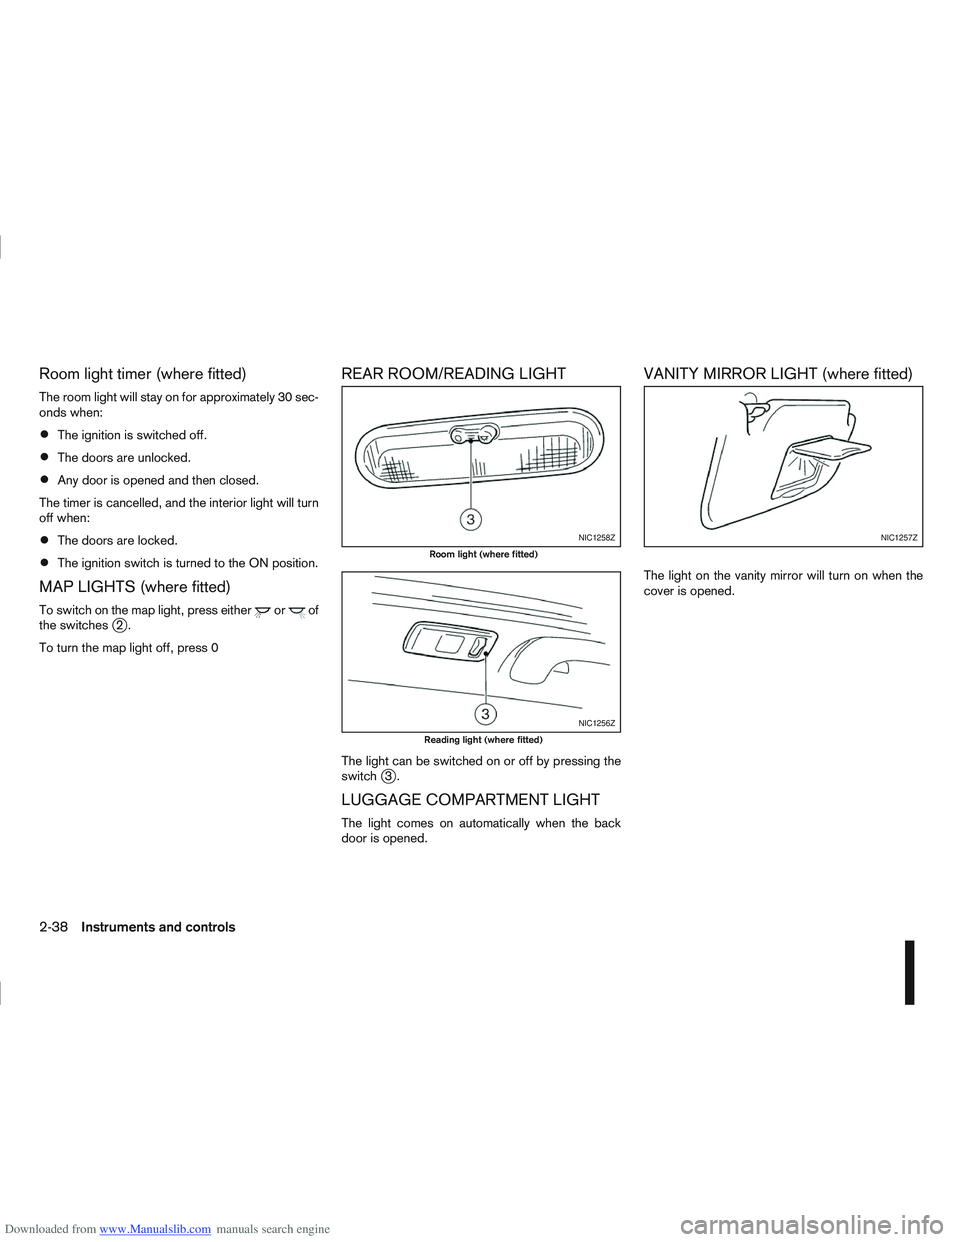
To switch on the map light, press eitherorof
the switchesj2.
To turn the map light off, press 0
REAR ROOM/READING LIGHT
The light can be switched on or off by pressing the
switchj3.
LUGGAGE COMPARTMENT LIGHT
The light comes on automatically when the back
door is opened.
VANITY MIRROR LIGHT (where fitted)
The light on the vanity mirror will turn on when the
cover is opened.
NIC1258Z
Room light (where fitted)
NIC1256Z
Reading light (where fitted)
NIC1257Z
2-38Instruments and controls
Page 92 of 297
Downloaded from www.Manualslib.com manuals search engine door outside lock switch until the direction indi-
cators flash to confirm the setting mode. Then
release the driver’s door outside lock switch.
5. Setting anti-hijack mode:
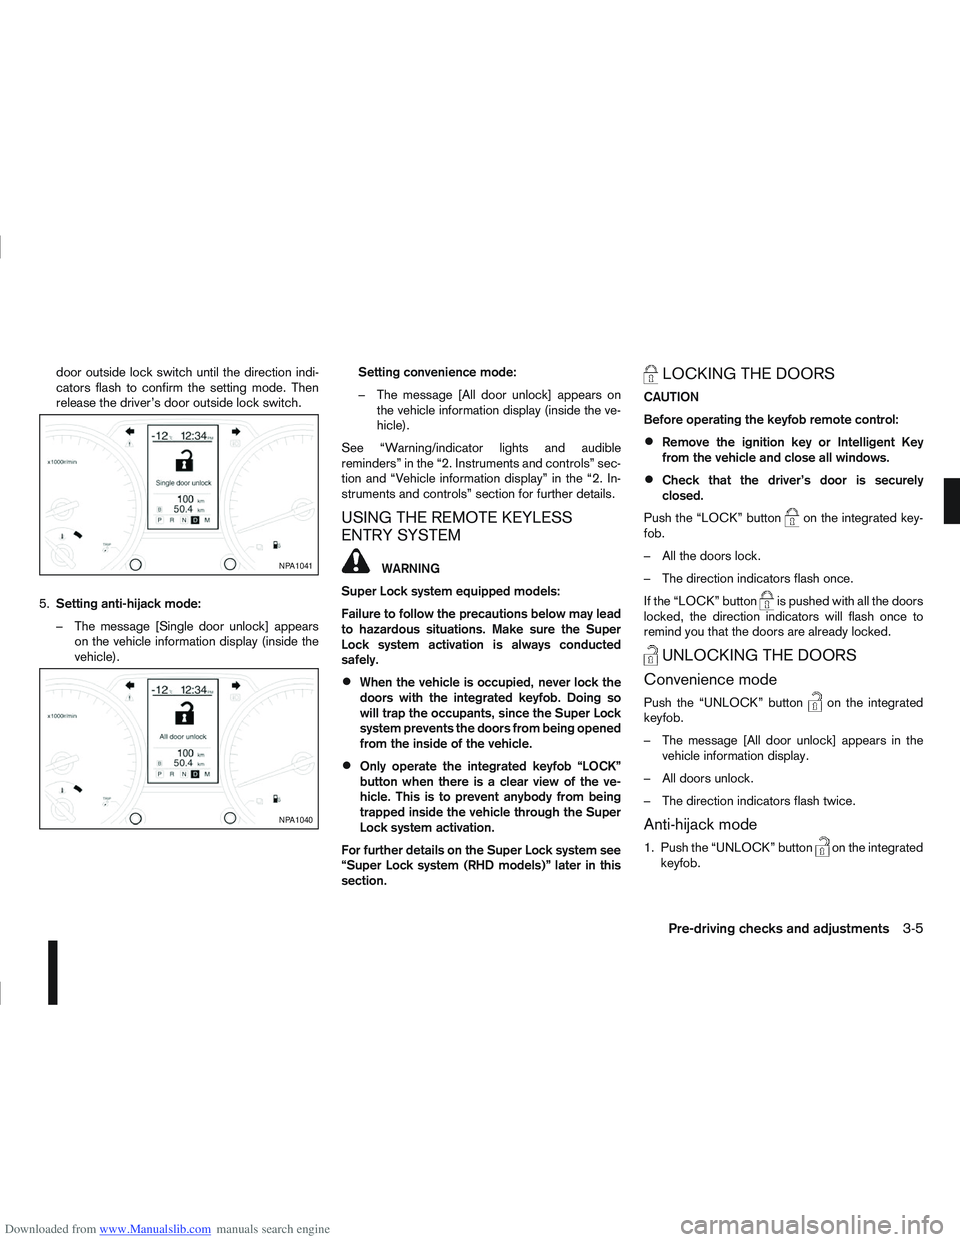
– The message [Single door unlock] appears on the vehicle information display (inside the
vehicle). Setting convenience mode:
– The message [All door unlock] appears on
the vehicle information display (inside the ve-
hicle).
See “Warning/indicator lights and audible
reminders” in the “2. Instruments and controls” sec-
tion and “Vehicle information display” in the “2. In-
struments and controls” section for further details.
USING THE REMOTE KEYLESS
ENTRY SYSTEM
WARNING
Super Lock system equipped models:
Failure to follow the precautions below may lead
to hazardous situations. Make sure the Super
Lock system activation is always conducted
safely.
When the vehicle is occupied, never lock the
doors with the integrated keyfob. Doing so
will trap the occupants, since the Super Lock
system prevents the doors from being opened
from the inside of the vehicle.
Only operate the integrated keyfob “LOCK”
button when there is a clear view of the ve-
hicle. This is to prevent anybody from being
trapped inside the vehicle through the Super
Lock system activation.
For further details on the Super Lock system see
“Super Lock system (RHD models)” later in this
section.
LOCKING THE DOORS
CAUTION
Before operating the keyfob remote control:
Remove the ignition key or Intelligent Key
from the vehicle and close all windows.
Check that the driver’s door is securely
closed.
Push the “LOCK” button
on the integrated key-
fob.
– All the doors lock.
– The direction indicators flash once.
If the “LOCK” button
is pushed with all the doors
locked, the direction indicators will flash once to
remind you that the doors are already locked.
UNLOCKING THE DOORS
Convenience mode
Push the “UNLOCK” buttonon the integrated
keyfob.
– The message [All door unlock] appears in the vehicle information display.
– All doors unlock.
– The direction indicators flash twice.
Anti-hijack mode
1. Push the “UNLOCK” buttonon the integrated
keyfob.
NPA1041
NPA1040
Pre-driving checks and adjustments3-5
Page 103 of 297
Downloaded from www.Manualslib.com manuals search engine the fuel system and emission control system.
An incorrect cap can result in a serious mal-
function and possible injury.
CAUTION
If fuel is spilled on the vehicle body, flush it away
with water to avoid paint damage.
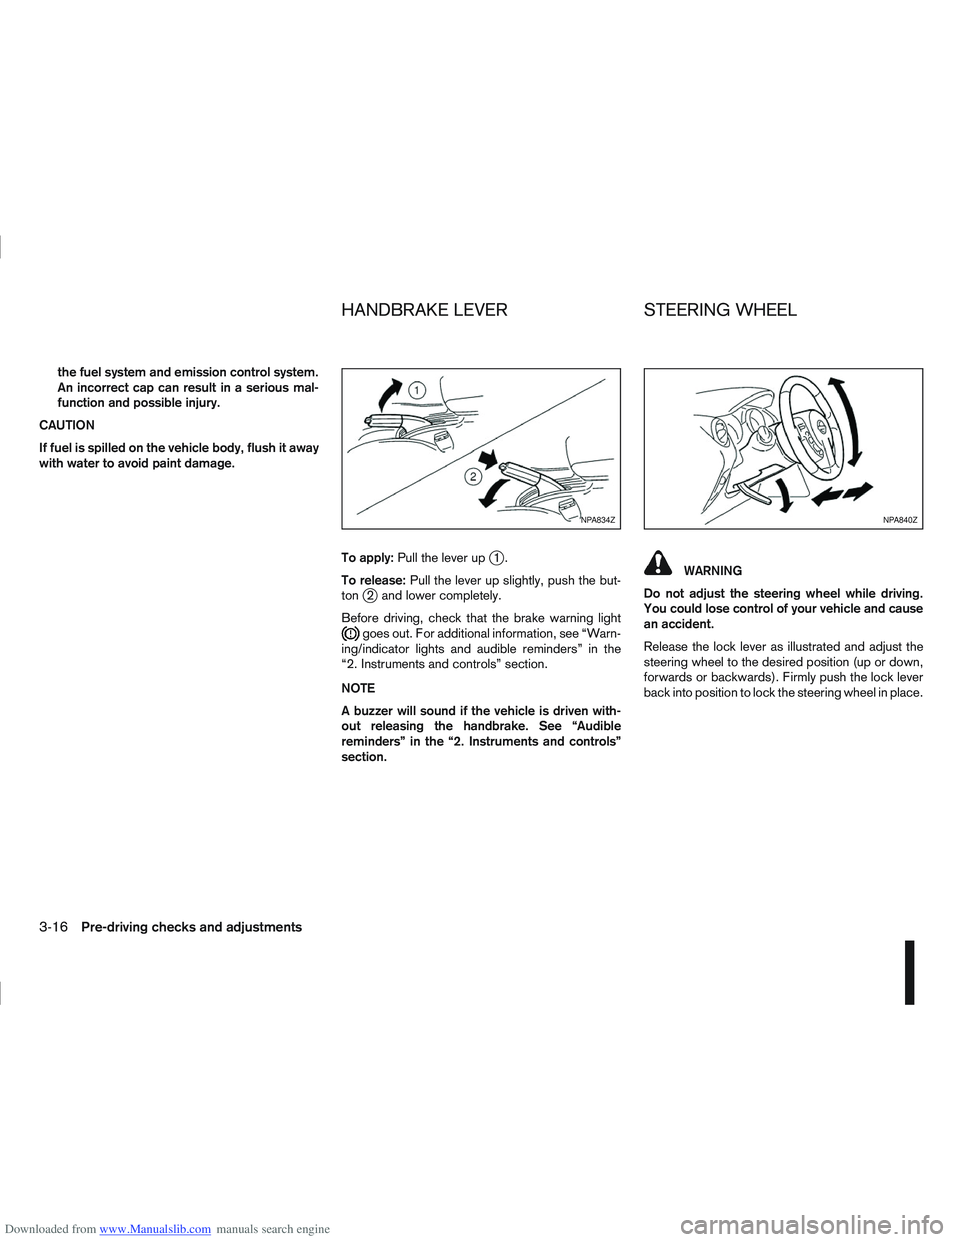
To apply:Pull the lever up
j1.
To release: Pull the lever up slightly, push the but-
ton
j2 and lower completely.
Before driving, check that the brake warning light
goes out. For additional information, see “Warn-
ing/indicator lights and audible reminders” in the
“2. Instruments and controls” section.
NOTE
A buzzer will sound if the vehicle is driven with-
out releasing the handbrake. See “Audible
reminders” in the “2. Instruments and controls”
section.
WARNING
Do not adjust the steering wheel while driving.
You could lose control of your vehicle and cause
an accident.
Release the lock lever as illustrated and adjust the
steering wheel to the desired position (up or down,
forwards or backwards). Firmly push the lock lever
back into position to lock the steering wheel in place.
NPA834ZNPA840Z
HANDBRAKE LEVER STEERING WHEEL
3-16Pre-driving checks and adjustments
Page 112 of 297
Downloaded from www.Manualslib.com manuals search engine Do not use the Around View Monitor with the
outside mirror in the stored position, and
make sure that the back door is securely
closed when operating the vehicle using the
Around View Monitor.
The distance between objects viewed on the
Around View Monitor differs from the actual
distance.
The cameras are installed above the front
grille, the outside mirrors and above the rear
number plate. Do not put anything on or cover
the cameras.
When washing the vehicle with high-pressure
water, be sure not to spray it around the cam-
eras. Otherwise, water may enter the camera
unit causing water condensation on the lens,
a malfunction, fire or an electric shock.
Do not strike the cameras. They are precision
instruments. Doing so could cause a malfunc-
tion or cause damage resulting in a fire or an
electric shock.
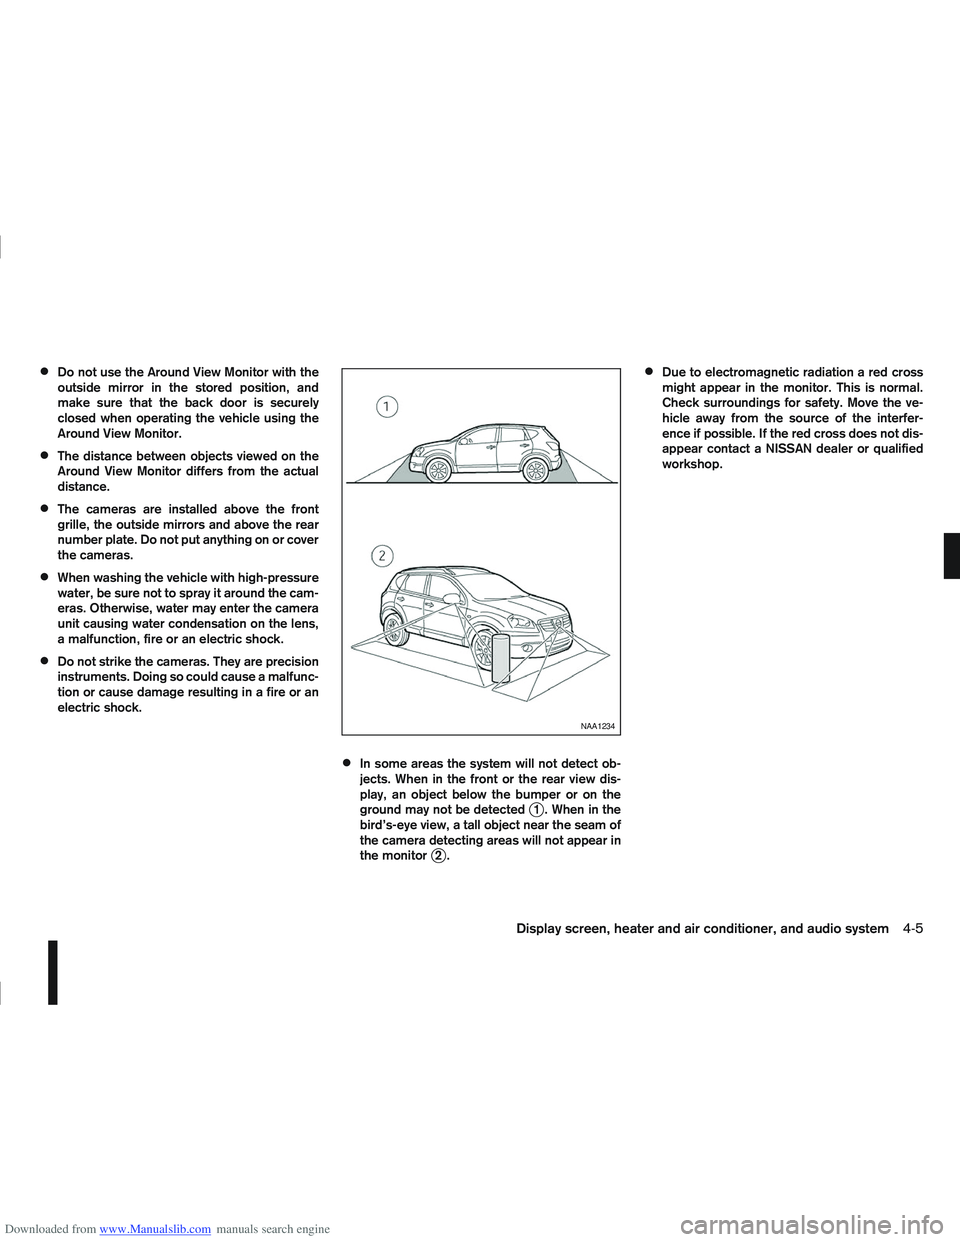
In some areas the system will not detect ob-
jects. When in the front or the rear view dis-
play, an object below the bumper or on the
ground may not be detected
j1 . When in the
bird’s-eye view, a tall object near the seam of
the camera detecting areas will not appear in
the monitor
j2.
Due to electromagnetic radiation a red cross
might appear in the monitor. This is normal.
Check surroundings for safety. Move the ve-
hicle away from the source of the interfer-
ence if possible. If the red cross does not dis-
appear contact a NISSAN dealer or qualified
workshop.
NAA1234
Display screen, heater and air conditioner, and audio system4-5
Page 120 of 297

Downloaded from www.Manualslib.com manuals search engine MANUAL AIR CONDITIONER
j
1Temperature control dial
j2Air recirculation button
j3Fan speed control dial
j4Rear window defogger button
(For details, see “Defogger switch” in the “2. Instruments and controls” section)
j5
Airflow control dial
j6Air conditioner ON/OFF button
Controls
Fan speed control dialm:
To switch the fan on or off and to control the fan
speed, turn the fan speed control dial clockwise to
increase the fan speed. To decrease the fan speed,
turn the fan speed control dial anticlockwise.
Temperature control dial:
Turn the temperature control dial to set the desired
air temperature from the vents and floor outlets.
NAA947
Manual air conditioner
Display screen, heater and air conditioner, and audio system4-13
Page 125 of 297
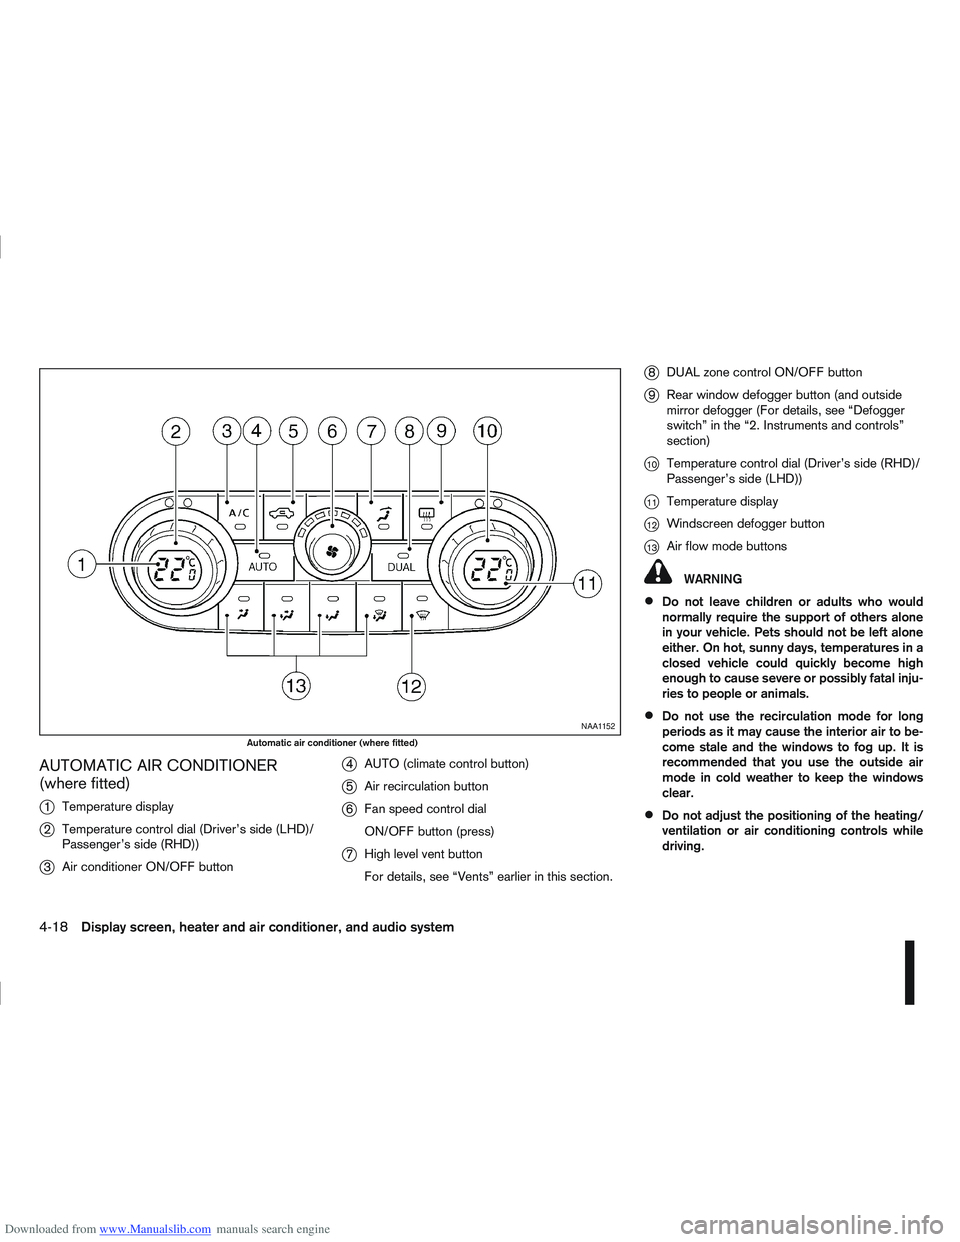
Downloaded from www.Manualslib.com manuals search engine AUTOMATIC AIR CONDITIONER
(where fitted)
j
1Temperature display
j2Temperature control dial (Driver’s side (LHD)/
Passenger’s side (RHD))
j3Air conditioner ON/OFF button
j4AUTO (climate control button)
j5Air recirculation button
j6Fan speed control dial
ON/OFF button (press)
j7High level vent button
For details, see “Vents” earlier in this section.
j8DUAL zone control ON/OFF button
j9Rear window defogger button (and outside
mirror defogger (For details, see “Defogger
switch” in the “2. Instruments and controls”
section)
j10Temperature control dial (Driver’s side (RHD)/
Passenger’s side (LHD))
j11Temperature display
j12Windscreen defogger button
j13Air flow mode buttons
WARNING
Do not leave children or adults who would
normally require the support of others alone
in your vehicle. Pets should not be left alone
either. On hot, sunny days, temperatures in a
closed vehicle could quickly become high
enough to cause severe or possibly fatal inju-
ries to people or animals.
Do not use the recirculation mode for long
periods as it may cause the interior air to be-
come stale and the windows to fog up. It is
recommended that you use the outside air
mode in cold weather to keep the windows
clear.
Do not adjust the positioning of the heating/
ventilation or air conditioning controls while
driving.
NAA1152
Automatic air conditioner (where fitted)
4-18Display screen, heater and air conditioner, and audio system
Page 150 of 297
Downloaded from www.Manualslib.com manuals search engine For details, see the separately provided NISSAN
Connect Owner’s Manual.
MAIN OPERATION
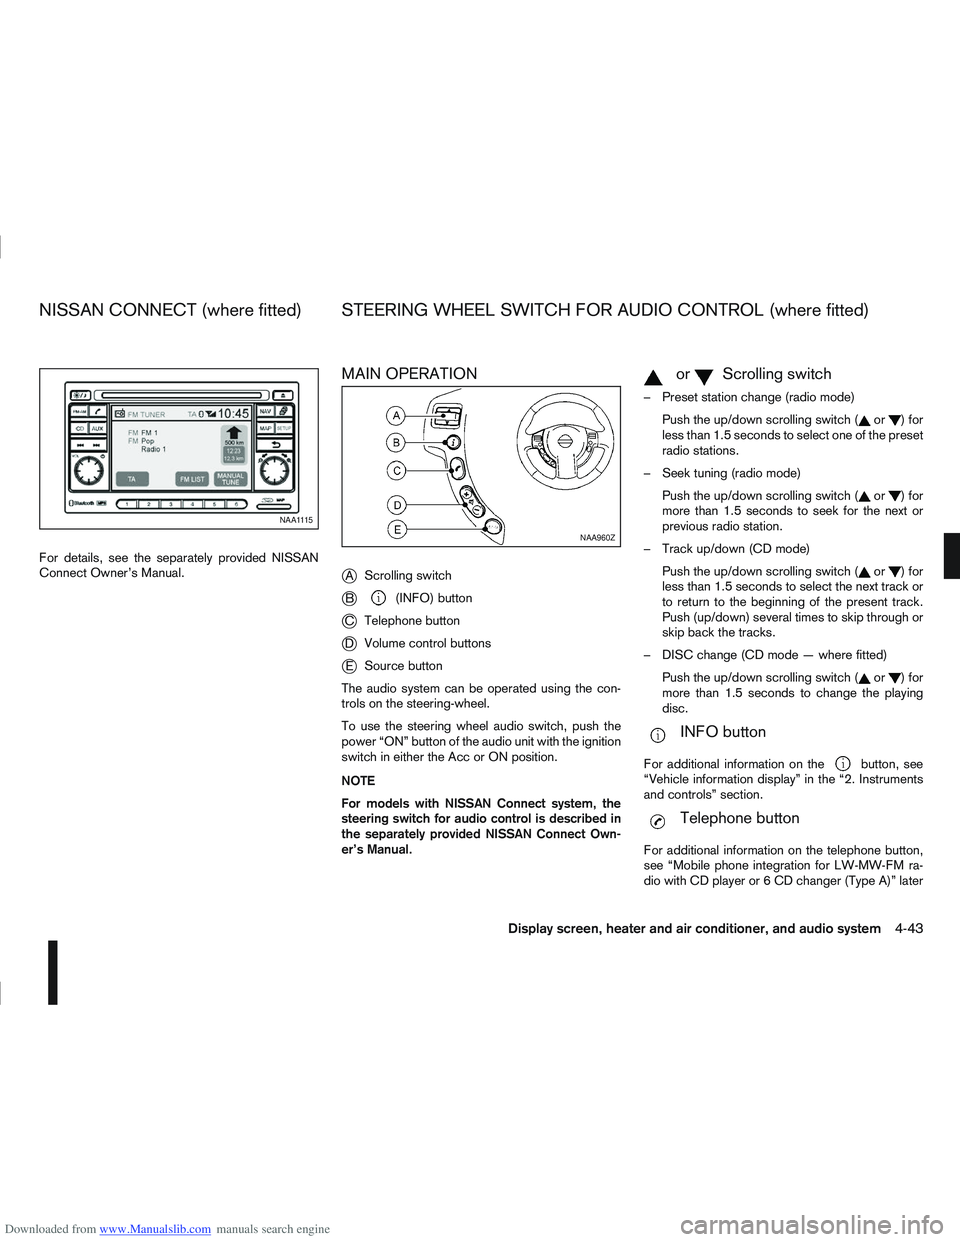
j
AScrolling switch
jB(INFO) button
jC Telephone button
jDVolume control buttons
jESource button
The audio system can be operated using the con-
trols on the steering-wheel.
To use the steering wheel audio switch, push the
power “ON” button of the audio unit with the ignition
switch in either the Acc or ON position.
NOTE
For models with NISSAN Connect system, the
steering switch for audio control is described in
the separately provided NISSAN Connect Own-
er’s Manual.
mormScrolling switch
– Preset station change (radio mode) Push the up/down scrolling switch (
or)for
less than 1.5 seconds to select one of the preset
radio stations.
– Seek tuning (radio mode) Push the up/down scrolling switch (
or)for
more than 1.5 seconds to seek for the next or
previous radio station.
– Track up/down (CD mode) Push the up/down scrolling switch (
or)for
less than 1.5 seconds to select the next track or
to return to the beginning of the present track.
Push (up/down) several times to skip through or
skip back the tracks.
– DISC change (CD mode — where fitted) Push the up/down scrolling switch (
or)for
more than 1.5 seconds to change the playing
disc.
mINFO button
For additional information on thebutton, see
“Vehicle information display” in the “2. Instruments
and controls” section.
mTelephone button
For additional information on the telephone button,
see “Mobile phone integration for LW-MW-FM ra-
dio with CD player or 6 CD changer (Type A)” later
NAA1115
NAA960Z
NISSAN CONNECT (where fitted) STEERING WHEEL SWITCH FOR AUDIO CONTROL (where fitted)
Display screen, heater and air conditioner, and audio system4-43
Page 172 of 297
Downloaded from www.Manualslib.com manuals search engine AUTOMATIC TRANSMISSION OR
CONTINUOUSLY VARIABLE
TRANSMISSION
The ignition knob is designed so that it cannot be
turned to the LOCK position until the selector lever
is moved to the P (Park) position. The selector lever
can only be moved from the P (Park) position when
the ignition knob is in the ON position and the
footbrake pedal is depressed.
NOTE
The ignition knob warning appears and a buzzer
sounds twice when the ignition knob is turned to
the “OFF” position. Make sure that the selector
lever is in the P (Park) position, then turn the igni-
tion knob to the LOCK position. See “Warnings
and alerts” in the “2. Instruments and controls”
section for further details regarding the function-
ality of the ignition knob warning.
STEERING LOCK
To lock the steering wheel
In the LOCK position, turn the steering wheel 1/6 of
a turn from the straight up position.
To unlock the steering wheel
Depress the brake pedal, push the ignition knob and
turn it towards the Acc position while gently rotating
the steering wheel right or left.
IGNITION KNOB POSITION
LOCK (Normal parking position) (0)
The steering lock can only be locked in this position.
“OFF” (1)
The engine can be turned off without locking the
steering wheel.
Acc (Accessories) (2)
This position activates electrical accessories, such
as the radio, when the engine is not running.
ON (Normal operating position) (3)
This position turns on the ignition system and the
electrical accessories.
START (4)
The engine starter activates and the engine will start.
As soon as the engine has started, release the knob
immediately. It will return to the ON position.
NOTE
For vehicles fitted with Stop/Start System:
When the engine is automatically stopped by the
Stop/Start System the ignition knob can still be
operated as usual.
At the end of a journey turn the ignition OFF to
avoid a flat battery. The Stop/Start System does
not automatically turn ignition off.
Starting and driving5-9