2009 NISSAN MURANO clock
[x] Cancel search: clockPage 203 of 443
Black plate (201,1)
Model "Z51-D" EDITED: 2007/ 10/ 2
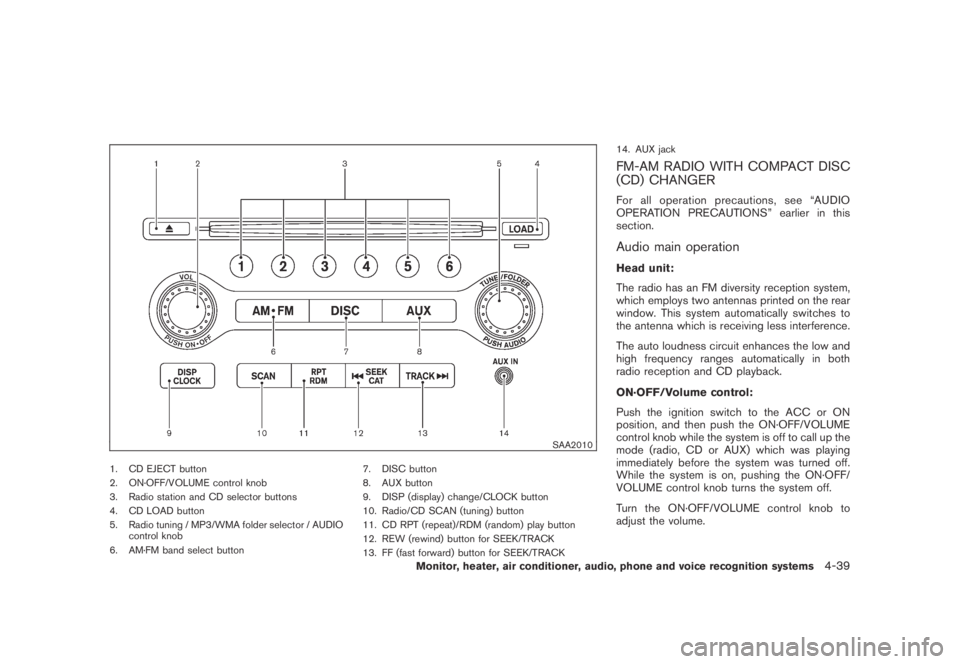
SAA2010
1. CD EJECT button
2. ON·OFF/VOLUME control knob
3. Radio station and CD selector buttons
4. CD LOAD button
5. Radio tuning / MP3/WMA folder selector / AUDIO
control knob
6. AM·FM band select button7. DISC button
8. AUX button
9. DISP (display) change/CLOCK button
10. Radio/CD SCAN (tuning) button
11. CD RPT (repeat)/RDM (random) play button
12. REW (rewind) button for SEEK/TRACK
13. FF (fast forward) button for SEEK/TRACK14. AUX jack
FM-AM RADIO WITH COMPACT DISC
(CD) CHANGER
For all operation precautions, see “AUDIO
OPERATION PRECAUTIONS” earlier in this
section.
Audio main operation
Head unit:
The radio has an FM diversity reception system,
which employs two antennas printed on the rear
window. This system automatically switches to
the antenna which is receiving less interference.
The auto loudness circuit enhances the low and
high frequency ranges automatically in both
radio reception and CD playback.
ON·OFF/Volume control:
Push the ignition switch to the ACC or ON
position, and then push the ON·OFF/VOLUME
control knob while the system is off to call up the
mode (radio, CD or AUX) which was playing
immediately before the system was turned off.
While the system is on, pushing the ON·OFF/
VOLUME control knob turns the system off.
Turn the ON·OFF/VOLUME control knob to
adjust the volume.
Monitor, heater, air conditioner, audio, phone and voice recognition systems4-39
Page 204 of 443

Black plate (202,1)
Model "Z51-D" EDITED: 2007/ 10/ 2
Adjusting sound quality:
Push the Audio control knob to change the
selecting mode as follows.
Bass?Treble?Fade?Balance?Beep
Rotate the Audio control knob to adjust Bass,
Treble, Fade and Balance to the desired level.
Fade adjusts the sound level between the front
and rear speakers and Balance adjusts the
sound between the right and left speakers.
To turn the beep sound off or on, rotate the
Audio control knob until the desired mode is
displayed. This turns on or off the beep sound
when audio buttons are pushed.
Once you have adjusted the sound quality to the
desired level, push the Audio control knob
repeatedly until the radio or CD display re-
appears. Otherwise, the radio or CD display will
automatically reappear after about 5 seconds.
CLOCK adjust:
Push the CLOCK adjust button for more than
1.5 seconds to turn on the CLOCK display.
See “CLOCK” in the “2. Instruments and
controls” section for the detailed clock adjust-
ment operation.
FM-AM radio operation
radio (FM/AM) band select:
Pushing the radio band select button will
change the band as follows:
AM?FM1?FM2?AM
When the radio band select button is pushed
while the ignition switch is in the ACC or ON
position, the radio will come on at the station last
played.
The last station/channel played will also come
on when the ON·OFF/VOL control knob is
pushed to ON.
If another audio source is playing when the radio
band select button is turned to ON, the audio
source will automatically be turned off and the
last radio station played will come on.
When the stereo broadcast signal is weak, the
radio will automatically change from stereo to
monaural reception.
TUNE (Tuning):
Turn the TUNE/FOLDER knob for manual tuning.
SEEK tuning:
Push the SEEK·CAT or TRACK button
orto tune from low to high or high to low
frequencies and to stop at the next broadcasting
station.
SCAN tuning:
Push the SCAN tuning button to tune from low
to high frequencies and stops at each broad-
casting station for 5 seconds. Pushing the
button again during this 5 seconds period will
stop SCAN tuning and the radio will remain
tuned to that station.
If the SCAN tuning button is not pushed within 5
seconds, SCAN tuning moves to the next
station.
*1to*6Station memory operations:
Twelve stations/channels can be set for the FM
band (6 for FM1, 6 for FM2) and 6 stations can
be set for the AM band.
1. Choose the radio band AM, FM1 or FM2
using the radio band select button.
2. Tune to the desired station using the SEEK,
SCAN or TUNE button.
3. Select the desired station/channel and keep
pushing any of the desired station preset
4-40Monitor, heater, air conditioner, audio, phone and voice recognition systems
Page 226 of 443
Black plate (224,1)
Model "Z51-D" EDITED: 2007/ 10/ 2
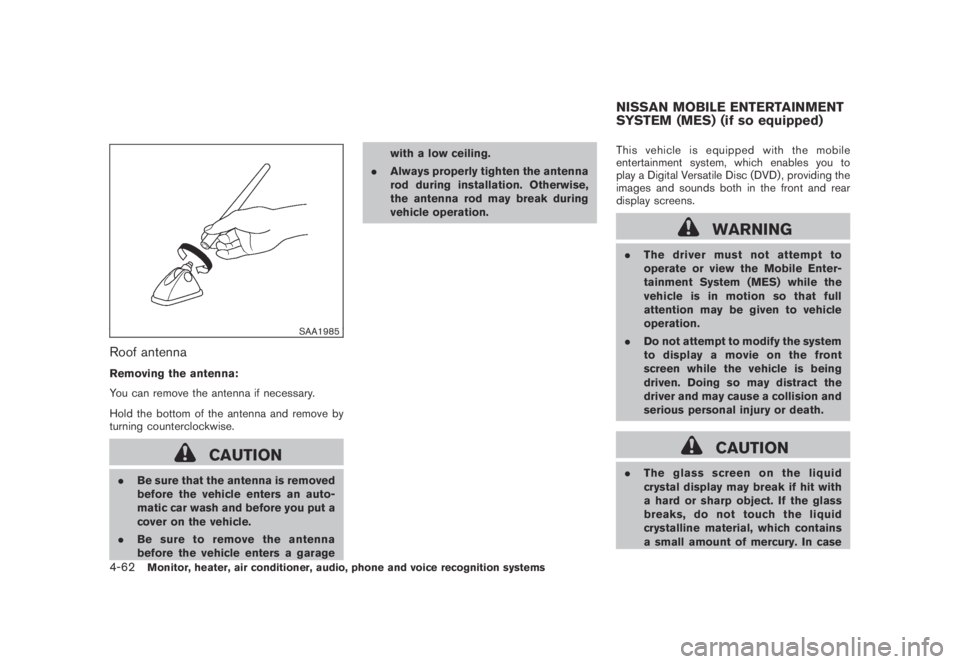
SAA1985
Roof antenna
Removing the antenna:
You can remove the antenna if necessary.
Hold the bottom of the antenna and remove by
turning counterclockwise.
CAUTION
.Be sure that the antenna is removed
before the vehicle enters an auto-
matic car wash and before you put a
cover on the vehicle.
.Be sure to remove the antenna
before the vehicle enters a garagewith a low ceiling.
.Always properly tighten the antenna
rod during installation. Otherwise,
the antenna rod may break during
vehicle operation.This vehicle is equipped with the mobile
entertainment system, which enables you to
play a Digital Versatile Disc (DVD) , providing the
images and sounds both in the front and rear
display screens.
WARNING
.The driver must not attempt to
operate or view the Mobile Enter-
tainment System (MES) while the
vehicle is in motion so that full
attention may be given to vehicle
operation.
.Do not attempt to modify the system
to display a movie on the front
screen while the vehicle is being
driven. Doing so may distract the
driver and may cause a collision and
serious personal injury or death.
CAUTION
.The glass screen on the liquid
crystal display may break if hit with
a hard or sharp object. If the glass
breaks, do not touch the liquid
crystalline material, which contains
a small amount of mercury. In case
NISSAN MOBILE ENTERTAINMENT
SYSTEM (MES) (if so equipped)
4-62Monitor, heater, air conditioner, audio, phone and voice recognition systems
Page 346 of 443
Black plate (348,1)
Model "Z51-D" EDITED: 2007/ 10/ 2
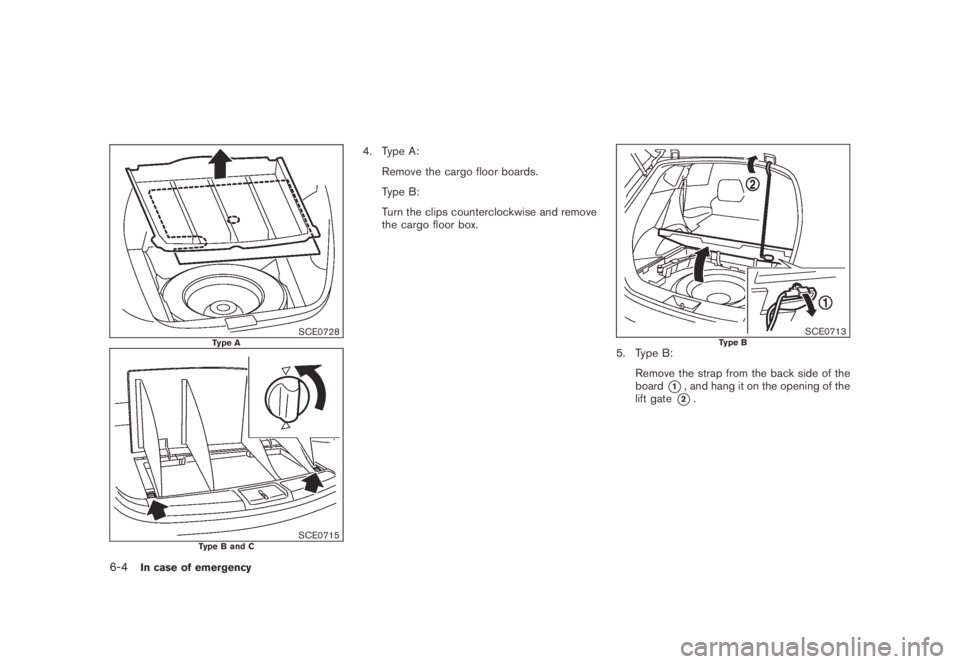
SCE0728Type A
SCE0715Type B and C
4. Type A:
Remove the cargo floor boards.
Type B:
Turn the clips counterclockwise and remove
the cargo floor box.
SCE0713Type B5. Type B:
Remove the strap from the back side of the
board
*1, and hang it on the opening of the
lift gate
*2.
6-4In case of emergency
Page 349 of 443
Black plate (351,1)
Model "Z51-D" EDITED: 2007/ 10/ 2
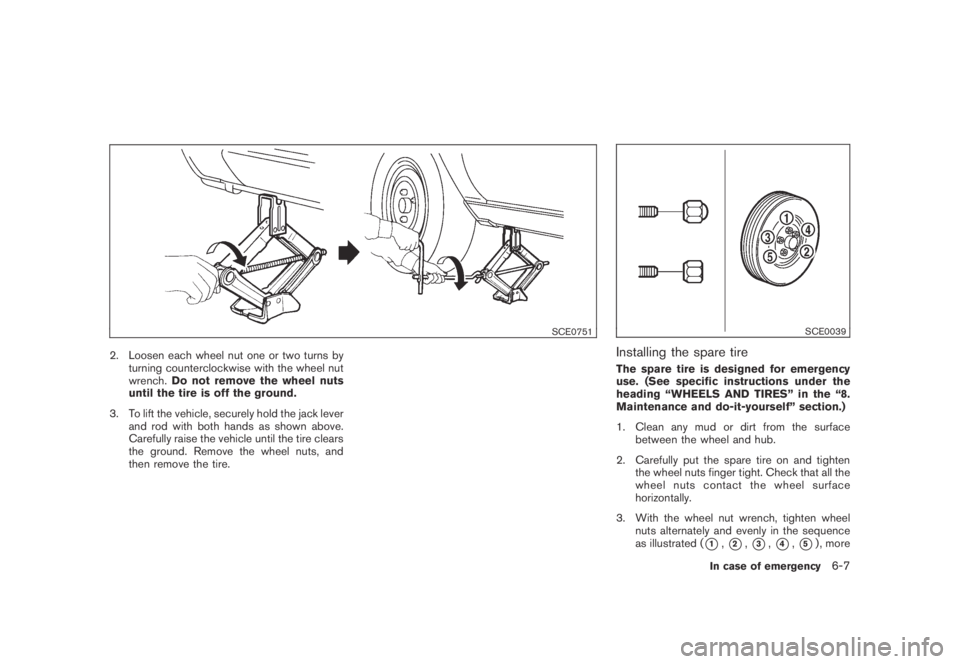
SCE0751
2. Loosen each wheel nut one or two turns by
turning counterclockwise with the wheel nut
wrench.Do not remove the wheel nuts
until the tire is off the ground.
3. To lift the vehicle, securely hold the jack lever
and rod with both hands as shown above.
Carefully raise the vehicle until the tire clears
the ground. Remove the wheel nuts, and
then remove the tire.
SCE0039
Installing the spare tire
The spare tire is designed for emergency
use. (See specific instructions under the
heading “WHEELS AND TIRES” in the “8.
Maintenance and do-it-yourself” section.)
1. Clean any mud or dirt from the surface
between the wheel and hub.
2. Carefully put the spare tire on and tighten
the wheel nuts finger tight. Check that all the
wheel nuts contact the wheel surface
horizontally.
3. With the wheel nut wrench, tighten wheel
nuts alternately and evenly in the sequence
as illustrated (
*1,*2,*3,*4,*5) , more
In case of emergency6-7
Page 374 of 443

Black plate (376,1)
Model "Z51-D" EDITED: 2007/ 10/ 2
CAUTION
Be careful not to burn yourself, as the
engine oil is hot.
.Waste oil must be disposed of
properly.
.Check your local regulations.
Perform steps 4 to 9 when the engine oil
filter change is needed.
4. Remove the plastic cover over the oil filter
location by removing the small plastic clips
as illustrated.
5. Loosen the oil filter
*Cwith an oil filter
wrench. Remove the oil filter by turning it by
hand.
6. Wipe the engine oil filter mounting surface
with a clean rag.
CAUTION
Be sure to remove any old gasket
material remaining on the mounting
surface of the engine. Failure to do so
could lead to engine damage.
7. Coat the gasket on the new filter with clean
engine oil.8. Screw in the oil filter clockwise until a slight
resistance is felt, then tighten additionally
more than 2/3 turn.
Oil filter tightening torque:
11 to 15 ft-lb (14.7 to 20.5 N·m)
9. Install the plastic cover.
10. Clean and re-install the drain plug with a
new washer. Securely tighten the drain plug
with a wrench.
Drain plug tightening torque:
22 to 29 ft-lb (29 to 39 N·m)
Do not use excessive force.
11. Refill engine with recommended oil through
the oil filler opening, and install the oil filler
cap securely.
See “CAPACITIES AND RECOMMENDED
FUEL/LUBRICANTS” in the “9. Technical
and consumer information” section for drain
and refill capacity. The drain and refill
capacity depends on the oil temperature
and drain time. Use these specifications for
reference only. Always use the dipstick to
determine the proper amount of oil in the
engine.
12. Start the engine and check for leakage
around the drain plug and the oil filter.
Correct as required.
13. Turn the engine off and wait more than 10minutes. Check the oil level with the dipstick.
Add engine oil if necessary.
After the operation
1. Lower the vehicle carefully to the ground.
2. Dispose of waste oil and filter properly.
WARNING
.Prolonged and repeated contact
with used engine oil may cause skin
cancer.
.Try to avoid direct skin contact with
used oil. If skin contact is made,
wash thoroughly with soap or hand
cleaner as soon as possible.
.Keep used engine oil out of reach of
children.
8-10Maintenance and do-it-yourself
Page 435 of 443
Black plate (2,1)
10-2
Cigarette lighter and ashtray...................... 2-41
Circuit breaker, Fusible link ....................... 8-20
Cleaning exterior and interior................. 7-2, 7-4
Clock ............................................... 2-38
Coat hooks......................................... 2-49
Cold weather driving.............................. 5-28
Command (See Bluetooth
®Hands-Free
Phone System).................................... 4-100
Command (See NISSAN voice recognition
system)............................ 4-11, 4-114, 4-132
Compact Disc (CD) changer
(See audio system)................................ 4-41
CompactFlash (CF) player
(See audio system)................................ 4-49
Compass............................................. 2-7
Console box........................................ 2-44
Continuously Variable Transmission (CVT)
fluid................................................. 8-11
Coolant
Capacities and recommended
fuel/ lubricants ................................... 9-2
Changing engine coolant........................ 8-8
Checking engine coolant level.................. 8-7
Corrosion protection................................. 7-5
Cover, Cargo cover................................ 2-46
Cruise control...................................... 5-18
Cup holders........................................ 2-41
CVT, Driving with CVT
(Continuously Variable Transmission)............. 5-13
D
Daytime running light system..................... 2-35
Defroster switch, Rear window and outside
mirror defroster switch............................ 2-31
Dimensions and weights............................ 9-8Display cleaning...................................... 4-5
Display controls
(See center multi-function control panel).......... 4-2
Dot matrix liquid crystal display................... 2-17
Drive belts.......................................... 8-15
Drive positioner.................................... 3-30
Driving
All-wheel drive (AWD)......................... 5-21
Cold weather driving.......................... 5-28
Driving with CVT
(Continuously Variable Transmission)......... 5-13
On-pavement and off-road driving............. 5-5
Precautions when starting and driving......... 5-2
Safety precautions............................... 5-6
DVD player, NISSAN mobile entertainment...... 4-62
E
Economy, Fuel ..................................... 5-20
Elapsed time ....................................... 2-22
Emission control information label................ 9-10
Emission control system warranty................ 9-25
Engine
Before starting the engine.................... 5-12
Break-in schedule.............................. 5-20
Capacities and recommended
fuel/lubricants.................................... 9-2
Changing engine coolant........................ 8-8
Changing engine oil and filter................... 8-8
Checking engine coolant level.................. 8-7
Checking engine oil level........................ 8-8
Coolant temperature gauge..................... 2-6
Engine block heater........................... 5-29
Engine compartment check locations.......... 8-6
Engine cooling system.......................... 8-7Engine oil......................................... 8-8
Engine oil and oil filter recommendation....... 9-5
Engine oil replacement indicator.............. 2-20
Engine oil viscosity .............................. 9-5
Engine serial number ............................ 9-9
Engine specifications............................ 9-7
If your vehicle overheats....................... 6-11
Starting the engine............................ 5-12
Entry/exit function, Automatic drive positioner . . . 3-30
Event Data Recorders (EDR)..................... 9-26
Exhaust gas (Carbon monoxide).................... 5-2
F
F.M.V.S.S./C.M.V.S.S. certification label............ 9-9
Filter
Air cleaner housing filter...................... 8-16
Changing engine oil and filter................... 8-8
Flashers (See hazard warning flasher switch) . . . 2-36
Flat tire................................................ 6-2
Flat towing.......................................... 9-23
Floor mat cleaning ................................... 7-4
Fluid
Brake fluid...................................... 8-12
Capacities and recommended
fuel/lubricants.................................... 9-2
Continuously Variable Transmission (CVT)
fluid............................................. 8-11
Engine coolant ................................... 8-7
Engine oil......................................... 8-8
Power steering fluid ........................... 8-11
Window washer fluid.......................... 8-12
FM-AM radio with Compact Disc (CD)
changer............................................. 4-39
Model "Z51-D" EDITED: 2007/ 10/ 2