2009 NISSAN ALTIMA COUPE fog light
[x] Cancel search: fog lightPage 177 of 373
3. Turn the temperature control dial to the de-
sired position between the middle and the
hot position.
cTo quickly remove ice or fog from the win-
dows, turn the fan control dial to the highest
setting and the temperature control to the
full HOT position.
cWhen the
position is selected, the air
conditioner automatically turns on (however,
the indicator light on the
button will
not come on) if the outside temperature is
more than 36°F (2°C) . If in defrost mode for
more than one minute, the air conditioning
system will continue to operate until the fan
control dial is turned to OFF, the vehicle is
shut off, or the A/C button is used to turn off
the compressor even if the air flow control
dial is turned to a position other than
the
position. This dehumidifies the air
which helps defog the windshield.
The
mode automatically turns off, al-
lowing outside air to be drawn into the pas-
senger compartment to further improve the
defogging performance.
Bi-level heating
The bi-level mode directs warmed air to the side
and center vents and to the front and rear floor
outlets.1. Press the
button to the OFF position.
2. Press the
air flow control button.
3. Turn the fan control dial to the desired posi-
tion.
4. Turn the temperature control dial to the de-
sired position.
Heating and defogging
This mode heats the interior and defogs the wind-
shield.
1. Press the
air flow control button.
2. Turn the fan control dial to the desired posi-
tion.
3. Turn the temperature control dial to the de-
sired position between the middle and the
hot position.
cWhen the
position is selected, the air
conditioner automatically turns on if the out-
side temperature is more than 36°F (2°C) .
This dehumidifies the air which helps defog
the windshield. The
mode automati-
cally turns off, allowing outside air to be
drawn into the passenger compartment to
further improve the defogging performance.
Operating tips
Clear snow and ice from the wiper blades
and air inlet in front of the windshield. This
improves heater operation.
AIR CONDITIONER OPERATION
Start the engine, turn the fan control dial to the
desired position, and push in the
button to
activate the air conditioner. When the air condi-
tioner is on, cooling and dehumidifying functions
are added to the heater operation.
The air conditioner cooling function oper-
ates only when the engine is running.
Cooling
This mode is used to cool and dehumidify the air.
1. Press the
button to the OFF position.
2. Press MAX A/C or
air flow control
button.
3. Turn the fan control dial to the desired posi-
tion.
4. Push the
button. the indicator light
comes on.
5. Turn the temperature control dial to the de-
sired position.
Monitor, climate, audio, phone and voice recognition systems4-13
ZREVIEW COPYÐ2009 Altima(alt)
Owners Manual(owners)ÐUSA_English(nna)
02/03/09Ðdebbie
X
Page 178 of 373
cFor quick cooling when the outside tem-
perature is high, push the
button to
the ON position. Be sure to return the
to the OFF position for normal cooling. MAX
A/C may be used for quick cooling.
Dehumidified heating
This mode is used to heat and dehumidify the air.
1. Press the
button to the OFF position.
2. Press the
air flow control button.
3. Turn the fan control dial to the desired posi-
tion.
4. Push the
button. The indicator light
comes on.
5. Turn the temperature control dial to the de-
sired position.
Dehumidified defogging
This mode is used to defog the windows and
dehumidify the air.
1. Press the
air flow control button.
2. Turn the fan control dial to the desired posi-
tion.
3. Press the
button. The indicator light
comes on.When the
orare selected, the air
conditioner automatically turns on (however, the
indicator light will not illuminate) if the outside
temperature is more than 36°F (2°C) . This dehu-
midifies the air which helps defog the windshield.
The
mode automatically turns off, allowing
outside air to be drawn into the passenger com-
partment to further improve the defogging perfor-
mance.
4. Turn the temperature control dial to the de-
sired position.
Operating tips
cKeep the windows and moonroof closed
while the air conditioner is in operation.
cAfter parking in the sun, drive for 2 or 3
minutes with the windows open to vent hot
air from the passenger compartment. Then,
close the windows. This allows the air con-
ditioner to cool the interior more quickly.
cThe air conditioning system should be
operated for approximately 10 minutes
at least once a month. This helps pre-
vent damage to the system due to lack
of lubrication.cA visible mist may be seen coming from the
ventilators in hot, humid conditions as the air
is cooled rapidly. This does not indicate a
malfunction.
cIf the engine coolant temperature
gauge indicates engine coolant tem-
perature over the normal range, turn
the air conditioner off. See “If your
vehicle overheats” in the “In case of
emergency” section of this manual.
AIR FLOW CHARTS
The following charts show the button and dial
positions forMAXIMUM AND QUICKheating,
cooling or defrosting.The air recirculation
button should always be in the OFF posi-
tion for heating and defrosting.
4-14Monitor, climate, audio, phone and voice recognition systems
ZREVIEW COPYÐ2009 Altima(alt)
Owners Manual(owners)ÐUSA_English(nna)
02/03/09Ðdebbie
X
Page 183 of 373
cThe temperature of the passenger compart-
ment will be maintained automatically. Air
flow distribution, fan speed and A/C on/off
are also controlled automatically.
cA visible mist may be seen coming from the
vents in hot, humid conditions as the air is
cooled rapidly. This does not indicate a mal-
function.
Dehumidified defrosting or defogging
1. Push the defroster control buttonto
turn the system on. The indicator light in the
button will illuminate.
2. Turn the temperature dial to the left or right
to set the desired temperature.
cTo quickly remove ice from the outside of the
windows, turn the manual fan control to HI.
cAs soon as possible after the windshield is
clean, push the AUTO button to return to the
auto mode.cWhen the
control is activated, the air
conditioner will automatically be turned on at
outside temperatures above 36°F (2°C) .
This dehumidifies the air which helps defog
the windshield. The air recirculation mode
automatically turns off, allowing outside air
to be drawn into the passenger compart-
ment to further improve the defogging per-
formance.
Rear window defroster switch
For more information about the rear window de-
froster switch, see “Rear window and outside
mirror (if so equipped) defroster switch” in the
“Instruments and controls” section of this manual.
MANUAL OPERATION
Fan speed control
Turn the fan control dialleft or right to
manually control the fan speed.
Press the
/OFF button to turn the system
off.
Push the AUTO button to return to automatic
control of the fan speed.
Air recirculation
Push the air recirculation buttonto recir-
culate interior air inside the vehicle. The indicator
light on the switch will come on.
The air recirculation button will not be activated
when the air conditioner is in DEF or
mode.
Air flow control
Push the air flow control buttons to manually
control air flow and select the air outlet:
— Air flows from center and side
vents.
— Air flows from center and side
vents and foot outlets.
— Air flows mainly from foot outlets.
— Air flows from defroster and foot
outlets.
— Air flows from defroster outlets.
To turn system off
Press the/OFF button.
Monitor, climate, audio, phone and voice recognition systems4-19
ZREVIEW COPYÐ2009 Altima(alt)
Owners Manual(owners)ÐUSA_English(nna)
02/03/09Ðdebbie
X
Page 317 of 373

HEADLIGHTS
Replacing the xenon headlight bulb (if
so equipped)
WARNING
cHIGH VOLTAGE
When xenon headlights are on, they pro-
duce a high voltage. To prevent an electric
shock, never attempt to modify or disas-
semble. Always have your xenon head-
lights replaced at a NISSAN dealer. For
additional information, see “Headlight
and turn signal switch” in the “Instru-
ments and controls” section.
Replacing the halogen headlight bulb
The headlight is a semi-sealed beam type which
uses a replaceable headlight (halogen) bulb. Be-
cause the headlight assembly must be removed
from the vehicle for bulb replacement, see your
NISSAN dealer.
CAUTION
cAiming is not necessary after replacing
the bulb. When aiming adjustment is
necessary, contact a NISSAN dealer.cDo not leave the headlight assembly
open without a bulb installed for a long
period of time. Dust, moisture, smoke,
etc. entering the headlight body may
affect bulb performance. Remove the
bulb from the headlight assembly just
before a replacement bulb is installed.
cOnly touch the base when handling the
bulb. Never touch the glass envelope.
Touching the glass could significantly
affect bulb life and/or headlight
performance.
cHigh pressure halogen gas is sealed
inside the halogen bulb. The bulb may
break if the glass envelope is scratched
or the bulb is dropped.
cUse the same number and wattage as
shown in the chart.
Fog may temporarily form inside the lens of the
exterior lights in the rain or in a car wash. A
temperature difference between the inside and
the outside of the lens causes the fog. This is not
a malfunction. If large drops of water collect
inside the lens, contact a NISSAN dealer.
FRONT PARK/TURN/SIDEMARKER
LIGHT
Bulb replacement requires the removal of the
headlight assembly. If replacement is required,
see your NISSAN dealer.
LIGHTS
Maintenance and do-it-yourself8-27
ZREVIEW COPYÐ2009 Altima(alt)
Owners Manual(owners)ÐUSA_English(nna)
02/03/09Ðdebbie
X
Page 318 of 373
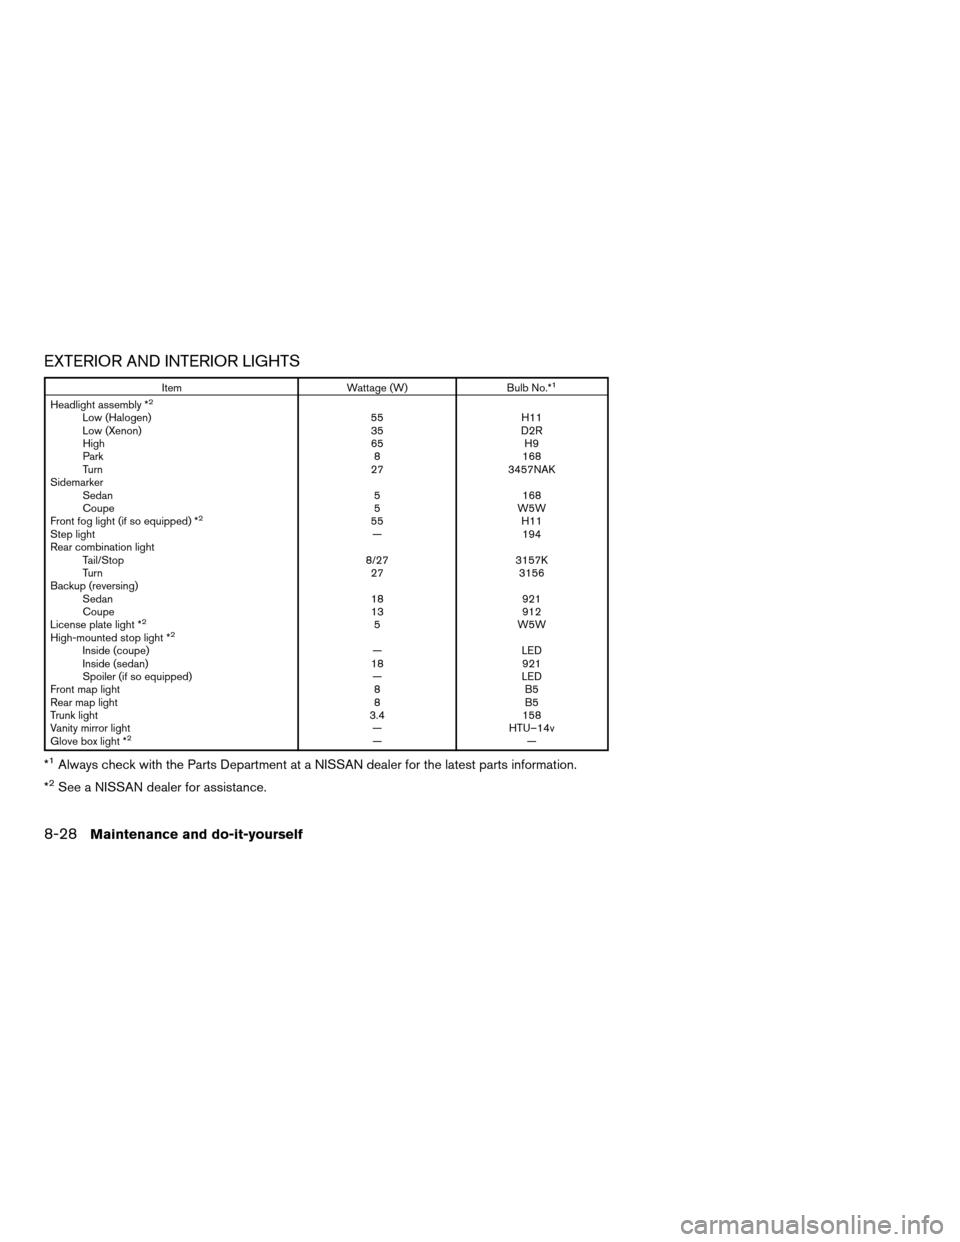
EXTERIOR AND INTERIOR LIGHTS
Item Wattage (W) Bulb No.*1
Headlight assembly *2
Low (Halogen) 55 H11
Low (Xenon) 35 D2R
High 65 H9
Park 8 168
Turn 27 3457NAK
Sidemarker
Sedan 5 168
Coupe 5 W5W
Front fog light (if so equipped) *
255 H11
Step light — 194
Rear combination light
Tail/Stop 8/27 3157K
Turn 27 3156
Backup (reversing)
Sedan 18 921
Coupe 13 912
License plate light *
25 W5W
High-mounted stop light *2
Inside (coupe) — LED
Inside (sedan) 18 921
Spoiler (if so equipped) — LED
Front map light 8 B5
Rear map light 8 B5
Trunk light 3.4 158
Vanity mirror light — HTU–14v
Glove box light *
2——
*1Always check with the Parts Department at a NISSAN dealer for the latest parts information.
*
2See a NISSAN dealer for assistance.
8-28Maintenance and do-it-yourself
ZREVIEW COPYÐ2009 Altima(alt)
Owners Manual(owners)ÐUSA_English(nna)
02/03/09Ðdebbie
X
Page 319 of 373
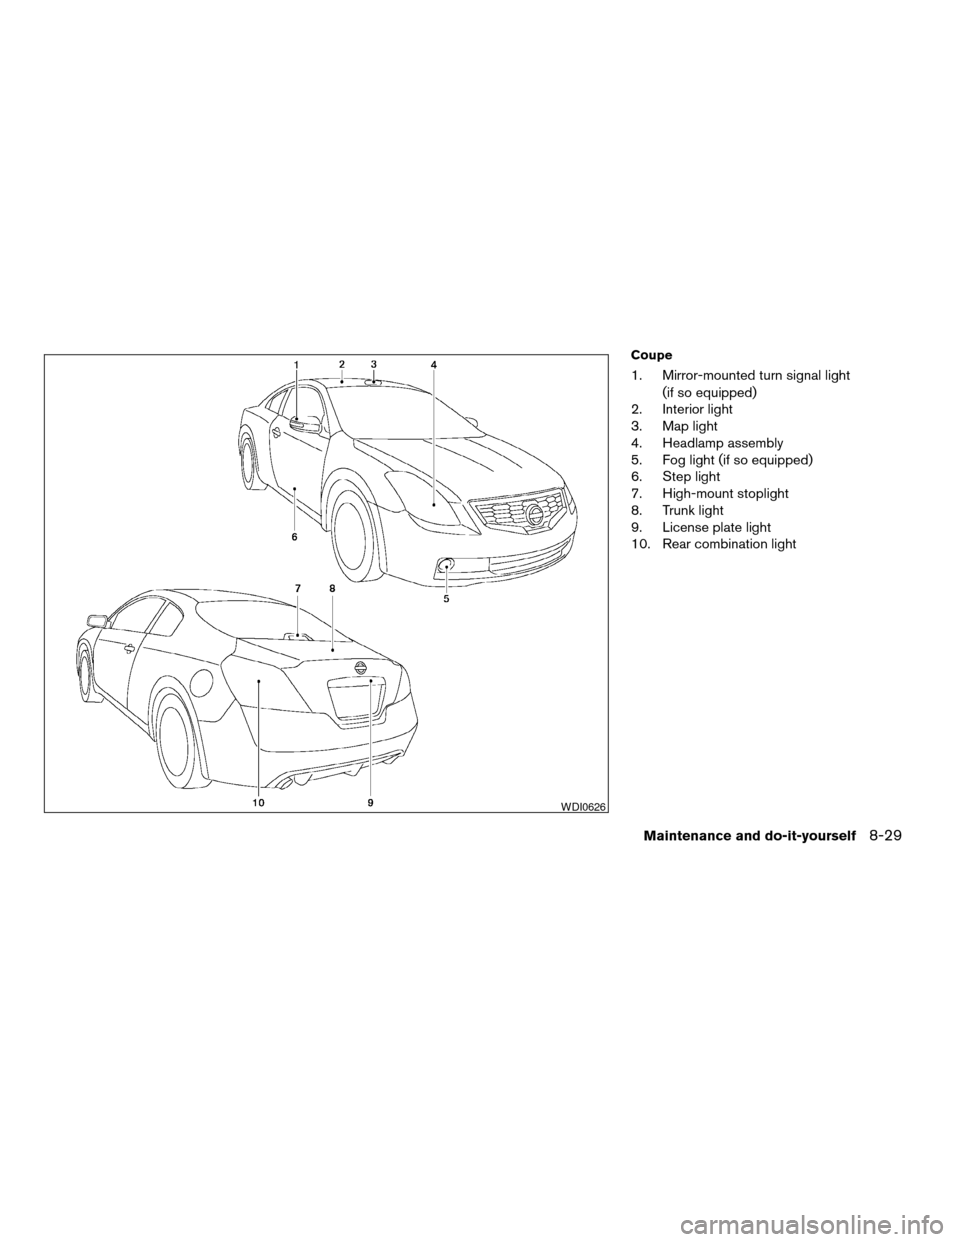
Coupe
1. Mirror-mounted turn signal light
(if so equipped)
2. Interior light
3. Map light
4. Headlamp assembly
5. Fog light (if so equipped)
6. Step light
7. High-mount stoplight
8. Trunk light
9. License plate light
10. Rear combination light
WDI0626
Maintenance and do-it-yourself8-29
ZREVIEW COPYÐ2009 Altima(alt)
Owners Manual(owners)ÐUSA_English(nna)
02/03/09Ðdebbie
X
Page 320 of 373
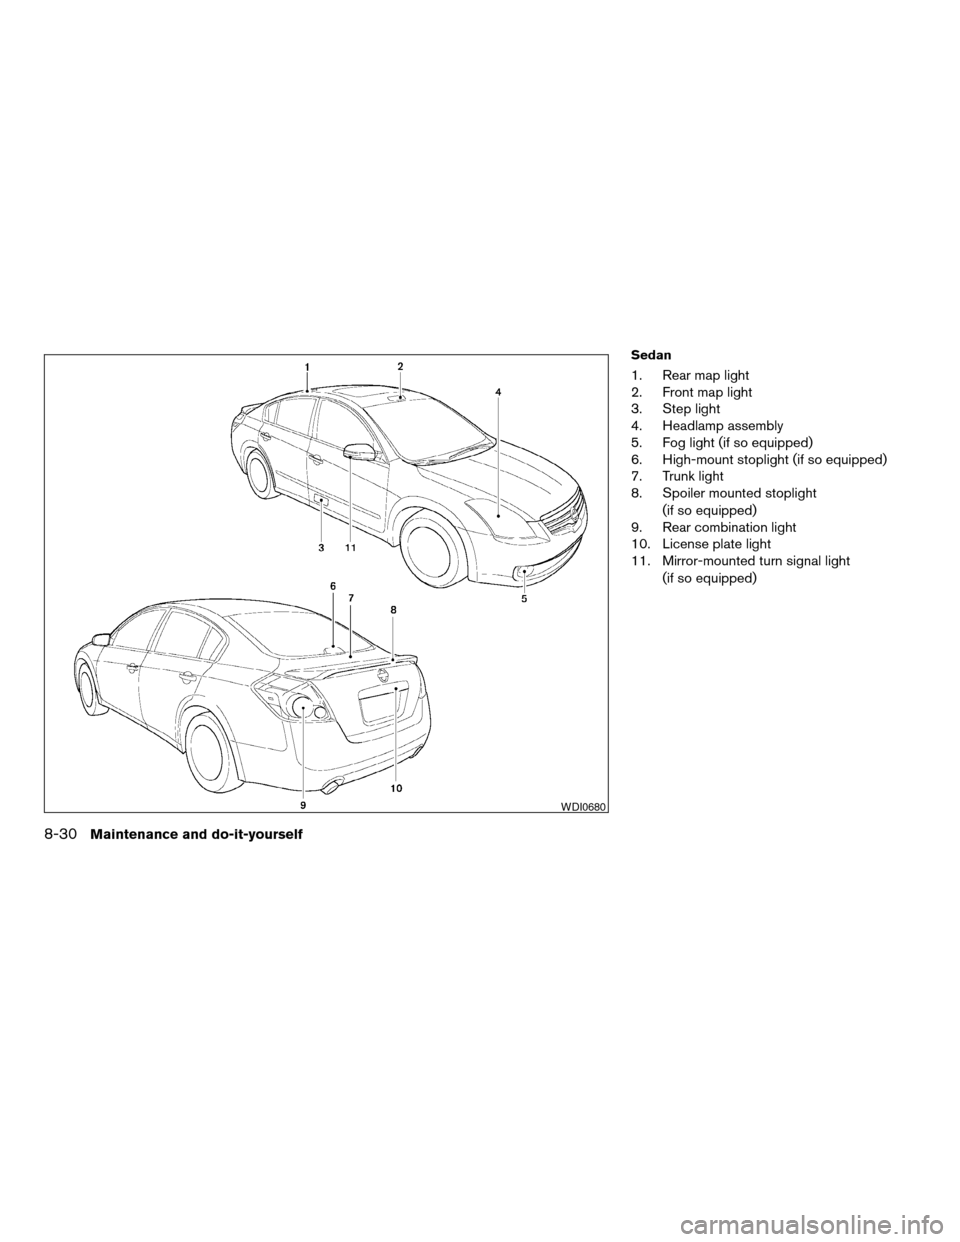
Sedan
1. Rear map light
2. Front map light
3. Step light
4. Headlamp assembly
5. Fog light (if so equipped)
6. High-mount stoplight (if so equipped)
7. Trunk light
8. Spoiler mounted stoplight
(if so equipped)
9. Rear combination light
10. License plate light
11. Mirror-mounted turn signal light
(if so equipped)
WDI0680
8-30Maintenance and do-it-yourself
ZREVIEW COPYÐ2009 Altima(alt)
Owners Manual(owners)ÐUSA_English(nna)
02/03/09Ðdebbie
X
Page 367 of 373
F.M.V.S.S. certification label..........9-10
Fog light switch.................2-33
Front air bag system
(See supplemental restraint system).....1-52
Front seats....................1-2
Fuel
Capacities and recommended
fuel/lubricants.................9-2
Fuel economy................5-21
Fuel gauge..................2-6
Fuel octane rating..............9-4
Fuel recommendation............9-3
Fuel-filler cap................3-25
Fuel-filler door and cap...........3-25
Fuel-filler door lock opener lever......3-25
Fuel-filler lid.................3-25
Fuses......................8-22
Fusible links...................8-23
G
Garage door opener, HomeLinkTUniversal
Transceiver...................2-51
Gascap.....................3-25
Gauge
Engine coolant temperature gauge.....2-5
Fuel gauge..................2-6
Odometer...................2-4
Speedometer.................2-4
Tachometer..................2-5
Trip odometer.................2-4
General maintenance..............8-2
Glove box....................2-41
Glove box lock.................2-41
Grocery hooks.................2-43H
Hands-free phone system,
BluetoothT................4-46, 4-61
Hazard warning flasher switch.........2-33
Headlight and turn signal switch........2-29
Headlight control switch............2-29
Headlights....................8-27
Heated seats..................2-34
Heater
Heater and air conditioner
controls................4-11, 4-18
Heater operation...........4-12, 4-19
HomeLinkTUniversal Transceiver.......2-51
Hood release..................3-23
Horn.......................2-34
I
Ignition Switch
Push-Button Ignition Switch.........5-7
Immobilizer system............2-26, 3-3
Important vehicle information label.......9-10
In-cabin microfilter...............8-19
Increasing fuel economy............5-21
Indicator lights and audible reminders
(See warning/indicator lights and audible
reminders)....................2-10
Inside automatic anti-glare mirror.......3-29
Inside mirror...................3-28
Instrument brightness control.........2-32
Instrument panel..............0-8, 2-2
Instrument panel dimmer switch........2-32Intelligent Key system
Key operating range..........3-8, 3-18
Key operation.................3-9
Mechanical key................3-3
Remote keyless entry operation. . .3-12, 3-18
Troubleshooting guide........3-16, 3-22
Warning signals...........3-16, 3-22
Interior light...................2-48
Interior trunk lid release.............3-24
ISOFIX child restraints.............1-25
J
Jump starting...................6-7
K
Keyfob battery replacement..........8-25
Keyless entry
With Intelligent Key system
(See Intelligent Key system).....3-12, 3-18
Keys, For Intelligent Key system.........3-2
L
Labels
Air conditioner specification label.....9-11
C.M.V.S.S. certification label........9-10
Emission control information label.....9-11
Engine serial number............9-10
F.M.V.S.S. certification label........9-10
Tire and Loading Information label.....9-11
10-3
ZREVIEW COPYÐ2009 Altima(alt)
Owners Manual(owners)ÐUSA_English(nna)
02/03/09Ðdebbie
X