Page 32 of 313
WARNING
When fastening the seat belts, be cer-
tain that the seatbacks are completelysecured in the latched position. If they
are not completely secured, passengers
may be injured in an accident or sudden
stop.
Page 80 of 313

This light illuminates when the soft top is being
operated or it is stopped before reaching a full
open/close state. When the top is fully opened,
the light")
Soft top indicator light
(Roadster models)
This light illuminates when the soft top is being
operated or it is stopped before reaching a full
open/close state. When the top is fully opened,
the light will turn off. When the top is fully closed,
the light will flash.
The soft top can be moved with the soft top
operating switch only under all of the following
conditions:
�When the vehicle is stopped.
�When the foot brake pedal is depressed.
�When the ignition switch is ON.
Turn signal/hazard indicator
lights
The light flashes when the turn signal switch
lever or hazard switch is turned on.AUDIBLE REMINDERS
Key reminder chimeThe chime will sound if the driver’s side door is
opened while the key is left in the ignition switch
(ignition switch is turned off). Remove the key
and take it with you when leaving the vehicle.Light reminder chimeThe chime will sound when the driver’s door is
opened with the headlight switch on unless the
key is in the ignition switch. Make sure to turn the
light switch off when you leave the vehicle.Seat belt warning chimeThe chime will sound for about 6 seconds unless
the driver’s seat belt is securely fastened.Brake pad wear warningThe disc brake pads have audible wear warn-
ings. When a brake pad requires replacement, it
will make a high pitched scraping sound when
the vehicle is in motion whether or not the brake
pedal is depressed. Have the brakes checked as
Instruments and controls
2-17
Page 81 of 313
SIC2132
SECURITY SYSTEMS
2-18
Instruments and controls
Page 106 of 313

Universal Transceiver provides a
convenient way to consolidate the functions of
up to three individual hand-held transmitters into
one built-in device.
HomeLink
Universal Transceiver:
�Will operate most Radio Frequency (RF)
devices such as garage doors, gates, home
and office lighting, entry door locks and se-
curity systems.
�Is powered by your vehicle’s battery. No
separate batteries are required. If the vehi-
cle’s battery is discharged or is discon-
nected, HomeLink
will retain all program-
ming.
Once the HomeLinkUniversal Transceiver
is programmed, retain the original trans-
mitter for future programming procedures
(for example, new vehicle purchases).
Upon sale of the vehicle, the programmed
HomeLink
Universal Transceiver buttons
should be erased for security purposes.
For additional information, refer to “Pro-
gramming HomeLink
” later in this sec-
tion.
WARNING
�Do not use the HomeLink
Universal
Transceiver with any garage door
opener that lacks safety stop and
reverse features as required by fed-
eral safety standards. (These stan-
dards became effective for opener
models manufactured after April 1,
1982). A garage door opener which
cannot detect an object in the path of
a closing garage door and then auto-
matically stop and reverse, does not
meet current federal safety stan-
dards. Using a garage door opener
without these features increases the
risk of serious injury or death.
�During the programming procedure,
your garage door or security gate will
open or close (if the transmitter is
within range). Make sure that people
and objects are clear of the garage
door, gate, etc. that you are
programming.�Your vehicle’s engine should be
turned off while programming the
HomeLink
Universal Transceiver.
PROGRAMMING HomeLinkTo program your HomeLink
Transceiver to op-
erate a garage door, gate, or entry door opener,
home or office lighting, you need to be at the
same location as the device. Note: Garage door
openers (manufactured after 1996) have “rolling
code protection”. To program a garage door
opener equipped with “rolling code protection”;
you will need to use a ladder to get up to the
garage door opener motor to be able to access
the training button.
HomeLink
UNIVERSAL
TRANSCEIVER (if so equipped)
Instruments and controls
2-43
Page 120 of 313
button on the key-
fob once. (Pushing the HATCH/TRUNK
button on the keyfob can open the rear
hatch at once without pushing the release
switch.)
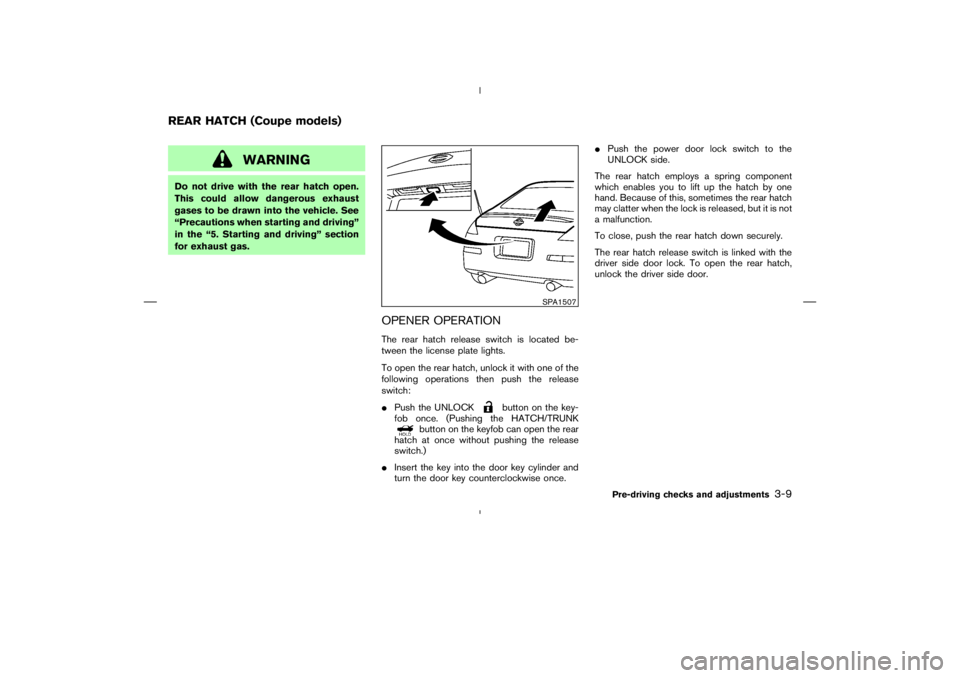
�Insert the key into the door key cylinder and
turn the door key counterclockwise once.�Push the power door lock switch to the
UNLOCK side.
The rear hatch employs a spring component
which enables you to lift up the hatch by one
hand. Because of this, sometimes the rear hatch
may clatter when the lock is released, but it is not
a malfunction.
To close, push the rear hatch down securely.
The rear hatch release switch is linked with the
driver side door lock. To open the rear hatch,
unlock the driver side door.
SPA1507
REAR HATCH (Coupe models)
Pre-driving checks and adjustments
3-9
Page 126 of 313
CAUTION
Keep all parts of the top linkage clear of
obstructions, or the top latch may not be
securely locked.NOTE:
�In case of low battery or low tempera-
ture, the top may temporarily stop mov-
ing during the operation. This functions
to protect the top control mechanism,
and it is not a malfunction.
�If the top is opened and closed repeat-
edly in a short period of time, it may
stop moving to protect the top motor.
Wait for a few minutes before operating
the top again.
Pre-driving checks and adjustments
3-15
Page 169 of 313
:
Push up or down the tuning switch for less than
1.5 seconds to change the radio frequency.
SEEK tuning (radio):
Push up or down the tuning switch for more than
1.5")
Tuning switch
Memory change (radio):
Push up or down the tuning switch for less than
1.5 seconds to change the radio frequency.
SEEK tuning (radio):
Push up or down the tuning switch for more than
1.5 seconds to seek the next or previous radio
station.
APS (Automatic Program Search) FF,
APS REW (CD or CD changer):
Push up or down the tuning switch for less than
1.5 seconds to return to the beginning of the
present program or skip to the next program.
Push several times to skip back or skip through
programs.
This system searches for the blank intervals
between selections. If there is a blank intervalwithin one program or there is no interval be-
tween programs, the system may not stop in the
desired or expected location.
FOLDER change (CD changer/CD with
MP3 or WMA):
Push up or down the tuning switch for more than
1.5 seconds to change the folders (if there are
any folders).
DISC change (CD changer/CD without
MP3 or WMA):
Push up or down the tuning switch for more than
1.5 seconds to change the playing disc up or
down.
ANTENNAThe antenna is located at the rear of the vehicle.
To remove the antenna, turn it counterclockwise.
To reinstall it, screw it securely into the base.
Page 293 of 313
TOWING LOAD/SPECIFICATION CHART
Unit: lb (kg)
MAXIMUM
TOWING LOAD1,000 (454)
MAXIMUM
TONGUE LOAD100 (45.4)
TOWING SAFETY
Trailer hitchChoose a proper hitch for a vehicle and trailer.
Make sure the trailer hitch is securely attached to
the vehicle, to help avoid personal injury or
property damage due to sway caused by cross-
winds, rough road surfaces or passing trucks.Hitch ballChoose a hitch ball of the proper size and weight
rating for your trailer:
�The required hitch ball size is stamped on
most trailer couplers. Most hitch balls also
have the size printed on top of the ball.
�Choose the proper class hitch ball based on
the trailer weight.
�The diameter of the threaded shank of the
hitch ball must be matched to the ball mount
hole diameter. The hitch ball shank should be
TI1011M
TI1012M
9-18
Technical and consumer information


MAXIMUM
TOWING LOAD1,000 (454)
MAXIMUM
TONGUE LOAD100 (45.4)
TOWING SAFETY
Trailer hitchChoose a proper hitch for a vehicle and trailer.
Make sure the tra")