2009 MITSUBISHI ASX braking
[x] Cancel search: brakingPage 299 of 368

WARNING
l When the engine is not running, the
brake booster and power steering system
do not operate. This means higher brake
depression force and higher steering ef-
fort are required. Therefore, vehicle oper-
ation is more difficult than usual. CAUTION
l
Do
not leave the ignition switch in the
“LOCK” position or the operation mode
in OFF. The steering wheel will lock, caus-
ing loss of control.
3. Place
the gearshift lever in the “N” (Neutral) position (M/T) or the selector lever in the
“N” (NEUTRAL) position (CVT).
4. Turn on the hazard warning lamps if required by law.
(Follow the local driving laws and regula-
tions.) CAUTION
l
The
person in the vehicle being towed
must pay attention to the brake lamps of
the towing vehicle and make sure the
rope never becomes slack.
l Avoid sudden braking, sudden accelera-
tion and sharp turning; such operation
could cause damage to the towing hooks
or the tow rope.
People in the vicinity could be injured as
a result. CAUTION
l
When
towing or being towed down a long
slope, the brakes may overheat reducing
the effectiveness. In this situation, have
your vehicle transported by a tow truck.
l When the vehicle equipped with CVT is
to be towed by another vehicle with the
all wheels on the ground, make sure that
the towing speed and distance given be-
low are never exceeded, causing damage
to the transmission.
Towing speed: 40 km/h (25 mph)
Towing distance: 40 km (25 miles)
For the towing speed and the towing dis-
tance, follow the local driving laws and
regulations.
If your vehicle tows another vehicle 1. Take
out the towing hook, wheel nut wrench
and jack bar.
Refer to “Tools, jack and tyre repair kit” on
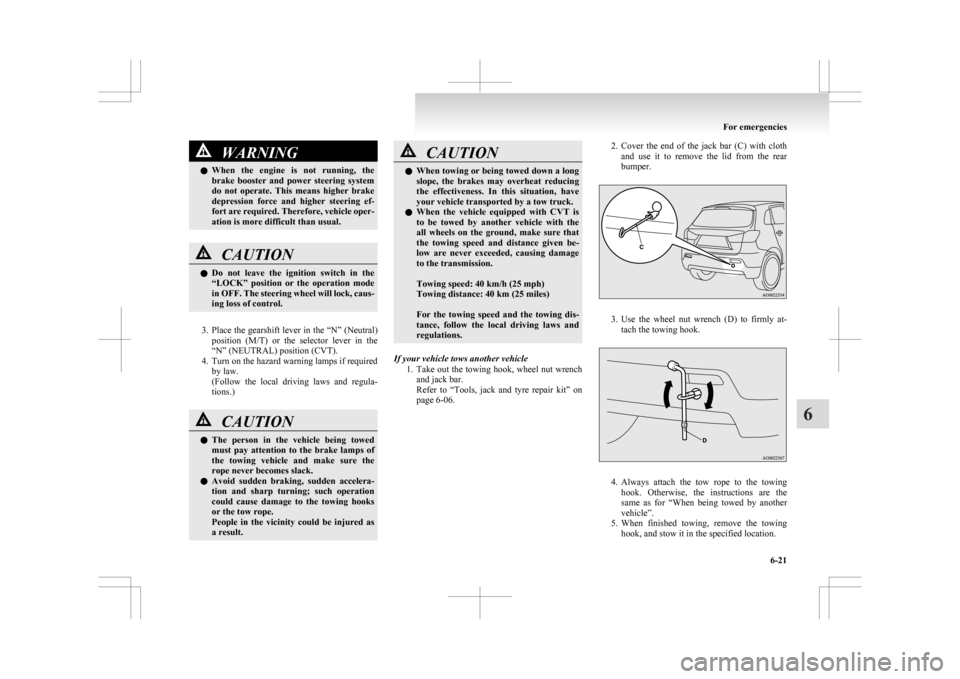
page 6-06. 2. Cover
the end of the jack bar (C) with cloth
and use it to remove the lid from the rear
bumper. 3. Use
the wheel nut wrench (D) to firmly at-
tach the towing hook. 4. Always
attach the tow rope to the towing
hook. Otherwise, the instructions are the
same as for “When being towed by another
vehicle”.
5. When finished towing, remove the towing hook, and stow it in the specified location. For emergencies
6-21 6
Page 300 of 368

Refer to “Tools,
jack and tyre repair kit” on
page 6-06.
When installing the bumper lid, align the
hook with the cut out area on the vehicle,
and firmly insert.
NOTE l Do not tow a vehicle heavier than your own
vehicle. Operation under adverse driving
conditions E00801702531
On a flooded road l Avoid
flooded roads. Water could enter the
brake discs, resulting in temporarily ineffec-
tive brakes. In such cases, lightly depress the
brake pedal to see if the brakes operate prop-
erly. If they do not, lightly depress the pedal
several times while driving in order to dry
the brake pads.
l When driving in rain or on a road with many
puddles a layer of water may form between
the tyres and the road surface.
This reduces a tyre’s frictional resistance on
the road, resulting in loss of steering stability
and braking capability.
To cope with this, observe the following items:
(a) Drive your vehicle at slow speed.
(b) Do not drive on worn tyres.
(c) Always maintain the specified tyre inflation pressures.
On a snow-covered or frozen road l The
use of snow tyres or tyre chains is recom-
mended for driving on snow and ice.
Refer to the “Snow tyres” and “Tyre chains”
sections.
l Avoid high-speed driving, sudden accelera-
tion, sudden braking, and sharp turns. l
Depressing
the brake pedal during travel on
snowy or icy roads may cause tyre slippage
and skidding. Tyres may slip if the ability of
the tyres to grip the road surface lessens.
This may make it more difficult to stop the
vehicle with normal braking operations. For
vehicles with an anti-lock brake system
(ABS), firmly depress and hold down the
brake pedal.
l Allow extra distance between your vehicle
and the vehicle in front of you, and avoid sud-
den braking.
l Accumulation of ice on the braking system
can cause the wheels to lock. Pull away from
a standstill slowly after confirming safety
around the vehicle. CAUTION
l
Do
not press the accelerator pedal rapid-
ly. If the wheels break free of the ice, the
vehicle could suddenly start moving and
possibly cause an accident.
On a bumpy or rutted road l Drive
as slow as possible when driving on
bumpy or rutted roads. CAUTION
l
The
impact on tyres and/or wheels when
driving on a bumpy or rutted road can
damage the tyre and/or wheel. For emergencies
6-22
6
Page 304 of 368

CAUTION
• When washing around the door glass,
hold the nozzle at a distance of more
than 70 cm and at right angles to the
glass surface.
l After washing the vehicle, drive the vehi-
cle slowly while lightly depressing the
brake pedal several times in order to dry
out the brakes.
Leaving the brakes wet could result in re-
duced braking performance. Also, there
is a possibility that they could freeze up
or become inoperative due to rust, render-
ing the vehicle unable to move.
l When using an automatic car wash, pay
attention to the following items, referring
to the operation manual or consulting a
car wash operator. If the following proce-
dure is not followed, it could result in dam-
age to your vehicle.
• The outside mirrors are retracted.
• The antenna is removed.
• The wiper arms are secured in placewith tape.
• If your vehicle is equipped with a rear spoiler or roof rails, consult a car
wash operator before using the car
wash.
• If your vehicle has rain sensor wipers, place the wiper switch lever in the
“OFF” position to deactivate the rain
sensor. During cold weather
Salt
and other chemicals spread on the roads in
some areas in winter can have a harmful effect on
the vehicle body. You should therefore wash the ve-
hicle as often as possible in accordance with our
care-instructions. It is recommended to have a pres-
ervative applied and the underfloor protection
checked before and after the cold weather season.
After washing your vehicle, wipe off all water-
drops from the rubber parts around the doors to pre-
vent the doors from freezing.
NOTE
l To prevent freezing of the weatherstripping
on the doors, bonnet, etc., they should be trea-
ted with silicone spray.
Waxing E00901000863
Waxing the vehicle will help prevent the adherence
of
dust and road chemicals to the paintwork. Apply
a wax solution after washing the vehicle, or at least
once every three months to assist displacing of water.
Do not wax your vehicle in direct sunlight. You
should wax after the surfaces have cooled. CAUTION
l
Waxes
containing high abrasive com-
pounds should not be used. Such waxes re-
move rust and stains effectively from the
paintwork but they are harmful to the lus-
tre on the painted surface and the plated
surface.
Further, they are harmful to glossy surfa-
ces such as grille, garnish, mouldings, etc. CAUTION
l
Do
not use petrol or paint thinners to re-
move road tar or other contamination to
the painted surface.
l Do not apply wax to sections that have a
black mat paint coating, as doing so
could cause uneven discolouration, spots
or stains. If wax gets on such areas, wipe
it off using lukewarm water and a soft
cloth.
Polishing E00901100066
The vehicle should only be polished if the paint-
work
has become stained or lost its lustre. Do not
polish parts with a mat coating and the plastic bump-
ers. Doing so could cause stains or damage the finish.
Damaged paint E00901200054
Small cracks and scratches in the paint coat should
be
touched up as soon as possible with
MITSUBISHI touch-up paint to prevent corrosion.
Check body areas facing the road or the tyres care-
fully for damage to the paint caused by gravels,
etc. The paint code number for your vehicle can be
found on the vehicle information code plate in the
engine compartment.
Cleaning plastic parts E00901300707
Use a sponge or chamois leather.
If
a car wax adheres on a grey or black rough sur-
face of the bumper, moulding or lamps, the surface
becomes white. In such a case, wipe it off using
lukewarm water and soft cloth or chamois leather. Vehicle care
7-04
7
Page 319 of 368

Wheel condition
E010018008851- Location of the tread wear indicator
2-
Tread wear indicator
Check the tyres for cuts, cracks and other damage.
Replace the tyres if there are deep cuts or cracks.
Also check each tyre for pieces of metal or pebbles.
The use of worn tyres can be very dangerous be-
cause of the greater chance of skidding or hydro-
planing. The tread depth of the tyres must exceed
1.6 mm in order for the tyres to meet the minimum
requirement for use.
Tread wear indicators will appear on the surface of
the tyre as the tyre wears, thereby indicating that
the tyre no longer meets the minimum requirement
for use. When these wear indicators appear, the
tyres must be replaced with new ones.
On 4-wheel drive vehicles, when replacement of
any of the tyres is necessary, replace all of them. CAUTION
l
Always
use tyres of the same size, same
type, and same brand, and which have no
wear differences.
Using tyres of different size, type, brands
or degree of wear, will increase the differ-
ential oil temperature, resulting in possi-
ble damage to the driving system. Fur-
ther, the drive train will be subjected to
excessive loading, possibly leading to oil
leakage, component seizure, or other seri-
ous faults.
Replacing tyres and wheels E01007200243 CAUTION
l
Avoid
using different size tyres from the
one listed and the combined use of differ-
ent types of tyres, as this can affect driv-
ing safety.
Refer to “Tyres and wheels” on page
9-12.
l Even if a wheel has the same rim size and
offset as the specified type of wheel, its
shape may prevent it from being fitted cor-
rectly. We recommend you to consult a
specialist before using wheels that you
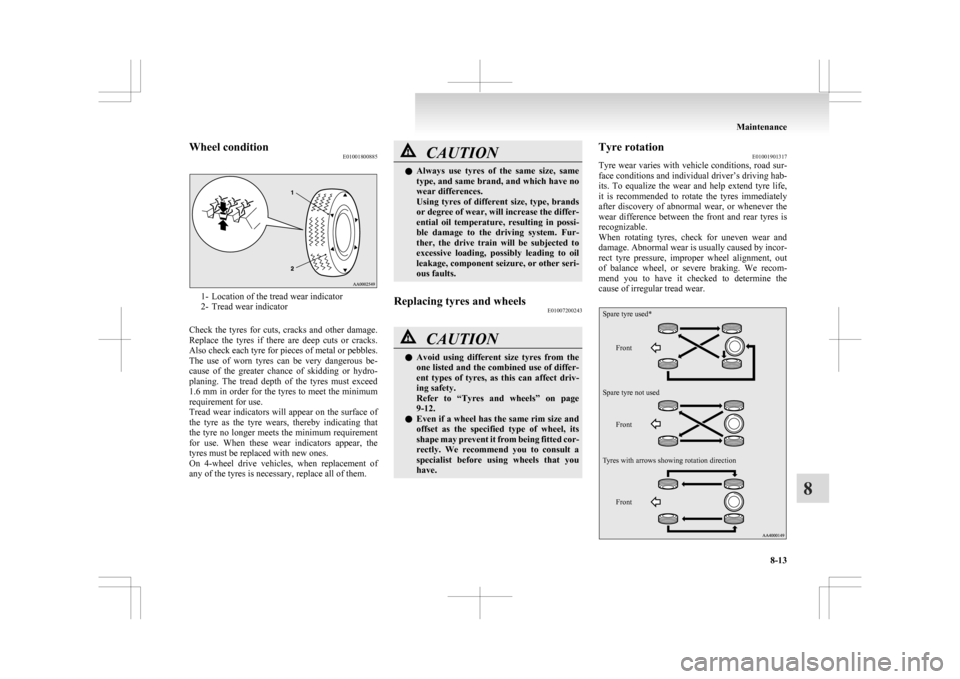
have. Tyre rotation
E01001901317
Tyre
wear varies with vehicle conditions, road sur-
face conditions and individual driver’s driving hab-
its. To equalize the wear and help extend tyre life,
it is recommended to rotate the tyres immediately
after discovery of abnormal wear, or whenever the
wear difference between the front and rear tyres is
recognizable.
When rotating tyres, check for uneven wear and
damage. Abnormal wear is usually caused by incor-
rect tyre pressure, improper wheel alignment, out
of balance wheel, or severe braking. We recom-
mend you to have it checked to determine the
cause of irregular tread wear.
Front Front Front
Spare tyre used*
Spare tyre not used
Tyres with arrows showing rotation direction Maintenance
8-13 8
Page 357 of 368

4
4-wheel drive operation 4-31
AAccessory (Installation) 04
Accessory socket 5-61
Active stability control (ASC)
4-40
Additional equipment 8-17
Air conditioning 5-03 Important operation tips for the air condition-
ing 5-09
Air purifier 5-10
Airbag 2-24
Antenna 5-39
Anti-lock brake system (ABS) 4-38 Display 4-38
Warning lamp 4-38
Ashtray 5-60
Assist grips 5-70
Audio 5-10 Error codes 5-35
External audio input function 5-32
Handling of compact discs 5-38
Steering wheel audio remote control
switches 5-33
Auto Stop & Go (AS&G) system 4-17
Automatic transmission Fluid 9-14
Selector lever operation 4-24
Selector lever position 4-25
Sports mode 4-26
BBattery 8-08
Charge warning lamp 3-42 Discharged battery (Emergency starting) 6-02
Disposal information for used batteries
06
Specification 9-11
Bluetooth® 2.0 interface 5-41
Bonnet 8-03
Bottle holder 5-69
Brake assist system 4-36
Brake Anti-lock brake 4-38
Braking 4-34
Fluid 8-07,9-14
Parking brake 4-06
Bulb capacity 8-23
C Capacities 9-14
Card holder 5-59,5-66
Cargo loads 4-52
Catalytic converter
8-02
Cautions on handling of 4-wheel drive vehi-
cles 4-33
Central door locks 1-22
Charge warning lamp 3-42
Chassis number 9-02
Check engine warning lamp 3-41
Child restraint 2-15
Child-protection rear doors 1-25
Cigarette lighter 5-60
Cleaning Exterior of your vehicle 7-03
Interior of your vehicle 7-02
Clock 5-39
Clutch Fluid 8-07
Coat hook 5-70
Combination headlamps and dipper switch 3-44
Coolant (engine) 8-06,9-14
Cruise control 4-43 Cup holder 5-68
D Daytime running lamps
Bulb capacity
8-24
Replacement 8-30
Demister (rear window) 3-57
Diesel particulate filter (DPF) 4-15
Dimensions 9-04
Dipper (High/Low beam change) 3-47
Doors Central door locks 1-22
Child-protection 1-25
Dead Lock System 1-23
Lock and unlock 1-21
Driving, alcohol and drugs 4-02
E Economical driving 4-02
Electric power steering system (EPS)
4-40
Electric window control 1-34
Electrical system 9-11
Electronic immobilizer (Anti-theft starting sys-
tem) 1-03
Electronically controlled 4WD system 4-29
Emergency starting 6-02
Emergency stop signal system 4-37
Engine specifications 9-10
Engine switch 1-11
Engine Coolant 8-06,9-14
Number 9-02
Oil 8-04
Oil and filter 9-14
Overheating 6-04
Specifications 9-10 Alphabetical index
1