2009 MITSUBISHI ASX jacking
[x] Cancel search: jackingPage 186 of 368

CAUTION
l
Do not tow 4-wheel drive vehicles with
the front or rear wheels on the ground
(Type A or Type B) as illustrated. This
could result in damage to the drivetrain,
or unstable towing.
If you tow 4-wheel drive vehicles, use
Type C or Type D equipment.
l Even in “2WD” drive mode, the vehicle
cannot be towed with the front or the
rear wheels on the ground.
Jacking up a 4-wheel drive vehicle WARNING
l Do
not crank the engine while the vehicle
is jacked up.
The tyre on the ground may turn and the
vehicle may roll off the jack.
Clutch operation
Quick
or slight clutch engagement made while the
engine is running at high speed will cause damage
to the clutch and transmission because the tractive
force is very great.
Operate the pedal slowly and positively. Braking
E00607001784
All
the parts of the brake system are critical to safe-
ty. We recommend you to have the vehicle
checked at regular intervals according to the serv-
ice booklet. CAUTION
l
Avoid
driving habits that cause heavy
braking and never “ride” the brakes by
resting your foot on the brake pedal
while driving.
It causes brake overheating and fade.
Brake system
The
service brake is divided into two brake cir-
cuits. And your vehicle is equipped with power
brakes. If one brake circuit fails, the other is availa-
ble to stop the vehicle. If you should lose the pow-
er assist for some reason, the brakes will still work.
In these situations, even if the brake pedal moves
down to the very end of its possible stroke or re-
sists being depressed, keep depressing the brake ped-
al down harder and further than usual; stop driving
as soon as possible and have the brake system re-
paired. WARNING
l Do
not turn off the engine while your ve-
hicle is in motion. If you turn off the en-
gine while driving, the power assistance
for the braking system will stop working
and your brakes will not work effectively. WARNING
l If
the power assist is lost or if either
brake hydraulic system stops working
properly, have your vehicle checked im-
mediately.
Warning display
The
brake warning lamp illuminates to indicate a
fault in the braking system. A warning is also dis-
played on the multi-information display. Refer to
“Brake warning lamp” on page 3-41 and “Brake
warning display” on page 3-42.
When brakes are wet
Check the brake system while driving at a low
speed immediately after starting, especially when
the brakes are wet, to confirm they work normally.
A film of water can be formed on the brake discs
and prevent normal braking after driving in heavy
rain or through large puddles, or after the vehicle is
washed. If this occurs, dry the brakes out by driv-
ing slowly while lightly depressing the brake pedal.
When driving downhill
It is important to take advantage of the engine brak-
ing by shifting to a lower shift position while driv-
ing on steep downhill roads in order to prevent the
brakes from overheating. Starting and driving
4-34
4
Page 290 of 368

l
A tyre in which puncture sealant has been
used should ideally be replaced with a new
one. If you wish to have such a tyre properly
repaired for reuse, please contact a
MITSUBISHI MOTORS Authorized Service
Point or another specialist. Note that a proper
repair is impossible following an emergency
repair if the puncture hole cannot be located.
l Wipe away any sealant that gets on the
wheel. Provided the valve is replaced with a
new one, the wheel can be reused.
l The manufacturer is unable to guarantee that
all tyre punctures can be repaired with the
tyre repair kit, in particular cuts or perfora-
tions with a diameter of more than 4 mm or
away from the tyre’s tread. The manufacturer
is not liable for damage sustained through im-
proper use of the tyre repair kit.
l The manufacturer is not liable for damage sus-
tained through re-use of any tyre in which
tyre sealant has been used. How to change a tyre
E00801202637
Before
changing a tyre, first stop your vehicle in a
safe, flat location. 1. Park the vehicle on level and stable ground,free of loose pebbles, etc.
2. Set the parking brake firmly.
3. On vehicles with M/T, stop the engine and move the gearshift lever to the “R” (Reverse)
position.
On vehicles with CVT, move the selector lev-
er to the “P” (PARK) position and stop the en-
gine.
4. Turn on the hazard warning flashers and set up a warning triangle, flashing signal lamp,
etc., at an adequate distance from the vehi-
cle, and have all your passengers leave the ve-
hicle.
NOTE l The warning triangle and flashing signal
lamp do not come with your vehicle. It is rec-
ommended that you keep one in the vehicle
for use if needed.
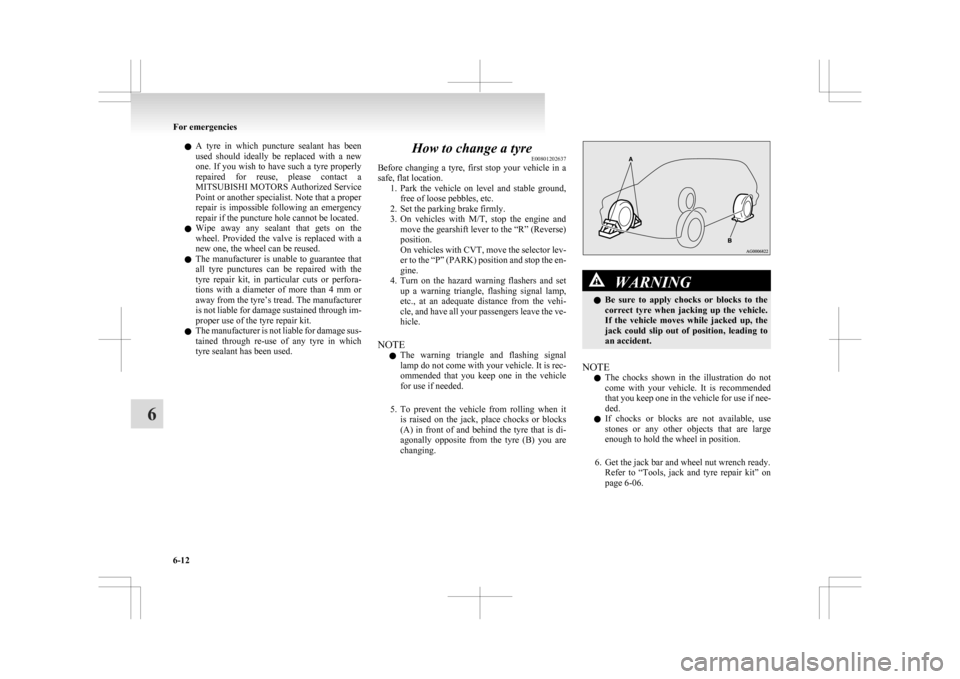
5. To prevent the vehicle from rolling when it is raised on the jack, place chocks or blocks
(A) in front of and behind the tyre that is di-
agonally opposite from the tyre (B) you are
changing. WARNING
l Be
sure to apply chocks or blocks to the
correct tyre when jacking up the vehicle.
If the vehicle moves while jacked up, the
jack could slip out of position, leading to
an accident.
NOTE l The
chocks shown in the illustration do not
come with your vehicle. It is recommended
that you keep one in the vehicle for use if nee-
ded.
l If chocks or blocks are not available, use
stones or any other objects that are large
enough to hold the wheel in position.
6. Get the jack bar and wheel nut wrench ready. Refer to “Tools, jack and tyre repair kit” on
page 6-06. For emergencies
6-12
6
Page 292 of 368

CAUTION
l
Do not install more than one temporary
spare wheel at the same time.
To remove the spare wheel E00803300117
1. Lift up the luggage floor board.
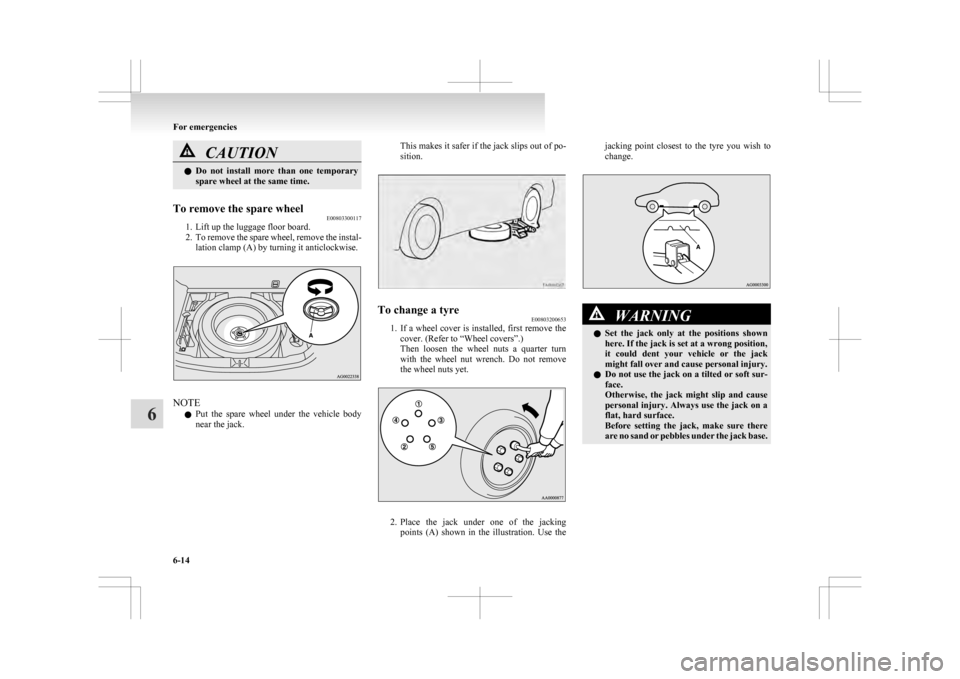
2. To
remove the spare wheel, remove the instal-
lation clamp (A) by turning it anticlockwise. NOTE
l Put
the spare wheel under the vehicle body
near the jack. This makes it safer if the jack slips out of po-
sition.
To change a tyre
E00803200653
1. If
a wheel cover is installed, first remove the
cover. (Refer to “Wheel covers”.)
Then loosen the wheel nuts a quarter turn
with the wheel nut wrench. Do not remove
the wheel nuts yet. 2. Place
the jack under one of the jacking
points (A) shown in the illustration. Use the jacking point closest to the tyre you wish to
change.
WARNING
l Set
the jack only at the positions shown
here. If the jack is set at a wrong position,
it could dent your vehicle or the jack
might fall over and cause personal injury.
l Do not use the jack on a tilted or soft sur-
face.
Otherwise, the jack might slip and cause
personal injury. Always use the jack on a
flat, hard surface.
Before setting the jack, make sure there
are no sand or pebbles under the jack base. For emergencies
6-14
6
Page 293 of 368

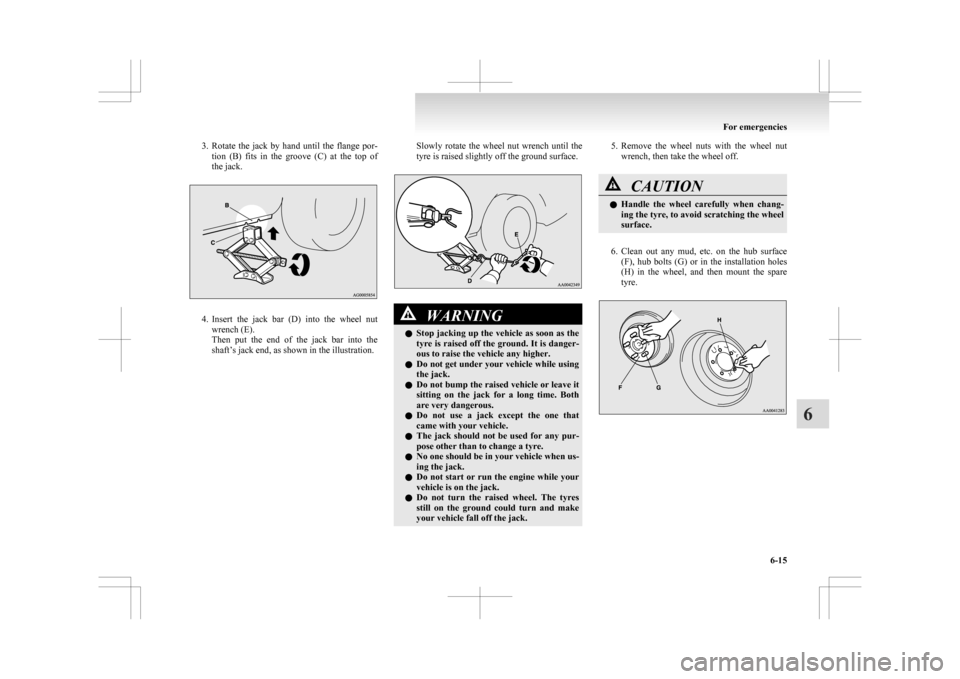
3. Rotate the jack by hand until the flange por-
tion (B) fits in the groove (C) at the top of
the jack. 4. Insert
the jack bar (D) into the wheel nut
wrench (E).
Then put the end of the jack bar into the
shaft’s jack end, as shown in the illustration. Slowly rotate the wheel nut wrench until the
tyre is raised slightly off the ground surface. WARNING
l Stop
jacking up the vehicle as soon as the
tyre is raised off the ground. It is danger-
ous to raise the vehicle any higher.
l Do not get under your vehicle while using
the jack.
l Do not bump the raised vehicle or leave it
sitting on the jack for a long time. Both
are very dangerous.
l Do not use a jack except the one that
came with your vehicle.
l The jack should not be used for any pur-
pose other than to change a tyre.
l No one should be in your vehicle when us-
ing the jack.
l Do not start or run the engine while your
vehicle is on the jack.
l Do not turn the raised wheel. The tyres
still on the ground could turn and make
your vehicle fall off the jack. 5. Remove
the wheel nuts with the wheel nut
wrench, then take the wheel off. CAUTION
l
Handle
the wheel carefully when chang-
ing the tyre, to avoid scratching the wheel
surface.
6. Clean
out any mud, etc. on the hub surface (F), hub bolts (G) or in the installation holes
(H) in the wheel, and then mount the spare
tyre. For emergencies
6-15 6