2009 MITSUBISHI ASX tow
[x] Cancel search: towPage 216 of 368
Demisting of the windscreen and door windows
E00702100768CAUTION
l
For safety, make sure you have a clear
view through all the windows.
Use the mode selection dial (“ ”
or “ ”) to re-
move frost or mist from the windscreen or door win-
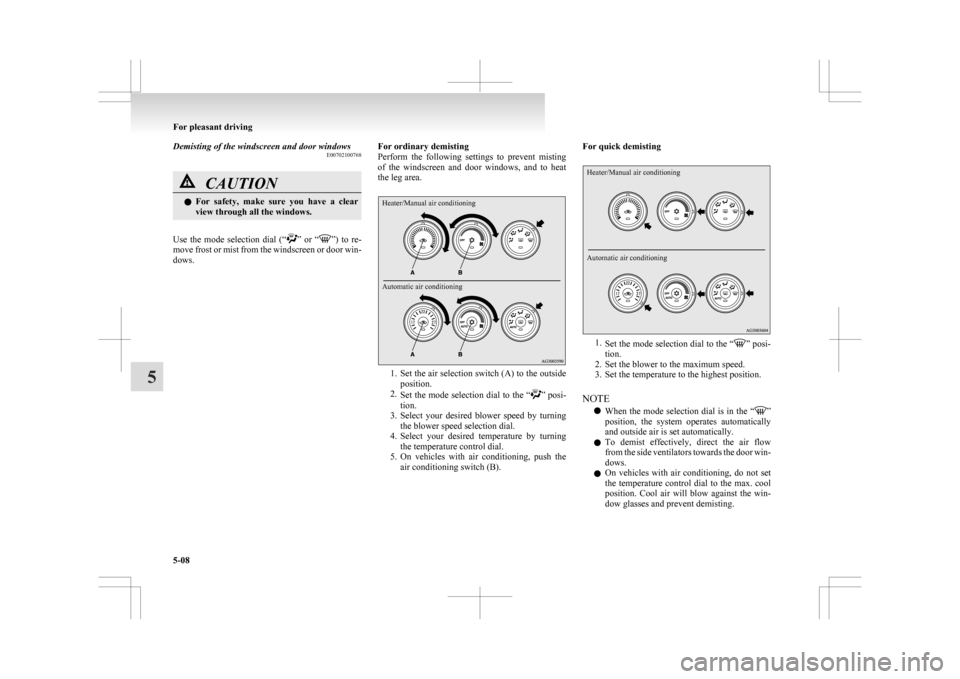
dows. For ordinary demisting
Perform
the following settings to prevent misting
of the windscreen and door windows, and to heat
the leg area.
Heater/Manual air conditioning
Automatic air conditioning 1. Set
the air selection switch (A) to the outside
position.
2. Set the mode selection dial to the “ ”
posi-
tion.
3. Select your desired blower speed by turning the blower speed selection dial.
4. Select your desired temperature by turning the temperature control dial.
5. On vehicles with air conditioning, push the air conditioning switch (B). For quick demisting
Heater/Manual air conditioning
Automatic air conditioning
1.
Set
the mode selection dial to the “ ” posi-
tion.
2.
Set the blower to the maximum speed.
3. Set the temperature to the highest position.
NOTE l When the mode selection dial is in the “ ”
position,
the system operates automatically
and outside air is set automatically.
l To demist effectively, direct the air flow
from the side ventilators towards the door win-
dows.
l On vehicles with air conditioning, do not set
the temperature control dial to the max. cool
position. Cool air will blow against the win-
dow glasses and prevent demisting. For pleasant driving
5-08
5
Page 246 of 368

Handling of compact discs
E00723000425
l Use
only the type of compact discs that have
the mark shown in the illustration below.
(Playback of CD-R or CD-RW discs may
cause problems.) l
The use of special shaped, damaged compact
discs (like cracked discs) or low-quality com-
pact discs (like warped discs or burrs on the
discs) such as those shown will damage the
CD player. l
In
the following circumstances, moisture can
form on discs and inside the audio system,
preventing normal operation. • When there is high humidity (for exam-ple, when it is raining). • When
the temperature suddenly rises,
such as right after the heater is turned on
in cold weather.
In this case, wait until the moisture has
had time to dry out.
l When the CD player is subjected to violent vi-
brations, such as during off-road driving, the
tracking may not work.
l When storing compact discs, always store
them in their separate cases. Never place com-
pact discs in direct sunlight, or in any place
where the temperature or humidity is high.
l Never touch the flat surface of the disc with-
out a label. This will damage the disc surface
and could affect the sound quality. When han-
dling a compact disc, always hold it by the
outer edge and the centre hole.
l To clean a disc, use a soft, clean, dry cloth.
Wipe directly from the centre hole towards
the outer edge. Do not wipe in a circle. Nev-
er use any chemicals such as benzine, paint
thinner, a disc spray cleaner, or an anti-static
agent on the disc.
l Do not use a ball point pen, felt pen, pencil,
etc. to write on the label surface of the disc.
l Do not put additional labels or stickers on
compact discs.
Also, do not use any compact disc on which
a label or sticker has started to peel off or
any compact disc that has stickiness or other
contamination left by a peeled-off label or
sticker. If you use such a compact disc, the
CD player may stop working properly and
you may not be able to eject the compact disc. For pleasant driving
5-38
5
Page 279 of 368

If the vehicle breaks down
............................................................ 6-02
Emergency starting ....................................................................... 6-02
Engine overheating ....................................................................... 6-04
Tools, jack and tyre repair kit ....................................................... 6-06
How to change a tyre .................................................................... 6-12
Towing.......................................................................................... 6-19
Operation under adverse driving conditions .................................6-22For emergencies
6
Page 284 of 368
Tools, jack and tyre repair kit
E00800901278
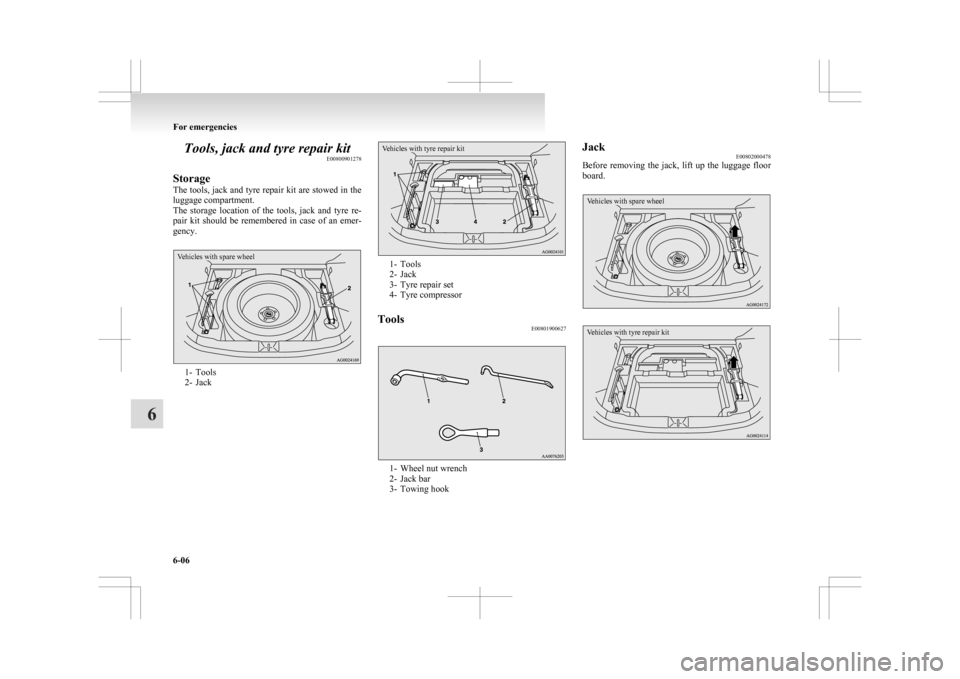
Storage
The
tools, jack and tyre repair kit are stowed in the
luggage compartment.
The storage location of the tools, jack and tyre re-
pair kit should be remembered in case of an emer-
gency.
Vehicles with spare wheel 1- Tools
2-
Jack
Vehicles with tyre repair kit 1- Tools
2-
Jack
3- Tyre repair set
4- Tyre compressor
Tools E00801900627 1- Wheel nut wrench
2-
Jack bar
3- Towing hook Jack
E00802000478
Before
removing the jack, lift up the luggage floor
board.
Vehicles with spare wheel
Vehicles with tyre repair kit For emergencies
6-06
6
Page 288 of 368
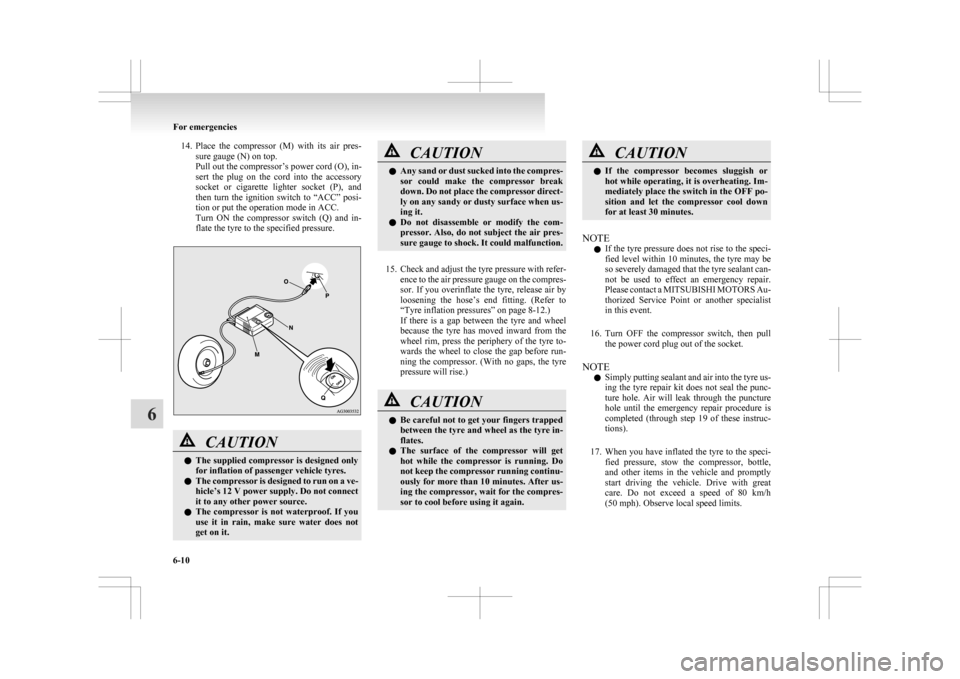
14. Place the compressor (M) with its air pres-
sure gauge (N) on top.
Pull out the compressor’s power cord (O), in-
sert the plug on the cord into the accessory
socket or cigarette lighter socket (P), and
then turn the ignition switch to “ACC” posi-
tion or put the operation mode in ACC.
Turn ON the compressor switch (Q) and in-
flate the tyre to the specified pressure. CAUTION
l
The
supplied compressor is designed only
for inflation of passenger vehicle tyres.
l The compressor is designed to run on a ve-
hicle’s 12 V power supply. Do not connect
it to any other power source.
l The compressor is not waterproof. If you
use it in rain, make sure water does not
get on it. CAUTION
l
Any
sand or dust sucked into the compres-
sor could make the compressor break
down. Do not place the compressor direct-
ly on any sandy or dusty surface when us-
ing it.
l Do not disassemble or modify the com-
pressor. Also, do not subject the air pres-
sure gauge to shock. It could malfunction.
15. Check
and adjust the tyre pressure with refer- ence to the air pressure gauge on the compres-
sor. If you overinflate the tyre, release air by
loosening the hose’s end fitting. (Refer to
“Tyre inflation pressures” on page 8-12.)
If there is a gap between the tyre and wheel
because the tyre has moved inward from the
wheel rim, press the periphery of the tyre to-
wards the wheel to close the gap before run-
ning the compressor. (With no gaps, the tyre
pressure will rise.) CAUTION
l
Be
careful not to get your fingers trapped
between the tyre and wheel as the tyre in-
flates.
l The surface of the compressor will get
hot while the compressor is running. Do
not keep the compressor running continu-
ously for more than 10 minutes. After us-
ing the compressor, wait for the compres-
sor to cool before using it again. CAUTION
l
If
the compressor becomes sluggish or
hot while operating, it is overheating. Im-
mediately place the switch in the OFF po-
sition and let the compressor cool down
for at least 30 minutes.
NOTE l If
the tyre pressure does not rise to the speci-
fied level within 10 minutes, the tyre may be
so severely damaged that the tyre sealant can-
not be used to effect an emergency repair.
Please contact a MITSUBISHI MOTORS Au-
thorized Service Point or another specialist
in this event.
16. Turn OFF the compressor switch, then pull the power cord plug out of the socket.
NOTE l Simply putting sealant and air into the tyre us-
ing the tyre repair kit does not seal the punc-
ture hole. Air will leak through the puncture
hole until the emergency repair procedure is
completed (through step 19 of these instruc-
tions).
17. When you have inflated the tyre to the speci- fied pressure, stow the compressor, bottle,
and other items in the vehicle and promptly
start driving the vehicle. Drive with great
care. Do not exceed a speed of 80 km/h
(50 mph). Observe local speed limits. For emergencies
6-10
6
Page 291 of 368
Spare wheel information*
E00803600497
Check
the air pressure of the spare tyre frequently
and make sure it is ready for emergency use at any
time.
Maintaining the spare wheel at the highest speci-
fied air pressure will ensure that it can always be
used under any conditions (city/high-speed driving,
varying load weight, etc.).
The spare wheel is stored beneath the luggage floor
board of the luggage compartment. CAUTION
l
The
pressure should be periodically
checked and maintained at the specified
pressure while the tyre is stowed.
Driving with an insufficient tyre pressure
can lead to an accident. If you have no
choice but to drive with an insufficient
tyre pressure, keep your speed down and
inflate the tyre to the correct pressure as
soon as possible. (Refer to “Tyre inflation
pressures” on page 8-12.)
l When the tread wear indicators appear,
the tyre must be replaced.
Refer to “Wheel condition” on page 8-13.
Temporary spare wheel (spare wheel with a speed
limit label)*
The T155/90D16
or T125/90D16 size spare wheel
is stored beneath the luggage floor board of the lug-
gage compartment. It is designed to save space in
the luggage compartment and its light weight
makes it easy to handle in the event of a flat tyre. CAUTION
l
The
temporary spare wheel is for tempo-
rary use only and should be removed as
soon as the original wheel can be re-
paired or replaced.
l The vehicle must not be driven at speeds
in excess of 80 km/h (50 mph) while using
the temporary spare wheel.
l The T155/90D16 or T125/90D16 size
spare wheel is not as good as a standard
wheel in controllability and stability.
When the temporary spare wheel is used,
avoid quick starts, sudden braking and
sharp steering.
Tyre size of the 215/65R16 size tyre is dif-
ferent from that of the standard tyre.
When the temporary spare tyre is used,
avoid quick starts, sudden braking and
sharp steering.
l The temporary spare wheel is specifically
designed for your vehicle and it should
not be used on any other vehicle.
When you purchase a 215/65R16 size
spare wheel, be sure to purchase the type
designed specially for your vehicle from
your MITSUBISHI MOTORS Author-
ized Service Point. CAUTION
l
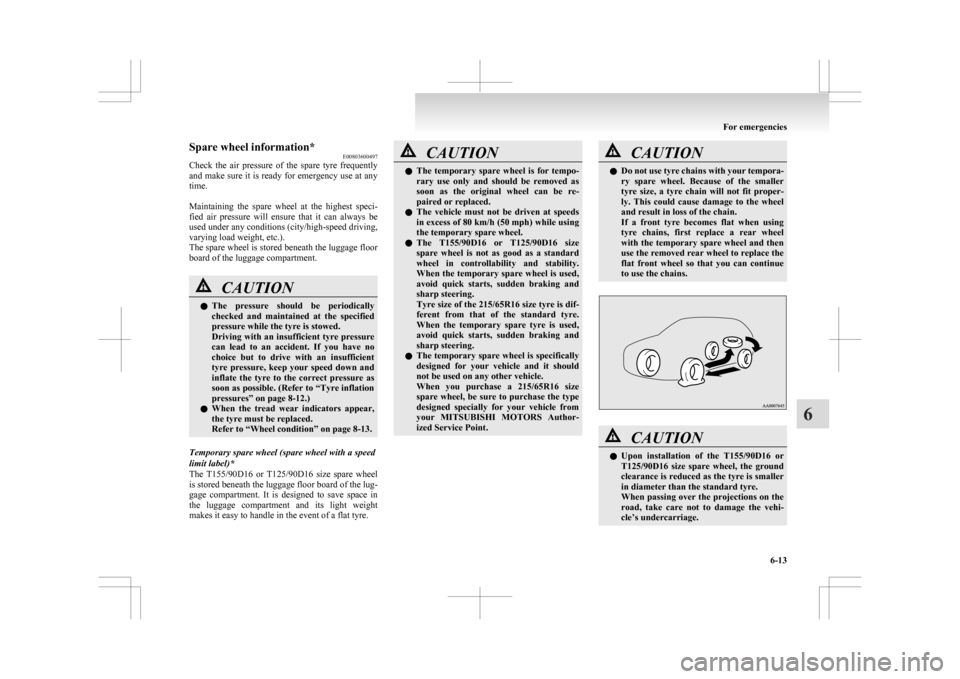
Do not use tyre chains with your tempora-
ry spare wheel. Because of the smaller
tyre size, a tyre chain will not fit proper-
ly. This could cause damage to the wheel
and result in loss of the chain.
If a front tyre becomes flat when using
tyre chains, first replace a rear wheel
with the temporary spare wheel and then
use the removed rear wheel to replace the
flat front wheel so that you can continue
to use the chains. CAUTION
l
Upon
installation of the T155/90D16 or
T125/90D16 size spare wheel, the ground
clearance is reduced as the tyre is smaller
in diameter than the standard tyre.
When passing over the projections on the
road, take care not to damage the vehi-
cle’s undercarriage. For emergencies
6-13 6
Page 297 of 368
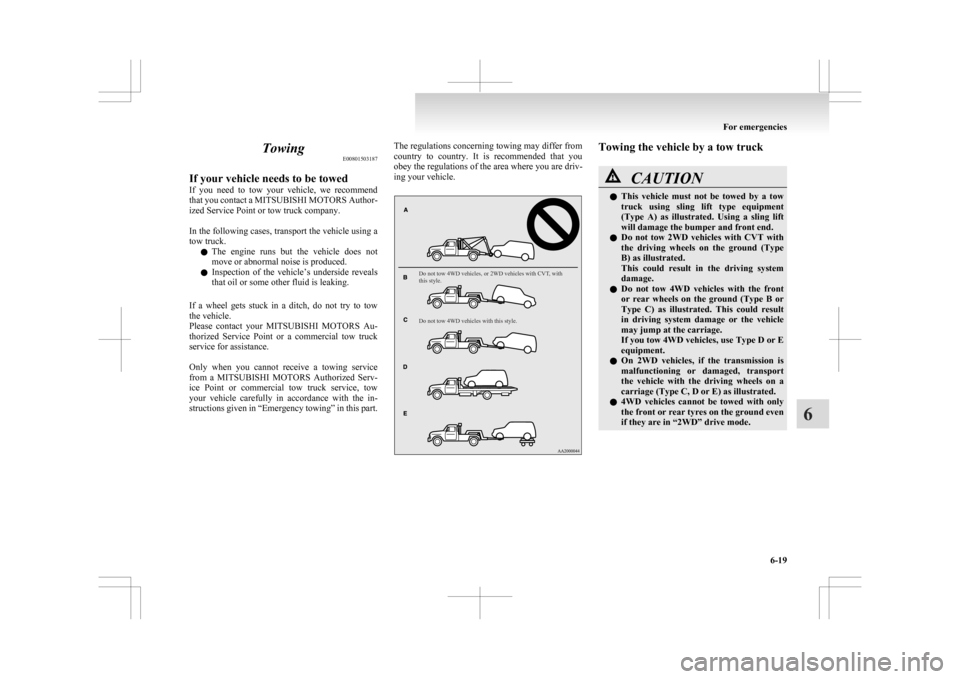
Towing
E00801503187
If your vehicle needs to be towed
If
you need to tow your vehicle, we recommend
that you contact a MITSUBISHI MOTORS Author-
ized Service Point or tow truck company.
In the following cases, transport the vehicle using a
tow truck.
l The engine runs but the vehicle does not
move or abnormal noise is produced.
l Inspection of the vehicle’s underside reveals
that oil or some other fluid is leaking.
If a wheel gets stuck in a ditch, do not try to tow
the vehicle.
Please contact your MITSUBISHI MOTORS Au-
thorized Service Point or a commercial tow truck
service for assistance.
Only when you cannot receive a towing service
from a MITSUBISHI MOTORS Authorized Serv-
ice Point or commercial tow truck service, tow
your vehicle carefully in accordance with the in-
structions given in “Emergency towing” in this part. The regulations concerning towing may differ from
country
to country. It is recommended that you
obey the regulations of the area where you are driv-
ing your vehicle.
Do not tow 4WD vehicles, or 2WD vehicles with CVT, with
this style.
Do not tow 4WD vehicles with this style. Towing the vehicle by a tow truck
CAUTION
l
This
vehicle must not be towed by a tow
truck using sling lift type equipment
(Type A) as illustrated. Using a sling lift
will damage the bumper and front end.
l Do not tow 2WD vehicles with CVT with
the driving wheels on the ground (Type
B) as illustrated.
This could result in the driving system
damage.
l Do not tow 4WD vehicles with the front
or rear wheels on the ground (Type B or
Type C) as illustrated. This could result
in driving system damage or the vehicle
may jump at the carriage.
If you tow 4WD vehicles, use Type D or E
equipment.
l On 2WD vehicles, if the transmission is
malfunctioning or damaged, transport
the vehicle with the driving wheels on a
carriage (Type C, D or E) as illustrated.
l 4WD vehicles cannot be towed with only
the front or rear tyres on the ground even
if they are in “2WD” drive mode. For emergencies
6-19 6
Page 298 of 368
![MITSUBISHI ASX 2009 1.G Owners Manual CAUTION
l
[For 2WD vehicles equipped with the Ac-
tive Stability Control (ASC)]
If the vehicle is towed with the ignition
switch in the “ON” position or the opera-
tion mode in ON and MITSUBISHI ASX 2009 1.G Owners Manual CAUTION
l
[For 2WD vehicles equipped with the Ac-
tive Stability Control (ASC)]
If the vehicle is towed with the ignition
switch in the “ON” position or the opera-
tion mode in ON and](/manual-img/19/7566/w960_7566-297.png)
CAUTION
l
[For 2WD vehicles equipped with the Ac-
tive Stability Control (ASC)]
If the vehicle is towed with the ignition
switch in the “ON” position or the opera-
tion mode in ON and only the front
wheels or only the rear wheels raised off
the ground (Type B or C), the ASC may
operate, resulting in an accident.
When towing the vehicle with the rear
wheels raised, turn the ignition switch to
the “ACC” position or put the operation
mode in ACC.
When towing the vehicle with the front
wheels raised, keep the ignition switch or
the operation mode as follows.
[Except for vehicles equipped with key-
less operation system]
The ignition switch is in “LOCK” or
“ACC” position.
[Vehicles with keyless operation system]
The operation mode is in OFF or ACC.
Towing with rear wheels off the ground (Type B)
Place
the gearshift lever in the “N” (Neutral) posi-
tion.
Turn the ignition switch to the “ACC” position or
put the operation mode in ACC and secure the steer-
ing wheel in a straight-ahead position with a rope
or tiedown strap. Never place the ignition switch in
the “LOCK” position or put the operation mode in
OFF when towing.
Towing with front wheels off the ground (Type C)
Release the parking brake. Place the gearshift lever in the “N” (Neutral) posi-
tion
(M/T) or the selector lever in the “N” (NEU-
TRAL) position (CVT).
Emergency towing
If towing service is not available in an emergency,
your vehicle may be temporarily towed by a rope
secured to the towing hook.
If your vehicle is to be towed by another vehicle or
if your vehicle tows another vehicle, pay careful at-
tention to the following points:
If your vehicle is to be towed by another vehicle
1. The front towing hook (A) is located asshown in the illustration. Secure the tow rope
to the front towing hook. NOTE
l Do
not use the tie-down hooks (B) for tow-
ing. These hooks are provided only for the
purpose of transporting the vehicle itself.
Using any part other than the designated tow-
ing hook (A) could result in damage to vehi-
cle body. l
Using
a wire rope or metal chain can result
in damage to the vehicle body. It is best to
use a non-metallic rope. If you use a wire
rope or metal chain, wrap it with cloth at any
point where it touches the vehicle body.
l Take care that the tow rope is kept as horizon-
tal as possible. An angled tow rope can dam-
age the vehicle body.
2. Keep the engine running. If the engine is not running, perform the fol-
lowing operation to unlock the steering wheel.
[Except for vehicles with keyless operation
system]
Turn the ignition switch to the “ACC” or
“ON” position (M/T) or “ON” position
(CVT).
[For vehicles with the keyless operation sys-
tem]
Put the operation mode in ACC or ON (M/T)
or ON (CVT).
NOTE l For vehicles equipped with the Auto Stop &
Go (AS&G) system, press the “Auto Stop &
Go (AS&G) OFF” switch to deactivate the
Auto Stop & Go (AS&G) system before stop-
ping the vehicle.
Refer to “To deactivate” on page 4-20. For emergencies
6-20
6